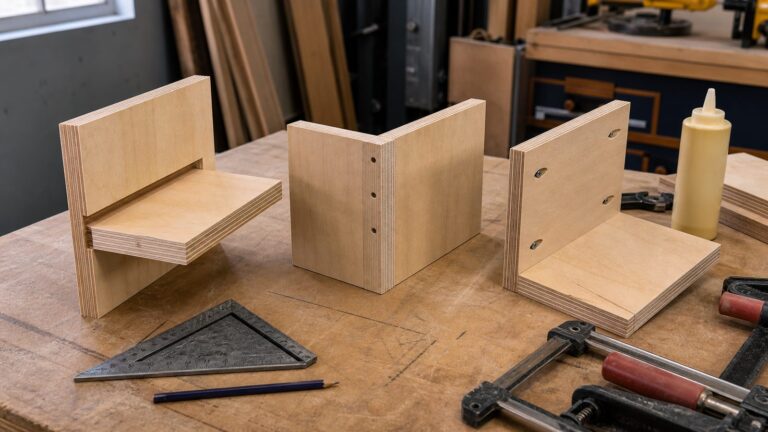
Frame-and-panel casework is built from rails and stiles that capture panels in grooves. Choose the panel and joint to suit the furniture’s expected use, then size the grooves to the actual panel thickness. For a sturdy piece that will be moved often, prioritize a reinforced joint such as haunched mortise-and-tenon or dowels; for a straightforward build, stub-tenon-and-groove can be easier to fit and adjust.
How frame-and-panel casework works
Rails run across the case and stiles run vertically. Together they form a frame that holds a panel, usually in grooves cut along the frame’s inside edges. The panel helps the frame resist racking—the tendency for a rectangular assembly to shift out of square—and gives the case its visible surface.
This construction suits both fine furniture and practical projects such as a pine tool stand. The key decisions are what to use for the panel, how to join the frame, and how to attach the case’s top, bottom, and back without undermining the frame-and-panel assembly.
Choose a panel material and profile
Flat panels: solid wood or veneered plywood
Flat panels are the simplest option. Veneered plywood can save preparation time, and the surrounding frame hides its edges. It also expands less than solid wood, making it useful when predictable panel movement matters. If both faces need an attractive appearance, two 1/8-inch veneered plywood sheets can be joined together.
The Tool Desk
Outbyte PC Repair FREEClear out junk files and repair common Windows errorsFree Scan →Outbyte Driver Updater FREEScan for outdated or missing drivers - takes under a minuteDriver Scan →#1 Best Overall

- The 4-Way Panel Clamp:With parallelogram couplers, our 2 pack panel clamps are very convenient to use. It clamps in two directions at once, making it easier to achieve flat panels and flush joints.
- Easy to Use: With parallelogram-action couplers and fix pins, it is easy to adjust the width and thickness you need and continuous apply pressure from all sides. (Tips: Although the operation process is simple, please follow the instructions or video instructions to use it to bring a better experience. )
- Durable Quality: These clamps are made by steel pipe with a durable powder-coat finish and copper thread bushing to ensure that the retaining pins are durable and strong,making it a reliable and precision tool. The special surface treatment allows the glue spilled during the panel splicing process to be easily removed by hand or knife, and is not easy to damage the surface of the panel fixture.
- Versatile Adjustable: Our panel clamps are designed to accommodate panels up to 24'' wide and thicknesses ranging from 1/4" to 3", making it perfect for panel clamp woodworking projects of various sizes and dimensions.
- Ideal Projects: Perfect for medium panel clamp woodworking projects such as cutting boards, table tops, wide door panels, cabinet tops, and thick bench tops. This tool is designed to meet your various needs.
Measure the plywood rather than relying on its nominal size: material sold as 1/4-inch plywood can be about 1/16 inch thinner. Make the groove to fit the sheet you have, not the label on it. An overly wide groove leaves the panel loose; a groove that is too narrow prevents assembly.
Raised panels: a shaped, solid-wood center
A panel-raising router bit can shape a 3/4-inch solid-wood panel into a profile that adds shadow lines and depth. Route the ends first, then the edges in several shallow passes to reduce tear-out and burning. Solid-wood panels require more preparation than sheet material, and specialty bits add cost.
Rank #2

- [4-Way Pressure Panel Clamp ]This 4-way panel clamp applies pressure both vertically and horizontally at the same time, keeping boards flat, aligned and tightly joined. The parallelogram/self-centering linkage focuses even pressure at the center of the panel, effectively preventing bowing, cupping, or boards popping out during glue-ups.
- [Heavy-Duty Steel Construction]These clamps are Made by CNC-machined thick steel rails with durable powder-coated finish and reinforced copper thread bushings, this clamp delivers strong, stable clamping force for professional woodworking. The special surface treatment allows glue squeeze-out to be easily removed without damaging the clamp or your workpieces.
- [Wide Adjustment Range]Our panel clamps are designed to accommodate panels up to 24'' wide and thicknesses ranging from 1/4" to 3", making it perfect for panel clamp woodworking projects of various sizes and dimensions.
- [Ideal for Woodworking Projects]Perfect for cutting boards, table tops, cabinet tops, wide door panels, and workbench tops. The four-way pressure keeps panels flat and flush during clamping, reducing sanding work and improving final surface quality—an essential tool for DIYers and professional woodworkers alike.
- [Easy to Use]With parallelogram-action couplers and fix pins, it is easy to adjust the width and thickness you need and continuous apply pressure from all sides.
For a painted project, MDF is a lower-cost raised-panel option. Its suitability depends on the profile: avoid back-cutting MDF, which removes material from both faces and eliminates most of its strength.
Back-cut raised panels: flush faces
A back-cutting bit leaves a tongue—typically 1/4 inch in the method described by WOOD Magazine—so the panel faces can sit flush with the frame faces. Shims adjust the remaining edge thickness. This approach works best with solid wood. The described bits lack the bearing needed to guide cuts for arch-top panels, so this setup does not cover that shape.
Recommended Free Tools
Rank #3

- The 4-Way Panel Clamp:With parallelogram couplers, our 2 pack panel clamps are very convenient to use. It clamps in two directions at once, making it easier to achieve flat panels and flush joints.
- Versatile Adjustable: Our panel clamps are designed to accommodate panels up to 36” wide and thicknesses ranging from 1/4" to 3", making it perfect for panel clamp woodworking projects of various sizes and dimensions.
- Easy to Use: With parallelogram-action couplers and fix pins, it is easy to adjust the width and thickness you need and continuous apply pressure from all sides. (Tips: Although the operation process is simple, please follow the instructions or video instructions to use it to bring a better experience. )
- Durable Quality: These clamps are made by heavy-duty steel pipe with a durable powder-coat finish and copper thread bushing to ensure smooth operation, making it a reliable and precision tool. Special surface treatment allows glue used in the panel assembly process to be easily removed.
- Ideal Projects: Perfect for medium panel clamp woodworking projects such as cutting boards, table tops, wide door panels, cabinet tops, and thick bench tops. This tool is designed to meet your various needs.
Other infill choices
Panels need not be wood: perforated hardboard, glass, and acrylic are also possible infill materials. Choose a frame groove and assembly approach compatible with the selected panel, and account for the panel’s thickness and handling requirements.
Select frame joints for the job
No single joint suits every case. Consider how much stress the furniture will see, the panel’s material and thickness, the appearance you want, your available equipment, and how much setup and hand-fitting you are prepared to do.
Rank #4

- Wooden boardTwo Installation Options: Two installation solutions are provided, allowing users to select the most suitable option based on operational requirements. Whether choosing wood beam installation or high and wide strut channel installation, detailed installation instructions and all necessary accessories are included to ensure a smooth installation process. flat clamp
- Prevent Workpiece Deformation: The clamps applies equal pressure simultaneously from four directions (top, bottom, and both sides) effectively preventing unexpected deformation caused by uneven force during machining. Equipped with 6-inch-long non-damaging jaw surfaces to protect workpiece surfaces from damage.
- Capacity Controllable: The clamping capacity of the bar clamp is determined by the length of the user-supplied wooden beam. Featuring an adjustable length design, it easily accommodates various processing projects. Whether bonding tabletops, shelves, veneers, or laminates, it delivers stable and adaptable clamping performance to meet the demands of diverse projects.
- Height Adjustable: GADFISH wood clamps for woodworking feature durable plastic rods with four slots. Simply adjust the number of slots engaged to set different width capacities, enabling easy handling of workpieces of various widths. They can accommodate boards up to 6 inches thick.
- Simple Operation: During installation, simply attach the clamp to a wooden beam of any length using the provided wood screws. After applying wood glue, place the clamp on the distribution board and turn the handle to complete the clamping operation on all four sides.
| Joint | Strength and useful application | Trade-offs |
|---|---|---|
| Stub-tenon-and-groove | A simple approach; groove width can be adjusted to accommodate unusual plywood thicknesses. | Short tenons provide less glue area. Some tablesaw blades do not cut a flat-bottom groove. |
| Dowel | A strong, simple joint; dowels also reinforce butt-jointed corners. | Accurate hole alignment is essential. Stopped grooves require care and chiseling. |
| Haunched mortise-and-tenon | Added tenon length and glue area help resist racking. WOOD Magazine recommends it for furniture moved frequently or roughly. | Mortises and tenons require cutting and hand-fitting. |
| Cope-and-stick | Creates a decorative profile on the rails and stiles. | Bit height takes time to tune, and the groove width cannot be narrowed to suit thin plywood. |
Heavy panels such as MDF call for heavy-duty joints. For a case likely to be carried, shifted, or used roughly, favor a joint with more reinforcement over the quickest assembly method.
Match tools to the chosen method
- Stub-tenon-and-groove: Use a tablesaw for the tenons and grooves, checking that the groove’s width and bottom suit the panel and joint.
- Dowel joints: A doweling jig helps keep mating holes aligned; careful layout remains important. Stopped grooves may also need chiseling.
- Panel grooves: A router table and straight bit can cut grooves. Set the groove to the measured panel thickness.
- Cope-and-stick: A rail-and-stile router bit set includes a stick-profile bit for the frame edges and a coping bit for mating rail ends. This is specific to the cope-and-stick method, not a requirement for all casework.
- Raised panels: A panel-raising bit shapes 3/4-inch solid wood; make multiple shallow passes and route ends before edges.
Assemble the case and fit its panels
- Measure the panel stock. Confirm the actual thickness of plywood or other sheet material before cutting grooves.
- Choose the frame joint. Base it on expected handling and load, panel weight, desired appearance, and the tools available.
- Cut matching grooves and frame parts. Keep the panel fit in mind, and account for any stopped groove or joint detail that requires hand work.
- Shape the panel if needed. For a raised panel, route ends first and edges in shallow passes. For a back-cut panel, adjust shims to set the edge thickness.
- Dry-fit and check alignment. Confirm that the frame closes squarely and the panel sits as intended before final assembly. With dowels, verify hole alignment; with cope-and-stick, tune bit height so the rail and stile profiles meet cleanly.
- Complete the case. Install the top, bottom, and back in a way that works with the frame-and-panel construction. The specific attachment details depend on the case design and are not prescribed by the cited guide.
Source and scope
This guide draws on WOOD Magazine Staff’s “A simple system for classic casework,” updated July 7, 2023: WOOD Magazine’s frame-and-panel casework guide. Its construction guidance covers panel choices, frame joints, grooves, and case assembly; tool specifications and availability can vary.
Do these 3 things before closing this tab:
1Clear out junk files and repair common Windows errors2Fix the driver behind crashes, sound loss and screen glitches3Repair Windows errors before they cause bigger problemsQuick Recap
Best Value
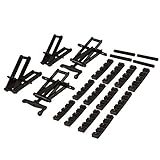
- Clamping panels can certainly be a challenge. Especially when we try to use everyday pipe clamps or bar clamps. While these types of clamps work fairly well on certain glue up projects, the one thing they don’t do at all is apply pressure from the top and bottom of the panels during glue up. In fact, with all the pressure being applied on both sides, bar and pipe clamps will almost certainly bow, buckle or rack your panel glue up project.
- Let’s make racked panel glue ups a thing of the past! The uniquely designed 4 way pressure solves this age old issue by applying pressure to all four sides of your panel glue up. With a simple turn of the rotating clamp handle, all four sides of the clamp will draw inward at the same time. This provides equal pressure on to your panel and prevents bowing, buckling, or racked panels.
- Build any length clamp with the durable plastic bars with 4 notches for maximum adjustability to handle a variety of stock widths. Clamp can be used for boards up to 6 inches in thickness by simply adjusting the clamp width capacity with the appropriate number of notches. Turn the handle clockwise to tighten the clamp and turn the handle counter clockwise to release pressure. The 4 way pressure clamp is equipped with side pressure pads to prevent damaging your stock.
- Now you can confidently glue up wide boards, shelving, table tops, and more up to 6” thick. To setup the clamps simply attach the clamp to any length 2 x 2’s (2” x 4” ripped in half) with the the wood screws that are provided, apply wood glue to your project, set the clamps on to your panel boards and turn handle to tighten the clamp on all four sides. We recommend that you place a 4 way pressure clamp every 12” to 18” for best results.
- This clamp package comes with two full 4 way pressure clamp assemblies. Includes: 2 each rotating handle assemblies, 2 each tailstock assemblies, 4 each side pressure pads and 12 each 4 notch bars. Together, this setup will allow you to create two 4 way pressure clamps. More than one clamp is generally recommended for any project over 12” in length. Wood is required for setting up the clamp. Wood is NOT included.
Product prices and availability are accurate as of the date/time indicated and are subject to change. Any price and availability information displayed on Amazon at the time of purchase will apply.