The Tool Desk
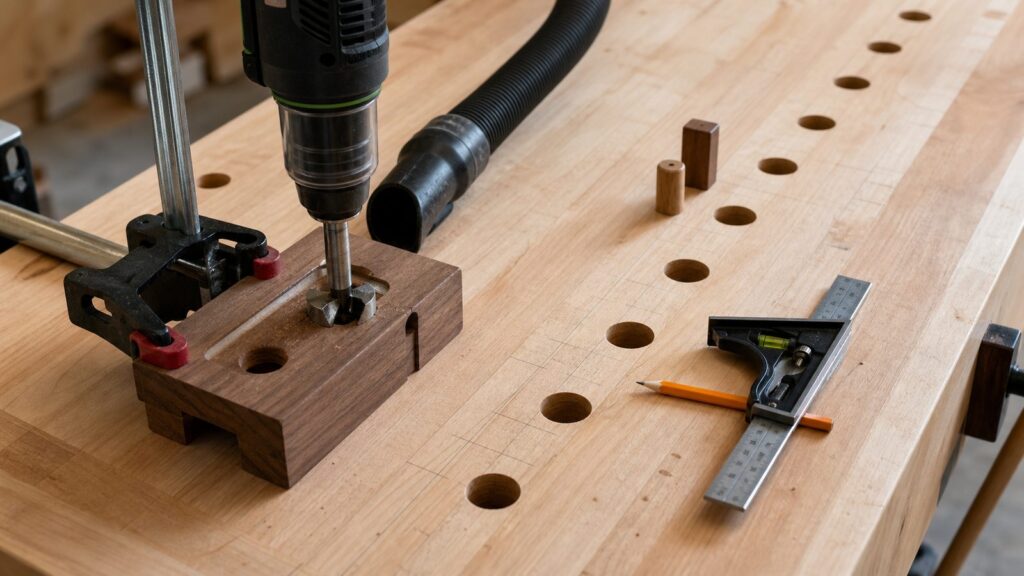
Outbyte Driver Updater FREEScan for outdated or missing drivers - takes under a minuteDriver Scan →Outbyte PC Repair FREERepair Windows errors before they cause bigger problemsFix Now →If you want straight dog holes in a workbench, do not start by grabbing a drill and aiming by eye. Start with the workholding system, then use a guide. For most homeowners and serious DIY woodworkers, the best method is a sharp 3/4 in. Forstner or brad-point bit, a dead-square drill guide or guide block, a sacrificial backer board, and test holes in scrap that matches the bench top thickness.
On our job sites and in cabinet-shop setups, we treat dog holes like any other layout-critical construction detail: the first mistake is usually not the drilling, it is the layout. A row that misses the vise dog by 1/4 in., a hole pattern that runs into a drawer box, or 20 mm holes drilled for 3/4 in. accessories can turn a good bench top into a frustrating one.
The short answer: use 3/4 in. holes for most traditional US round bench dogs and holdfasts, or 20 mm holes for MFT-style systems. Space traditional dog holes commonly 4 in. to 6 in. on center, with 4 in. spacing giving more clamp positions. Use a portable drill guide, router template, or a thick guide block bored square on a drill press. Drill slowly, clear chips often, support the underside, and chamfer the rim lightly after drilling.
Start With the Workholding, Not the Hole Pattern
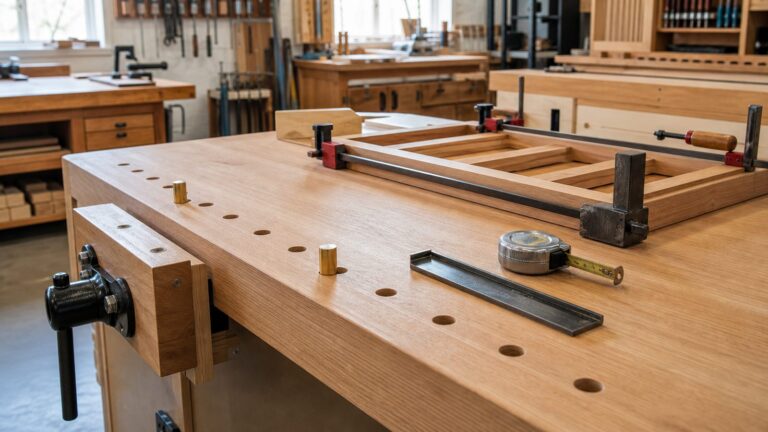
A dog-hole layout should serve the way you actually build. Before marking the first center point, place the bench dogs, holdfasts, dog-hole clamps, and vise hardware on the bench and map their reach. This is where many otherwise careful DIY layouts go wrong.
A traditional bench often needs one clean row of dog holes aligned with a tail vise or end vise. A cabinetmaking bench may benefit from a second row for wide panels, face frames, door parts, and casework. An assembly table or MFT-style top may use a full grid, usually based around 20 mm holes and 96 mm spacing. Those are different systems, and mixing them without a plan creates problems.
Check these items before drilling:
- Dog size: Most US round bench dogs and many holdfasts use 3/4 in. holes. MFT-style accessories are commonly 20 mm, which is about 0.787 in.
- Vise alignment: The dog holes must line up with the dog in the vise jaw, not simply with the edge of the bench.
- Clamp reach: Dog-hole clamps and holdfasts need enough distance from the edge to grip without hitting aprons, stretchers, drawers, or metal fasteners.
- Bench thickness: A 3 in. hardwood top behaves differently from a 3/4 in. MDF or plywood top. Holdfast grip depends heavily on thickness and hole wall contact.
- Workpiece sizes: Cabinet doors, drawer fronts, face-frame rails, cutting boards, and small panels may need closer spacing than large slabs.
For a traditional woodworking bench, we usually like a front row about 2 in. to 3 in. back from the front edge, depending on the vise and apron. Spacing of 4 in. to 6 in. on center is common. Four inches gives more options for short cabinet parts; 6 in. keeps the top cleaner and removes less material. For high-repeatability cabinet work, 4 in. spacing is often worth it.
Choose 3/4 Inch or 20 mm Before Buying the Bit
The most expensive dog-hole mistake is choosing the hole size before choosing the accessories. A 3/4 in. bench dog will not fit properly in a 20 mm hole. A 20 mm clamp may be sloppy or unusable in a 3/4 in. hole. The difference is small on a ruler but large in actual workholding.
#1 Best Overall

- 【Precision Repeatable Bench Dog Hole Drilling】GOINGMAKE 3/4" work bench dog hole drill guide for straight holes make you drill 3/4" dog holes fast and accurately. GOINGMAKE work bench dog hole drill template makes you build your own multifunction workbench easy. Including edge extension position guide rail and bench dog hole position pin, you can drill precision 3/4" straight work bench dog holes fast and make dog holes drilling the same horizontal or vertical lines.
- 【Edge Offset Extension Position Guide】GOINGMAKE 3/4" workbench top drill guide includes edge extension position guide and you can drill the first group holes without any measuring accurately. Provides 64mm/96mm/128mm/160mm/192mm/224mm/256mm position.
- 【Work Bench Dog Hole Position Pin】GOINGMAKE 3/4" work table top drill guide provides 4 dog hole position pins. Easy to drill repeatable dog holes fast and accurately at a hole spacing including 64mm/96mm/128mm/160mm/192mm/224mm/256mm. You can drill precision 3/4" straight work bench dog holes fast and make dog holes drilling the same horizontal or vertical lines.
- 【Multifunction and Easy to Use】GOINGMAKE 3/4" multifunction MFT table top drill guide produces precise 3/4" dog holes and perfect 0°, 45°, 90° cuts. You can easy to build your own worktables, portable workstation, MFT top, track saw cutting system, work table top, portable workbench and DIY heavy duty workbench. After drilling 3/4" dog holes, your workbench top are compatible with 3/4" bench dog holes fittings and accessories. You can easy to build a replace MFT table tops compatible with Festool.
- 【A Complete Kit for Workbench Dog Hole Building】GOINGMAKE 3/4" workbench dog hole drill template includes a complete tools kit for diy MFT work table top and drilling bench dog holes easily. Package includes: 1x drill guide, 2x extension position guide rail, 4x bench dog hole position pins, 1x 3/4" hole boring jig drill bit.
Use 3/4 inch holes for traditional US benches
For a standard American workbench, 3/4 inch dog holes are the default. They match many round bench dogs, holdfasts, planing stops, and common dog-hole clamps sold in the US. If you already own 3/4 in. holdfasts or dogs, stay with 3/4 in. and drill test holes before touching the bench.
Outdated Drivers Are Slowing You Down
One free scan finds every outdated or missing driver and matches the right update for your exact hardware.Free scan · exact hardware matchWindows Errors? Fix Them Before They Spread
Repair common Windows errors and clear accumulated junk for a smoother, more stable PC - no reinstall needed.Free scan · no reinstallUse 20 mm holes for MFT-style systems
Use 20 mm holes if you are building around track-saw tables, MFT-style clamps, 20 mm bench dogs, rail squares, and 96 mm indexed layouts. This system is popular for cabinet parts because it supports repeatable 90-degree clamping and cutting setups. For that level of precision, a router template or dedicated 20 mm dog hole jig is usually better than a handheld drill alone.
If your goal is simply to hold boards for planing, a traditional 3/4 in. row is faster and cheaper. If your goal is repeatable cabinet-part layout, square clamping, and track-saw registration, a 20 mm system can be worth the added jig cost.
Recommended Tools and Materials
You can drill dog holes cleanly with basic tools, but accuracy depends on the guide. A handheld drill by itself is rarely consistent enough across a full row. Even a 1 degree to 2 degree lean can make a holdfast bind, make dogs look crooked, or throw off alignment across a long run.
For most homeowner benches, gather the following:
- 3/4 in. Forstner bit or brad-point bit for traditional bench dogs
- 20 mm bit, router bit, or template system for MFT-style accessories
- Portable drill guide, commercial dog-hole jig, router template, or shop-made guide block
- Combination square, straightedge, story stick, sharp pencil or marking knife, awl, and tape measure
- Clamps for locking the guide and a sacrificial backer board under the top
- Shop vacuum or dust extractor
- Eye protection, hearing protection, and an N95/P100-style respirator appropriate for wood dust exposure
- chamfer bit, countersink, or block plane for easing the hole rims
- Bench dogs, holdfasts, or clamps in hand before layout
A Forstner bit leaves a clean rim and flat-bottomed starter cut, which is why we like it for finished bench tops. A brad-point bit can also work well, especially when drilling through thicker tops, because it tracks cleanly and clears more easily. Avoid using a dull spade bit for finished dog holes. It can wander, tear the surface, and leave ragged or oversized holes.
Cost to Drill Workbench Dog Holes in 2026
Dog holes can be a $20 upgrade or part of a much larger shop improvement. The cost depends on whether you already own a drill, whether you need a guide system, and how much precision the bench needs.
| Approach | Typical 2026 Cost | Best For | Notes |
|---|---|---|---|
| Basic DIY drilling | $15 to $80 | One or two rows of 3/4 in. holes | Assumes you already own a drill. Covers a 3/4 in. Forstner bit, layout supplies, clamps, and backer material. |
| Guided DIY setup | $50 to $180 | Cleaner, straighter holes in an existing bench | Includes a portable drill guide, commercial jig, or router template plus bit or bushing. |
| Precision MFT-style system | $100 to $350+ | 20 mm holes, 96 mm spacing, track-saw and cabinet work | Costs vary by template, rail system, premium bit, and included dogs or clamps. |
| Professional carpenter or cabinetmaker | $150 to $500+ | High-value bench tops, vise coordination, shop-grade accuracy | Usually a service-call or minimum-labor job. More if flattening, a new top, or vise work is included. |
Current retail pricing varies widely. Basic Forstner bits can start around $10 to $12, with a 3/4 in. bit commonly near that range. Small Forstner sets often run about $30 to $48. Dog-hole accessories such as round dogs and in-line clamps commonly fall in the $15 to $70 range. Once you add vises, dust collection, lighting, new circuits, or a laminated top, the project can move from under $100 into several hundred or several thousand dollars.
Lay Out the Holes Accurately
Good dog-hole drilling is layout work first and boring work second. Measuring every hole independently with a tape is a good way to build cumulative error into the bench. Use a story stick, indexed template, or carefully made layout strip instead.
For one traditional row
Start by locating the vise dog. Drop the vise dog or a temporary center marker into the moving jaw, close the vise, and transfer that line to the bench top. That line controls the row. Snap or mark a straight centerline parallel to the front edge, commonly 2 in. to 3 in. back from the edge depending on the vise and bench design.
Do these 3 things before closing this tab:
1Clear out junk files and repair common Windows errors2Scan for outdated or missing drivers - takes under a minute3Repair Windows errors before they cause bigger problemsFrom there, mark centers at 4 in., 5 in., or 6 in. increments. For cabinet and furniture work, 4 in. spacing gives more clamping flexibility. For general carpentry and planing, 5 in. or 6 in. can be enough. Keep the first hole close enough to the vise to hold short stock, but not so close that the dog weakens the jaw area or lands over hardware.
For a two-row pattern
A second row is useful when you hold wider panels or use holdfasts regularly. Keep the rows parallel and think about clamp swing. Many benches work well with one front row and a second row 6 in. to 10 in. behind it, but the right number depends on the bench width and the parts you build.
For a 20 mm MFT-style grid
If you are building an MFT-style top, do not freehand a full grid. The common system uses 20 mm holes on 96 mm centers. The whole point is repeatability, so the grid must be square and consistent. Use a commercial template, rail-guided jig, CNC-made template, or router system with an appropriate guide bushing. For cabinet work, that accuracy is what makes the system useful.
Best Methods for Drilling Straight Dog Holes
There are four practical ways to drill straight dog holes. The right choice depends on the bench size, accuracy target, and tools available.
Quick wins for a faster PC:
Clear out junk files and repair common Windows errorsFree Scan →Scan for outdated or missing drivers - takes under a minuteDriver Scan →Repair Windows errors before they cause bigger problemsFix Now →Rank #2
- 【Precision Repeatable Bench Dog Hole Drilling】GOINGMAKE 20mm work bench dog hole drill guide for straight holes make you drill 20mm dog holes fast and accurately. GOINGMAKE work bench dog hole drill template makes you build your own multifunction workbench easy. Including edge extension position guide rail and bench dog hole position pin, you can drill precision 20mm straight work bench dog holes fast and make dog holes drilling the same horizontal or vertical lines.
- 【Edge Offset Extension Position Guide】GOINGMAKE 20mm workbench top drill guide includes edge extension position guide and you can drill the first group holes without any measuring accurately. Provides 64mm/96mm/128mm/160mm/192mm/224mm/256mm position.
- 【Work Bench Dog Hole Position Pin】GOINGMAKE 20mm work table top drill guide provides 4 dog hole position pins. Easy to drill repeatable dog holes fast and accurately at a hole spacing including 64mm/96mm/128mm/160mm/192mm/224mm/256mm. You can drill precision 20mm straight work bench dog holes fast and make dog holes drilling the same horizontal or vertical lines.
- 【Multifunction and Easy to Use】GOINGMAKE 20mm multifunction MFT table top drill guide produces precise 20mm dog holes and perfect 0°, 45°, 90° cuts. You can easy to build your own worktables, portable workstation, MFT top, track saw cutting system, work table top, portable workbench and DIY heavy duty workbench. After drilling 20mm dog holes, your workbench top are compatible with 20mm bench dog holes fittings and accessories. You can easy to build a replace MFT table tops compatible with Festool.
- 【A Complete Kit for Workbench Dog Hole Building】GOINGMAKE 20mm workbench dog hole drill template includes a complete tools kit for diy MFT work table top and drilling bench dog holes easily. Package includes: 1x drill guide, 2x extension position guide rail, 4x bench dog hole position pins, 1x 20mm hole boring jig drill bit.
Method 1: Drill press starter holes
A drill press gives the squarest holes, but many finished benches are too large to fit under one. If you are building a new top from removable slabs or panels, drill the dog holes before final assembly if the parts fit the press. Use stops and fences so the row stays straight.
For a thick bench top, the drill press can also be used to make a master guide block. Bore a perfectly square 3/4 in. or 20 mm hole through a thick block of hardwood, plywood, or MDF. Then clamp that block to the bench and use it to guide the bit. This is one of the most reliable low-cost field methods.
Method 2: Shop-made guide block
A guide block should be thick enough to control the bit. We prefer at least 1-1/2 in. thick material, and 2 in. to 3 in. is better if the bit length allows it. Bore the guide block on a drill press, label the reference edge, and use that same edge against your layout line every time.
Clamp the block securely for each hole. Do not hold it by hand. If the guide shifts during drilling, the hole can widen at the top and lose accuracy. A guide block is inexpensive, repeatable, and well suited to traditional 3/4 inch dog holes.
Recommended Free Tools
Method 3: Portable drill guide
A portable drill guide is a practical choice when the bench is already assembled. It keeps the drill more vertical than hand-eye alignment and can be moved along the layout. Use clamps wherever possible. Before drilling the actual bench, make several test holes in scrap the same thickness as the top and check the fit of the dogs or holdfasts.
Method 4: Router template
A router template gives the best control over hole diameter and spacing, especially for 20 mm systems. It is also a strong choice for a clean 3/4 in. row when the top surface needs to look professional. The tradeoff is setup time and cost. You need the right bit, bushing, template, clamping method, and dust control.
For high-end cabinet work, we lean toward a router template or dedicated dog-hole jig because it controls both location and hole wall quality. If you expect to use dog-hole clamps for square assembly, that precision pays back quickly.
Step-by-Step: How to Drill Straight Dog Holes
Plan on 2 to 4 hours for a careful one-row layout and drilling session on an existing bench. A full MFT-style top can take longer, especially if you are setting up a router template for the first time.
Free tools Windows power users keep installed
One-click scans. No signup required.
1. Confirm the hardware
Put the actual dogs, clamps, holdfasts, and vise hardware on the bench. Confirm whether you need 3/4 in. or 20 mm holes. If you are using holdfasts, test their grip in a sample of similar thickness before committing to the layout.
2. Inspect below the top
Look under the bench for aprons, stretchers, drawer boxes, screws, lag bolts, vise hardware, and metal plates. Mark no-drill zones on painter’s tape. A dog hole that breaks into a stretcher pocket or screw head is a preventable problem.
Rank #3

- Wide compatibility: Adapt to seven standard drill sleeve specifications of 4mm (5/32"), 5mm (13/64"), 6mm (15/64"), 7mm (9/32"), 8mm (5/16"), 9mm (23/64"), and 10mm (3/8"), perfectly matching 19mm (3/4") standard countertop holes to meet woodworking operations with different precision requirements
- Precise positioning system: Equipped with three positioning teeth, through the precision dial, to ensure that the drill bit is accurately aligned with the marking line
- Stable and non-slip design: The bottom is made of high-density rubber non-slip pads, combined with a weighted aluminum alloy base, to maintain stability and not move during drilling
- Smooth drilling experience: The multi-layer chrome steel bearing sleeve design makes the drill bit move up and down more smoothly, reduces friction resistance, and extends the service life of the drill bit
- Durable material structure: The main body is made of aluminum alloy, and the key components are made of stainless steel and carbon steel, which are wear-resistant and corrosion-resistant, ensuring long-term use without deformation
3. Make test holes
Use scrap that matches the bench top material and thickness as closely as possible. Drill one or two holes with the chosen bit and guide. Test the dog fit, holdfast grip, and clamp movement. If the dog is too tight, too sloppy, or angled, fix the process before drilling the bench.
4. Mark the centerline and centers
Use a straightedge and story stick. Mark the centerline first, then prick each hole center with an awl. A small center mark helps the bit start cleanly. Avoid redrawing the layout multiple times with a thick pencil; fuzzy layout marks create fuzzy drilling decisions.
5. Clamp the guide and backer
Clamp the guide block, portable guide, or template so it cannot shift. Clamp a sacrificial backer board tightly to the underside of the bench top where the bit will exit. If you cannot clamp a backer securely, stop as soon as the center spur breaks through, then finish the hole from underneath.
6. Score a clean rim
With a Forstner bit, start slowly and cut a shallow rim before drilling to depth. This reduces surface tearout and gives the bit a clean shoulder to follow. Keep the drill steady and let the cutter work. Heavy pressure makes bits heat up and wander.
7. Drill in stages and clear chips
For thick maple, beech, ash, oak, or laminated butcher-block tops, do not force a Forstner bit through in one pass. Drill about 1/2 in. to 3/4 in., back the bit out, vacuum chips, and continue. Packed chips create heat, burn the hole walls, and can make the bit steer off plumb.
8. Prevent exit blowout
The underside matters, especially if dogs or clamps pass all the way through. Use a backer board or finish from below after the center point breaks through. This keeps the exit side from splintering.
9. Chamfer the top edge
Lightly ease the top edge of each hole with a chamfer bit, countersink, or a few careful turns by hand. The goal is a small bevel, not a funnel. A light chamfer prevents splintering and helps dogs drop in without making the hole sloppy.
10. Test every hole
Drop in the dog or clamp after each hole. If a hole feels tight because of dust or fuzz, clean it up lightly. Do not enlarge every hole aggressively. A dog hole works because the accessory has full-wall contact.
Do Dog Holes Need to Go All the Way Through?
Most traditional dog holes go through the bench top because through-holes clear dust and chips easily and accept more accessories. Through-holes also make it easier to pop out a stuck dog from below. For benches used heavily with holdfasts, through-holes are common.
Blind holes can make sense when there are drawers, cabinets, or dust-sensitive storage under the bench. The downside is that chips collect in the bottom, and some clamps or holdfasts may not seat correctly. If you drill blind holes, make them deep enough for the dog or clamp stem and clean them regularly.
What’s actually slowing this PC down?
Pick the symptom - the matching free tool is one click away.
Rank #4

- Acrylic Template: Machined from 5/16" thick clear acrylic
- Repeatable Hole Pattern: Features two twist lock dog pins
- Template Alignment: Includes two pairs of adjacent location pins for corner alignment
- Router Compatibility: Designed for use with 3/8" router bushing and 1/4" straight router bit (sold separately)
- Secure Template Positioning: Can be held firmly in place with WoodRiver Track Clamps (#163683) or WoodRiver Template Quick Clamps (#190232) (sold separately)
For a thick hardwood top, through-holes are usually the most practical. For an MDF assembly table with storage below, blind or partially relieved holes may be a better compromise. The accessory instructions should control the final decision.
Independent reader supportYour contribution helps us test, update, and keep practical guides available for everyone.Safety, Dust, and Garage Shop Electrical Notes
Drilling dog holes is not normally a permit item by itself. You are making holes in a bench top, not altering the structure of the house. The larger workshop changes around the bench can trigger code or safety requirements.
Wood dust deserves real attention. Fine dust from hardwoods, plywood, MDF, and treated materials can irritate the eyes and lungs, and some dust exposures are more hazardous than they look. Use a shop vacuum or dust extractor at the bit, wear eye protection, and use an N95/P100-style respirator or equivalent dust mask suited to the exposure. Do not blow dust across the shop with compressed air.
If you are adding a new garage workshop circuit, hardwired dust collector, permanent air filtration, additional lighting, or a 240-volt tool circuit, check local requirements before starting. Many garage circuits require GFCI protection, and permanent electrical work may require a permit or licensed electrician depending on the jurisdiction. Commercial cabinet-shop use brings additional expectations for dust collection, housekeeping, ignition control, and worker exposure.
Dust collection equipment also creates fire and explosion considerations in larger shops. For a homeowner drilling one bench, a vacuum and respirator are usually enough. For a production woodshop, permanent dust collection should be designed around applicable fire, electrical, and occupational safety requirements.
When to DIY vs. When to Hire a Pro
DIY is a good choice when you are drilling a basic 3/4 in. row, the bench top is replaceable or modest in cost, and you can make test holes first. A careful homeowner with a drill, clamps, a sharp bit, and a guide block can do excellent work.
Hire a carpenter or cabinetmaker when the bench is expensive, the vise layout is complicated, the top needs flattening first, or the holes must coordinate with a full cabinetmaking system. Professional help is also sensible if you want a 20 mm grid that must be square enough for track-saw indexing and repeatable 90-degree clamping.
Expect a professional layout and drilling visit to land around $150 to $500 for many existing benches, depending on local labor rates, travel minimums, bench size, jig requirements, and whether the shop supplies accessories. If the work expands into a new laminated top, vise installation, dust collection, or electrical upgrades, the budget can move much higher.
The Tool Desk
Outbyte Driver Updater FREEScan for outdated or missing drivers - takes under a minuteDriver Scan →Outbyte PC Repair FREEClear out junk files and repair common Windows errorsFree Scan →Common Mistakes That Make Dog Holes Crooked
The most common mistake is freehand drilling. The first hole may look straight, but small angular errors show up across a row. They also affect holdfast grip and dog-hole clamps more than simple bench dogs.
The second mistake is measuring every hole separately. Use a story stick or indexed template so the spacing stays consistent. A tape measure is fine for establishing the first location, but it should not be the only control for a long row.
Best Value

- Grade Durability Material- Crafted from 1/4''(8mm) thick shatter-resistant acrylic, this router template withstands heavy-duty woodworking while maintaining crystal clarity for years of reliable use.
- Laser-Focused Accuracy - Transparent design provides real-time visibility of drill bit positioning, ensuring perfect 3/4" dog holes every time with precision.
- Universal Workshop Companion - Compatible with all standard routers (Porter-Cable, DeWalt, Bosch) and bench dogs/bench pups systems. Create organized workbench surfaces for chisels, clamps, and hand tools.
- Size : 16*12'' (40*30cm) ;The drilling hole is 3/4''.Net weight : 1.72lb(781g)
- Perfect distance between the holes:When you use the included bolts as an edge reference, the holes will be placed 3-4 inches away from the edge. This distance is ideal for dog holes that are in line with a tail vise, providing enough room to place a hand plane on its edge which turns your workbench into a functional shooting board!
Other common problems include drilling before checking underside obstructions, using a dull spade bit, pushing too hard, skipping chip clearance, and forgetting a backer board. Overbuilding is another one. A full grid looks impressive, but one well-placed row aligned to a vise plus a few holdfast holes may serve the work better and preserve more of the bench top.
Bottom Line
To drill straight dog holes in a workbench, commit to the accessory system first, lay out from the vise and workholding needs, and use a guide for every hole. For most traditional benches, that means 3/4 inch holes spaced 4 in. to 6 in. on center. For MFT-style cabinet work, it usually means 20 mm holes on a 96 mm grid using a router template or dedicated guide system.
Do these 3 things before closing this tab:
1Repair Windows errors before they cause bigger problems2Scan for outdated or missing drivers - takes under a minute3Clear out junk files and repair common Windows errorsThe reliable field method is simple: make a square guide block or use a portable guide, clamp everything, drill test holes, cut a clean rim, clear chips often, back up the underside, and chamfer the top edge. That process costs far less than replacing a bench top and gives you dog holes that actually improve the bench instead of fighting you every time you clamp a board.
Frequently Asked Questions
What size should workbench dog holes be: 3/4 in. or 20 mm?
Use 3/4 in. holes for most traditional US bench dogs, holdfasts, and round dog-hole accessories. Use 20 mm holes for MFT-style systems, track-saw tables, and accessories designed around 20 mm dogs and clamps. Buy or confirm the accessories before drilling.
How far apart should dog holes be on a workbench?
Traditional dog holes are commonly spaced 4 in. to 6 in. on center. Four-inch spacing gives more clamping positions for cabinet parts and shorter boards. Many MFT-style systems use 96 mm spacing instead.
Can I drill dog holes with a handheld drill?
Yes, but use a portable drill guide or a thick guide block bored square on a drill press. Freehand drilling is risky because even a small angle error can make dogs, holdfasts, and clamps bind or slip.
Quick wins for a faster PC:
Clear out junk files and repair common Windows errorsFree Scan →Scan for outdated or missing drivers - takes under a minuteDriver Scan →Repair Windows errors before they cause bigger problemsFix Now →What bit is best for drilling dog holes straight?
A sharp Forstner bit is a good choice for clean 3/4 in. dog holes because it cuts a neat rim. A brad-point bit can also work well, especially for deeper through-holes. For precision 20 mm tops, a router template and proper bit often produce the most consistent results.
How do I prevent tearout when drilling dog holes?
Clamp a sacrificial backer board tightly under the bench top, drill slowly, clear chips often, and avoid forcing the bit. If you cannot use a backer, stop when the center spur breaks through and finish the hole from the underside.
Do I need a permit to drill dog holes or upgrade my garage shop?
Drilling dog holes in a workbench usually does not require a permit. Electrical upgrades, new garage circuits, hardwired dust collection, commercial shop use, or structural changes may require local code review or a licensed professional.
Quick Recap
Product prices and availability are accurate as of the date/time indicated and are subject to change. Any price and availability information displayed on Amazon at the time of purchase will apply.
What’s actually slowing this PC down?
Pick the symptom - the matching free tool is one click away.