Sharpen a skew chisel by preserving a straight, centered cutting edge, shaping its bevels only when needed, honing on a flat abrasive, and lightly removing the burr from the underside. There is no universal bevel angle: use the geometry intended for your tool and sharpening method rather than treating one machine’s setting as a rule for every skew.
Inspect the edge before sharpening
Check whether the cutting edge is straight and centered across the chisel’s thickness, and whether the bevels meet it smoothly. These are the geometry goals in Dan Faia’s Fine Woodworking method, which is intended to let the tool cut from either bevel. If the edge is still serviceable, avoid removing metal just to repeat a full grinding routine; refresh it by honing instead.
The right geometry can depend on the tool and intended use. The cited guidance does not establish one ideal shape or angle for every skew chisel.
Choose an angle that fits your method
Angle figures describe particular methods and systems, not a single standard. Dan Faia’s 2009 Fine Woodworking method uses roughly 30° edge geometry and bevels of 15° on each side. Robert Sorby lists 15° as a recommended setting for skew chisels on its ProEdge system. Norton’s general chisel guidance says there is no standard angle; its examples vary by tool type.
What’s actually slowing this PC down?
Pick the symptom - the matching free tool is one click away.
#1 Best Overall
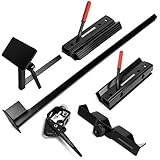
- This high-performance grinding jig serves as an upgraded grinder table for everyday grinding; replacing the light duty tool rests on your grinder.
- It offers even and consistent grinding of your chisels, gouges, and other cutting tools.
- Ideal for quick grinding of fingernail profiles on shallow spindle gouges or side grinds on deep fluted bowl gouges. The v-arm holder support your chisels at a constant angle. With Fingernail gouge jig, it allows you upgrade to a three-position tool holder.
- The two bases mount under each grinding wheel of your grinder. The locking handle allow you to secure positioning after moving the bases in or out based on your needs.
- The platform table can be repositioned in different angles by the adjustable lock lever.
Keep the existing, intended geometry when possible. If you need to re-establish the bevel, follow the setting for your sharpening system and make both sides consistent with the chisel’s design. Do not assume Sorby’s 15° machine setting is interchangeable with Faia’s described geometry.
Shape the bevels only when needed
For substantial reshaping or metal removal, Faia describes using a belt sander. His method joints the edge at roughly 30° relative to the tool sides, then grinds and rounds the bevels at 15° on each side. He keeps the jointed edge square to the belt and blends each bevel smoothly from shank to edge. Those numbers and motions belong to that method; they are not a universal specification.
Rank #2

- Made for Turning Skew Chisels with a Straight or Curved Edge
- Can Also be used for Oval Section Skews
- Consists of Two Seats - One Open and One Closed
- Can Grind both Bevels Symmetrically when Turning Jig Upside Down
- Use for Straight Carving Gouges up to 2-Inches Wide
A powered belt system is optional. Sorby says ProEdge is intended for sharpening turning, carving and bench chisels; it comes with a 120-grit aluminum-oxide belt and has nine indexed settings, with adjustment possible between indexes. Its product page lists 15° for skew chisels. A belt system is useful for shaping and stock removal, but is not required for routine honing.
Hone on a flat abrasive
Once the bevels are established, honing refines the edge without repeating the heavy shaping step. Faia describes starting with the tool flat on the stone, raising it to the 15° bevel, then drawing it across the stone. He progresses from an India stone to an Arkansas stone for polishing, noting that honing repeats the grinding movement on stones.
Do these 3 things before closing this tab:
1Fix the driver behind crashes, sound loss and screen glitches2Clear out junk files and repair common Windows errors3Scan for outdated or missing drivers - takes under a minuteRank #3

- For Accurate Honing: This chisel sharpening kit consists of a sharpening guide, a sharpening stone, a sharpening angle gauge and a sharpening angle fixture for creating straight and consistent bevel. Two adjustable jaws of the sharpener help securely clamp the blade at the correct bevel angle to whetstone surface. Make each honing accurate, consistent, and effective
- Angle Gauge & Angle Fixture: Instead of estimating the bevel angle by eye, this honing guide kit features an angle gauge to find blade’s bevel angle quickly. What’s more, our innovative angle fixture adopts a positioning block to help set the blade length precisely on it. Greatly simplify your sharpening setup process and improve the honing accuracy
- Four Grit Sharpener:Features 400#/1000# grits for sharpening and repair—400# for chips and reshaping, 1000# for honing and maintenance, durable diamond surfaces wear longer and never need flattening, outperforming traditional stones.Achieve razor-sharp edges and a polished finish with 3000# and 8000# grits options. Includes a non-slip base for stability.
- High Compatibility: Chisels and plane blades ranging from 0.1 in to 2.8 in width fit the honing guide securely, easily meeting your various honing needs. Moreover, our extended roller always ensures rapid, smooth and stable honing at the correct bevel angle regardless of blade width
- Easy To Operate: First, find out the chisel’s bevel angle with the angle gauge. Then lock the positioning block at the same angle on fixture. Place the chisel sharpening jig on fixture and adjust the knob at either side to make opening larger. Then insert the blade and make the blade tip contact the groove on the positioning block. Tighten the screw to fix the blade. Finally, Start rolling the chisel honing jig back and forth on the whetstone
You can use suitable sharpening stones or waterproof sandpaper. Norton lists water, oil and diamond stones as options, and emphasizes keeping the abrasive surface flat and using fine abrasive stages. Whichever medium you choose, maintain a flat working surface so you do not unintentionally round or alter the bevel.
Remove the burr and finish the edge
Honing can leave a fine burr on the underside of the cutting edge. Norton’s instruction is to rub the underside lightly against a stone until the burr is gone. Use only enough contact to remove it; aggressive grinding on the flat side can damage the edge geometry. Faia also describes polishing with an Arkansas stone and stropping. A mirror finish is not established as necessary for every skew-chisel task.
Rank #4

- TRANSFORM YOUR SHARPENING EXPERIENCE - Achieve razor-sharp edges and finely finished bevels effortlessly with this lathe tool sharpener. Transform sharpening from a challenging task into a simple, repeatable process, saving you time and ensuring consistent results.
- PRECISION AT YOUR FINGERTIPS - With the quad setup jig Quickly and accurately set precise angles for roughing gouges at 45°, parting tools at 30-60°, skews at 21.5-43°, and bowl scrapers at 8°. Ensure optimal cutting performance every time with our turning tools sharpening system.
- DURABILITY THAT PAYS OFF - By reducing the need for frequent grinding, the GrindMaster helps prolong the life of your tools and grinding wheels. With our woodworking tool sharpening jig, enjoy a smoother sharpening process while saving time and costs for replacement tools over the long term.
- SUPPORT FOR LARGE SCRAPERS - Effortlessly sharpen even large scrapers with the adjustable 3 x 5 inch platform featured on this wood lathe tool sharpening system. Enjoy stable support and complete control for consistent, professional-grade results on all your turning tools.
- VERSATILE SHARPENING JIG - This grinder sharpening system expertly sharpens gouges, chisels, scrapers, parting tools, skews, and carving tools, making it an indispensable addition to your workshop.
Use a honing guide if you need repeatability
A guide can help hold a consistent angle, but check the exact model’s skew support and blade limits before using or buying one. Lee Valley’s honing-guide chart marks skew chisels as compatible with its short-blade and Mk.II guide options. Its Mk.II Standard and Deluxe systems list angle ranges from 15° to 54° and require a registration jig for skew setup; the short-blade guide lists 25° and 30° positions. Check the chart’s blade-width and thickness limits against your actual chisel.
Lee Valley describes a honing guide as holding a blade at the correct angle regardless of sharpening medium. That is the retailer’s general description, not an independent comparison of guide performance. A guide is most useful when you want repeatable hand honing; it does not remove the need to choose compatible equipment and preserve the tool’s intended geometry.
Quick wins for a faster PC:
Fix the driver behind crashes, sound loss and screen glitchesFind Drivers →Clear out junk files and repair common Windows errorsFree Scan →Scan for outdated or missing drivers - takes under a minuteDriver Scan →Best Value

- This high-performance grinding jig serves as an upgraded grinder table for everyday grinding; replacing the light duty tool rests on your grinder.
- It offers even and consistent grinding of your chisels, gouges, and other cutting tools.
- Ideal for quick grinding of fingernail profiles on shallow spindle gouges or side grinds on deep fluted bowl gouges. The v-arm holder support your chisels at a constant angle.
- The two bases mount under each grinding wheel of your grinder. The locking handle allow you to secure positioning after moving the bases in or out based on your needs.
- The platform table can be repositioned in different angles by the adjustable lock lever.
Control heat and follow machine instructions
Powered grinding can overheat a tool if material is removed too aggressively. Norton recommends a slow-speed bench grinder and cool-cutting wheel for bevel grinding, and cautions against heavy pressure and slow feeds. Faia’s belt-sander method specifies securing the machine with the platen facing up, orienting the belt to move away from the user, and holding the chisel firmly with both hands. These are limited equipment-specific notes, not a complete safety protocol. Follow the operating and safety instructions for your machine and abrasive.
Quick Recap
A repeatable sharpening sequence
- Inspect: Check edge straightness, centering and bevel condition. If the edge remains serviceable, hone rather than reshaping it.
- Shape only if necessary: Use a suitable powered method to restore damaged or substantially altered geometry, following the machine’s instructions and its specified angle setup.
- Hone: Work the bevel on a flat abrasive, maintaining the chosen geometry. Progress through suitable finer stages rather than relying on a particular brand.
- Deburr: Lightly rub the underside against a stone until the burr is removed, then polish or strop if desired.
- Check the result: Confirm the edge remains straight and centered and that the bevel transitions are smooth.
Product prices and availability are accurate as of the date/time indicated and are subject to change. Any price and availability information displayed on Amazon at the time of purchase will apply.