Some links on this page are affiliate links: if you buy through them we may earn a commission, at no extra cost to you.
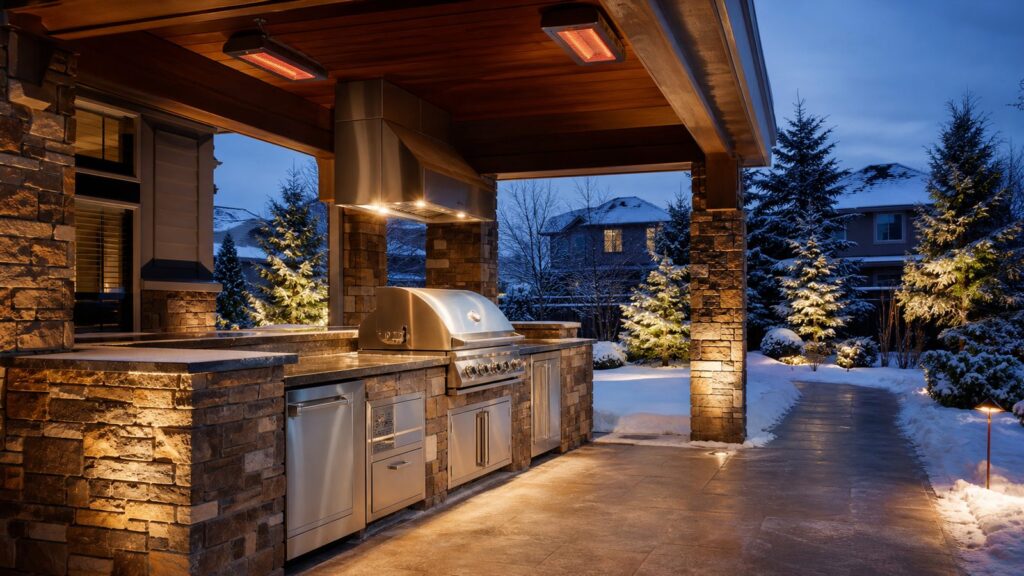
Yes, you can use an outdoor kitchen in winter, but the right approach is not simply to cover everything until spring or leave the whole setup running as if it were July. The best winter strategy is to separate the kitchen into two zones: a winterized wet zone and an active dry cooking zone. Shut down and drain anything that can freeze, then keep the grill, counters, dry storage, lighting, heat, and safe access ready for use.
On our job sites, the outdoor kitchens that perform best in cold weather have a few things in common: short walking routes from the house, reliable task lighting, non-slip surfaces, proper gas and electrical installation, durable freeze-thaw materials, and a simple shutdown checklist the homeowner can actually follow. Winter use is less about cooking in the cold and more about controlling utilities, footing, moisture, ventilation, and comfort.
As an Amazon Associate I earn from qualifying purchases.
Recommended Free Tools
For homeowners planning upgrades, the investment is meaningful. Current 2026 U.S. cost guidance puts a typical outdoor kitchen around $16,000 to $16,500, with many projects falling between $6,000 and $30,000. Custom outdoor rooms with masonry, heaters, plumbing, roofing, premium appliances, and drainage can reach $50,000 to $100,000+. That makes winter performance worth designing into the project from the beginning, not patching in after the first freeze.
Start With a Winter Use Plan, Not Just a Winterization Checklist
Most outdoor kitchen problems in winter come from treating every component the same way. A sink, ice maker, dishwasher, refrigerator, gas grill, storage cabinet, and stone counter do not have the same cold-weather risks. Water lines can burst. Grease can harden. Meltwater can refreeze. Covers can trap condensation. Heaters can create clearance issues. Electrical components need weather-rated protection.
#1 Best Overall

- ❄【High Compatibility】-- Faucet covers for winter measures 6.7" W x 8.3" H, Works well with various faucet types, such as garden spigots, hose bibs, water tap, keep faucets protected in freezing weather.
- ❄【Easy To Install and Remove】-- Spicket cover outside No more tools and screws.ust slide covers onto the faucet; fasten it with hook-and-loop straps & cord. Measier to use than some foam covers or hook & loop tape styles.
- ❄【Superior Protection】-- Very thick faucet cover design.In winter protecting your outside faucets from freezing and bursting. In summer prevent faucets from the blazing sun or the rust. Help save costly repairs.
- ❄【Against freezing & Waterproof Material】-- Outside faucet cover freeze protection outer surface is 600D Oxford protection water coating, which prevents rainwater from entering. the middle was filled with special PP insulated cotton.Three-layer design have Some good insulation effects. effectively keep the faucet dry and warm during.
- ❄【Please confirm again】--- Our water faucet covers for outside size and packaging is 6.7" W x 8.3" H, Set of 2,If you don't know the size of your faucet, you can try to buy it. If it is not compatible with your faucet or the product is damaged, please contact our customer service team at any time, we will refund or replace you within 24 hours.
A better plan is to decide what you actually want to use from December through March. Many homeowners do not need a working sink in January. They do need the grill, a landing surface for hot pans, weatherproof drawers for tools, a safe walkway, and enough light to cook without holding a flashlight.
For a practical winter setup, we recommend this division:
- Shut down for winter: sink supply lines, faucet, ice maker, dishwasher, beverage lines, and any refrigerator that is not rated for the expected temperature range.
- Keep active: outdoor-rated grill, dry counters, storage, GFCI-protected outlets, lighting, heaters, and the primary walking path.
- Inspect before use: gas shutoff, flexible connections, vents, burner ports, covers, snow loads, and nearby combustible materials.
This split approach lets you keep using the outdoor kitchen without gambling on frozen plumbing. It also gives you a cleaner construction plan if you are building new: fewer winter-sensitive appliances, better service access, and a layout that supports real cold-weather use.
Protect the Plumbing Before the First Hard Freeze
Water lines are the highest-risk system in an outdoor kitchen. A quarter-inch ice expansion inside a supply line can split a pipe, damage a faucet body, crack a valve, or flood the cabinet when temperatures rise. If your outdoor kitchen has a sink, refrigerator water line, ice maker, dishwasher, or beverage station, winterizing the plumbing should happen before the first hard freeze, not after the forecast shows single digits.
A proper winter shutdown usually includes an interior shutoff valve, drained supply lines, open faucets, and bleed valves at low points. If compressed air is used, it should be done carefully and at an appropriate pressure for the system. The goal is not to blast fittings apart; it is to remove trapped water from vulnerable sections.
What to Shut Off and Drain
Start with the supply line feeding the outdoor kitchen. Ideally, that valve is inside the conditioned part of the house or another protected area. Once the line is closed, open the outdoor faucet and drain valves so water can leave the exposed sections. Leave the faucet open during the winter so pressure does not build if residual water freezes.
Do not forget small appliance lines. Ice makers, refrigerator water dispensers, bar faucets, and dishwashers often have narrow tubing that freezes faster than larger plumbing. These lines should be disconnected, drained, and capped if required by the manufacturer. Sink traps also need attention. In many climates, the trap should be drained or protected with plumbing antifreeze approved for that use.
Why We Often Recommend Fewer Wet Appliances
In freeze-thaw regions, a great grill station with storage, lighting, and covered prep space often serves homeowners better than a complicated outdoor wet bar that gets shut down for four months. Every wet appliance adds valves, traps, supply lines, drainage, service access, and winter maintenance.
If you use the kitchen heavily in summer, a sink may still be worth it. Just design it correctly: accessible shutoffs, reachable drain points, a cabinet layout that allows service, and clear labeling. A laminated winter checklist inside the cabinet is a small detail that prevents expensive mistakes.
Keep the Grill Usable, Clean, and Properly Vented
Gas grills can usually remain usable in winter if they are outdoor-rated, installed correctly, cleaned, covered after cooling, and kept clear of snow and ice. The key is to treat the grill like an appliance, not patio furniture.
Rank #2
- Cover has a hard outer plastic shell to prevent freeze up in the winter season
- Protect from freezing, wind, and chill
- Insulate and protect regular and stand outdoor faucets
- Easy to install
- Hard. Outdoor. Faucet Cover.Insulates Faucet To Prevent Winter Freeze-up.Hard Plastic Outer Shell, Plus Poly Foam.Inner Cover Provides A Long Lasting Insulation.Protects From Freezing Wind, And Chill
Before winter cooking, remove the cover and inspect the firebox, burners, ignition, drip tray, gas connections, and ventilation openings. Snow, nesting debris, grease buildup, and blocked vents can all create problems. If the grill is built into an island, confirm the island has the ventilation required by the appliance manufacturer.
Natural gas is usually more convenient for winter use than propane because it avoids cold-weather tank pressure issues. Propane can still work, but very cold temperatures reduce tank pressure, especially when the tank is low. If you are upgrading from propane tanks to a hard-piped natural gas line, expect a permit and a licensed installer in most jurisdictions. Gas line size, shutoff location, appliance BTU load, and pressure all matter.
Clearances Matter More in Winter
Winter encourages homeowners to pull cooking closer to walls, screens, roof edges, and heaters. That is where fire risk increases. Always follow the exact grill manual for side, rear, and overhead clearances. Built-in grills installed into combustible or heat-sensitive surrounds often require an insulated jacket. That is not optional trim; it is a safety component.
As a general working rule, keep grills away from siding, deck rails, low rooflines, vinyl components, fabric curtains, furniture cushions, and dry landscape material. Fire features and patio heaters need the same level of clearance planning. The location that feels cozy may not be code-compliant or safe.
Free tools Windows power users keep installed
One-click scans. No signup required.
Make the Path Short, Lit, and Shovelable
Winter outdoor kitchen design starts at the back door. If a homeowner has to cross 40 feet of icy patio carrying a tray, the kitchen will not get used. A winter-friendly layout keeps the cook zone close enough to the house for normal meal prep but far enough away to meet grill, fire, and ventilation clearances.
We pay close attention to the walking route. A good winter path is direct, wide enough for someone carrying food, easy to shovel, and not interrupted by furniture legs, raised thresholds, loose pavers, or low landscape edging. For most homes, a clear path of 36 inches minimum is a practical baseline, with 42 to 48 inches feeling better where two people pass or where doors swing into the route.
Surface pitch also matters. Patios and counters should shed water away from the house and away from appliance openings. A common patio slope is about 1/8 inch to 1/4 inch per foot, depending on the surface and site conditions. That small slope helps move meltwater before it refreezes at the grill or doorway.
Add Lighting in Layers
Winter cooking usually happens in the dark. One wall sconce by the back door is not enough. A useful outdoor kitchen has layered lighting: bright task light where you cook, lower ambient light where people sit, and path or step lighting where people walk.
What’s actually slowing this PC down?
Pick the symptom - the matching free tool is one click away.
For the grill and prep counter, aim for direct light that does not cast your body shadow over the cooking surface. Under-hood lighting, overhead fixtures, wall-mounted task lights, or low-glare directional fixtures can all work. Seating areas can use warmer, lower-output light. Steps, grade changes, and edges need clear visibility, especially when surfaces are wet or icy.
Outdoor electrical work should use weather-rated fixtures, proper boxes and covers, and GFCI protection where required. In many cases, adding new outlets, circuits, lighting, or hardwired heaters triggers electrical permitting. That is not paperwork for paperwork’s sake; winter moisture and electricity are a poor place to improvise.
Rank #3

- The foam faucet cover is built to last and user-friendly
- 5/8-inch expanded foam shell with a 3/4-inch one piece polystyrene gasket
- Protects outdoor faucets from freezing, wind and chill
- 6.9 x 6.3 x 5.2 Inch Suitable for most outdoor faucets
- Reusable season after season
Control Wind Before Buying Bigger Heaters
Heat is useful, but wind determines whether that heat does anything. We often see homeowners add a powerful patio heater and still feel cold because the cook zone is exposed to prevailing winter wind. A modest wind screen, partial wall, fence return, masonry wing wall, or well-placed privacy panel can make the same heater feel far more effective.
For winter use, think about air movement at standing height. If the grill is on the corner of a patio with wind cutting across the front, the cook gets cold, the grill loses heat faster, and smoke becomes harder to manage. A wind solution should reduce exposure without trapping smoke, blocking ventilation, or creating a clearance problem near the grill.
Infrared electric heaters are popular because they warm people and surfaces directly rather than trying to heat all the air. They work best under overhead cover and within the manufacturer’s mounting height and clearance range. Gas heaters and fire features can also help, but they require fuel planning, combustion clearances, and proper placement away from roofs, furniture, screens, and siding.
Use Materials That Survive Freeze-Thaw Cycles
Winter is hard on outdoor kitchens because moisture gets into small gaps, freezes, expands, and repeats. The wrong materials may look fine for one season, then start cracking, swelling, staining, or delaminating after repeated freeze-thaw cycles.
For permanent islands, we prefer noncombustible and moisture-resistant construction. That often means steel framing, masonry, concrete block, or manufacturer-approved outdoor kitchen systems instead of wood framing inside the island. Wood can move, rot, hold moisture, and create clearance complications around grills and heat-producing appliances.
Countertops should be selected for exterior exposure. Granite, quartzite, sealed concrete, stainless steel, and porcelain slabs can perform well when properly detailed. Standard indoor quartz is often a poor choice outdoors because UV exposure and temperature swings can damage resins and color. Natural stone should be sealed as needed, and the slab should be supported to prevent cracking at overhangs and appliance openings.
Do these 3 things before closing this tab:
1Fix the driver behind crashes, sound loss and screen glitches2Repair Windows errors before they cause bigger problems3Scan for outdated or missing drivers - takes under a minuteCabinets and appliance faces should be outdoor-rated. Stainless steel quality matters. In coastal or deicing-salt environments, higher-grade stainless or marine-grade components can reduce corrosion risk. Hinges, drawer slides, fasteners, and toe-kick areas deserve attention because they often fail before the visible panels do.
Choose Covers Carefully and Vent Before Use
Covers help, but the wrong cover can trap moisture. Breathable, fitted covers are usually better than loose plastic tarps wrapped tight around appliances. Plastic can hold condensation against stainless steel, stone, and painted finishes, especially during freeze-thaw swings.
Cover the grill only after it is fully cool and clean enough that grease and food debris are not sealed in place. Before cooking, remove the cover completely, check that vents and air openings are clear, and let the appliance air out. Do not operate a grill, heater, refrigerator, or fire feature while partially covered.
For cabinets, use covers where the manufacturer recommends them, but keep weep holes, louvers, and ventilation openings clear. Outdoor appliances are designed to manage water and airflow in specific ways. Blocking those paths can cause corrosion, ignition issues, or trapped gas hazards.
PC Slower Than It Used to Be?
A free scan shows the junk files, broken settings and background clutter dragging Windows down - then fixes them in one click.Free scan · Windows 10 & 11Outdated Drivers Are Slowing You Down
One free scan finds every outdated or missing driver and matches the right update for your exact hardware.Free scan · exact hardware matchRank #4

- Upgrade 3-Layer Thickened Insulation Design Protect your outdoor faucets from freezing temperatures with our upgraded 3-layer construction. Made with 2 layers of heavy-duty 600D Oxford waterproof fabric and 1 layer of thick insulation cotton, these faucet covers provide excellent cold resistance and protection against freezing rain, snow, wind, and harsh winter weather.
- ❄️Perfect size - The faucet protector measures 5.9 inches wide x 8.5" tall and 1.9" thick. Long adjustable strap is designed to fit most standard outdoor faucets, garden taps, and more.
- 🦌High-Visibility Reflective Strip - The nabreeli outdoor faucet protector has a unique reflective strip on the cover, which can produce strong reflected light and can be quickly found, whether it is day or night. It can serve as a warning if a car passes near the faucet.
- 🎄Easy To use and Stay Sturdy - Just slide the spigot cover over the faucet, secure with the strips, and you’re done in 3 seconds. No need to worry about the dog chasing it away or the wind blowing it away. More durable and easier to use than some foam covers or hook and loop tape styles.
- 🎁Applicable to Any Season - Our thickened insulated covers not only protect against the harshest elements, but also withstand long-term exposure to wind and sun to maintain their structure. These faucet covers are moisture-proof and cold-proof. Protect your outdoor faucet from rain, wind, sun, corrosion and erosion. Resistant to tearing, reusable, and provide year-round protection for your faucet.
Understand Winter Upgrade Costs
If you already have an outdoor kitchen, winter upgrades can be modest: better covers, lighting, service access, a wind panel, or plumbing improvements. If you are building from scratch, designing for winter may affect the entire scope, especially if you add a roof, heaters, gas lines, new circuits, drainage, or masonry.
Current 2026 U.S. pricing puts many outdoor kitchens around $16,000 to $16,500 as a typical national average, with common ranges from $6,000 to $30,000. Simple DIY material packages may run $4,000 to $10,000, but that does not include the risk of mistakes with gas, electrical, plumbing, masonry, clearances, or permits. Prefab and modular islands often fall around $3,500 to $15,000+ before site work and utility hookups. Professionally built entry-level grill islands commonly land around $10,000 to $25,000. Mid-range custom projects are often $16,500 to $35,000, while covered outdoor rooms with premium appliances can exceed $50,000 to $100,000.
| Winter Upgrade or Project Type | Typical 2026 Cost Context | What Drives the Price |
|---|---|---|
| Basic winter readiness | Hundreds to a few thousand dollars | Covers, cleaning, plumbing winterization, small lighting fixes, minor service work |
| Prefab or modular island | $3,500 to $15,000+ | Island size, grill package, storage, countertop, delivery, utility hookups |
| Professional entry-level grill island | $10,000 to $25,000 | Existing patio condition, built-in grill, counters, storage, limited utility work |
| Mid-range custom outdoor kitchen | $16,500 to $35,000 | Appliances, masonry, electrical, refrigeration, durable exterior materials |
| Covered winter-capable outdoor room | $50,000 to $100,000+ | Roof or pavilion, heaters, gas fireplace, lighting, drainage, premium appliances, permits |
Freeze-thaw climates often cost more than mild regions because the build needs better foundations, drainage, non-wood framing, sealed counters, durable pavers, and corrosion-resistant hardware. In cold-climate markets, quality outdoor kitchens can price around $15,000 to $35,000 or roughly $700 to $1,800 per linear foot, depending on materials and utility complexity.
Know When Permits and Pros Are Needed
Winter usability upgrades often cross into permitted work. A freestanding grill on an existing patio is one thing. A hard-piped gas grill under a new roof structure with heaters, lighting, outlets, drainage, and masonry is another.
The Tool Desk
Outbyte Driver Updater FREEFix the driver behind crashes, sound loss and screen glitchesFind Drivers →Outbyte PC Repair FREEClear out junk files and repair common Windows errorsFree Scan →Permits are commonly required for new gas lines, electrical circuits, plumbing supply or drainage, roof structures, pavilions, some pergolas, fireplaces, and significant patio or foundation work. Local rules vary, and some municipalities also regulate setbacks, stormwater drainage, easements, and proximity to property lines.
When DIY Makes Sense
DIY can be reasonable for low-risk maintenance and setup: cleaning grill grates, emptying refrigerator contents, washing cabinets, applying manufacturer-approved covers, labeling shutoffs, replacing worn utensils, organizing dry storage, and keeping the walkway shoveled. Many homeowners can also build a simple laminated checklist and handle routine post-cook cleaning.
When to Hire a Professional
Hire qualified trades for gas, electrical, plumbing, masonry, structural covers, appliance cutouts, insulated jackets, drainage corrections, and any work that affects fire safety or code compliance. If a project involves trenching a gas line, adding GFCI-protected circuits, connecting a sink drain, building a roof, or placing heaters near combustible materials, it belongs in professional hands.
On our projects, we also plan service access before finishes go on. Gas shutoffs, plumbing drains, GFCI outlets, appliance plugs, refrigerator toe-kick areas, and cleanouts should be reachable without dismantling the kitchen. Access panels are not glamorous, but they save money when something needs service in January.
Quick wins for a faster PC:
Fix the driver behind crashes, sound loss and screen glitchesFind Drivers →Clear out junk files and repair common Windows errorsFree Scan →Use a Simple Winter Operating Checklist
The best winter outdoor kitchens are easy to operate because the process is written down. We like a laminated checklist inside a cabinet or on the garage wall near the door. It does not need to be complicated; it needs to be followed.
Before the First Freeze
- Shut off the outdoor kitchen water supply from an interior valve.
- Drain supply lines and open outdoor faucets or bleed valves.
- Drain or protect sink traps as appropriate.
- Disconnect and winterize ice makers, dishwashers, and refrigerator water lines.
- Clean the grill, burners, drip tray, counters, cabinets, and storage areas.
- Check GFCI outlets, lighting, gas shutoffs, and appliance ventilation.
- Seal stone or concrete surfaces if the maintenance schedule calls for it.
Before Each Winter Use
- Clear snow and ice from the path, work zone, appliance vents, and counters.
- Remove covers fully before operating any appliance.
- Check that grill clearances are open and no furniture, cushions, or screens shifted too close.
- Confirm gas valves, ignition, burners, and ventilation are working normally.
- Turn on task lighting before carrying food outside.
- Use heaters only within their rated clearances and mounting requirements.
After Each Use
- Burn off or brush grill residue according to the appliance manual.
- Empty grease trays before buildup becomes a fire risk.
- Let appliances cool completely before covering.
- Wipe counters dry where meltwater may refreeze.
- Close cabinets and secure covers against wind without blocking ventilation.
Spring Restart
- Inspect plumbing before turning water back on.
- Close drain valves, reconnect appliance lines, and watch for leaks under pressure.
- Clean refrigerator coils and toe-kick areas.
- Test outlets, lighting, ignition, and gas appliances.
- Inspect counters, grout, veneer, pavers, and sealants for winter damage.
Design the Next Outdoor Kitchen for All-Season Use
The outdoor kitchen market continues to grow because homeowners want functional outdoor rooms, not occasional novelty spaces. Market projections for 2026 estimate the global outdoor kitchen category at nearly $29.74 billion, with continued growth expected through 2034. The trend is not just more luxury appliances; it is better usability, better storage, beverage centers, pizza ovens, shading, built-in components, and spaces that work across more of the year.
Best Value

- XXL Enlarge Size – 25 x 13 inch (64cm x 33cm), fits for all standard garden lawn faucets and yard hydrant. It is about three inch or four larger than most of other faucet covers, so that it can reach the ground, cover every inch of your yard spigot.
- Better Material & Freeze Protection – Made of 3M Thinsulate insulation cotton and strong waterproof coating help protecting your outside spigot during the harsh winter. Prevent hose bibbs freezing, bursting and blowouts, which may cause expensive repairs.
- Water Resistant & Easy Clean - Double layer, 210D Oxford cloth coasting and Polyester Taffeta inner, to help prevent water get into the cover. Durable waterproof fabric makes it easy to clean and dry.
- Easy to Use –Put the cover on your faucet or yard hydrant, fasten it with the rope on it. No more tools and screws. Keep your faucet cover in place. No worry dogs to get it away. Works well with various faucet types, such as garden spigots, hose bibs, water tap, sillcock.
- Please measure the size before purchase. If you are not sure, please feel free to contact us. We are pleasure to help you.
For winter, translate those trends into practical decisions. Put the grill where smoke can escape and the cook can stand out of the wind. Add a real task light over the cooking surface. Choose fewer wet appliances if you will not maintain them. Use noncombustible framing. Pitch surfaces correctly. Build with materials that tolerate freeze-thaw movement. Keep service panels accessible. Provide dry storage near the grill so no one has to run back inside for every tool.
A winter-ready outdoor kitchen does not have to be oversized or overloaded. In many homes, the best cold-weather setup is a covered grill station with 6 to 10 linear feet of counter space, enclosed weatherproof storage, a short lit walkway, wind protection, and one or two well-placed heaters. That can outperform a more expensive summer-focused layout once temperatures drop.
Do these 3 things before closing this tab:
1Repair Windows errors before they cause bigger problems2Fix the driver behind crashes, sound loss and screen glitches3Clear out junk files and repair common Windows errorsFinal Advice From the Field
If you want to use your outdoor kitchen in winter, protect the water first, then make the dry cooking zone reliable. Keep the route short. Light the work surface. Control wind before adding more heat. Follow grill clearances exactly. Use breathable covers. Build with freeze-thaw materials. Know when a permit is required.
The homeowners who get the most from their outdoor kitchens are not the ones with the longest appliance list. They are the ones with a layout that works on a dark Tuesday night in February: safe footing, a clean grill, a dry counter, reachable storage, clear lighting, and no frozen pipe waiting behind the cabinet wall.
Frequently Asked Questions
Can you use an outdoor kitchen in winter?
Yes. The safest approach is to winterize the plumbing and wet appliances while keeping the grill, counters, lighting, heat, and dry storage usable. Clear snow and ice, remove covers before use, and follow appliance clearances.
How do I winterize an outdoor kitchen but still use the grill?
Shut off the water from an interior valve, drain supply lines, open faucets, winterize sink traps and appliance water lines, then leave the dry cooking zone active. Keep the grill clean, uncovered only during use, and properly ventilated.
Do outdoor kitchen water lines need to be drained?
In freeze-prone climates, yes. Outdoor supply lines, faucets, sinks, refrigerator water lines, ice makers, and dishwashers can freeze and split if water is trapped inside them.
Is natural gas better than propane for winter grilling?
Natural gas is often more convenient in cold weather because it avoids propane tank pressure problems. However, installing a new gas line usually requires a permit, correct sizing, shutoffs, and a licensed professional.
How much does a winter-ready outdoor kitchen cost?
In 2026, many U.S. outdoor kitchens fall between $6,000 and $30,000, with typical averages around $16,000 to $16,500. Covered, heated, custom outdoor rooms with premium appliances can reach $50,000 to $100,000 or more.
When should I hire a pro for winter outdoor kitchen upgrades?
Hire a pro for gas lines, electrical circuits, plumbing, drainage, structural covers, masonry, heaters, insulated grill jackets, and any work that affects fire safety, utility connections, or permits.
Quick wins for a faster PC:
Clear out junk files and repair common Windows errorsFree Scan →Fix the driver behind crashes, sound loss and screen glitchesFind Drivers →Repair Windows errors before they cause bigger problemsFix Now →Quick Recap
Product prices and availability are accurate as of the date/time indicated and are subject to change. Any price and availability information displayed on Amazon at the time of purchase will apply.

