What’s actually slowing this PC down?
Pick the symptom - the matching free tool is one click away.
Some links on this page are affiliate links: if you buy through them we may earn a commission, at no extra cost to you.
Gutter guards are installed by cleaning and flushing the gutter system, repairing loose or damaged sections, confirming proper slope, measuring the gutter profile, cutting guards to fit, fastening them according to the guard type, sealing problem areas, and testing the entire run with water before calling the job finished. The best installation is not just a leaf-control upgrade. It is a roof-drainage tune-up.
On our job sites, we treat gutter guards as part of the home’s water-management system. A guard that keeps leaves out but sends water behind the fascia, over the front lip, or into a foundation planting bed has failed. The goal is simple: roof water should enter the gutter, move to the downspout, discharge away from the structure, and leave the roof edge, siding, fascia, crawlspace, basement, and landscaping protected.
As an Amazon Associate I earn from qualifying purchases.
Most American homes have 5-inch or 6-inch K-style gutters. That sounds standard, but the details matter. The hanger spacing, front lip shape, drip-edge position, roof pitch, shingle overhang, valleys, fascia condition, and downspout capacity all affect which gutter guard will fit and whether it will work in heavy rain. This guide covers the common installation methods for screen, perforated aluminum, micro-mesh, and reverse-curve guards, plus the mistakes that cause leaks, overflow, corrosion, and warranty headaches.
Start With the Gutter System, Not the Guard
The biggest mistake homeowners make is installing guards over a gutter system that already has problems. Gutter guards hide defects. They do not fix sagging runs, undersized downspouts, rotten fascia, loose hangers, leaking miters, standing water, or a gutter pitched the wrong direction.
#1 Best Overall

- [EASY TO INSTALL] This kit includes 48 FT. (Nominal) of Stainless Steel Micro-Mesh Gutter Guard and self-tapping screws. Designed to fit on 5 IN. gutters or smaller and easy DIY installation.
- [QUALITY & PERFORMANCE] Engineered with Stainless Steel Micro-Mesh, offering unmatched strength and durability. Offers maximum performance, resisting rust and warping.
- [TECHNOLOGY] V-Bend & Trough Technology optimizes water flow, adds strength and rigidity, improves filtration, and prevents debris from sticking.
- [MAXIMUM PROTECTION] Keep leaves, pine needles, pests, and roof grit from entering your gutters while protecting your home from water damage, landscape erosion, infestation, and fire hazards.
- [UNIQUE FEATURES] WUI (Wild Urban Interface) Compliant and UL Approved for rainwater collection – NSF P151 and NSF 372.
Before the first screw goes in, inspect the complete roof-drainage path. That means the shingles and drip edge above the gutter, the gutter trough, hangers, seams, end caps, elbows, downspouts, splash blocks, underground drain connections, and discharge point.
A proper pre-install check usually takes 30 to 90 minutes on a single-story home, depending on access and debris load. For a two-story home, steep roof, heavy tree cover, or older gutter system, plan longer. The time is worth it because the guard installation will only perform as well as the gutter beneath it.
Recommended Free Tools
Pre-install checklist
- Measure gutter size, usually 5-inch or 6-inch K-style on most homes.
- Confirm the guard is compatible with the gutter profile and front lip.
- Check that gutters slope toward downspouts, typically about 1/16 inch to 1/8 inch per foot depending on the run and local practice.
- Look for standing water after flushing. Persistent standing water means the run may need re-pitching.
- Inspect fascia for rot, softness, splitting, or loose fasteners.
- Tighten or replace loose hidden hangers before guards cover access.
- Seal leaking end caps, outlets, and inside or outside miters.
- Flush every downspout and confirm water exits freely.
- Identify high-flow roof valleys that may overwhelm some guard styles.
- Check the drip edge so roof water enters the gutter instead of running behind it.
If the gutters are sagging, leaking heavily, pulling from the fascia, too small for the roof area, or badly pitched, install repairs first. In some cases, replacing the gutter system before adding guards is the better investment.
Choose the Right Gutter Guard for Your Roof and Debris
There is no one best gutter guard for every house. A home under maple trees has a different problem than a home surrounded by pines. A low-slope ranch with wide eaves is different from a steep two-story home with roof valleys dumping water into short gutter runs.
The guard opening needs to match the debris. Large-hole screen guards can work where the main issue is broad leaves and light debris. Micro-mesh performs better around pine needles, shingle grit, seed pods, and small organic material. Reverse-curve systems can shed leaves well, but they need careful fitting at roof valleys because high-volume water can overshoot the curve during hard rain.
Foam and brush inserts are common DIY options because they are easy to place in the gutter. We rarely treat them as a permanent professional solution. They can trap fine debris, grow organic buildup, restrict capacity, and require more frequent removal and cleaning. In wildfire-prone areas, plastic, foam, and brush products may also be the wrong material choice.
| Guard type | Best use | Typical installed cost in 2026 | Installation notes |
|---|---|---|---|
| Basic screen guard | Broad leaves, lighter tree cover | About $2.50-$6 per linear foot | Often snap-in or screw-fastened; openings may admit pine needles and small seeds. |
| Perforated aluminum guard | Leaves, moderate debris, durable residential installs | Often midrange, commonly above basic screens and below premium micro-mesh | Good rigidity; must be cut cleanly at corners and fastened without warping. |
| Stainless micro-mesh guard | Pine needles, shingle grit, small seeds, mixed debris | Commonly about $8-$12 per linear foot | Requires careful edge support and water testing, especially below valleys. |
| Reverse-curve guard | Leaf shedding where roof and gutter geometry are compatible | Often $15-$20+ per linear foot | Fit and pitch are critical; valleys may need diverters or other drainage changes. |
| Proprietary covered gutter system | Premium full-system replacement or integrated cover projects | Can range from about $20-$70 per linear foot | Usually contractor-installed; pricing depends heavily on brand, access, and scope. |
For most homeowners asking how to install gutter guards, the practical choice is between screen, perforated aluminum, and micro-mesh. If the house has pines, small leaves, seed pods, or heavy roof grit, micro-mesh is usually worth the higher cost. If the house has large deciduous leaves and easy access for annual maintenance, a heavier screen or perforated metal guard may be enough.
Understand the Cost Before You Start
For 2026, national installed gutter guard pricing commonly falls around $6-$13 per linear foot, with many total projects landing between about $650 and $2,500. Other national contractor data puts typical projects around $600-$2,100, with many homeowners paying near $1,200. For a 150- to 200-linear-foot single-story home, professional projects often run about $900-$3,500, depending on the guard, access, and repairs. Premium micro-mesh, steep roofs, two- or three-story homes, difficult access, or bundled gutter repairs can push totals to $5,000-$7,000 or more.
DIY material costs can be much lower. Plastic screens, foam inserts, and brush products may cost only a few dollars per foot or less. Better stainless micro-mesh and heavy-gauge aluminum cost more, but the bigger issue is not only material price. DIY savings disappear quickly if the gutters need re-pitching, hidden hangers are failing, fascia is soft, the roof edge gets damaged, or the ladder work is unsafe.
What drives the price
- Linear footage, commonly 150-200 feet on many single-family homes.
- One-story versus two- or three-story access.
- Roof pitch and ladder setup difficulty.
- Guard material and fastening system.
- Number of corners, miters, end caps, and downspout outlets.
- Existing gutter condition.
- Tree density and debris type.
- Roof valleys and high-flow areas.
- Regional labor rates.
- Wildfire or WUI requirements for noncombustible materials.
Budget separately for cleaning, downspout clearing, re-pitching, replacing hidden hangers, sealing miters, fascia repair, gutter replacement, drip-edge correction, and removal of old guards. Those items are not extras when they are needed. They are what make the guard installation work.
Tools, Materials, and Measurements
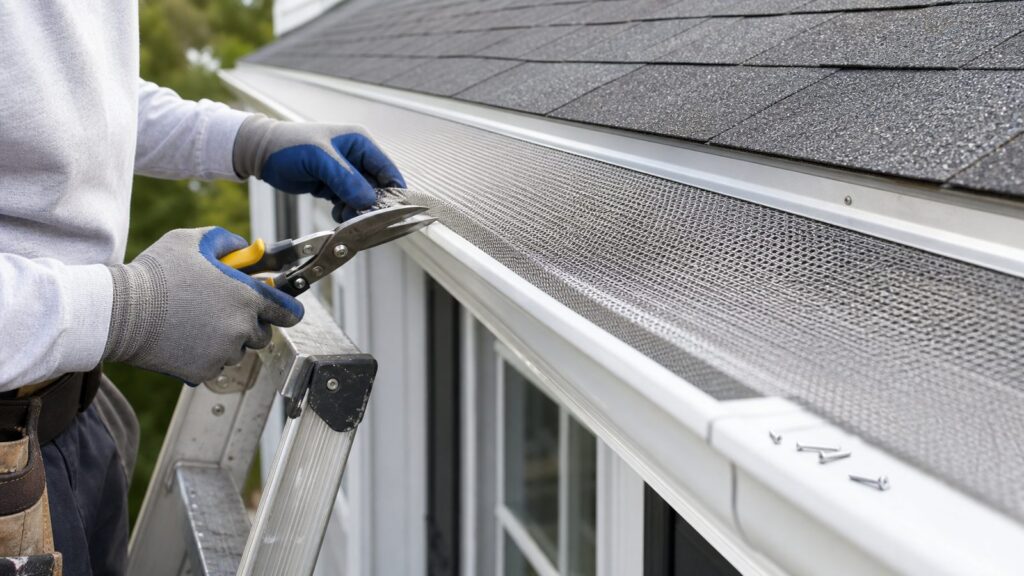
At minimum, a common residential gutter guard installation requires a stable ladder setup, work gloves, eye protection, tape measure, aviation snips, drill or driver, corrosion-resistant screws, sealant compatible with gutters, a garden hose, and a safe way to collect debris. Depending on the product, you may also need end caps, miter pieces, rear support brackets, valley splash diverters, and replacement hidden hangers.
Use corrosion-resistant fasteners. Stainless steel or coated exterior-rated screws are common choices, but compatibility matters. Mixing metals carelessly can create galvanic corrosion, especially where aluminum gutters, steel fasteners, and wet debris are present. Use the fastener type recommended by the guard manufacturer and avoid cheap screws that rust out after a few seasons.
Measure each gutter run separately. Do not assume the front and back of a house are the same length. Record inside corners, outside corners, end caps, downspout outlets, roof valleys, and any areas where the fascia or roof edge changes. For 5-inch and 6-inch K-style gutters, confirm the guard width and attachment method before ordering. A guard that almost fits is a field problem waiting to happen.
Rank #2

- [EASY TO INSTALL] This kit includes 48 FT. (Nominal) of Stainless Steel Micro-Mesh Gutter Guard and self-tapping screws. Designed to fit on 6 IN. & 7 IN. gutters and easy DIY installation.
- [QUALITY & PERFORMANCE] Engineered with Stainless Steel Micro-Mesh, offering unmatched strength and durability. Offers maximum performance, resisting rust and warping.
- [TECHNOLOGY] V-Bend & Trough Technology optimizes water flow, adds strength and rigidity, improves filtration, and prevents debris from sticking.
- [MAXIMUM PROTECTION] Keep leaves, pine needles, pests, and roof grit from entering your gutters while protecting your home from water damage, landscape erosion, infestation, and fire hazards.
- [UNIQUE FEATURES] WUI (Wild Urban Interface) Compliant and UL Approved for rainwater collection – NSF P151 and NSF 372.
Safety setup
Use a ladder rated for the worker and tools. Set it on firm, level ground at a stable angle, and avoid reaching more than your belt buckle outside the ladder rails. For two-story work, steep grades, poor access, or wet surfaces, hire a professional. Gutter guard installation looks simple from the ground, but most of the risk is ladder positioning and roof-edge work.
Free tools Windows power users keep installed
One-click scans. No signup required.
Do not install guards in rain, high wind, icy conditions, or when shingles are brittle from cold. In hot weather, be careful around asphalt shingles because the surface can scuff or tear more easily.
Step 1: Clean the Gutters and Flush the Downspouts
Remove leaves, mud, pine needles, shingle grit, seed pods, and old sealant pieces from the gutter trough. Scoop debris into a bucket or tarp instead of washing everything into the downspout. Once the trough is clear, flush the run with a hose from the high end toward the outlet.
Watch the downspout discharge. Water should exit at full flow. If it backs up, gurgles, or dribbles, disconnect elbows and clear the blockage before installing guards. Downspout clogs are one of the most common reasons gutter guards get blamed for overflow they did not cause.
Also watch the back of the gutter during flushing. If water runs behind the gutter, the drip edge, shingle overhang, or gutter placement may need correction. Installing a guard over that condition can conceal a roof-edge leak until fascia damage appears.
PC Slower Than It Used to Be?
A free scan shows the junk files, broken settings and background clutter dragging Windows down - then fixes them in one click.Free scan · Windows 10 & 11Outdated Drivers Are Slowing You Down
One free scan finds every outdated or missing driver and matches the right update for your exact hardware.Free scan · exact hardware matchStep 2: Repair, Re-pitch, and Reinforce Before Covering the Gutter
After cleaning, tighten loose hangers and replace weak ones. Many residential gutters use hidden hangers spaced roughly every 24 to 36 inches, with closer spacing often preferred in snow, ice, or heavy rainfall areas. If the gutter pulls away from the fascia when you apply light pressure, fix the attachment before adding guards.
Seal leaking miters, outlets, and end caps with gutter sealant after the surfaces are clean and dry. Do not smear new sealant over wet sludge or failed old sealant. Remove loose material, dry the joint, and seal only where needed.
Check slope with water, not just your eye. A gutter can look straight and still hold water. If water sits more than a shallow film after flushing, the run may need re-pitching. Long runs may require a downspout at each end or a center-high pitch draining both directions. Guards reduce open access later, so fix drainage now.
Inspect fascia carefully. Soft, punky, or split fascia will not hold fasteners reliably. A screw-fastened guard attached to failing fascia is not a repair. It adds more load to a weak edge. Replace damaged wood and address the source of the moisture before installing guards.
Step 3: Dry Fit the Guards and Plan the Layout
Lay out the guard sections before fastening. Start at a clean end or corner and work toward outlets and miters. The goal is to avoid small awkward pieces where they will be weak, visible, or prone to lifting. Where the product allows overlap, overlap sections in the direction of water and debris flow so leaves do not catch on exposed edges.
At inside and outside corners, cut clean miters. Jagged cuts leave gaps for leaves, pests, and wind uplift. Use aviation snips for most aluminum and mesh products. For heavier systems, follow the manufacturer’s cutting instructions and wear eye protection.
Keep access in mind. Downspout outlets, inside corners, and roof valley discharge points may need future service. A good installation does not permanently trap the system behind long, difficult-to-remove runs. If a section is likely to need inspection after storms, make sure it can be removed without dismantling half the house.
Step 4: Install Snap-In or Screen Guards
Snap-in screen guards are common DIY products for 5-inch and 6-inch K-style gutters. They usually tuck under the front lip and rest on or near the back edge. Some designs also slide under the shingle edge, but that should be approached carefully.
Quick wins for a faster PC:
Clear out junk files and repair common Windows errorsFree Scan →Fix the driver behind crashes, sound loss and screen glitchesFind Drivers →Repair Windows errors before they cause bigger problemsFix Now →Rank #3

- 【EASY DIY INSTALLATION】Each panel measures 5.5 in. × 48 in. and fits most standard 5-inch and smaller gutters. Easy to trim for corners and custom layouts using basic tools.
- 【STAINLESS STEEL MICRO MESH PROTECTION】Fine stainless steel micro mesh helps block leaves, pine needles, roof grit and small debris while allowing rainwater to flow freely, reducing gutter clogs throughout the year.
- 【HEAVY DUTY STAINLESS STEEL & ALUMINUM】Built with corrosion-resistant stainless steel mesh and reinforced aluminum alloy frame for long-lasting outdoor durability in all weather conditions.
- 【HELPS REDUCE GUTTER CLEANING】Keeps gutters flowing properly by helping prevent water overflow caused by clogged debris, reducing routine gutter cleaning and minimizing ladder maintenance.
- 【BUILT FOR YEAR-ROUND PERFORMANCE】Engineered to withstand heavy rain, snow, heat, wind and seasonal debris while helping protect your gutter system and home from water damage all year long.
Begin at one end of the run. Set the rear edge so roof water will flow onto or through the guard and into the gutter, not behind it. Lock the front edge into the gutter lip without deforming the lip. Continue section by section, keeping joints tight and corners covered.
If the guard requires screws, fasten at the spacing specified by the manufacturer. Do not overtighten. Overtightening can warp the guard, create low spots that collect debris, deform the gutter lip, and restrict thermal movement. A snug exterior fastener is usually better than a crushed panel.
Screen guards are forgiving, but their weakness is debris size. Pine needles, roof grit, and small seeds can pass through or lodge in the openings. In heavy pine areas, expect more maintenance or choose micro-mesh instead.
Step 5: Install Perforated Aluminum Guards
Perforated aluminum guards are more rigid than basic screens and often perform well on homes with broad leaves and moderate debris. They typically attach to the front lip of the gutter and bear against the rear edge, drip edge, or fascia-side condition depending on the product.
Keep each section flat and aligned. If the guard is crowned, buckled, or tilted away from the roof edge, water may overshoot during hard rain. If it is tilted too far backward, debris may collect against the fascia or roof edge. The correct angle depends on the product, but the principle is the same: water must enter, debris must shed, and the gutter must still drain.
At corners, cut and fit the metal carefully. Leave no open triangles at miters. At downspout outlets, avoid covering the outlet in a way that blocks service or restricts flow. A guard can keep leaves out of the trough while still starving the downspout if the outlet area is poorly detailed.
Step 6: Install Micro-Mesh Gutter Guards
Micro-mesh guards usually combine a stainless steel mesh with an aluminum or metal frame. They are a strong choice for pine needles, shingle grit, small seeds, and mixed debris. They are also less tolerant of sloppy installation. A small gap at the rear edge or a bad angle under a valley can defeat the product.
Most micro-mesh systems use front-lip fastening with a rear support under the drip edge, against the fascia, or on existing hidden hangers. Follow the product’s attachment method. Do not force the guard under shingles if the roof edge is not designed for it. Lifting shingles can damage the starter course, break the seal strip, disturb the drip edge, and create warranty problems.
The Tool Desk
Outbyte Driver Updater FREEScan for outdated or missing drivers - takes under a minuteDriver Scan →Outbyte PC Repair FREERepair Windows errors before they cause bigger problemsFix Now →Keep the mesh clean during installation. Sealant smears, metal shavings, sawdust, and roof grit can clog the surface before the first rain. Cut sections cleanly and brush off debris as you work.
High-flow valleys deserve special attention. A steep roof valley can dump a large volume of water onto one short section of guard. If the water overshoots during hose testing, the answer may be a valley diverter, a wider gutter, an added downspout, a different guard style in that location, or a combination of those fixes.
Step 7: Be Careful With Under-Shingle Guards
Some gutter guards are designed to slide under the first course of shingles. That detail can work when the roof edge, shingle condition, drip edge, and manufacturer instructions all support it. It can also cause problems when forced into the wrong roof assembly.
Do not pry up brittle shingles. Do not break the seal strip. Do not drive fasteners through the roof surface unless the guard manufacturer and roofing requirements allow it. Do not block the drip edge. The back edge of the guard needs to coordinate with the roof edge so water enters the gutter rather than running behind the fascia.
Do these 3 things before closing this tab:
1Repair Windows errors before they cause bigger problems2Scan for outdated or missing drivers - takes under a minute3Clear out junk files and repair common Windows errorsIf the roof is newer, check roofing warranty terms before installing any under-shingle product. Some warranties restrict modifications at the roof edge. If the shingles are old, curled, cracked, or fragile, choose a guard that attaches to the gutter instead of disturbing the roof covering.
Rank #4

- ✅ 【𝗠𝗜𝗖𝗥𝗢-𝗠𝗘𝗦𝗛 𝗙𝗢𝗥 𝗣𝗜𝗡𝗘 𝗡𝗘𝗘𝗗𝗟𝗘 𝗣𝗥𝗢𝗧𝗘𝗖𝗧𝗜𝗢𝗡】 The Micro-Mesh is designed to block even the smallest debris, including pine needles, while keeping your gutters clear and functioning smoothly.
- ✅【𝗙𝗨𝗟𝗟 𝟯𝟬𝟰 𝗦𝗧𝗔𝗜𝗡𝗟𝗘𝗦𝗦-𝗦𝗧𝗘𝗘𝗟 𝗕𝗨𝗜𝗟𝗗】 Engineered for a lifetime of performance. Both the Micro-Mesh and the heavy-duty frame are 100% 304 stainless steel, delivering superior resistance to rust, corrosion, and warping under snow or sun. Backed by our lifetime no-rust guarantee.
- ✅ 【𝗘𝗫𝗖𝗘𝗟𝗟𝗘𝗡𝗧 𝗪𝗔𝗧𝗘𝗥 𝗙𝗟𝗢𝗪】 Despite its fine mesh design, this gutter guard allows water to flow freely during rain, preventing overflow while blocking small debris.
- ✅ 【𝗘𝗔𝗦𝗬 𝗗𝗜𝗬 𝗜𝗡𝗦𝗧𝗔𝗟𝗟𝗔𝗧𝗜𝗢𝗡】 Pre-drilled for easy alignment, each panel comes with stainless steel screws and a magnetic Phillips bit for quick and secure installation.
- ✅【𝗟𝗜𝗙𝗘𝗧𝗜𝗠𝗘 𝗪𝗔𝗥𝗥𝗔𝗡𝗧𝗬】Customer satisfaction is our priority. While we strive for complete satisfaction, we back our product with a lifetime warranty. Buy with confidence, knowing that you're protected for the life of the product.
Step 8: Detail Corners, Valleys, End Caps, and Downspouts
Most failures happen at transitions. Straight gutter runs are easy. Corners, valleys, outlets, and end caps are where leaves enter, water overshoots, and sections lift.
At inside corners, fit guards tightly enough to stop leaf entry but not so tight that metal buckles. At outside corners, keep the front lip engaged and avoid sharp exposed edges. At end caps, close the gap fully. Small openings invite leaves, nesting insects, and wind-driven debris.
At downspout outlets, maintain flow and access. If the outlet is already undersized, guards will not fix it. Many homes have 2-by-3-inch downspouts where 3-by-4-inch downspouts would handle roof water better, especially on larger roof areas or heavy rainfall sites. If a roof valley feeds a short gutter run, a larger outlet or added downspout may matter more than the guard itself.
At roof valleys, test aggressively. A gentle hose stream is not enough. Run water from the valley area and watch for overshoot. If water shoots over the guard, install a diverter only where appropriate and without creating a roof leak. Sometimes the better correction is increasing gutter or downspout capacity.
Step 9: Water-Test the Finished Installation
Water testing is not optional. After installation, run a hose from the high end of each gutter run and verify that water reaches the downspout without pooling, leaking behind the gutter, or overshooting the guard. Test corners, valleys, and long runs separately.
Look for four things. First, water should enter the gutter through or over the guard as intended. Second, the gutter should carry water to the outlet without standing water. Third, the downspout should discharge freely. Fourth, water should leave the foundation area through extensions, splash blocks, or a drainage system.
If water runs behind the gutter, check the drip edge and rear guard position. If water overshoots at the front, check guard angle, valley flow, roof pitch, and gutter size. If water pools, recheck gutter pitch. If water backs up near the outlet, clear or enlarge the downspout path.
The Tool Desk
Outbyte Driver Updater FREEScan for outdated or missing drivers - takes under a minuteDriver Scan →Outbyte PC Repair FREERepair Windows errors before they cause bigger problemsFix Now →Permit, Code, Warranty, and Wildfire Notes
For many basic gutter guard installations, a permit is not required because the work is treated as maintenance. That is not universal. Local requirements can change when the work is part of a larger reroof, gutter replacement, drainage modification, structural fascia repair, or work in a regulated wildfire zone. Some jurisdictions also care about where roof drainage discharges, especially if it affects neighboring property, public sidewalks, erosion, or stormwater systems.
Before a larger project, check the local building department. The question is not only, “Do gutter guards need a permit?” It is, “Does this scope include gutter replacement, roof-edge work, drainage changes, or WUI requirements that trigger local rules?”
Roof warranties matter too. Under-shingle guards can create conflict if they disturb shingles, starter strips, seal strips, or drip edge. If the roof is under warranty, confirm allowed attachment methods before installing anything that slides under or fastens through roofing materials.
In wildfire-prone or Wildland Urban Interface areas, material selection matters. Noncombustible metal guards are commonly recommended because gutters can collect dry leaves and embers. Plastic, foam, and brush inserts are poor choices for many fire-exposure conditions. In those regions, verify the product’s listing, testing, and local acceptance instead of relying on generic packaging claims.
Free tools Windows power users keep installed
One-click scans. No signup required.
When to DIY and When to Hire a Professional
DIY installation can make sense on a one-story home with stable ground, clean access, sound gutters, simple roof lines, light tree cover, and a snap-in or screw-fastened product that clearly matches the gutter profile. A capable homeowner can often install 100 to 200 linear feet over a weekend after cleaning and minor repairs.
Hire a professional when the home is two stories or taller, the roof is steep, the ground is uneven, the gutters need re-pitching, fascia is damaged, downspouts are clogged or undersized, roof valleys are causing overflow, or the guard system requires precise fastening. Also hire a pro if the project is in a wildfire-prone area with specific material requirements or if the roof warranty could be affected.
Professional installation costs more because the crew is not just attaching covers. A proper scope includes access setup, cleaning, repairs, fastening, corner detailing, valley adjustments, and water testing. For many homes, that is the difference between a guard that looks installed and a drainage system that works through real weather.
Best Value

- 【Stainless Steel Micro-Mesh】Crafted with high-strength stainless steel mesh and a premium aluminum frame, the Sukhavati gutter guard is built to withstand even the toughest weather. Each piece measures 48" long and 5.6" wide, with 12 pieces in the box providing 48 feet of total coverage. The durable materials resist rust and corrosion, ensuring reliable, long-term protection for your gutter all year round.
- 【Patented SmartPitch Technology】Our patented SmartPitch Technology creates a natural upward angle between the guard and roofline, ensuring the mesh stays horizontal relative to the gutter. This design improves water flow, prevents debris buildup, and makes installation easier while enhancing overall performance.
- 【Superior Filtration Efficiency】The precisely engineered mesh size effectively blocks small debris like Pine Needles, leaves, twigs and bugs, while allowing water to flow effortlessly. Designed to fit 4 and 5 inch gutters or smaller, it prevents clogs and ensures smooth water drainage, keeping your gutters clear in all climates.
- 【Hassle-Free DIY Installation】No professional assistance required! The screw-in installation process is simple and straightforward, allowing you to fit the guard securely on your own. Compatible with most rooflines and gutter types, this guard offers unmatched versatility and ease of use for homeowners.
- 【30-Year Warranty for Peace of Mind】Enjoy long-lasting protection backed by a 30-year warranty. This extended coverage reflects our confidence in the product’s quality and ensures your investment in gutter protection is secure for years to come.
Maintenance After Installation
Gutter guards reduce debris. They do not eliminate maintenance. Fine pollen, shingle grit, pine needles, seed pods, and valley wash can still build up over time. Plan to inspect the system at least once a year. Twice a year is better under heavy trees: once after spring seed drop and once after fall leaf drop.
Recommended Free Tools
Also inspect after major storms, reroofing work, wildfire season, high wind, ice events, or nearby tree trimming. Look for debris mats on top of the guards, clogged valleys, loose fasteners, lifted sections, staining behind gutters, and water marks on fascia or siding.
Do not pressure-wash guards aggressively unless the manufacturer allows it. High pressure can deform mesh, force water behind the gutter, or damage roof-edge materials. Use a soft brush, blower from a safe position, or low-pressure rinse when appropriate.
Common Installation Mistakes to Avoid
Installing guards over dirty gutters is the first mistake. It hides the exact problem the system is supposed to solve. The second is skipping gutter pitch and downspout testing. A covered gutter that holds water can still rot fascia, attract pests, and overflow in storms.
Wrong product selection is another common failure. Large-hole screens under pine trees, foam inserts under heavy seed pods, and reverse-curve guards below high-volume valleys can all disappoint. Match the guard to the debris and the roof geometry.
Fastener mistakes also show up often. Low-quality screws rust. Incompatible metals corrode. Overtightened screws warp panels and gutter lips. Poor spacing allows wind uplift. Follow the manufacturer’s spacing requirements and use exterior-rated corrosion-resistant fasteners.
Finally, do not ignore the roof edge. A gutter guard that blocks the drip edge, lifts shingles, breaks the seal strip, or creates a path for water behind the fascia can cause more damage than the leaves ever would.
The Bottom Line
The right way to install gutter guards is to repair and verify the roof-drainage system first, then fit the guard to the actual gutter, roof edge, debris type, and rainfall conditions. Clean the gutters, flush the downspouts, fix slope and fascia problems, use compatible fasteners, avoid shingle damage, detail corners and valleys, and water-test every run.
For a simple one-story home with sound gutters, DIY installation may be reasonable. For steep roofs, taller homes, damaged gutters, wildfire requirements, complex valleys, or premium micro-mesh systems, professional installation is usually the better call. Either way, judge the job by performance in water, not by how clean the gutter looks from the ground.
Quick wins for a faster PC:
Scan for outdated or missing drivers - takes under a minuteDriver Scan →Clear out junk files and repair common Windows errorsFree Scan →Frequently Asked Questions
Can I install gutter guards myself or should I hire a professional?
You can install gutter guards yourself on a one-story home with sound 5-inch or 6-inch gutters, safe ladder access, and a product that matches the gutter profile. Hire a professional for two-story homes, steep roofs, damaged fascia, sagging gutters, clogged or undersized downspouts, complex roof valleys, or premium systems that require precise fastening.
How much does gutter guard installation cost in 2026?
Most professional gutter guard installations fall around $6-$13 per linear foot, with common total project costs near $650-$2,500. A typical 150- to 200-foot single-story home often runs about $900-$3,500, while premium micro-mesh, complex access, repairs, or proprietary systems can reach $5,000-$7,000 or more.
Do I need a permit to install gutter guards?
Basic gutter guard installation is often treated as maintenance and may not require a permit, but local rules vary. A permit or code review may be needed if the work includes gutter replacement, roof-edge changes, drainage modifications, structural fascia repair, or wildfire/WUI material requirements.
Should gutter guards go under shingles?
Only if the guard manufacturer allows it and the roof edge is suitable. Forcing guards under shingles can damage the starter course, seal strip, drip edge, or roofing warranty. When in doubt, use a guard that fastens to the gutter rather than disturbing the roof covering.
What’s actually slowing this PC down?
Pick the symptom - the matching free tool is one click away.
What type of gutter guard works best for pine needles and small debris?
Stainless micro-mesh guards usually perform best for pine needles, shingle grit, small seeds, and fine debris. Large-hole screens and basic perforated guards can work for broad leaves, but they often let smaller material enter or lodge in the openings.
Do gutter guards eliminate gutter cleaning?
No. Gutter guards reduce debris entry, but they do not make gutters maintenance-free. Plan on annual or semiannual inspections, especially after storms, heavy leaf drop, spring seed drop, wildfire season, or reroofing work.
Quick Recap
Product prices and availability are accurate as of the date/time indicated and are subject to change. Any price and availability information displayed on Amazon at the time of purchase will apply.

