Free tools Windows power users keep installed
One-click scans. No signup required.
Some links on this page are affiliate links: if you buy through them we may earn a commission, at no extra cost to you.
A smash burger is a thin patty made by pressing a loose ball of ground beef hard onto a very hot flat cooking surface. That pressure gives the meat maximum contact with the griddle, which creates the crisp browned crust that makes the style different from a regular thick burger.
At home, the burger itself is simple: 80/20 ground chuck, a hot cast-iron pan or griddle, parchment, a heavy press, a stiff spatula, salt, pepper, cheese, and a soft bun. The part homeowners often underestimate is the setup. Smash burgers cook fast, smoke heavily, and throw grease. If you want to make them more than once or twice a year, the cooking station matters as much as the recipe.
As an Amazon Associate I earn from qualifying purchases.
On our job sites, we think about cooking areas the same way we think about any working surface: heat, clearance, workflow, cleanup, utilities, and safety. A good smash burger station can be as small as a 12-inch cast-iron skillet under a strong hood, or as involved as a built-in outdoor kitchen with gas, electrical, lighting, prep counters, noncombustible finishes, and inspection signoffs. The right answer depends on how many burgers you cook, how often you entertain, and how much permanent infrastructure you want to add.
What Makes a Smash Burger Different?
A regular burger is usually shaped before it hits the grill. A smash burger starts as a loose ball, usually 2 to 3 ounces for a double-stack burger or 3 to 4 ounces for a larger single patty. The beef goes onto a hot flat surface and is smashed immediately, usually for 5 to 10 seconds. That one move creates a thin patty with ragged edges and a deeply browned crust.
Popular on Amazon

- Pre-Seasoned: Our cast iron hamburger press is professionally pre-seasoned, so after use, simply clean it and wipe it dry, or place it directly in the dishwasher
- Heavy-duty Cast Iron Grill Press: Our 6.6” smash burger press is made from 1.98 lbs of heavy-duty food-grade cast iron, designed to effortlessly crush and perfectly grill burger patties, ensuring a deliciously crispy crust every time
- Comfortable Wooden Handle: Made from natural wood, the ergonomically designed handle ensures a more comfortable grip. Its cool touch helps reduce heat transfer, preventing finger burns
- Professional Flat Bottom Design: The completely flat bottom allows you to better control the thickness and crispiness of your burger, helping you easily make juicy, evenly cooked burgers. It also prevents bacon from curling, ensures even heat distribution, and locks in moisture, guaranteeing both great appearance and flavor
- Wide Applications: Perfect for burgers, bacon, meat, steaks, sandwiches, and more. This press can be used on grills, griddles, and skillets, making it the perfect tool for both outdoor barbecues and indoor cooking
The flat surface is the key. Grill grates leave contact marks, but most of the patty is suspended over air. A griddle, cast-iron skillet, carbon-steel plate, stainless flat top, or baking steel puts the whole patty in contact with hot metal. More contact means more browning. That browning is the point of the method.
The best smash burgers are not pressed over and over. You smash once, right after the beef hits the surface, while the meat is still loose and cold. Pressing later, after the crust has formed, mostly squeezes out fat and juice. A good cook lets the crust build, scrapes under it decisively, flips once, adds cheese, and gets the burger off the heat quickly.
What’s actually slowing this PC down?
Pick the symptom - the matching free tool is one click away.
The Basic Smash Burger Formula
For most homeowners, the most reliable formula is 80/20 ground chuck, American cheese, soft potato or brioche buns, and a griddle surface in the 425 to 500 degree Fahrenheit range. Leaner beef can work, but it does not produce the same crust or richness. If you use 90/10 ground beef, expect a drier patty and less forgiving timing.
Ingredients for 4 Double Burgers
- 1.25 to 1.5 pounds 80/20 ground chuck
- 8 slices American cheese
- 4 soft burger buns
- Kosher salt and black pepper
- Neutral oil only if your surface needs it
- Optional toppings: diced onions, pickles, shredded lettuce, thin tomato, burger sauce, mustard, ketchup
Tools That Actually Matter
- Cast-iron skillet, griddle pan, baking steel, carbon-steel griddle, or outdoor flat-top griddle
- Heavy burger press or a stiff second spatula
- Parchment squares, roughly 5 by 5 inches
- Wide beveled metal spatula or scraper
- Instant-read thermometer for food safety
- Infrared thermometer if you want to check griddle surface temperature
A flexible fish spatula is usually not enough. The crust bonds to the metal, and you need a stiff beveled edge to scrape under it. If the browned bits stay behind, you left the best part of the burger on the griddle.
How to Make Smash Burgers at Home
Start with cold beef. Divide it into loose balls. Do not knead it, pack it tight, mix salt into it, or form finished patties ahead of time. Salt mixed into ground beef changes the texture and can make it firm and sausage-like. Season the exposed side after smashing instead.
- Preheat the surface. Give cast iron 5 to 10 minutes over medium-high heat. Outdoor griddles may need 10 to 15 minutes depending on wind and ambient temperature. You want a surface around 425 to 500 degrees Fahrenheit.
- Stage everything first. Cheese should be unwrapped, buns split, toppings ready, and tools within reach. A 2-ounce smash patty may cook in about 90 seconds on the first side and less than a minute after flipping.
- Toast the buns. Toast cut-side down with a little butter or rendered beef fat. Move them to a tray before the patties start.
- Place the beef balls on the hot surface. Leave at least 3 to 4 inches between balls so they have room to spread.
- Smash immediately. Put parchment over the beef, press hard for 5 to 10 seconds, then remove the parchment. Aim for a patty about 1/4 inch thick.
- Season the top. Salt and pepper are enough. Keep seasoning simple until you have the timing down.
- Wait for the crust. The edges should look browned and lacy before you flip. If the patty tears because it is stuck, you probably need a stiffer scraper or a few more seconds.
- Scrape and flip. Get the spatula under the crust, not just under the meat. Flip once.
- Add cheese. Cheese melts fast on a thin patty. Stack two patties if making doubles.
- Check doneness and serve. USDA guidance for ground beef is 160 degrees Fahrenheit internal temperature. Serve immediately.
Food safety is not decorative here. Ground beef is different from a steak because bacteria can be distributed throughout the meat during grinding. The federal safety guidance remains 160 degrees Fahrenheit for ground beef. Use a thermometer, especially when cooking for guests, children, older adults, or anyone with a higher food-safety risk.
Indoor Skillet, Portable Griddle, or Built-In Outdoor Kitchen?
The best setup depends on volume. If you make two burgers once in a while, a cast-iron skillet is enough. If you feed a family, a 22- to 28-inch outdoor griddle changes the experience. If burgers, breakfast, stir-fry, and game-day cooking are part of your lifestyle, a permanent outdoor cooking station may be worth designing properly.
Also popular on Amazon

- Food Grade 304 Stainless Steel: The smash burger press is made of 100% 304 stainless steel with 2.5mm thickness and 5.5 inches diameter
- Silicone Heat-Resistant Handle: The upgraded heat-resistant handle, covered with high-quality silicone on the basis of a cylindrical anti-scald hollow handle, further insulates heat
- Perfect Burger Partner: The 5.5-inch Burger press patty maker can smash patties and sear the bottom into a caramelized crust, sealing in juices
- No Stick: Polished stainless steel has a smooth surface that prevents sticking, keeping your patties intact
- Easy to Clean: It's stain-resistant and rust-resistant, making it easy to clean with either water or a dishwasher
| Setup | Best For | Typical 2026 Cost | Construction Notes |
|---|---|---|---|
| Indoor cast-iron skillet or griddle pan | 1 to 4 burgers | $40-$120 for pan, $15-$50 press, $10-$35 spatula, $15-$100 thermometer | Needs strong ventilation, nearby landing space, and careful grease cleanup |
| Portable outdoor propane griddle | Family batches and casual entertaining | About $170-$600 for common tabletop or cart units; $500-$1,200+ for larger premium flat tops | Requires outdoor clearance, level surface, propane storage plan, grease control, and weather cover |
| Natural gas outdoor griddle or grill station | Frequent outdoor cooking without propane tanks | Gas line often $303-$1,030 for BBQ lines, with many outdoor kitchen runs $400-$2,500 | Requires BTU planning, shutoff, pressure testing, permits, and inspection |
| Built-in outdoor kitchen | Heavy entertaining and permanent backyard investment | Roughly $6,300-$27,100 for many outdoor kitchens; custom work can go much higher | Design around appliance listing, noncombustible materials, ventilation, drainage, lighting, utilities, and code |
A small indoor setup is the cheapest and fastest, but it puts smoke and grease in the house. A portable griddle moves the mess outside and increases capacity. A built-in kitchen adds convenience and resale appeal, but only if it is designed around actual appliances and local code instead of treated like a cabinet project with a hot plate dropped in later.
Designing a Real Smash Burger Station
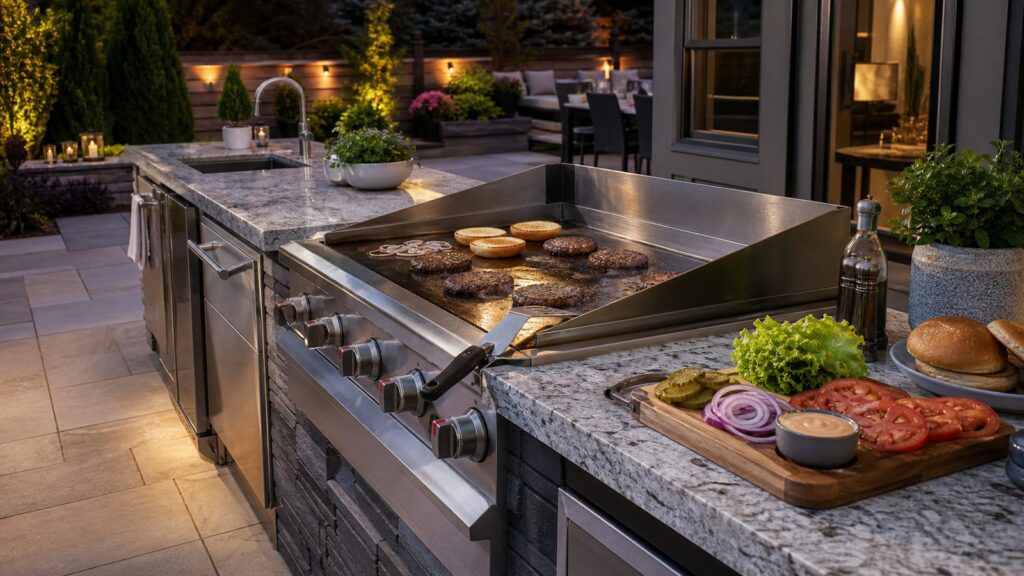
A smash burger station is a fast workflow. Once the first beef ball hits the griddle, you do not have time to walk across the patio for cheese or search a drawer for the scraper. We lay out outdoor cooking areas with zones, just like an efficient interior kitchen.
The 5-Zone Workflow
- Raw-meat landing zone: A tray area close to the griddle but separate from finished food. Plan for at least 18 inches of counter if space allows.
- Hot griddle zone: The appliance itself, with required clearances to combustible materials, siding, posts, railings, and overhead covers.
- Bun and topping zone: A clean landing area for toasted buns, cheese, onions, pickles, and sauce. Another 18 to 24 inches of counter makes a big difference.
- Assembly zone: A tray or counter area where finished patties move off the heat and burgers are built.
- Cleanup path: Grease cup access, trash, paper towels, handwashing, and a path that does not cross clean food with raw meat tools.
For a portable griddle, that might mean a sturdy cart with side shelves and a small prep table. For a built-in station, it means specifying the appliance first, then designing the island, vents, access doors, gas routing, electrical outlets, countertop, and weather protection around the manufacturer’s installation manual.
PC Slower Than It Used to Be?
A free scan shows the junk files, broken settings and background clutter dragging Windows down - then fixes them in one click.Free scan · Windows 10 & 11Outdated Drivers Are Slowing You Down
One free scan finds every outdated or missing driver and matches the right update for your exact hardware.Free scan · exact hardware matchCountertops and Surrounding Materials
High-heat cooking punishes weak material choices. Around a griddle, we prefer noncombustible or heat-tolerant surfaces: stainless steel, masonry, concrete, porcelain slab, stone, or properly specified outdoor-rated countertop materials. Combustible framing, wood trim, vinyl siding, composite cladding, and fabric shade structures all need clearance review.
Do not assume a portable griddle can be built into an island. Many cart-style griddles are listed and vented as freestanding appliances. Enclosing them can trap heat, block ventilation, damage components, and create a fire hazard. Built-in appliances are designed with specified cutout dimensions, insulation jacket requirements, venting, and clearance tables. Those documents should drive the construction.
Ventilation, Grease, and Cleanup
Smash burgers make smoke because the method depends on high heat and fat contact with hot metal. Indoors, a weak recirculating hood can be overwhelmed quickly. If your kitchen hood does not vent outside, expect lingering odor and greasy residue on nearby cabinets. Open windows help, but they are not a substitute for a properly ducted range hood.
Outdoors, smoke is easier to live with, but grease still needs planning. Flat-top griddles drain to a grease cup or rear trap. That cup must be accessible without reaching over a hot surface. On patios, grease runoff can stain concrete, pavers, stone, and wood decking. Keep the griddle level enough for predictable drainage, and do not place it where grease can run toward a door threshold, pool deck, or high-traffic walkway.
Recommended Free Tools
Also popular on Amazon

- DINER-STYLE SMASH — The cast iron burger press for cooks who want thin, diner-style burger edges at home. Its 2 lb. weight helps you apply even pressure as you flatten the meat.
- 2 LBS. OF CAST IRON — This heavy-duty burger press has a 6.5-inch pressing surface for flattening meat into thin patties.
- CRISP, BROWNED EDGES — Press a loose ball of beef flat against a hot griddle, then lift the press and let the patty sear.
- EVEN PRESSURE FOR EDGE-TO-EDGE CRUST — A flat iron face smashes the full circle at once for even pressure across the whole patty. This cast iron smash burger press is heat-tolerant and compatible with grills, griddles, and stovetops.
- SIMPLE CLEAN-UP — Hand-wash with warm water and mild soap, dry completely, and apply a light coat of oil. Do not put the press in the dishwasher or leave it soaking. Backed by a 1-year warranty.
Lighting matters too. A thin patty can go from browned to burned in seconds. If the station is used after sunset, install task lighting that hits the griddle surface and prep counter, not just decorative overhead light. Outdoor outlets should be properly rated and GFCI-protected where required. If you use plug-in ignition, refrigeration, lighting, or small appliances outside, electrical planning belongs in the design phase.
Gas, Permits, and Code Considerations
Portable propane units keep utility work simple, but you still need safe cylinder storage, hose routing, and clearance from ignition sources. Natural gas is more convenient for a permanent station, but it is not just a hose extension. Gas lines must be sized for the appliance BTU load, total connected demand, run length, pressure, meter capacity, shutoff location, and local inspection requirements.
National consumer cost data for 2026 places many gas grill installations around $200 to $1,200, with many homeowners near $700. Other cost models put outdoor grill installation around $1,189 to $1,663 per grill. Gas line installation for outdoor BBQ or grill use commonly falls around $303 to $1,030, while more involved outdoor-kitchen contractors may quote $400 to $2,500 depending on trenching, distance, pipe size, hardscape removal, meter capacity, permit fees, and inspection.
Permit costs vary by city and county. For utility-heavy outdoor kitchens, homeowners often see individual gas, electrical, and plumbing permits in the $50 to $500 range each, building permits around $200 to $1,500 or more, and total permit costs around $250 to $2,000 or more for larger custom projects. HOA approval can add another layer, especially for visible structures, roof covers, exterior gas lines, or changes near property setbacks.
Quick wins for a faster PC:
Clear out junk files and repair common Windows errorsFree Scan →Scan for outdated or missing drivers - takes under a minuteDriver Scan →Repair Windows errors before they cause bigger problemsFix Now →Fuel-gas work should follow adopted local code, manufacturer instructions, and applicable standards such as the fuel gas provisions in the residential code and NFPA 54 where adopted. In plain homeowner terms: use a licensed pro for permanent gas work, pressure test the line, install an accessible shutoff, and get the inspection closed before burying or enclosing anything.
Cost Planning for a Home Smash Burger Setup
There is a big difference between buying a skillet and building an outdoor kitchen. Start with the way you actually cook. A homeowner making four burgers twice a month does not need a $25,000 patio kitchen. A family that hosts 20 people every weekend may hate a 12-inch skillet after the first party.
| Budget Level | What It Usually Includes | Expected 2026 Range |
|---|---|---|
| Basic indoor kit | Cast-iron pan or griddle, press, metal spatula, instant-read thermometer | About $80-$305 total |
| Outdoor starter setup | Portable propane griddle, cover, scraper, press, propane tank, prep table | About $250-$900 |
| Large portable setup | 28- to 36-inch cart griddle, accessories, cover, storage, better prep surfaces | About $600-$1,500+ |
| Permanent gas station | Outdoor-rated griddle or grill, gas line, shutoff, basic counter or cabinet work | Often $2,500-$8,000+ depending on utility distance and finishes |
| Full outdoor kitchen | Built-in cooking, counters, cabinets, utilities, lighting, possible sink, permits | Commonly $6,300-$27,100; custom/premium projects higher |
The most common budget surprise is not the appliance. It is the work around the appliance: trenching, extending gas, upgrading pipe size, adding electrical, cutting hardscape, building noncombustible surrounds, adding ventilation, repairing patio surfaces, and paying permit or inspection fees. Before buying a built-in griddle, confirm the installation manual, cutout dimensions, required clearances, gas type, BTU demand, ventilation requirements, and whether your local jurisdiction treats the work as a permitted outdoor kitchen.
Also popular on Amazon

- 【HEAVY-DUTY CAST IRON GRILL PRESS】 :Our barbeque grill press is made of heavy duty food grade cast iron. Use the grill weight to press out unwanted grease and fat, safe to use in the oven, on the stove, on the grill, griddle, or campfire. The press can also be seasoned like cast-iron skillets to create a non-stick surface.
- 【SAFE-TOUCH ,COMFORT-GRIP WOOD HANDLE】: Wooden handle, has ergonomic design to reduce hand fatigue while ensuring a secure and comfortable grip. Made of natural wood, the handle of meat press is smooth without any burrs, insulate heat transfer that's heat-proof and always remain cool to touch. Firmly attached to the cast iron smash burger press with two screws.
- 【LESS TIME COOKING, MORE TIME EATING】: Healthy cooking, burger smasher for griddle can transfers heat evenly to food when pressing it. At the time it prevents food like bacon from curling, it can also prevents some part will be over cooked, some are still raw. Press out unwanted excess fat and oils from meats for healthy grilling and shorten the cooking time.
- 【PROFESSIONAL TEXTURED DESIGN GROOVED BOTTOM】: Our kitchen grill press is designed to give your meats and sandwiches restaurant quality grill marks, keeps the press positioned, and prevents bacon from curling, ensuring it looks as good as it tastes!
- 【WIDE APPLICATIONS】: Bacon press for griddle is a professional indoor kitchen and outdoor BBQ, camping flat top grill tool. The smash burger press can be used on various surfaces, including grills, griddles, flat tops, teppanyaki, skillets pans, and induction stoves. Ideal for food like bacon, sandwich, burgers, chicken, steak, Paninis.
When to DIY and When to Hire a Pro
DIY is reasonable for the burger technique, an indoor cast-iron setup, and most portable propane griddle use. You can buy the tools, learn the timing, and improve quickly. Keep the unit outdoors, follow the manufacturer’s clearances, manage grease, and store propane correctly.
Hire a pro when the work becomes construction. That includes permanent gas lines, hard-piped natural gas appliances, new exterior electrical circuits, outdoor sinks, drains, roof structures, built-in islands, masonry, countertop fabrication, or any installation where the appliance will be enclosed. A licensed plumber or gas fitter should handle gas-line sizing and pressure testing. A licensed electrician should handle outdoor circuits and GFCI protection. A qualified contractor should coordinate framing, noncombustible materials, ventilation, access panels, drainage, and inspection sequencing.
As builders, our rule is simple: if failure can create fire, gas leakage, water damage, shock risk, or a failed inspection, it is not a casual weekend upgrade. Save DIY energy for cooking, accessories, and movable furniture. Bring in the trades for fixed utilities and assemblies that must meet code.
Independent reader supportYour contribution helps us test, update, and keep practical guides available for everyone.Common Smash Burger Mistakes
The cooking mistakes are easy to fix. The construction mistakes are more expensive.
- Using lean beef: 80/20 ground chuck is the practical baseline. Lean beef dries out faster and browns less aggressively.
- Packing the meat too tight: Loose balls create better texture and crisp edges.
- Cooking on lukewarm metal: If the surface is not hot enough, the burger steams instead of sears.
- Smashing more than once: Smash immediately, then leave it alone until the crust forms.
- Using the wrong spatula: A stiff beveled scraper is the right tool for releasing the crust.
- Crowding the surface: Too many patties drop griddle temperature and create steam.
- Ignoring ventilation: Indoor smoke and aerosolized grease can overwhelm weak hoods and coat cabinets.
- Building around a portable appliance: Freestanding griddles are usually not meant to be enclosed in cabinetry.
- Skipping gas planning: A natural gas line needs BTU sizing, shutoff placement, pressure testing, permits, and inspection.
A Practical Buying Checklist
Before buying equipment, answer these questions. They will tell you whether you need a skillet, a cart, or a construction project.
- How many burgers do you want to cook in one batch: 2, 6, 12, or more?
- Will you cook indoors, on an uncovered patio, under a roof, or inside a screened structure?
- Do you have at least 18 to 24 inches of prep space beside the cooking surface?
- Where will raw meat sit, and where will finished food land?
- How will grease drain, and can the grease cup be removed safely?
- Does the appliance require clearance from combustibles, overhead construction, siding, railing, or cabinetry?
- Is the unit listed for built-in installation, or is it freestanding only?
- If using natural gas, can the existing meter and piping handle the added BTU load?
- Will the work require gas, electrical, plumbing, building, or HOA approval?
- Can the area be cleaned without staining pavers, damaging decking, or carrying grease through the house?
For many homeowners, the sweet spot is a portable 28-inch outdoor griddle with a solid prep table, cover, tools, and good lighting. It keeps smoke outside, handles family batches, and avoids the cost of permanent utility work. For a custom patio or outdoor living project, a built-in cooking station can be excellent, but it should be designed as part of the construction package, not added as an afterthought.
The Bottom Line
A smash burger is not complicated: cold 80/20 beef, hot flat metal, one hard press, good scraping, fast cheese melt, and a soft bun. The difference between an average burger and a great one is heat, timing, and contact.
Also popular on Amazon

- 【FOOD GRADE PRESS & HEAVY-DUTY CAST IRON】: Avoid harmful PTFE or PFOA chemicals that other presses use with our food-grade iron cookware. The Bellman Bacon Press might just be the most indestructible cooking tool you use. Made with heavy-duty cast iron, the press can also be seasoned like cast-iron skillets to create a non-stick surface.
- 【EQUALIZED WEIGHT DISTRIBUTION FOR PERFECT GRILL MARKS EVERY TIME】: Pre-heat your beautiful Firsgrill Press on the pan. Then apply the equalized Heavy pressure to your food of choice for a short time. When you remove it, smile at the beautiful creation you’ve made. Share it with loved ones or have it all to yourself.
- 【LESS TIME COOKING, MORE TIME EATING】: Got people coming over, and want perfect, consistent bacon, quick? The Firsgrill signature iron grill press is 7.08-inch and presses down on your favorite thin meats to make them cook faster and more evenly.
- 【STAY-COOL WOOD HANDLE: THINK SAFE | ACT SAFE | COOK SAFE】: Press and lift without fear or need of cooking gloves. We manufactured our press with a stylish all-cool wood handle. Cook so safe, so easy!
- 【Commercial Grade Accessories for Griddle】 Cast iron flat grill press, they’re used by real griddle masters. HOMENOTE offers you professional chef-level flat top grill accessories for Blackstone so you can make your own restaurant-like cuisine at home.
The difference between an occasional burger night and a dependable home cooking station is design. Plan the workflow, ventilation, grease control, heat-safe surfaces, lighting, utilities, clearances, and permits before you spend serious money. Done right, a smash burger setup is one of the most useful small cooking upgrades a homeowner can make, whether it starts with a $40 skillet or becomes part of a full outdoor kitchen.
Frequently Asked Questions
What makes a smash burger different from a regular burger?
A smash burger starts as a loose ball of ground beef that is pressed hard onto a very hot flat surface. The pressure creates more contact with the metal, giving the patty a thin shape, crisp edges, and a deeply browned crust.
Do these 3 things before closing this tab:
1Scan for outdated or missing drivers - takes under a minute2Repair Windows errors before they cause bigger problems3Fix the driver behind crashes, sound loss and screen glitchesWhat temperature should the griddle be for smash burgers?
A practical target is roughly 425 to 500 degrees Fahrenheit at the cooking surface. The surface needs to be hot enough to brown the beef quickly before the thin patty dries out.
Can you make smash burgers without an outdoor griddle?
Yes. A cast-iron skillet, cast-iron griddle pan, carbon-steel griddle, baking steel, or heavy stainless flat surface can work indoors. The tradeoff is smoke and grease, so strong ventilation is important.
What ground beef is best for smash burgers?
80/20 ground chuck is the usual baseline because it has enough fat for browning, flavor, and moisture. For double burgers, use 2- to 3-ounce balls; for larger singles, use 3 to 4 ounces.
Do you need a permit for an outdoor griddle or outdoor kitchen?
A portable propane griddle usually does not need a building permit, but permanent gas, electrical, plumbing, roof, masonry, or built-in outdoor kitchen work often does. Local rules vary, so check your city, county, and HOA before construction.
How much does it cost to add a gas line for an outdoor griddle?
Many outdoor BBQ or grill gas lines fall around $303 to $1,030, while more complex outdoor-kitchen runs can cost $400 to $2,500 depending on distance, trenching, pipe sizing, BTU load, permits, and meter capacity.
Quick Recap
Product prices and availability are accurate as of the date/time indicated and are subject to change. Any price and availability information displayed on Amazon at the time of purchase will apply.

