Some links on this page are affiliate links: if you buy through them we may earn a commission, at no extra cost to you.
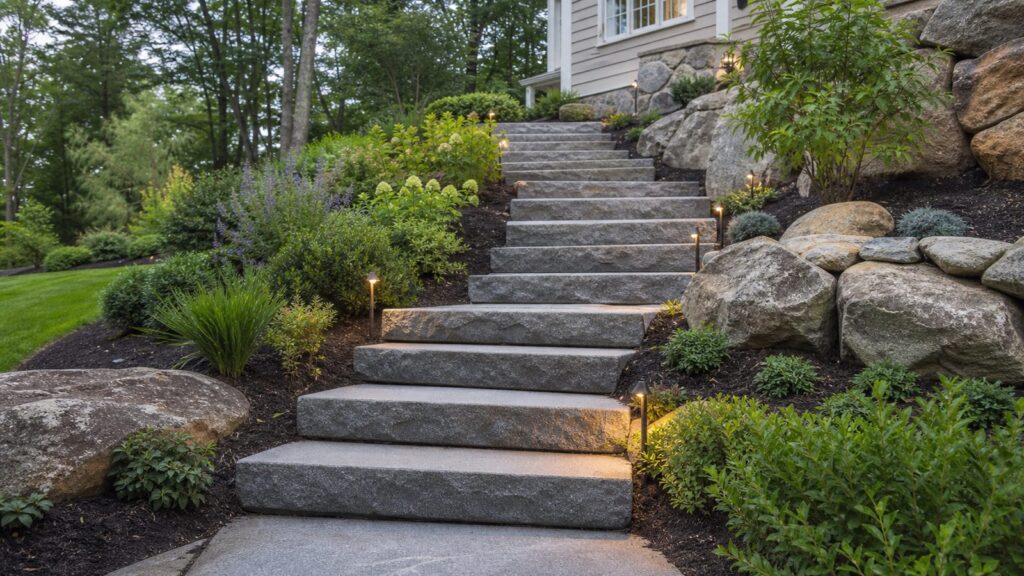
Rock stairs are one of the most durable landscape upgrades you can build, but only when they are treated like a small structural system. The stone is the part everyone sees. The long-term performance comes from the layout, excavation, compacted base, drainage, edge restraint, and consistent stair geometry underneath it.
For a U.S. homeowner planning a 2026 project, professionally installed natural stone steps commonly fall around $300 to $900 per step, with many complete projects landing between $1,500 and $12,000. A simple three-step garden transition may be a few thousand dollars. A front-entry stair or hillside flight with drainage, railings, lighting, retaining walls, or difficult machine access can move into the mid-four to low-five figures.
As an Amazon Associate I earn from qualifying purchases.
On our job sites, the best rock stair installations start with two questions: where is the water going, and how will each stone be supported after years of foot traffic, frost, and soil movement? If those answers are solid, the stair usually performs well. If they are skipped, even expensive stone can settle, rock, pond water, or become a trip hazard.
Start With the Site, Not the Stone
Before choosing granite, bluestone, limestone, fieldstone, or boulder steps, measure the slope and decide what the stair actually needs to do. A decorative path through a garden has different demands than a front-entry stair used every day by family, guests, delivery drivers, and service crews.
#1 Best Overall

- 【Heavy Duty Non-Woven Material】Made from 4oz premium polypropylene non-woven fabric, this geotextile weed barrier fabric offers superior strength, tear resistance, and UV protection. Designed for long-term use, it withstands harsh weather and resists UV damage—ideal for landscaping, gardening, and construction use.
- 【Superior Permeability for Healthy Soil】The needle-punched non-woven structure allows water, air, and nutrients to flow through while blocking sunlight to suppress weeds. This breathable design promotes root health, prevents erosion, and works perfectly as weed landscape fabric, French drain lining, or paver underlayment.
- 【Versatile Multi-Purpose Use】Suitable for a wide range of applications, including landscaping, gardening, French drains, erosion control, driveway underlayment, gravel filtration, retaining walls, and construction projects. Whether you’re creating garden beds or stabilizing paths, this weed blocker fabric heavy duty is engineered to perform.
- 【Easy Installation & Custom Fit】This durable garden fabric weed barrier is easy to handle, cut, and shape to your exact dimensions without fraying. Simply roll it out, trim to size, and secure with garden staples or pegs—perfect for quick setup and minimizing material waste.
- 【Long-Lasting Performance】With high tensile strength, this heavy-duty non woven geotextile fabric resists tearing and withstands heavy loads. Designed to last for years without rotting or degrading, it reduces replacement costs—making it a smart choice for home gardeners, contractors, and farmers alike.
Begin by measuring the total rise, which is the vertical height from the lower grade to the upper landing. Then measure the available total run, which is the horizontal distance you have to work with. Those two numbers determine the step count, tread depth, landing locations, and whether the stair can be comfortable without forcing awkward risers.
A practical landscape stair often uses risers around 6 to 7 inches with deeper treads than an interior stair. Many natural stone slabs are 5 to 8 inches thick, which can work well if the stone thickness, bedding layer, and base elevations are planned together. If the yard is steep and the run is short, you may need landings, a switchback, retaining walls, or a different route instead of forcing tall, uneven steps into the slope.
Quick wins for a faster PC:
Scan for outdated or missing drivers - takes under a minuteDriver Scan →Repair Windows errors before they cause bigger problemsFix Now →We also look at soil type, erosion patterns, downspouts, irrigation overspray, tree roots, and access for machines. A 400-pound stone step is manageable with the right equipment and a clear route. It is a problem if the only path to the backyard is a narrow side gate, a finished patio, or a soft lawn that cannot support a skid steer or compact loader.
Choose the Right Type of Rock Step
Rock stairs can be built from several materials, and the right choice depends on climate, style, traffic, budget, and how precise the finished stair needs to be.
Granite
Granite is dense, strong, and excellent for freeze-thaw climates. It holds up well under heavy foot traffic and is a good choice for front entries, public-facing walkways, and exposed slopes. It is usually more expensive than softer stone, and its weight often requires machine placement.
Bluestone
Bluestone is popular for patios, walkways, and formal landscape steps because it has a clean look and good durability when properly selected. Thermal or textured finishes are better for exterior treads than smooth finishes because wet stairs need traction.
Limestone
Limestone can look refined and may be cost-effective in regions where it is locally available. Material pricing commonly runs about $25 to $50 per linear foot for limestone step material, with average installed stair projects often around $1,300 to $3,250 depending on size and conditions. In harsh freeze-thaw areas, the specific grade and density matter.
Sandstone and Fieldstone
Sandstone and fieldstone can create a natural, rustic stair that blends into gardens and wooded properties. The tradeoff is variability. Irregular thicknesses require more fitting and bedding work, and softer stone can wear faster in high-traffic areas.
Flagstone Slabs
Flagstone can be used for broad, low landscape steps or as tread material over a built base. Thin flagstone is not a substitute for a structural step slab unless it is fully supported. Unsupported corners and hollow spots tend to crack.
Modular Concrete Stone-Look Units
Manufactured step units can be a smart choice when consistency matters. They are usually easier to design around because dimensions are predictable, and many systems have matching wall, landing, and paver components.
Recommended Free Tools
Boulder Steps
Boulder steps can look natural on hillsides, but they are not casual DIY material. Large boulders often cost around $150 to $350 per ton before delivery and placement, and setting them safely requires equipment, judgment, and careful bedding.
Plan the Stair Geometry Before Excavation
Bad stair geometry is hard to fix after the stone is delivered. Before digging, lay out the stair with stakes, string lines, marking paint, or a laser level. Confirm the starting elevation, finished top elevation, tread depth, riser height, and landing locations.
For code-regulated residential stairs, common IRC-style benchmarks include a maximum 7 3/4-inch riser, minimum 10-inch tread, maximum 3/8-inch variation in riser height within a flight, minimum 36-inch stair width, and handrails on stairways with 4 or more risers. Local rules and stair classification can change what applies, especially at front entries, deck connections, multifamily properties, and commercial sites.
For commercial or multifamily egress stairs under IBC-style rules, typical benchmark dimensions include 4- to 7-inch risers, minimum 11-inch treads, clear width often 36 to 44 inches or more depending on occupant load, handrails at 34 to 38 inches high, and 42-inch guards at open sides where required.
Windows Errors? Fix Them Before They Spread
Repair common Windows errors and clear accumulated junk for a smoother, more stable PC - no reinstall needed.Free scan · no reinstallOutdated Drivers Are Slowing You Down
One free scan finds every outdated or missing driver and matches the right update for your exact hardware.Free scan · exact hardware matchEven when a garden stair is not treated as a regulated building stair, these numbers are useful because people walk best on predictable steps. A 6-inch riser followed by an 8-inch riser is not just uncomfortable; it is a trip hazard. Our crews check every finished riser as the stair goes in, not just at the end, because small errors compound quickly.
Rock Stair Cost in 2026
The visible stone is only part of the price. A durable installation also includes layout, excavation, base aggregate, Geotextile fabric where needed, bedding material, compaction, drainage, hauling, equipment, labor, cleanup, and sometimes permits, railings, lighting, or retaining walls.
Nationally, installed stone steps commonly range from about $900 to $12,000 total. Another useful planning range is $300 to $900 per step installed, with premium stone, custom widths, poor access, or engineered work exceeding that. Natural stone paver materials generally run about $8 to $30 per square foot, while bulk gravel and crushed stone commonly average $10 to $50 per ton. Hardscape crew rates often fall around $50 to $120 per hour, varying by region, insurance, equipment, project complexity, and demand.
| Project type | Typical scope | 2026 planning range |
|---|---|---|
| Small garden transition | 2 to 5 stone steps, simple access, limited excavation | $1,500 to $4,500 |
| Standard landscape stair | 5 to 10 steps, compacted base, drainage corrections | $3,000 to $9,000 |
| Front-entry stone steps | Code-aware layout, landing coordination, railings possible | $5,000 to $12,000+ |
| Hillside stair with retaining | Drainage, side walls, erosion control, machine placement | $8,000 to $20,000+ custom |
| Boulder step installation | Large irregular stones, equipment-heavy placement | $300 to $900+ per step installed |
The biggest cost drivers are total rise, number of steps, stair width, stone species, standard versus custom-cut slabs, demolition, haul-off, drainage work, machine access, slope stability, frost-depth requirements, railings, guards, lighting, permits, and engineering. A short stair in an open yard may be straightforward. The same number of steps beside a foundation, on clay soil, with poor drainage and no equipment access is a different project.
Free tools Windows power users keep installed
One-click scans. No signup required.
Build the Base Like It Matters, Because It Does
Most failed stone steps do not fail because the stone was weak. They fail because water softened the soil, the base was too thin, aggregate was not compacted in lifts, or the stone was set directly into dirt.
Rank #2

- MEDIUM DUTY – 4 Ounce Heavy Duty Geotextile – Don’t settle for lighter weights, the 4 ounce is tough and durable, non-woven fabrics are produced to be high-strength
- EASY TO INSTALL – Save time and money, we stock many sizes to cut down on scrap, one single piece cut to exact dimensions
- MADE TO LAST – Will last many years and stands up to the toughest conditions, Superior strength, dimensionally stable, UV/rot resistant
- MANY USES – Can be used for many different projects including Landscaping, Retaining walls, French drains, Underlayment, Erosion Control, Gardening, Riprap filter fabric, Pond underlayment, Construction Projects and More
- SUPERIOR QUALITY – Super Geotextile offers the highest quality products
For many landscape stone steps, each step pad may use 4 to 6 inches of compacted aggregate over prepared subgrade. More demanding sites need more. Hardscape manufacturer guidance for paver-type assemblies commonly calls for geotextile over suitable subgrade, 6 to 14 inches of compacted 3/4-inch crusher-run gravel, and about a 1-inch bedding course. Poor soils, freeze-thaw exposure, concentrated runoff, and heavy stone units push the design toward deeper excavation and a more robust base.
Compaction should happen in thin lifts. A common working rule is to place gravel in about 3-inch layers, and avoid lifts over about 4 inches when using small equipment. A plate compactor or hand tamper cannot properly densify a thick loose layer in one pass. If the base settles later, the tread moves with it.
Geotextile fabric is worth considering when the subgrade is silty, wet, clay-heavy, or likely to pump into the gravel base. The fabric separates soil from aggregate so the base stays clean and free-draining. It is not a magic fix for bad drainage, but it helps the base keep its structure.
Do these 3 things before closing this tab:
1Repair Windows errors before they cause bigger problems2Scan for outdated or missing drivers - takes under a minute3Clear out junk files and repair common Windows errorsThe first step deserves extra attention. We overbuild the bottom pad because movement there can affect the entire flight. The first unit carries the start of the stair and often takes runoff, frost pressure, and foot traffic from both the stair and lower path. If that first stone sinks or tips, the steps above can start to lose alignment.
Drainage Determines How Long the Stairs Stay Put
Outdoor stairs live in the weather. Rain, snowmelt, irrigation, and roof runoff all look for the easiest path downhill. If that path runs under or behind the steps without a controlled exit, the stair can settle, heave, wash out, or become icy.
Each tread should shed water without feeling like it slopes forward. Many installers use about 1/8 inch per foot of pitch as a practical drainage target, adjusted for the site and stone texture. The goal is to prevent ponding while keeping the walking surface comfortable and secure.
Behind and beneath the stone, free-draining aggregate gives water a place to move. On slopes, we often add drainage blankets, perforated pipe where appropriate, and daylight outlets that carry water away from the stair. The outlet matters. A stair should not dump runoff toward a foundation, across a driveway where it can freeze, or onto a neighboring property.
In freeze-thaw climates, drainage is also frost protection. Water trapped in soil expands when it freezes. Dense stone such as granite or high-quality bluestone helps, but the base and drainage are what reduce frost heave. If the site has clay soil, shaded winter exposure, or a history of water sitting after storms, plan for more excavation and better drainage from the start.
Install From the Bottom Up
Rock stairs are usually built from the bottom up so each stone bears on a prepared pad and helps lock the next step into sequence. The basic process is simple in concept, but the execution needs patience.
1. Excavate to the Planned Elevations
Remove organic soil, roots, loose fill, and soft pockets. Topsoil is not a structural base. Dig each step area wide enough for the stone, base material, edge support, and room to work. On hillside projects, excavation may also include side slopes, retaining wall footings, and drainage trenches.
2. Stabilize the Subgrade
Compact the subgrade before placing aggregate. If the soil pumps, ruts, or holds water, stop and address it. That may mean geotextile fabric, deeper excavation, drainage improvements, or professional evaluation.
What’s actually slowing this PC down?
Pick the symptom - the matching free tool is one click away.
3. Place and Compact Aggregate in Lifts
Use a suitable crushed stone or crusher-run base material, not loose round river rock under the structural bearing area. Place it in thin lifts, compact each lift, and check elevations as you go. Round decorative stone can move under load; angular aggregate locks together better.
4. Add a Bedding Course Where Appropriate
A thin bedding layer, often about 1 inch, helps fine-tune the stone elevation. It should not be used to make up for a poorly compacted base. Thick bedding layers can shift and settle.
5. Set Each Stone Fully Supported
Every stone should sit solidly with no rocking and no hollow corners. Large slabs may need small adjustments, lifting straps, clamps, forks, or a machine. Workers should never put hands or feet under a suspended stone.
6. Check Riser, Tread, Level, and Pitch
After each stone is placed, check the rise to the next step, tread depth, side-to-side level, and drainage pitch. Correct errors immediately. Waiting until the whole flight is installed usually means more rework.
7. Backfill and Lock the Edges
Backfill with appropriate aggregate or soil depending on the design, compact carefully, and stabilize the edges. On naturalized stairs, planting can control erosion along the sides. On formal stairs, walls, curbs, or paver borders may provide cleaner restraint.
Do Not Skip Safety Details
Exterior stairs need traction, visibility, predictable dimensions, and safe edges. A beautiful stone stair that is slick in the rain or uneven underfoot is not a successful installation.
Use textured stone for treads. Thermal, flamed, cleft, or otherwise slip-resistant surfaces are better choices than polished or very smooth stone outdoors. This matters most on shaded entries, pool approaches, north-facing slopes, and areas that collect leaves or snow.
Lighting should be planned before the final stones are set. Low-voltage step lights, path lights, or integrated wall lights help people read the stair at night. Conduit sleeves and fixture locations are much easier to place before backfill than after the stair is complete.
The Tool Desk
Outbyte Driver Updater FREEFix the driver behind crashes, sound loss and screen glitchesFind Drivers →Outbyte PC Repair FREEClear out junk files and repair common Windows errorsFree Scan →Handrails and guards are not just finish selections. They affect layout, anchoring, stone drilling, post sleeves, landings, and inspections. For many residential stairways, handrails are commonly required at 4 or more risers. Open sides may need guards depending on height and local code. For front-entry stairs, coordinate the stair with door thresholds, porch landings, snow storage, drainage away from the house, and the existing structure.
Rank #3
- MEDIUM DUTY – 4 Ounce Heavy Duty Geotextile – Don’t settle for lighter weights, the 4 ounce is tough and durable, non-woven fabrics are produced to be high-strength
- EASY TO INSTALL – Save time and money, we stock many sizes to cut down on scrap, one single piece cut to exact dimensions
- MADE TO LAST – Will last many years and stands up to the toughest conditions, Superior strength, dimensionally stable, UV/rot resistant
- MANY USES – Can be used for many different projects including Landscaping, Retaining walls, French drains, Underlayment, Erosion Control, Gardening, Riprap filter fabric, Pond underlayment, Construction Projects and More
- SUPERIOR QUALITY – Super Geotextile offers the highest quality products
Permits and Code: When a Landscape Stair Becomes More Than Landscaping
Permit requirements vary by city and county, but homeowners should not assume every outdoor stone stair is permit-free. A short garden step in a planted bed may be treated differently than a stair serving a required exit, a front door, a deck, a retaining wall, or a significant grade change.
Ask the local building department these questions before work starts:
- Will this stair serve a required entrance or means of egress?
- Does the project connect to a porch, deck, driveway, sidewalk, or public way?
- Are handrails or guards required for the number of risers and height above grade?
- Does the stair include retaining walls, and if so, what wall height triggers a permit or engineering?
- Are there drainage rules for discharging runoff near foundations, sidewalks, or neighboring lots?
- Are there historic district, HOA, zoning, right-of-way, or stormwater requirements?
Some jurisdictions require residential permits for structural work, exterior stairs, retaining walls above certain heights, or work attached to buildings. Others have exemptions for limited landscape work. The safest move is to verify before ordering stone, because changing stair geometry after delivery can be expensive.
When to DIY vs. When to Hire a Pro
A homeowner with good tools, patience, and a small grade change can sometimes build a simple garden stair. A good DIY candidate is a low-risk path with 2 to 4 steps, small stones that can be moved safely, stable soil, no code-regulated entry, no retaining wall, and no drainage problem. Even then, budget for more than stone: gravel, fabric, bedding material, delivery, compactor rental, hand tools, disposal, and extra time.
DIY becomes risky when the stones weigh hundreds of pounds, the stair is used daily, the slope is steep, the soil is wet or clay-heavy, the project touches a house or porch, railings are required, or drainage has to be redirected. Heavy slabs can injure people quickly, and a stair that settles at a front entry can create liability and expensive rework.
Professional installation makes sense for front entries, hillside flights, long stair runs, boulder steps, tight tolerances, poor access, freeze-thaw sites, and any project with retaining walls or permit requirements. A good contractor will plan equipment access, protect surrounding surfaces, build a compacted base in lifts, control drainage, document the hidden work with photos, and coordinate inspections where required.
Maintenance After Installation
Well-built rock stairs do not need much maintenance, but they should not be ignored. Once or twice a year, walk the stair and look for rocking stones, ponding water, washed-out edges, soil erosion, loose railing posts, and vegetation pushing into joints.
Keep leaves, mud, and algae off the treads so the surface stays slip-resistant. In winter climates, use deicing products carefully because some chemicals can damage stone, mortar, concrete, nearby metal, and planting beds. Snow should be cleared in a way that does not pile meltwater where it refreezes on the steps.
If one stone begins to move, address it early. Resetting a single step and improving the base below it is far easier than rebuilding a stair after several units have shifted. Photos of the original base, drainage, and fabric installation are useful for future troubleshooting, which is why we document those stages before backfill.
Pre-Installation Checklist for Better Rock Stairs
Before you approve a rock stair plan, confirm the practical details. The best projects are not vague about dimensions, drainage, or access.
- Measure total rise and run: Confirm the vertical change, available horizontal distance, and desired top and bottom landing elevations.
- Calculate step count: Aim for comfortable, consistent risers, commonly around 6 to 7 inches for landscape use unless code requires otherwise.
- Confirm tread depth: Deep treads are easier to walk on outdoors, especially on garden and hillside stairs.
- Check code triggers: Verify whether the stair serves an entry, deck, public route, or retaining wall condition.
- Pick the right stone: Match stone durability, texture, thickness, and style to the site and climate.
- Plan the base: Specify excavation depth, geotextile fabric, aggregate type, lift thickness, compaction method, and bedding layer.
- Solve drainage: Decide how water moves across, under, behind, and away from the stairs.
- Plan equipment access: Confirm gate widths, ground protection, staging areas, delivery location, and lifting method.
- Coordinate railings and lighting: Locate posts, sleeves, conduits, transformers, and fixtures before final placement.
- Set maintenance expectations: Know how to clean the stone, manage ice, and watch for early movement.
Rock stair installation is not just placing attractive stone into a hillside. Done well, it is a durable hardscape assembly that manages load, water, frost, and daily use. Spend the planning time on layout, base, drainage, and safety, and the finished stairs will feel solid from the first step and stay that way for years.
Frequently Asked Questions
How much do rock stairs cost to install in 2026?
Natural stone landscape steps commonly cost about $300 to $900 per step installed in the U.S. Many full projects range from roughly $1,500 to $12,000 depending on stone type, number of steps, stair width, excavation, drainage, access, railings, retaining walls, and permits.
What is the best stone for outdoor stairs?
Granite and high-quality bluestone are strong choices for freeze-thaw climates and high-traffic areas. Limestone, sandstone, fieldstone, flagstone, modular concrete units, and boulder steps can also work when matched to the site, climate, and intended style.
How deep should the base be under stone steps?
Simple landscape stone steps may use 4 to 6 inches of compacted aggregate at each step pad, but paver-style assemblies and tougher sites often need 6 to 14 inches of compacted 3/4-inch crusher-run gravel plus a thin bedding course. Poor soils, frost, heavy stones, and drainage issues usually require a more robust base.
Do outdoor rock stairs need a permit?
Sometimes. A small garden stair may not require one, but stairs serving an entry, deck, required exit, retaining wall, public route, or significant grade change may trigger local building, zoning, stormwater, or railing requirements. Check with the local building department before ordering materials.
Can I install rock steps myself?
DIY can be reasonable for 2 to 4 low garden steps with small stones, stable soil, and no code or drainage complications. Hire a pro for heavy slabs, front entries, hillside stairs, wet or clay soil, retaining walls, railings, poor access, or any stair where settlement would create a safety issue.
How do you keep stone steps from settling?
Prevent settling by removing organic soil, compacting the subgrade, using geotextile fabric where soils are weak or wet, placing angular aggregate in 3- to 4-inch compacted lifts, setting each stone fully supported, and directing water away from the stair system.
Quick Recap
Product prices and availability are accurate as of the date/time indicated and are subject to change. Any price and availability information displayed on Amazon at the time of purchase will apply.

