The Tool Desk
Outbyte Driver Updater FREEFix the driver behind crashes, sound loss and screen glitchesFind Drivers →Outbyte PC Repair FREEClear out junk files and repair common Windows errorsFree Scan →Some links on this page are affiliate links: if you buy through them we may earn a commission, at no extra cost to you.
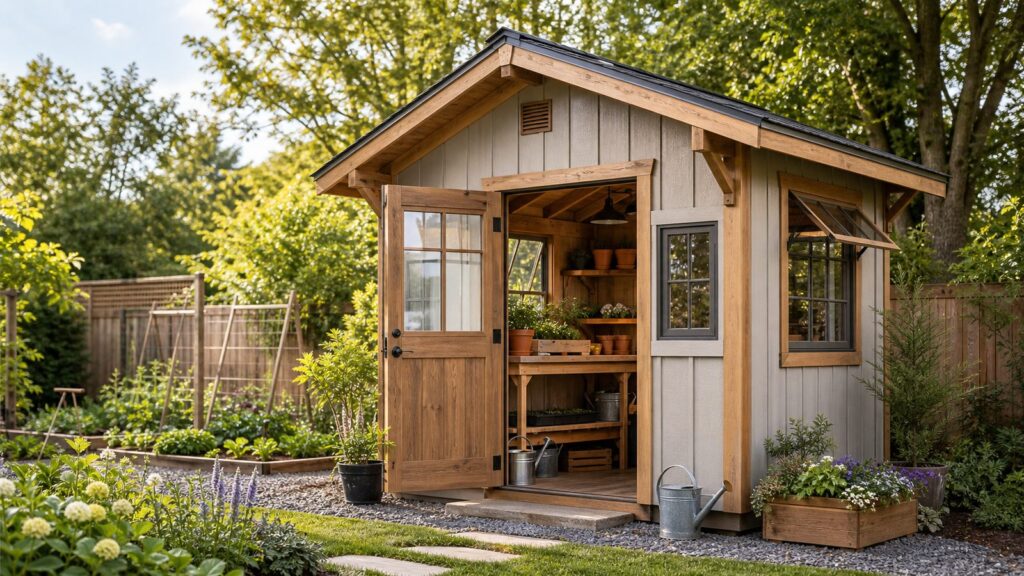
A good potting shed is not just a cute backyard building with a bench inside. It is a small workroom that has to handle soil, water, heat, tools, seed trays, fertilizers, and daily traffic from the garden. The best woodworking plan starts with that reality: build a durable shed shell first, then design the interior around potting work.
For most homeowners, the sweet spot is an 8×10 or 10×12 wood potting shed. A 6×8 works for tight yards and light gardening, but it gets crowded fast once you add a potting bench, soil bins, shelves, and long-handled tools. A 10×12 gives enough room for a 24- to 30-inch-deep bench, a clear aisle, seedling shelves, and dry storage. A 12×16 starts to feel like a true garden workshop and can handle mower storage or greenhouse-style glazing.
In 2026, plan on roughly $800 to $3,500 in DIY materials for a simple 6×8 or 8×10 wood potting shed, depending on siding, roofing, windows, and finish quality. A 10×12 shed commonly lands around $1,200 to $3,000 for DIY kit or material costs, $3,000 to $7,000 for a professionally assembled kit, and $5,500 to $12,000 for a custom contractor-built shed before major upgrades. National shed-cost averages cluster around $3,350 to $3,500, with many installed projects falling between about $1,875 and $8,250. Larger custom work, electrical, concrete slabs, upgraded glazing, cedar, or difficult access can push projects into the $10,000 to $15,000 range or higher.
Do these 3 things before closing this tab:
1Repair Windows errors before they cause bigger problems2Scan for outdated or missing drivers - takes under a minute3Clear out junk files and repair common Windows errorsAs an Amazon Associate I earn from qualifying purchases.
On our job sites, the sheds that last are not necessarily the most elaborate. They are the ones with the right site prep, a dry foundation, a roof that throws water away from the walls, real ventilation, and storage planned before the walls are closed up.
Start With the Floor Plan, Not the Roofline
A lot of potting shed plans begin with a charming elevation. That is fine for inspiration, but it is the wrong place to start construction planning. Start with how you will move through the building.
Popular on Amazon

- Stainless Steel Tabletop: This outdoor potting bench features an easy-clean stainless steel tabletop that wipes away soil, spills, and gardening debris in seconds. Engineered for year-round outdoor use, it stands up to rain, UV rays and extreme weather, and resists warping, cracking, or rotting over time
- Multi-Zone Storage System: This work table features a multi-zone storage design to keep all your gardening supplies neatly organized. The open shelf offers quick access to your frequently used essentials, while the enclosed storage cabinet provides spacious storage for large soil bags, fertilizer buckets and bulky gardening supplies
- Thoughtful Design: This garden work bench features a 32" × 18" wide work platform with a raised edge to contain soil mess and stop gardening tools from falling. Designed at a comfortable 32" universal working height, it minimizes unnecessary bending and hunching, easing back strain during long potting, pruning, and planting sessions
- Stable Outdoor Build: Adjustable leveling feet at the base of this outdoor potting bench easily compensate for uneven patio, lawn, deck or greenhouse surfaces, keeping the unit steady and secure for all your gardening projects
- Versatile Multi-Use Work Station: More than a dedicated potting table for outdoor gardening, this table doubles seamlessly as a patio prep table, outdoor storage cabinet, garage utility workbench, or greenhouse workstation to fit all your indoor and outdoor project needs
A useful potting shed needs four zones: a workbench, wet or dirty storage, dry storage, and a clear path from the door. If the shed will support seed starting, add a fifth zone for shelves near natural light or under grow lights. The door should face the path you already use between the house, garden beds, compost area, and hose bib. If you have to turn a wheelbarrow around a corner every time you bring in soil, the shed will feel wrong from day one.
For most backyard builds, use these planning dimensions:
- Potting bench depth: 24 inches minimum, 30 inches if you regularly handle large pots.
- Bench height: 34 to 38 inches. Match it to the person who uses it most.
- Main aisle: 36 inches preferred, 30 inches minimum for a compact shed.
- Door width: 36 inches is much better than a narrow garden-style door for carts, trays, bags of soil, and small equipment.
- Shelf depth: 10 to 12 inches for seed packets and small supplies, 16 to 18 inches for pots and trays.
- Tool wall clearance: Reserve at least 12 inches of wall depth for hooks, racks, and handles.
A simple and efficient 8×10 layout puts the 36-inch door on one short wall, a 30-inch-deep potting bench along one long wall, tall tool storage opposite the bench, and seedling shelves under the best window. A 10×12 layout can add a second short bench, lidded soil bins, or a rolling cart without making the aisle feel pinched.
Choose the Right Size for the Way You Garden
The right size depends less on yard size and more on what you expect the building to do. A potting shed that only stores hand tools and a few trays can be compact. A shed that also holds bagged soil, pots, fertilizers, hoses, a wheelbarrow, seed-starting gear, and seasonal decor needs more square footage.
| Size | Best Use | Practical Notes | Typical 2026 Cost Range |
|---|---|---|---|
| 6×8 | Compact potting and basic tool storage | Works with one bench and wall storage, but floor space is tight. | About $800-$2,500 DIY materials |
| 8×10 | Most hobby gardeners | Room for a real bench, shelves, tool wall, and clear aisle. | About $1,200-$3,500 DIY materials |
| 10×12 | Comfortable work shed plus storage | Good benchmark size for custom wood builds and kits. | About $1,200-$3,000 DIY kit/materials; $5,500-$12,000 custom built |
| 12×16 | Garden workshop, greenhouse features, mower storage | More likely to trigger permit, foundation, zoning, and electrical questions. | Often $7,500-$15,000+ depending on finish and utilities |
If you are choosing between two sizes and the site allows it, go one size larger. The price difference between an 8×10 and a 10×12 is usually easier to absorb during the first build than the cost and disruption of replacing an undersized shed three years later.
Recommended Free Tools
Check Permits, Zoning, HOA Rules, and Utilities First
Before buying lumber, check four things: building permit thresholds, zoning setbacks, easements, and utility locations. A shed that is small enough to avoid a building permit may still need zoning approval. It may also have to stay a set distance from rear lot lines, side lot lines, fences, septic areas, drainage easements, or other structures.
Permit rules vary widely by city and county. Some jurisdictions exempt small storage sheds under a certain square footage from full building permits. Others still require a zoning review, site plan, anchoring detail, or inspection. Current permit cost ranges are commonly about $50 to $500 for shed permits. If you add electrical, expect another permit in many areas, often around $50 to $200. Some municipalities use flat shed fees; one current example is a $40 shed permit in Nixa, Missouri.
Do not assume a potting shed can be treated like patio furniture. Local rules may address height, roof drainage, distance from property lines, maximum lot coverage, flood zones, wind exposure, snow loads, and whether plumbing or electrical changes the classification. A greenhouse-style wall or roof panel may also raise questions in some jurisdictions, especially if the structure becomes larger, heated, wired, or more permanent.
Call 811 before digging for piers, posts, trenching, or electrical conduit. On professional jobs, we want utility marking complete before layout stakes go in. Moving a shed location on paper costs nothing. Moving it after concrete is poured is expensive.
Pick a Foundation That Keeps Wood Dry
The foundation is where many shed plans are too casual. A potting shed lives with water, wet pots, damp soil, and splashback. If the floor framing sits too close to grade or the site drains toward the structure, rot starts early.
Also popular on Amazon

- Premium Fir Wood: Made from sturdy, high-quality fir wood, this outdoor potting bench is safe for handling herbs and vegetables. Its stable surface and smooth touch blend naturally into garden surroundings, offering a comfortable, durable workspace for all your gardening tasks
- Spacious Worktop & Enclosed Storage: This potting bench includes a 44 × 17.5in metal-covered tabletop supporting up to 220 lb for gardening tasks. A roomy drawer and enclosed cabinet provide storage, with each shelf holding 88 lb to keep your supplies neatly organized
- Metal Top, Effortless Cleaning: The metal tabletop of this garden potting table resists water and stains, making cleanup easy after potting. Its sturdy surface holds heavy flowerpots, soil bags, and gardening tools with ease
- Attentive Details: This potting bench is made for a smooth gardening workflow. Three side hooks keep tools or bags within reach, raised tabletop edges prevent items from slipping, and the elevated shelf provides extra space without crowding your workspace
- Easy Assembly: This garden potting table requires assembly, but illustrated instructions and an included accessory kit make it straightforward. Most setups take about 1 hour and two people. Check all components and accessories before starting
For small and medium wood potting sheds, the most common foundation options are compacted gravel with pressure-treated skids, concrete blocks, concrete piers, and poured slabs. The best choice depends on soil, slope, frost depth, shed size, budget, and whether the shed will be anchored for wind.
| Foundation | Typical Materials Cost | Best For | Watch Outs |
|---|---|---|---|
| Compacted gravel pad with skids | About $100-$400 | 6×8, 8×10, many 10×12 sheds on well-drained sites | Needs excavation, fabric, proper compaction, and a pad larger than the shed footprint. |
| Concrete blocks | About $200-$600 | Small sheds on level sites | Blocks set directly on soil can settle and twist the frame. |
| Concrete piers | About $300-$800 | Sloped sites, frost areas, stronger anchoring | Requires accurate layout and depth appropriate to local frost conditions. |
| Poured concrete slab | About $800-$2,500 for a standard shed footprint | Heavier sheds, mower storage, high-use workrooms | Costs more and must be sloped or detailed so water does not sit at wood walls. |
For many backyard potting sheds, a properly built gravel pad is the best value. We typically want the pad to extend 12 inches beyond the shed on all sides, with geotextile fabric under compacted crushed stone. The finished pad should sit above surrounding grade and shed water away from the building. Do not place untreated framing directly on soil. Use pressure-treated skids or ground-contact-rated lumber where wood is close to grade.
If you choose a slab, detail the bottom of the walls carefully. Keep siding above concrete, use sill sealer where appropriate, and avoid trapping water against sheathing. A slab can be excellent for cleaning and durability, but a flat slab with poor edge detailing can rot a wood shed faster than a well-drained gravel base.
Build the Shell Like a Small House
A potting shed does not need the complexity of a house, but it benefits from the same discipline: straight framing, good sheathing, drainage planes, flashing, roof overhangs, and proper fasteners. The woodworking plan should show more than wall dimensions. It should identify lumber sizes, spacing, sheathing thickness, siding type, roof pitch, rafter or truss layout, door rough opening, window rough openings, and anchoring details.
A practical wood-framed potting shed specification might include 2×4 wall studs at 16 inches on center, pressure-treated 2×6 floor joists at 16 inches on center, 3/4-inch tongue-and-groove plywood subfloor, 7/16-inch wall sheathing where structural sheathing is needed, and 1/2-inch roof sheathing. In higher snow or wind zones, those assumptions may change. Local code and span tables matter.
For exterior durability, prioritize these details:
- Roof overhangs: 8 to 12 inches helps keep rain off doors and siding.
- Drip edge: Use it at eaves and rakes under the roofing system.
- Flashing: Flash windows, doors, horizontal trim, greenhouse panels, and any roof-to-wall intersections.
- Siding clearance: Keep siding off grade and away from standing water.
- Back-priming: Prime cut edges and the backs of wood trim or siding when the product calls for it.
- Fasteners: Use exterior-rated galvanized, stainless, or manufacturer-approved coated fasteners.
Common siding choices include T1-11 plywood siding, LP-style engineered panels, fiber cement, cedar, and board-and-batten assemblies. T1-11 is economical and straightforward, but it needs proper paint and edge protection. Engineered wood siding performs well when installed per manufacturer instructions. Cedar looks good and handles outdoor use well, but costs more and still needs finish maintenance. Fiber cement resists rot but is heavier and less forgiving for a casual DIY build.
Plan Daylight, Ventilation, and Heat Control Together
A potting shed needs bright task light, but too much unvented glass can turn it into a plant oven. Treat windows, skylights, and polycarbonate panels as a system with ventilation.
At minimum, include one operable window and a second source of cross ventilation, such as another window, wall vent, gable vent, or vented door panel. Better sheds use both low and high ventilation. Low vents bring cooler air in. High vents, ridge vents, gable vents, or operable transom windows let hot, humid air escape. This reduces heat buildup, mildew, condensation, and odors from stored garden products.
If you add greenhouse-style wall or roof panels, use UV-rated polycarbonate, not random clear plastic panels. Follow the panel manufacturer’s fastening rules for expansion, closure strips, washers, and edge sealing. Polycarbonate moves with temperature changes. If it is fastened too tightly or without the right washers, it can crack, leak, or distort.
Also popular on Amazon

- Premium Stainless Steel Worktop: Unlike traditional wooden or galvanized tabletops, the stainless steel work surface is more durable, easier to wipe clean, and better suited for messy gardening tasks, outdoor prep, and everyday use.
- Raised-Edge work surface Design: Protective raised edges help gardening tools, pots, and accessories securely on the tabletop during use, while the elevated rear edge helps reduce water runoff behind the workstation during cleanup.
- Large Enclosed Storage Cabinet: Integrated cabinet provides approximately 50 gallons of organized storage space for potting soil, gardening tools, fertilizers, outdoor accessories, and more - helping keep your outdoor area tidy and clutter-free.
- Adjustable Shelf & Removable Hutch: Features a flexible storage system with an adjustable interior shelf and detachable upper hutch, allowing you to customize the workspace for tools, supplies, planters, or decorative items.
- Multi-Purpose Outdoor Workstation: Built with adjustable feet for enhanced stability on uneven patios, decks, balconies, or garden areas. designed for gardening, outdoor prep, utility storage, and a variety of outdoor projects.
Place windows based on how you work. A window directly over the potting bench gives excellent light but can limit upper shelving. A window beside the bench leaves more wall storage. South and west glazing can overheat quickly in warm climates, so consider exterior shade, roof overhangs, blinds, or fewer clear panels on those elevations. North light is softer and more consistent for many workspaces.
Use Materials That Tolerate Moisture and Dirt
Potting work is hard on finishes. Soil spills, damp trays, clay pots, fertilizer dust, and hose spray will quickly expose weak materials. The goal is not to make the shed precious. The goal is to make it easy to clean and difficult to damage.
For floors, use pressure-treated framing and a durable walking surface. A plywood floor should be exterior-rated and sealed, painted, or covered with a rugged coating. Some homeowners add rubber mats in the work zone, but do not trap moisture underneath permanently. If the shed sits on a slab, use a broom-finished or lightly textured surface so it is not slippery when wet.
Around the potting bench, use washable wall surfaces. Painted plywood, PVC sheet goods, fiber-reinforced panels, or sealed beadboard can work depending on the look and budget. We like lighter surfaces near the bench because they improve visibility and make pests, mildew, and spills easier to see. Lower wall areas near soil bags and tools can be darker or more scuff tolerant.
For benches, use cedar, pressure-treated lumber with a suitable barrier or finish, exterior plywood with a sealed top, stainless hardware cloth over a soil-catching tray, or a replaceable work surface. A 30-inch-deep bench with a lower shelf is more useful than a shallow decorative table. Leave space for a trash bin, compost bucket, or soil tub underneath.
Keep dry storage away from condensation zones. Seed packets, labels, twine, hand tools, and fertilizers should be off the floor in sealed bins, drawers, or cabinets. Do not stack bagged soil directly against exposed framing. It holds moisture and blocks airflow.
Quick wins for a faster PC:
Fix the driver behind crashes, sound loss and screen glitchesFind Drivers →Clear out junk files and repair common Windows errorsFree Scan →What a Complete Woodworking Plan Should Include
A good potting shed woodworking plan should do more than show a perspective drawing and a cut list. It should help you estimate cost, order materials, frame safely, and avoid moisture problems.
At minimum, look for these plan components:
- Scaled floor plan with door, windows, bench, shelves, and storage zones.
- Foundation plan showing pad size, skids, blocks, piers, or slab dimensions.
- Floor framing plan with joist size, spacing, rim boards, skids, and anchoring.
- Wall framing elevations with rough openings and header sizes.
- Roof framing plan with pitch, rafter lengths, overhangs, fascia, and sheathing.
- Separate material lists for framing lumber, sheathing, siding, roofing, trim, fasteners, connectors, windows, door hardware, ventilation, bench materials, shelving, and foundation materials.
- Flashing and water-management notes for doors, windows, roof edges, and glazing panels.
- Interior blocking locations for shelves, hooks, fold-down benches, hose reels, and cabinets.
- Finish schedule for primer, paint, stain, caulk, and exposed cut ends.
Blocking is one of the easiest upgrades to miss. Before sheathing the inside, add 2x blocking where future shelves, hooks, tool racks, cabinets, hose reels, and fold-down benches will attach. Fastening heavy shelves into thin sheathing alone is a weak long-term plan, especially when pots and soil are involved.
Cost Breakdown for a 10×12 Potting Shed
A 10×12 shed is a useful benchmark because it is large enough to function well but still manageable in many backyards. The following budget is a planning range, not a bid. Local labor, access, material choices, and code requirements can move the numbers quickly.
Also popular on Amazon

- Natural Wood Build: Crafted from non-deformable fir wood, the wood plant workstation offers reliable strength and lasting durability while bringing a warm, timeless look to your patio, porch, lawn, or backyard setting.
- Smart Storage Layout: The gardening workstation includes a top shelf, 3 hanging hooks and a spacious tabletop, so pots, soil, gloves, and tools stay neatly arranged and easier to access during busy gardening sessions. Plus, the 3-tier cabinet with removable shelves offers flexible storage solution.
- Easy-to-clean Work Surface: The stainless steel surface on the outdoor work bench handles potting, transplanting, watering, and other messy tasks with easier cleanup than standard wood tops. In addition, 3-sided guardrails help keep supplies from sliding off.
- More Thoughtful Details: The secure latch of the outdoor storage cabinet offers added protection, while the ventilated louvered doors helping keep stored items dry. Furthermore, adjustable foot pads help the unit remain steady in both indoor and outdoor spaces.
- Multipurpose Design: With ample storage space, this garden potting bench table works beautifully as a planting station, outdoor serving table, plant display stand, or practical organizer for everyday essentials.
| Cost Item | Budget Range | Notes |
|---|---|---|
| Foundation | $100-$2,500 | Gravel pad at the low end, poured slab at the high end. |
| Framing lumber and sheathing | $900-$2,200 | Varies with lumber grade, floor framing, roof design, and sheathing thickness. |
| Siding and trim | $500-$2,000 | T1-11 or engineered panels cost less than cedar or custom board-and-batten. |
| Roofing | $300-$1,500 | Asphalt shingles are economical; metal costs more but performs well. |
| Door, windows, vents | $500-$2,500 | Operable windows, skylights, and polycarbonate panels raise cost. |
| Bench, shelves, interior finish | $250-$1,500 | Depends on cabinets, work surfaces, bins, and wall finish. |
| Paint, stain, caulk, fasteners | $250-$900 | Exterior-rated fasteners and sealants are worth using. |
| Permits | $50-$500+ | Electrical permits may add $50-$200 in many areas. |
For a basic DIY 10×12, many homeowners can keep the shell in the $1,200 to $3,000 range if they use a simple plan, economical siding, asphalt shingles, and a gravel base. A more polished custom build with better windows, upgraded siding, a slab, built-in benches, painting, and professional labor commonly reaches $5,500 to $12,000. If you add electrical, water, custom greenhouse glazing, metal roofing, or sitework on a slope, the budget can climb further.
Free tools Windows power users keep installed
One-click scans. No signup required.
For contractor-built sheds, expect many custom projects to price around $45 to $100 per square foot, with high-end details exceeding that. Ask for line-item pricing for the foundation, shed shell, glazing or windows, electrical, interior benches and shelving, paint, permits, and site cleanup. Line items make it much easier to compare a kit, a custom build, and a hybrid approach where you do the interior fit-out yourself.
Independent reader supportYour contribution helps us test, update, and keep practical guides available for everyone.When to DIY and When to Hire a Pro
A potting shed is a reasonable DIY project for an experienced homeowner who can read plans, frame square walls, install roofing safely, flash openings correctly, and manage site prep. A simple 6×8 or 8×10 shed on a level gravel pad is the best DIY candidate. Two capable people can often frame a small shed shell over two or three weekends, with additional time for roofing, siding, paint, benches, and shelves.
Hire a pro, or at least bring one in for specific portions, when the project includes a poured slab, steep grade, retaining work, complex roof framing, large custom doors, greenhouse glazing, electrical, plumbing, or strict HOA requirements. Also get professional help in snow, high-wind, coastal, or flood-prone areas where anchoring and structural loads are not generic.
Electrical deserves special respect. Outdoor circuits, buried feeders, GFCI protection, conduit, disconnects, damp-location fixtures, and permits are not casual add-ons. If you want lights, outlets, a heat mat station, a small fan, or a mini fridge for garden use, plan the wiring early and use a licensed electrician where required. Retrofitting conduit after the shed is finished usually costs more and looks worse.
Outdated Drivers Are Slowing You Down
One free scan finds every outdated or missing driver and matches the right update for your exact hardware.Free scan · exact hardware matchPC Slower Than It Used to Be?
A free scan shows the junk files, broken settings and background clutter dragging Windows down - then fixes them in one click.Free scan · Windows 10 & 11Water is similar. A hose bib outside the shed is often simpler and safer than plumbing a sink inside. If you do add a sink, think through supply shutoff, drainage, winterization, and whether the wastewater can legally discharge where you intend. Potting soil and drain lines are not a friendly combination.
Common Mistakes That Shorten Shed Life
The most expensive potting shed mistakes usually happen before the first wall goes up. Poor site choice, weak drainage, and ignored permit rules can cost more than any interior upgrade.
Avoid these problems:
- Starting from a free plan before checking setbacks, easements, HOA rules, utility lines, and permit thresholds.
- Building directly on soil or on loose blocks that settle after the first wet season.
- Skipping compaction under gravel pads, especially on clay or sloped sites.
- Using untreated lumber near grade or interior-grade fasteners outdoors.
- Choosing a narrow door or high threshold that makes carts and soil bags awkward.
- Adding glazing without ventilation or shade, causing seedlings to overheat.
- Forgetting roof overhangs, drip edge, flashing, gutters, or splash control.
- Storing wet soil against framing or keeping dry supplies in condensation-prone areas.
- Adding electrical without permits, GFCI protection, and weather-appropriate materials.
- Skipping interior blocking, then relying on thin sheathing to hold heavy shelves.
On our crews, we treat water as the main opponent. If the grade slopes away, the roof throws water clear, the openings are flashed, the siding is kept off splash zones, and air can move through the building, the shed has a much better chance of aging well.
A Practical Build Sequence
A clean sequence reduces rework. For a typical wood potting shed, use this order:
What’s actually slowing this PC down?
Pick the symptom - the matching free tool is one click away.
Also popular on Amazon

- Your Mobile Multi-Purpose Hub: Move this outdoor storage cabinet on four smooth castors (two lockable) around your patio, garden, or backyard. The durable, easy-clean metal top handles potting, outdoor cooking, flower arranging, or DIY projects—one station, endless possibilities
- Spacious Metal Platform: This rolling potting bench features a spacious 34.3″ L × 15.2″ W platform with 2.6″ raised, anti-falling edges. Covered with a water-resistant galvanized metal sheet, it provides ample space for transplanting, pruning, and organizing, while being easy to clean and maintain
- Generous Storage: This garden potting bench features two closed tiers of shelves, offering ample storage space for long-handled tools, lawn care equipment, watering cans, shovels, flower pots, and more. Keep your gardening essentials organized and easily accessible
- Green Materials, Natural Beauty: This patio wooden workstation is made from solid fir, prized for strength, stability, and natural scent. The surface preserves wood grain and knots, making each piece unique—your companion as plants grow
- Removable Shelf, Flexible Space: Need more room for your gardening tools? Simply remove or adjust the middle shelf to create a generous, customizable space for your accessories, offering you the flexibility to organize as needed
- Confirm zoning, permits, HOA rules, and utility locations.
- Choose the site based on drainage, access, sunlight, and garden workflow.
- Lay out the footprint and verify door swing, path width, and setbacks.
- Build the gravel pad, pier layout, block base, or slab.
- Frame and square the floor system using pressure-treated material where required.
- Frame walls with rough openings for the door, windows, vents, and any glazing panels.
- Add blocking for benches, shelves, hooks, cabinets, and future accessories.
- Frame the roof, install sheathing, underlayment, drip edge, and roofing.
- Install windows, doors, vents, siding, trim, and flashing.
- Prime, paint, stain, and seal exposed edges.
- Build the potting bench, shelves, bins, racks, and washable wall surfaces.
- Install code-compliant electrical or water features if included in the approved scope.
For a small DIY shed, plan realistically. Site prep can take one full day. Foundation work may take one to two days depending on excavation and compaction. Framing and sheathing can take a weekend with help. Roofing, siding, trim, paint, and interior fit-out can easily add two to four more weekends. A professional crew can compress that timeline, but weather, inspections, material lead times, and concrete curing still matter.
Final Planning Advice
The best potting shed woodworking plan is specific to your yard, not just your taste. Start with the work: where soil enters, where trays sit, where water comes from, where tools hang, where wet items dry, and how air moves through the space. Then size the building, select the foundation, and choose materials that can survive moisture.
If you are building from plans, do not buy on appearance alone. Look for real framing details, foundation guidance, flashing notes, material lists, and dimensions that match how you garden. If you are hiring a contractor, ask for a written scope that separates foundation, framing, siding, roofing, windows, electrical, interior build-out, finish, and permits. That is the clearest way to compare options and avoid paying custom prices for a vague shed.
A potting shed does not need to be oversized or overbuilt. It does need to be dry, ventilated, washable, sturdy, and easy to work in. Get those parts right, and the shed becomes a daily garden tool instead of another place where things pile up.
Frequently Asked Questions
How much does it cost to build a potting shed in 2026?
A simple DIY 6×8 or 8×10 wood potting shed commonly costs about $800 to $3,500 in materials. A 10×12 shed may run about $1,200 to $3,000 for DIY kit or material costs, $3,000 to $7,000 for a professionally assembled kit, and $5,500 to $12,000 for a custom contractor-built version before major upgrades.
Do I need a permit to build a backyard potting shed?
Possibly. Many areas exempt small sheds from full building permits, but zoning approval, setbacks, easements, HOA rules, height limits, and utility clearances may still apply. Shed permits often cost about $50 to $500, and electrical permits may add another $50 to $200.
What is the best size for a potting shed?
An 8×10 shed is a good size for many hobby gardeners. A 6×8 is compact but tight. A 10×12 gives more comfortable room for a bench, shelves, tool storage, and soil bins. A 12×16 works when you want greenhouse glazing, mower storage, or a true garden workshop.
What foundation is best for a wood potting shed?
For many small and medium sheds, a compacted crushed-stone pad with pressure-treated skids is the best value. It drains well, costs roughly $100 to $400 in materials, and keeps wood off wet soil. Concrete piers or slabs are better for larger sheds, sloped sites, heavier equipment, or local anchoring requirements.
Can a potting shed have electricity or water?
Yes, but plan it early. Outdoor electrical work may require buried feeder lines, conduit, GFCI protection, damp-location fixtures, and permits. Water can be as simple as a nearby hose bib, while an interior sink requires supply, drainage, winterization, and code review.
How do I keep a potting shed from overheating or getting moldy?
Use both high and low ventilation, such as operable windows, gable vents, soffit or ridge ventilation, or vented door panels. Avoid too much unshaded south or west glazing, use UV-rated polycarbonate when adding greenhouse panels, and keep wet soil and supplies away from wall framing.
Quick Recap
Product prices and availability are accurate as of the date/time indicated and are subject to change. Any price and availability information displayed on Amazon at the time of purchase will apply.

