Windows Errors? Fix Them Before They Spread
Repair common Windows errors and clear accumulated junk for a smoother, more stable PC - no reinstall needed.Free scan · no reinstallCrashes, No Sound, or Screen Glitches?
Random freezes, missing sound and display glitches usually trace back to one bad driver. Find and replace yours safely.Free scan · under a minuteA kitchen sink drain looks simple from above: one opening, one strainer, one pipe disappearing into the cabinet. Under the sink, the details matter. A good drain installation keeps sewer gas out of the house, clears water quickly, stays serviceable, and does not leak when someone dumps a full basin of hot dishwater all at once.
For a homeowner, this is often a realistic DIY project if you are replacing a like-for-like basket strainer, tailpiece, and P-trap. It becomes a plumber job when the wall drain height is wrong, the trap arm or vent has to move, old galvanized or cast-iron pipe starts crumbling, or you are adding a garbage disposal or dishwasher connection that changes the layout. On our job sites, we treat sink drains as small plumbing assemblies, not loose parts. Everything has to line up before the first bead of putty goes under the flange.
This guide walks through the right way to install a kitchen sink drain, what parts to buy, what costs to expect in 2026, where homeowners most often create leaks, and when to stop before a small cabinet repair becomes a wall-opening plumbing correction.
What a Kitchen Sink Drain Assembly Includes
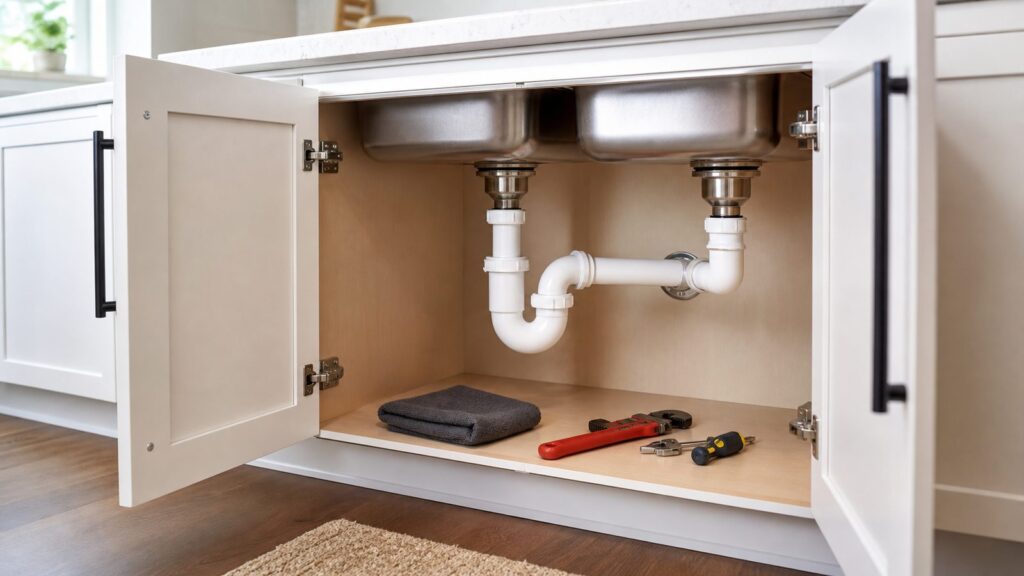
A standard kitchen sink drain assembly includes the visible basket strainer or disposal flange at the sink, the rubber gasket and friction washer below it, a locknut, a tailpiece, slip-joint nuts and washers, a P-trap, a trap arm, and the wall adapter at the drain stub-out. Most modern kitchen sink drain piping under the cabinet is 1-1/2 inch tubular plastic or brass. The sink opening for the basket strainer is commonly about 3-1/2 to 4 inches, but you should confirm the sink and strainer specs before buying parts.
#1 Best Overall

- New design, Easy to install, J-bend can be adjusted for extend and bend.
- Perfect for upgrading kitchen and bathroom sink fixtures, ensuring seamless functionality and style.
- Comparable in quality to products found in your neighborhood supermarket, guaranteeing reliability and durability.
- Engineered to prevent any leaks when installed correctly, providing peace of mind and hassle-free maintenance.
- Versatile inlet design, accommodating both 1.5" and 1.25" tailpieces with included TPE washers for a secure fit.
The P-trap is not optional. It holds a small amount of water that blocks sewer gas from coming back through the sink. Under IPC-style plumbing rules, the typical trap seal depth is 2 to 4 inches, and the trap must be vented so normal drainage does not siphon that seal dry. If you see an old S-trap dropping straight down through the cabinet floor, that is not a layout to copy. It may drain, but it can self-siphon and leave the kitchen smelling like the sewer line.
For a single-bowl sink without a disposal, the layout is usually straightforward: basket strainer, tailpiece, P-trap, trap arm, wall connection. For a double-bowl sink, you normally use a continuous-waste kit or center-outlet/end-outlet kit that combines both bowls into one P-trap. In most kitchens, two separate traps under a double sink are the wrong answer unless the local code and rough-in are specifically designed for that arrangement.
Kitchen Sink Drain Installation Cost in 2026
If you are only replacing the drain assembly and the wall connection is already correct, the parts cost is usually modest. A basic plastic P-trap kit, tailpiece, extension tube, washers, and a standard basket strainer can often land in a low two-figure to low three-figure materials budget. Premium brass strainers, disposal flanges, special adapters, and full tubular rebuilds cost more, but the job is still relatively small compared with replacing a sink, faucet, countertop, or concealed piping.
Professional pricing depends on scope. Current 2026 cost data puts a drain-only professional installation around $344 to $431 per kitchen sink drain assembly. Broader sink installation commonly runs $216 to $663 for many standard professional installs, while larger kitchen sink projects with materials and labor often fall around $280 to $1,400. Pipe replacement under a kitchen or bath sink can add about $100 to $350 or more. Master plumber labor is often cited around $100 to $200 per hour, and service-call fees commonly run $150 to $250 before emergency premiums.
What’s actually slowing this PC down?
Pick the symptom - the matching free tool is one click away.
| Project scope | Typical 2026 US cost | What is usually included |
|---|---|---|
| DIY drain-only replacement | Low two figures to low three figures | Basket strainer, 1-1/2 in. P-trap kit, tailpiece, washers, putty or silicone, adapters |
| Professional drain-only install | $344 to $431 per assembly | Like-for-like kitchen sink drain assembly installation without major layout changes |
| Standard professional sink install | $216 to $663 | Varies by sink type, labor, removal, faucet or drain work, and local market |
| Broader kitchen sink project | $280 to $1,400 | Sink, labor, drain, faucet, disposal, countertop fit, or other add-ons |
| Under-sink pipe replacement add-on | $100 to $350+ | Replacing damaged, corroded, or mismatched drain piping |
The biggest cost escalators are not the shiny parts. They are layout conflicts. A deeper undermount sink can leave the disposal outlet or tailpiece too low for the existing wall stub-out. Switching from single-bowl to double-bowl can require a new continuous-waste layout. Adding a dishwasher drain or garbage disposal can expose bad venting, wrong trap height, or old pipe that breaks when touched. In high-cost metro areas, labor and trip charges can move the final number quickly.
Tools and Materials You Need
Before taking anything apart, photograph the existing plumbing from several angles. Measure the sink depth, drain centerline, disposal outlet height if present, and the height from the cabinet floor to the wall stub-out. Bring those measurements when buying parts. Guessing under-sink plumbing parts is how homeowners end up with three trips to the store and one joint forced into tension.
Parts
For most drain-only installations, you will need a basket strainer assembly or disposal flange matched to the sink opening, a 1-1/2 inch tubular P-trap kit, trap arm or wall tube, tailpiece, extension tube if needed, slip-joint nuts, beveled washers, and reducing washers or adapters if the wall connection differs from the tubular size. For a double-bowl sink, use a continuous-waste kit or a center-outlet/end-outlet kit. If a dishwasher is connected without a disposal, you may need a branch tailpiece. If a dishwasher drains into a disposal, confirm the disposal inlet is open before reconnecting the hose.
Sealants and Hand Tools
Use plumber’s putty for compatible stainless or metal drain flanges unless the sink or drain manufacturer calls for silicone. Use 100 percent silicone or stain-free putty where required for stone, acrylic, ABS, plastic, or stain-prone materials. Standard plumber’s putty can stain porous stone and may be incompatible with some plastics.
Keep a bucket, towels, sponge, plastic scraper or putty knife, adjustable pliers, tongue-and-groove pliers, a basket strainer wrench or spud wrench, screwdriver, tape measure, marker, utility knife or tubing cutter, and a flashlight nearby. A dry paper towel or tissue is also one of the best leak-detection tools after assembly.
Before You Start: Check Layout, Code, and Permits
Like-for-like replacement of drain trim or accessible tubular parts may not need a permit in many jurisdictions. Moving a drain line, changing DWV piping inside the wall, adding a fixture, altering venting, or correcting an illegal trap commonly does. Permit rules are local. New York City, Michigan, and many other jurisdictions draw lines between minor replacement work and regulated plumbing alterations. If the work changes the sanitary drainage or vent system, call the local building department or hire a licensed plumber.
Rank #2

- Made of PVC for easier cutting and glue applications
- Super nuts feature full sized wings and longer threads
- Includes marvel connector
- Item is bagged
- Available in white or black polypropylene
From a practical standpoint, check four things before disassembly. First, the wall stub-out should be low enough that the tailpiece can drop into a P-trap and the trap arm can slope gently toward the wall. Second, the trap should meet the tailpiece naturally without flexing parts into place. Third, the trap must remain accessible and removable. Fourth, the assembly should not rely on flexible accordion pipe to solve misalignment. Accordion drains collect grease and debris, are harder to clean, and may violate local plumbing code.
Kitchen sinks are commonly treated as 2 drainage fixture units under IPC-style sizing tables, but local amendments can differ. For the under-sink portion, 1-1/2 inch tubular components are the normal residential kitchen size. Do not reduce the drain size just because it makes a kit fit.
Step-by-Step: How to Install a Kitchen Sink Drain
1. Shut Down the Work Area and Remove the Old Drain
Clear the cabinet and place a bucket under the trap. If there is a disposal, switch off power at the circuit or unplug it. Loosen the slip-joint nuts by hand or with pliers, then remove the trap and tailpiece. Expect water in the trap. If the nuts are seized, work slowly. Old metal tubular parts can crumble, and old wall adapters can crack if twisted hard.
Remove the basket strainer locknut from below the sink. A basket strainer wrench helps hold or turn the assembly. Once the nut, friction washer, and rubber gasket are off, push the strainer up through the sink opening. Scrape away old putty, mineral scale, and oil until the sink surface is clean and dry. This cleaning step is where many leak-free installations are won.
2. Dry-Fit the New Drain From the Wall and the Sink
Before using putty or silicone, assemble the drain loosely. Start from the wall stub-out outward, then from the sink tailpiece downward. The trap bend should sit directly below or near the tailpiece, and the trap arm should run toward the wall without a backward slope. Slip-joint washers should face the correct direction, with the beveled side toward the mating pipe.
Cut tailpieces or extension tubes only after confirming the trap position. Leave enough pipe inserted into slip joints for a solid connection, but do not bottom parts out so tightly that there is no adjustment. If a disposal outlet is lower than the wall drain, stop. Water will not climb uphill through a trap arm. The correct repair may be lowering the wall drain, changing the sink or disposal arrangement, or reworking the rough plumbing.
Quick wins for a faster PC:
Repair Windows errors before they cause bigger problemsFix Now →Scan for outdated or missing drivers - takes under a minuteDriver Scan →Clear out junk files and repair common Windows errorsFree Scan →3. Set the Basket Strainer or Disposal Flange
For a standard basket strainer, roll plumber’s putty into an even rope and place it under the flange. Press the strainer squarely into the sink opening from above. From below, install the rubber gasket, then the cardboard or friction washer, then the locknut. The rubber gasket belongs below the sink, not above it. The friction washer helps the locknut tighten without twisting and distorting the gasket.
Rank #3

- One-stop Installation and Great Time Saver: The 1-1/2" sink trap kit is designed for easy installation , which includes all the needed parts and sink drain pipes to install or repair your kitchen sink drain, you don't have to spend much time fumbling around in the store, plumbing department trying to find the right thing,making it a user-friendly solution for all your kitchen sink drainage worries.
- Universal Compatibility kitchen sink drain kit: This kitchen sink plumbing kit includes all essential tubular parts to remove guesswork during repairs or modifications. The kitchen sink drain pipe are designed for easy installation by homeowners and PROs, allowing configuration as P trap kit, S trap drain kit, end outlet waste, center outlet waste, or washing machine trap. Fits most sink drains with standard 1 1/2" drain pipes, whether connecting to wall or floor drainage systems.
- Budget-Friendly Drain Solution:This sink plumbing kit includes J-Bend pipes,Wall bend tubular,slip joint extension tube ,slip joint nut ,tailpiece and slip joint washers ,most of the time , make repairs to problem areas of kitchen drain system or attach your kitchen sink drain , utility sink laundry tub or lavatory to the wall or floor , you only need buy this completed 30-piece kit and without buy other drain tubular,so that you can save costs.
- Leak-resistant Design, No Tools Needed: This slip joint easily connects sink drain pipe kit and kitchen sink trap. Just hand-tighten the slip nut with the included high performance TPE slip joint washers — It seals tight in seconds, effectively reducing leak risks.
- Sturdy Build: Made with tough engineering polyvinyl chloride plastic(PVC), this Sink drain kit withstands high water temperatures, resists alkali, and reduces cracking risks. The kitchen sink drain kit stays strong through daily use, working reliably year after year in your bathroom or kitchen.
Tighten the locknut while keeping the strainer from spinning. If it spins, it can break the putty seal at the flange. Putty should squeeze out evenly around the top. Remove the excess after the strainer is tight. If the manufacturer calls for silicone instead of putty, follow that instruction and respect the cure time before heavy testing.
4. Install the Tailpiece and P-Trap
Attach the tailpiece to the strainer body using the correct washer and nut. Install the trap bend below it, then connect the trap arm to the wall adapter. Hand-tighten all slip-joint nuts first. Once everything is aligned, add only a small extra turn with pliers where needed. Snug and aligned beats crushed washers.
Do not use pipe thread tape or pipe dope on slip-joint tubular drain connections. These joints seal at the beveled washer, not at the threads. Tape can hide alignment problems and make plastic nuts easier to overtighten. If a slip joint leaks, the fix is usually washer direction, pipe alignment, pipe insertion depth, or a damaged washer.
5. Build a Double-Bowl, Disposal, or Dishwasher Layout Correctly
For double-bowl sinks, use a clean continuous-waste kit with one trap. The horizontal waste arm between bowls should have proper slope into the trapped side. Avoid layouts where one bowl drains across a long flat pipe that holds greasy water. If one bowl has a disposal, the disposal outlet height controls much of the layout. Confirm the discharge tube can enter the trap without forcing the trap arm uphill.
For dishwashers, follow local requirements for a high loop or air gap. Many areas allow a high loop secured up under the countertop, while others require an air gap fitting. If you connect a dishwasher to a new garbage disposal, remove the disposal knockout plug first. If there is an unused dishwasher branch on a tailpiece or disposal, cap it properly. An open branch under a sink can leak wastewater into the cabinet during draining.
6. Leak-Test in Stages
Do not test only with a trickle from the faucet. Start with cold water for 30 to 60 seconds and check every joint with a dry tissue. Then run hot water. Fill the sink halfway and release it all at once. For a double-bowl sink, test both bowls, including a full-basin dump from the side farthest from the trap. Run the disposal if installed. Run a dishwasher drain cycle if connected. Wait 10 to 15 minutes, then check again because slow seepage often appears after the piping warms, moves, or drains under load.
If the basket strainer leaks at the sink opening, tightening the slip joints will not fix it. The strainer seal has to be reset. If a slip joint leaks, loosen it, realign the pipe, check the washer direction, and retighten by hand before using pliers.
Do these 3 things before closing this tab:
1Repair Windows errors before they cause bigger problems2Fix the driver behind crashes, sound loss and screen glitches3Clear out junk files and repair common Windows errorsRank #4

- Universal Compatibility: This kitchen sink plumbing kit comes with all tubualr parts that removes the guesswork from any repair task or modification. Plumbing parts are easy to use for homeowners and pros,the kitchen sink drain repair kit can be installed to be P trap kit , S trap drain kit, end outlet waste, center outlet waste,washing machine traps to fits most sink drains with 1 1/2" drain pipes, no matter you need connect to the wall or floor
- One-stop Installation: The sink trap kit is designed for easy installation,making it a user-friendly solution for all your sink drainage worries, the kitchen and bathroom sink drain pipes Includes detailed instructions and helpful graphics for DIY installation, whether your sink drain system need garbage disposal installation kit or dishwasher installation kit , whether your kitchen is single bowl sink or need double sink drain kit , this sink drain kit can be one-stop installation .
- Economic and effective Solution :This sink plumbing kit includes J-Bend pipes,Wall bend tubular,slip joint extension tube ,slip joint nut ,tailpiece and slip joint washers ,most of the time , make repairs to problem areas of bathroom and kitchen drain system or attach your kitchen sink drain , utility sink laundry tub or lavatory to the wall or floor , you only need buy this completed 30-piece kit and without buy other drain tubular,so that you can cost saving.
- No Leaks and Easy Connection:this slip joint connect or direct joint sink drain pipe kit and bathroom sink trap is very easy installation,the provided high performance TPE slip joint washers provide the no leaks connection , you only need to tighten the slip nut by hand .
- Reliable Build:This Sink Drain Kit is constructed using high-quality engineering polyvinyl chloride plastic, specifically designed to withstand extreme water temperatures, resist alkali, and prevent cracking. This kitchen sink drain kit ensures long-lasting durability and reliable performance, making it a long-lasting addition to your bathroom or kitchen room .
Common Mistakes That Cause Leaks, Odors, and Clogs
The most common mistake is forcing parts to fit. Tubular drain components should meet naturally. If the trap has to be twisted hard to reach the tailpiece or wall adapter, the joint will eventually leak. Deep sinks and garbage disposals make this worse because they lower the outlet. A wall stub-out that worked for a shallow drop-in sink may be too high after a new undermount sink is installed.
Another frequent mistake is overtightening plastic slip-joint nuts. Overtightening can split the nut, flatten the washer, or deform the pipe. The leak may not show up until the sink is full and draining fast. Hand-tight plus a small controlled turn is enough for most plastic tubular assemblies.
Using the wrong sealant also creates callbacks. Standard plumber’s putty is useful under many stainless basket strainers, but it is not universal. Some sink materials and plastic drain bodies need silicone or a compatible stain-free product. Read the sink and drain instructions before choosing.
Avoid flexible accordion pipe. It is tempting because it bends around bad alignment, but the ribbed interior catches food waste and grease. It also makes proper slope and cleaning harder. If the drain only works with a flexible accordion section, the layout needs to be corrected.
Recommended Free Tools
When to DIY vs When to Hire a Pro
DIY makes sense when you are replacing the same type of basket strainer, tailpiece, and P-trap, the wall drain is in good condition, the trap lines up without stress, and no vent or in-wall pipe changes are needed. A careful homeowner with basic hand tools can usually complete a simple drain-only swap in 1 to 3 hours, not counting store trips or silicone cure time.
Hire a plumber when the wall stub-out is too high or too low, the trap arm slopes backward, the existing pipe is galvanized, cast iron, cracked, or badly corroded, or the cabinet shows old water damage. Also bring in a pro when you are moving from single-bowl to double-bowl with a disposal, adding a dishwasher connection, opening the wall, moving the drain centerline, or dealing with sewer gas odors that suggest venting or trap-seal problems.
There is no savings in making an illegal or unreliable drain fit. A plumber charging $100 to $200 per hour may feel expensive, but that is cheaper than a swollen cabinet floor, moldy drywall, or a second repair after an inspection issue. For a drain-only professional install around $344 to $431, you are paying for alignment, code awareness, and a leak test under real use, not just for someone to tighten plastic nuts.
Best Value

- Our p trap Crafted from top plastic, specifically designed to withstand extreme water temperatures, resist alkali, and prevent cracking. standing up to the rigors of daily use while resisting rust and chemical corrosion.Comparable in quality to products found in your neighborhood supermarket.
- The innovative leak - proof design is a standout feature. Our engineers have meticulously designed the joints, seals and thickened silicone pad to create a tight fit, eliminating the risk of leaks that can lead to water damage in your kitchen.
- The innovative leak - proof design is a standout feature. Our engineers have meticulously designed the joints, seals and thickened silicone pad to create a tight fit, eliminating the risk of leaks that can lead to water damage in your kitchen. This sink plumbing kit includes J-Bend pipes, Wall bend tubular,slip joint extension tube ,slip joint nut and slip joint washers ,most of the time, make repairs to problem areas of bathroom and kitchen drain system, kitchen sink drain to the wall or floor.
- Installation is a breeze. We've included all the necessary parts and a set of simple, step - by - step instructions. Whether you're a DIY enthusiast or just looking to make a quick fix, you'll find that setting up this drain pipe is straightforward and stress - free.
- The built - in odor - blocking trap is a game - changer. It stops foul sewer smells from seeping into your kitchen, ensuring that your cooking and dining area remains fresh and inviting. Upgrade your kitchen plumbing with this reliable and functional drain pipe today!
Final Checks Before You Close the Cabinet
Leave the cabinet empty overnight if you can. Place a dry towel or sheet of cardboard under the drain so any drip is obvious. Check again after normal kitchen use, especially after hot water, disposal operation, and dishwasher discharge. The trap should remain accessible and removable for cleaning. Do not bury the assembly behind permanent shelving or glue together every tubular fitting unless your local material system specifically requires solvent-welded DWV in that location.
The Tool Desk
Outbyte Driver Updater FREEFix the driver behind crashes, sound loss and screen glitchesFind Drivers →Outbyte PC Repair FREERepair Windows errors before they cause bigger problemsFix Now →A properly installed kitchen sink drain is quiet, boring, and easy to service. The basket strainer is sealed squarely. The trap holds water. The trap arm slopes the right way. The dishwasher or disposal connection is secure. Every joint stays dry after a full-bowl dump. That is the standard we use in finished kitchens because under-sink leaks rarely stay small for long.
Frequently Asked Questions
How much does it cost to install a kitchen sink drain in 2026?
A drain-only professional installation commonly runs about $344 to $431 per kitchen sink drain assembly. A broader sink installation can range from about $216 to $663, or $280 to $1,400 when materials, faucet work, disposal work, or countertop complications are included.
Can I install a kitchen sink drain myself?
Yes, if it is a like-for-like replacement and the P-trap, tailpiece, and wall stub-out line up naturally. Hire a plumber if you need to move the drain, alter venting, add a disposal or dishwasher connection, or disturb old galvanized or cast-iron piping.
Do I need a permit to replace a kitchen sink drain?
A simple like-for-like replacement often does not require a permit, but rules vary by city and state. Moving DWV piping, changing venting, adding fixtures, or opening the wall commonly requires a plumbing permit and inspection.
Free tools Windows power users keep installed
One-click scans. No signup required.
Should I use plumber’s putty or silicone on a kitchen sink drain?
Use plumber’s putty for compatible stainless or metal drain flanges unless the manufacturer says otherwise. Use 100 percent silicone or stain-free putty for stone, acrylic, ABS, plastic, or stain-prone materials when specified.
What size drain pipe does a kitchen sink need?
Most modern kitchen sink drain assemblies under the cabinet use 1-1/2 inch tubular parts. The sink basket opening is commonly about 3-1/2 to 4 inches, but always match the strainer and drain parts to the sink and local code.
Can I use a flexible accordion pipe under a kitchen sink?
It is better to avoid flexible accordion drain pipe. The ridges collect grease and food debris, make cleaning harder, and may violate local plumbing code. Correct the alignment with proper tubular parts instead.
Quick Recap
Product prices and availability are accurate as of the date/time indicated and are subject to change. Any price and availability information displayed on Amazon at the time of purchase will apply.