Do these 3 things before closing this tab:
1Scan for outdated or missing drivers - takes under a minute2Clear out junk files and repair common Windows errors3Fix the driver behind crashes, sound loss and screen glitchesA refrigerator waterline kit is one of the smallest upgrades in a kitchen, but it carries one of the most annoying risks: a slow leak behind a heavy appliance. The best kit is not simply the cheapest 1/4-inch tube on the shelf. It is the kit that matches your refrigerator, uses potable-water-rated parts, includes a dependable shutoff valve, gives you enough service slack to move the refrigerator, and can be leak-tested without guesswork.
For most US homeowners in 2026, expect to spend about $25 to $60 for a better DIY material package with the right valve and fittings. A basic professional hookup to an existing accessible shutoff often lands around $75 to $200, while a new line installed by a plumber commonly runs $150 to $300 in straightforward conditions. Difficult routing through finished walls, floors, cabinets, tile, or tight built-in refrigerator openings can push the job to $300 to $800+.
On our job sites, we treat refrigerator waterlines as small plumbing work, not appliance accessory work. The line is under household water pressure all day, every day. A $10 decision behind the fridge can become drywall, flooring, cabinet, or ceiling repair later.
As an Amazon Associate I earn from qualifying purchases.
What a Refrigerator Waterline Kit Should Include
Most refrigerator ice makers and water dispensers use a 1/4-inch outside diameter supply line with compression-style connections. That is the common size, but do not buy parts before checking the refrigerator manual. Some models specify required water pressure, fitting style, filter setup, tubing restrictions, or connection clearance behind the unit.
A good refrigerator waterline setup usually includes:
#1 Best Overall

- 【Compatibility】:Our water line kit is suitable for adding a branch waterway on your existing water line to refrigerator,ice maker,water dispenser and more.
- 【safe material】:Our water tubing and quick fittings is made by food grade materials, have tested to meet NSF/ANSI standards and BPA free;The self piercing saddle valve body material is lead free brass.All the accessories is choosed ensure you and your family enjoy crystal ice cubes and delicious pure water.
- 【Easy installation】:The fittings in the water line kit are standard and Push-in quick connect;The self piercing saddle valve quickly penetrates your pipe to divert the water where you want it to go,no additional tools required. Also a clear installation instructions help you complete your work in minutes.
- 【Prime quality accessories】:The accessories in our kit are extremely safe and durable,there is no need to consider replacement for several years.
- 【Include all parts you need】:25 FT 1/4" OD tubing,a self piercing saddle valve, 1/4" shut off valve,1/4" straight fitting,a 1/4" adapter,and compression fitting set (2 insert, 3 sleeve, 2 nut).
- 1/4-inch OD potable-water-rated tubing or connector, sized for the route.
- A dedicated shutoff valve, preferably a quarter-turn ball stop.
- Correct transition fittings for the existing cold-water pipe, such as copper, PEX, CPVC, or threaded connections.
- A compression nut, sleeve, and insert where required by the tubing type.
- Enough slack to pull the refrigerator out for service without stressing the line.
- Support or abrasion protection where tubing passes through cabinets, floors, or framing.
Look for products listed for drinking water contact. In practical terms, that often means markings or packaging references such as NSF/ANSI 61, NSF 372 lead-free, cUPC, IAPMO, or ASSE 1061, depending on the part. Do not assume every small plastic tube or push fitting is appropriate for potable water just because it fits.
Best Refrigerator Waterline Kit Materials
The right material depends on distance, accessibility, local code, and how often the refrigerator will need to move. No single material is best for every house.
Free tools Windows power users keep installed
One-click scans. No signup required.
| Material | Best Use | Typical 2026 DIY Cost | Pros | Watchouts |
|---|---|---|---|---|
| Polyethylene or plastic tubing | Short budget hookups where allowed and protected | $5 to $20 | Flexible, inexpensive, easy to route | Can kink, taste complaints are more common, lower confidence in hidden runs |
| PEX tubing | Longer branch lines through cabinets, basements, or accessible framing where allowed | About $14+ for common ice-maker lengths, more with fittings | Flexible, durable, good for supported plumbing runs | Requires compatible fittings and local-code approval |
| Soft copper tubing | Durable traditional installations and exposed service loops | About $25 for some 15-foot kits | Long service history, good taste profile, durable when protected | Kinks if bent sharply, harder for beginners to handle cleanly |
| Braided stainless steel connector | Final flexible connection from a nearby shutoff to the refrigerator | About $4 to $45 depending on length and listing | Kink-resistant, durable outer braid, easy final hookup | Not ideal as a long concealed branch line; check taste and listing details |
Plastic and Polyethylene Kits
Plastic refrigerator kits are common because they are cheap and flexible. They can work for simple, visible runs, but we do not like burying unknown plastic tubing in finished spaces. Plastic lines can be pinched behind cabinets, rubbed by drawer movement, or damaged where they pass through rough holes. Some homeowners also notice a plastic taste at the dispenser, especially before the line is flushed well.
If you use plastic tubing, buy a potable-water-rated kit, avoid sharp bends, protect every pass-through hole, and keep the route visible or accessible where possible.
PEX Kits
PEX is often a better choice for a longer refrigerator branch line, especially when the route runs from a basement ceiling, crawlspace, or nearby sink cabinet. It handles bends better than copper and is well suited to supported plumbing work when installed with approved fittings. The key is using the right connection system and following local code. A random mix of push fittings, crimp fittings, and compression adapters can create a service problem later.
Copper Kits
Soft copper remains a solid choice when handled carefully. It is durable, widely recognized, and less likely to create taste complaints than some plastic-lined products. Its weakness is kinking. Once soft copper is sharply kinked, do not trust that section under pressure. Replace it or cut it back and reconnect properly.
Braided Stainless Connectors
A braided stainless ice-maker connector is often the cleanest final connection when there is already a shutoff behind or beside the refrigerator. It resists kinking better than soft copper and is easier to work with in tight spaces. We prefer braided stainless for the final flexible connection, not as a substitute for a properly supported long branch line through hidden areas.
Do Not Build Around a Saddle Valve
Many older ice-maker kits used self-piercing saddle valves. These clamp onto an existing pipe and puncture it with a small needle. They were popular because they avoided cutting the pipe. They are also one of the first things our crews look for when troubleshooting weak ice-maker flow or old leaks.
Saddle valves are weak points. They can clog, weep, fail to shut off completely, or create a poor connection at the pipe wall. They are often discouraged by plumbers and may not be accepted under modern local code or inspection practice. If your existing refrigerator line is fed by a saddle valve, replacing the refrigerator is a good time to replace that valve too.
Better options include a proper tee with a quarter-turn stop, an approved push-to-connect tee and valve where permitted, or a recessed ice-maker outlet box. The best choice depends on the pipe material and access.
The Shutoff Valve Matters More Than the Tubing
A dedicated shutoff is not optional in a professional-quality installation. The 2021 International Plumbing Code requires shutoff valves on the water supply pipe to each appliance or piece of mechanical equipment. Local code adoption varies, but the principle is straightforward: you should be able to shut off the refrigerator water supply quickly without shutting down the whole house.
We prefer a quarter-turn ball stop over a needle valve. A quarter-turn valve is faster in an emergency, easier for a homeowner to understand, and usually more reliable after years of sitting untouched. If the shutoff is not directly behind the refrigerator, label it. An under-sink valve feeding an ice maker should be tagged so the next person does not waste time guessing during a leak.
During remodels or new branch-line work, a recessed ice-maker outlet box is usually the best detail. It keeps the valve accessible, reduces the chance of crushing the connector behind the refrigerator, and gives a cleaner finish. This is especially useful for counter-depth refrigerators and built-in openings where clearance is tight.
Rank #2
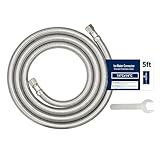
- 【Universal Standard ice maker water line】You will get 1pack of 5 feet ice maker water line. This hose for sink features 3/8" female compression and 3/8" nut, is compatible with most standard size Refrigerator.
- 【Premium Quality】This ice maker water line is made of superior quality braided stainless steel, resistant to corrosion and rust,and protects inner tube,ensures maximum pressure and performance. Never worry your ice maker water line will burst
- 【Easy Installation】No plumbers needed, you can easily installed with only spanners in few minutes. If you have any questions about the installation, you can watch our installation video or contact us to provide free installation guidance
- 【NSF & cUPC Certified】PLUMBINGMASTER ice maker water line are NSF&cUPC certified, Lead-free (with less than 0.25% lead content), safe for water supply in the kitchen.
- 【10-Year Warranty & Customer Support】Backed by a 10-year manufacturer warranty and 30-day money-back guarantee. We're committed to your satisfaction—use with confidence and enjoy peace of mind.
How Much Refrigerator Waterline Installation Costs in 2026
Costs vary because some jobs are simple appliance hookups and others are real plumbing runs. A refrigerator sitting next to a sink base with an accessible cold-water pipe is a different job than a refrigerator across the kitchen from the nearest supply line.
The Tool Desk
Outbyte Driver Updater FREEScan for outdated or missing drivers - takes under a minuteDriver Scan →Outbyte PC Repair FREERepair Windows errors before they cause bigger problemsFix Now →| Project Type | Typical 2026 Cost | What It Usually Includes |
|---|---|---|
| DIY connector or basic kit | $5 to $45 | Common 1/4-inch tubing or connector only |
| Higher-quality DIY materials | $25 to $60 | Better tubing, shutoff, fittings, and small accessories |
| Basic pro hookup to existing shutoff | $75 to $200 | Connect refrigerator to an accessible, compatible valve |
| Straightforward new line by plumber | $150 to $300 | Short route, accessible cold-water source, normal fittings |
| Complex route or corrective work | $300 to $800+ | Finished walls, floors, cabinets, valve replacement, difficult access, or permit-related work |
The main cost drivers are distance to the nearest cold-water pipe, whether an accessible shutoff already exists, tubing material, local plumber minimums, drywall or cabinet access, permit requirements, and whether an old saddle valve must be replaced.
Appliance delivery crews often connect only to an existing, code-compliant, accessible shutoff with a compatible connector. If they find old copper that is too short, a saddle valve, no shutoff, a corroded valve, or nonstandard fittings, they may set the refrigerator in place and leave the water disconnected until a plumber corrects it.
Planning the Route Before You Buy the Kit
Measure the route before buying. The shortest safe route is usually best, but short does not mean careless. Avoid wiring, heat sources, sharp cabinet edges, moving drawers, unconditioned spaces where freezing can occur, and any route where the tubing will rub every time the refrigerator moves.
For length, buy enough tubing for the route plus 6 to 8 additional feet so the refrigerator can be pulled out for cleaning or service. That extra length should sit in a controlled service loop without kinking, rubbing, or getting trapped under the refrigerator wheels. The goal is movable slack, not a tangled coil under pressure.
What’s actually slowing this PC down?
Pick the symptom - the matching free tool is one click away.
High-risk locations deserve extra attention. A refrigerator over a finished basement ceiling can cause damage before anyone notices a drip. Cabinet pass-throughs need smooth holes, grommets, or sleeves. Lines through unconditioned garages, exterior walls, crawlspaces, or attic spaces can freeze. Behind built-in and counter-depth units, crushed connectors are common because there is less room than people expect.
If walls are open during a remodel, photograph the waterline route before drywall. A simple phone photo showing studs, pipe location, and valve placement can save trouble years later when someone installs shelving, backsplashes, or new cabinets.
Step-by-Step Installation Overview
This is a general overview, not a substitute for the refrigerator manual or local plumbing code. If the work requires cutting into a supply pipe, soldering, crimping PEX, or routing through finished assemblies, many homeowners are better served by hiring a plumber.
1. Confirm the Refrigerator Requirements
Check the manual for fitting size, water pressure range, filter requirements, and tubing recommendations. Many refrigerators use a 1/4-inch OD line, but assumptions cause bad trips to the store. Confirm whether the refrigerator has a built-in fitting, a compression connection, or a supplied adapter.
Outdated Drivers Are Slowing You Down
One free scan finds every outdated or missing driver and matches the right update for your exact hardware.Free scan · exact hardware matchWindows Errors? Fix Them Before They Spread
Repair common Windows errors and clear accumulated junk for a smoother, more stable PC - no reinstall needed.Free scan · no reinstall2. Shut Off Water and Relieve Pressure
Turn off the relevant cold-water supply. Open a faucet downstream or nearby to relieve pressure. Keep towels and a small pan handy. If there is no reliable shutoff for the work area, stop and solve that first.
3. Install or Verify the Dedicated Valve
If an approved accessible shutoff already exists and operates cleanly, inspect it for corrosion, seepage, and compatibility. If not, install a proper tee and quarter-turn stop or an ice-maker outlet box. The valve should be reachable without removing built-in trim or disassembling cabinets.
Rank #3

- 【Widely Compatibility】:Our water line kit is compatible with most brands and models of refrigerator such as Samsung, GE, LG, Whirlpool, Frigidaire, etc. Perfect for connecting most standard under sink filtration system or reverse osmosis systems (1/4"or 3/8" Outlet) to refrigerator,ice maker,water dispenser and more.
- 【Safe Material】:Our Ice maker water line kit is made by food grade materials, have tested to meet NSF/ANSI standards and BPA free.Ensure you and your family enjoy crystal ice cubes and delicious pure water.
- 【Easy Installation】:The fittings in the water line kit are standard and Push-in quick connect,no additional tools required. Also a clear installation instructions help you complete your work in minutes.
- 【Prime Quality Accessories】:The accessories in our kit are extremely safe and durable,there is no need to consider replacement for several years.
- 【Include All Parts You Need】:25 FT 1/4" OD tubing, a 1/4" x 1/4" x 1/4" tee(for 1/4" outlet water filters),a 3/8" x 1/4" x 3/8" tee (for 3/8" outlet water filters),a 1/4" shut off valve,1/4" straight fitting,a 1/4" adapter,and a compression fitting set (2 insert, 2 sleeve, 1 nut).
4. Route the Tubing Cleanly
Run the tubing with gentle bends. Support it where required. Protect it through cabinet sides, floors, or framing. Keep it away from sharp metal edges, drawer slides, compressor heat, and anything that could pinch it.
5. Flush Before Final Connection
Where possible, flush the new line into a bucket before connecting it to the refrigerator. This removes manufacturing residue, pipe debris, and loose particles from the installation. After connection, flush the refrigerator dispenser according to the manual and discard the first batches of ice.
6. Connect Without Overtightening
Compression fittings need firm, even tightening, not brute force. Overtightening can crush tubing, deform sleeves, or damage small fittings. Use inserts where the tubing type requires them. Make sure the refrigerator end is straight and not side-loaded.
7. Leak-Test in Stages
Turn the water on slowly. Check the valve, tee, every fitting, and the refrigerator connection. Use a dry paper towel at each joint; it shows small leaks faster than your fingers. Run the dispenser, cycle the ice maker if possible, and check again after 15 minutes, after 1 hour, and the next day. Push the refrigerator back only after verifying that the service loop does not kink or crush.
When to DIY and When to Hire a Pro
A homeowner with basic tools can often replace a short refrigerator connector when there is already a good shutoff valve behind the appliance. That is the low-risk version of this job: accessible valve, matching 1/4-inch connection, no pipe cutting, no finished-wall routing, and enough room to inspect for leaks.
DIY is reasonable when:
- The refrigerator has an existing accessible shutoff.
- The old connector is being replaced with a compatible listed connector.
- The route is visible and short.
- You can pull the refrigerator out and inspect both ends after installation.
- You understand the fitting type and can leak-test it over time.
Hire a plumber when:
- There is no dedicated shutoff valve.
- The existing connection uses a saddle valve.
- You need to cut into copper, PEX, CPVC, or galvanized piping.
- The line must run through finished walls, floors, ceilings, or cabinets.
- The refrigerator sits over finished living space, a condo unit, or expensive flooring.
- The existing valve is corroded, stuck, leaking, or poorly located.
- Local rules require a permit or inspection for the new branch line.
Permits are local. Some jurisdictions treat a simple appliance connector replacement differently from adding a new branch water line. If you are opening walls, modifying supply piping, or working in a condo or multi-family building, check requirements before work begins. Condo associations and property managers may also require licensed plumbers even when the city does not require a permit for a small connection.
Quick wins for a faster PC:
Scan for outdated or missing drivers - takes under a minuteDriver Scan →Repair Windows errors before they cause bigger problemsFix Now →Fix the driver behind crashes, sound loss and screen glitchesFind Drivers →Water Pressure, Filters, and Taste
Ice makers and dispensers need adequate pressure to work correctly. Too little pressure can create hollow ice, slow dispensing, or valve chatter. Too much pressure can stress fittings and appliance valves. The correct range is model-specific, so use the refrigerator manual as the controlling document.
If your refrigerator has a filter, install the correct filter and flush it as directed. A new line can carry fine debris or manufacturing residue. Plan to flush several gallons through the dispenser after installation and discard the first ice batches. If a plastic or braided connector creates persistent taste issues after flushing, material choice or stagnant water in a long unused line may be the cause.
For homes with whole-house filtration, pressure regulators, reverse-osmosis systems, or well water, check compatibility. Some refrigerators do not perform well with low-pressure reverse-osmosis feeds unless the system includes a proper storage tank and pressure range.
Independent reader supportYour contribution helps us test, update, and keep practical guides available for everyone.Leak Prevention Details We Use on Job Sites
The best refrigerator waterline installation is boring after the day it is installed. No crushed tubing, no mystery valve, no hidden saddle connection, no slow drip into a finished ceiling.
Our standard practical details are simple:
- Use a quarter-turn shutoff that a homeowner can reach.
- Use potable-water-rated parts with recognizable listings.
- Keep long runs supported and protected.
- Use a braided stainless connector for the final flexible connection when the shutoff is close behind the refrigerator.
- Keep 6 to 8 feet of service slack only where it can move without kinking.
- Install a leak sensor behind or beside the refrigerator, especially above finished basements or in condos.
- Label any remote shutoff valve.
- Do not reuse brittle tubing, corroded compression nuts, or questionable old valves.
A basic battery leak sensor is inexpensive compared with flooring repair. Place it where water would naturally collect, not on a random dry shelf nearby. If the refrigerator sits in a tight built-in opening, make sure the sensor can still be heard or connected to a smart-home alert.
Common Mistakes to Avoid
The most common mistake is buying a kit before understanding the existing plumbing. A 1/4-inch refrigerator end does not tell you what is needed at the supply end. The home may have copper, PEX, CPVC, a threaded stop, an old saddle valve, or no nearby cold-water line at all.
Rank #4
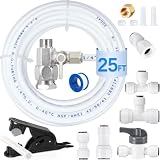
- 【Widely Compatibility】:Our water line kit is suitable for most standard under sink filtration system or reverse osmosis systems (1/4"or 3/8" Outlet), and most brand and models refrigerator,ice maker,water dispenser.
- 【Safe material】:Our Ice maker water line kit is made by food grade materials, have tested to meet NSF/ANSI standards and BPA free;The water line splitter is lead free brass,chrome-plated for cold potable water.Ensure you and your family enjoy crystal ice cubes and delicious pure water.
- 【Easy installation】:The fittings in the water line kit are standard and Push-in quick connect.Also a clear installation instructions help you complete your work in minutes.
- 【Prime quality accessories】:The accessories in our kit are extremely safe and durable,there is no need to consider replacement for several years.
- 【Include all parts you need】:25 FT 1/4" OD tubing, a 3/8"-3/8"-1/4" or G1/2”-G1/2”-1/4”feed water adapter,a 1/4" x 1/4" x 1/4" tee(for 1/4" outlet water filters),a 3/8" x 1/4" x 3/8" tee (for 3/8" outlet water filters),a 1/4" shut off valve,1/4" straight fitting,1/4"-3/8" straight fittinga 1/4" adapter, a tube cutter,and a compression fitting set (2 insert, 2 sleeve, 1 nut).
Other mistakes include using a self-piercing saddle valve, pushing the refrigerator back onto the line, skipping the flush, overtightening compression fittings, running tubing through rough cabinet holes, and leaving the shutoff inaccessible. Another frequent problem is assuming the appliance delivery crew will solve plumbing issues. Many delivery teams are not there to modify your water supply. They connect to what is already correct.
If you are replacing an older refrigerator, inspect the existing line before delivery day. If the valve is stuck, the tubing is brittle, or the connection disappears into a wall with no label, fix it before the new appliance arrives.
Recommended Free Tools
Our Bottom-Line Recommendation
For a simple replacement with an existing shutoff behind the refrigerator, a listed braided stainless 1/4-inch ice-maker connector is usually the cleanest choice. For a longer route from a basement, crawlspace, or nearby sink cabinet, use properly supported PEX or copper with approved fittings and a dedicated quarter-turn valve. For remodels, install a recessed ice-maker outlet box and photograph the route before closing the wall.
Avoid saddle-valve kits unless you have confirmed they are accepted in your specific situation, and even then, understand that they are a weak plumbing detail. Spend the extra money on a proper valve and better fittings. In 2026 numbers, upgrading from the cheapest kit to a better material package is usually a difference of $20 to $50. That is a small premium for a line that may sit pressurized behind your refrigerator for the next decade.
Frequently Asked Questions
What size waterline do most refrigerators use?
Most refrigerator ice makers and water dispensers use a 1/4-inch outside diameter supply line with compression fittings. Always verify the refrigerator manual because fitting style and water pressure requirements vary by model.
Are saddle valves okay for refrigerator waterlines?
We do not recommend saddle valves. They puncture the pipe, can clog, may fail to shut off fully, and are often not accepted by modern local code or inspection practice. A tee with a quarter-turn stop or an ice-maker outlet box is usually a better solution.
How much does it cost to install a refrigerator waterline in 2026?
DIY kits commonly cost $5 to $45, while a better DIY material package is usually $25 to $60. A basic professional hookup often costs $75 to $200, and a straightforward new plumber-installed line commonly runs $150 to $300. Difficult routing can reach $300 to $800 or more.
Is copper, PEX, plastic, or braided stainless best?
Braided stainless is often best for the final flexible connection to a nearby shutoff. PEX or copper is better for longer supported branch lines where allowed by local code. Plastic tubing is inexpensive and flexible, but it needs careful protection and is not our first choice for hidden or high-risk runs.
How much extra refrigerator waterline should I leave behind the fridge?
Plan for the route length plus about 6 to 8 extra feet so the refrigerator can be moved for cleaning or service. The slack should form a controlled service loop without kinking, rubbing, or being crushed by the appliance.
Do I need a plumber to connect a refrigerator waterline?
You may not need a plumber if you are replacing a short connector at an existing accessible shutoff. Hire a pro if there is no shutoff, the old setup uses a saddle valve, the line must run through finished spaces, or you need to cut into household plumbing.
The Tool Desk
Outbyte PC Repair FREEClear out junk files and repair common Windows errorsFree Scan →Outbyte Driver Updater FREEScan for outdated or missing drivers - takes under a minuteDriver Scan →Quick Recap
Product prices and availability are accurate as of the date/time indicated and are subject to change. Any price and availability information displayed on Amazon at the time of purchase will apply.

