Recommended Free Tools
Winterizing an automatic sprinkler system means removing water from the pipes, valves, backflow preventer, pump, and other freeze-sensitive components before freezing weather arrives. Turning the controller to Off stops the watering schedule, but it does not drain the system. In cold regions where frost can reach buried irrigation pipe, a properly performed blowout is usually the most reliable method. In milder climates, draining exposed components and using the system’s designed manual or automatic drains may be sufficient. The right method depends on your climate, pipe material, drainage layout, backflow preventer, and whether the system has a pump.
The four-step framework below is practical, but it is not a universal industry sequence for every installation. If you cannot identify the correct drain method, the pipe material, a downstream blowout connection, or the ratings of the system components, stop before applying compressed air and hire an irrigation professional.
As an Amazon Associate I earn from qualifying purchases.
First, decide whether you need a complete blowout
Freezing water expands by approximately one-eleventh, or about 9 percent. Trapped water can split rigid PVC, polyethylene tubing, valve bodies, fittings, sprinkler housings, pumps, and backflow assemblies. The greatest risk occurs when repeated or prolonged cold allows frost to reach buried irrigation pipe. However, an above-ground backflow preventer, exposed valve, pump, filter, regulator, or section of pipe can freeze even when the buried laterals are below the local frost depth. Colorado State University explains the expansion risk, while the University of Minnesota emphasizes protecting exposed components.
| System or climate | Usually appropriate |
|---|---|
| Frost can reach buried irrigation pipe, or the system has complex elevations and unknown low spots | Professional blowout, followed by separate backflow and pump drainage |
| Mild-freeze climate with properly installed, accessible manual drains | Manual drainage plus model-specific backflow protection and exposed-pipe insulation |
| Functional automatic drains on a system designed for them | Verify that the drains open and actually discharge water; separately protect valves, backflow equipment, and exposed parts |
| Pump-fed system, unusual backflow arrangement, no clear downstream blowout port, or unknown pipe material | Professional service rather than an improvised compressor connection |
Do not use USDA plant-hardiness zones as the only decision rule. Consider local freeze duration, frost depth, installation depth, soil conditions, pipe material, system elevations, and the components above ground. In many mild-climate installations, including many systems in Texas, a full blowout is not automatically the standard design. Texas A&M’s winterization guidance distinguishes mild-climate systems from northern systems.
#1 Best Overall
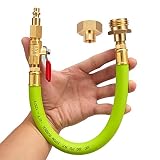
- Brass Material: Brass, for your health and safety, certified to contain less than 0.25% lead. Hose Material: EPDM Rubber, EXTRMELY durable, more excellent corrosion resistance
- Max Pressure rating: 300 PSI. Temperature ranging: -22℉ ~ +250℉. Hose Pipe Length: 12 inches (approximate)
- Adapter to easily winterize underground irrigation sprinkler systems, outdoor pipes, water lines, plumbing, homes, cabins, faucets, spigots, garden hoses, sillcocks, and hose bibbs by blow out method
- Flexible hose allows the adapter to access tight spaces and minimizes stress on pipes and fittings. Easily connects to air compressor and garden faucet to winterize lawn sprinkler systems, faucets, and plumbing to prevent damage due to freezing. Compatible with standard garden hose threading and air compressor quick-connect commonly found in North America
- If you are looking for a heavy duty tool that lasts a longtime, this one is for you. Always wear safety goggles when handling or using compressed air
A single brief temperature dip below 32°F does not guarantee that every buried system will be damaged. It may primarily threaten exposed components. Repeated or prolonged freezing, or frost that reaches the pipe, raises the need for complete drainage or a manufacturer-approved blowout.
When should winterization be done?
Complete the work before the first forecast freeze that could damage the system, rather than waiting for the first hard freeze. That gives you time to locate a stuck drain, repair a leaking valve, find the correct backflow instructions, or arrange professional service. Hunter’s winterization guidance and Rain Bird’s detailed guide both frame winterization as a before-freeze procedure.
Before you start: map the system
Locate and identify the following items before shutting off the water:
Free tools Windows power users keep installed
One-click scans. No signup required.
- The irrigation main shutoff, normally upstream of the backflow preventer. It may be inside a basement, crawlspace, garage, or utility room, or in an underground valve box.
- The backflow preventer and its type, such as a pressure vacuum breaker, reduced-pressure assembly, atmospheric vacuum breaker, or double-check assembly.
- Any stop-and-waste, manual drain, automatic drain, or low-point drain valves.
- A dedicated compressor blowout fitting or quick-connect port, if the system has one.
- The controller’s zone, common, master-valve, and pump-start connections.
- Any pump, filter, pressure regulator, flow sensor, exposed piping, or unusual equipment.
- The buried pipe material, especially rigid PVC versus flexible polyethylene.
- Sprinkler heads with check valves, which may retain water even after a lateral line drains.
Trace the water path before connecting anything:
Water source → irrigation main shutoff → backflow preventer → downstream blowout port, if present → zone valves → sprinkler heads.
Do not automatically treat the isolation valves on the backflow preventer as the system’s main shutoff. Some water utilities instruct owners to leave those valves partially open for winter drainage. Medford Water’s guidance explains this distinction.
Before shutting off the supply, run every zone briefly. Look for broken or missing heads, leaking fittings, water pooling around valve boxes, zones that fail to open, unusually weak flow, and exposed components that need repair or insulation. The University of Minnesota recommends inspecting each zone and making repairs before winterization. Photograph valve-box layouts, label zones, and record which components you remove or leave in a winter position.
Tools and materials
- System map, zone list, marker, and labels
- Safety glasses rated for the work, especially ANSI-approved eye protection for compressed-air work
- Bucket, drain hose, or other means of directing discharge water
- Manufacturer manuals for the controller, pump, backflow preventer, valves, and sprinkler heads
- Approved insulation or a purpose-built backflow enclosure for exposed components
- A regulated, high-volume compressor and the correct downstream adapter only if you are qualified to perform a blowout
Step 1: Inspect the system and identify its drain method
Most irrigation systems use one of three water-removal methods: manual drains, automatic drains, or compressed-air blowout. Some systems combine them. The system’s design—not a generic online instruction—determines which method is appropriate.
The Tool Desk
Outbyte Driver Updater FREEScan for outdated or missing drivers - takes under a minuteDriver Scan →Outbyte PC Repair FREERepair Windows errors before they cause bigger problemsFix Now →Manual-drain systems
A manual-drain system generally has drain valves at low points in the mainline or laterals. A safe general sequence is:
- Shut off the irrigation water.
- Open a zone or control valve briefly to release pressure.
- Open each manual drain slowly. A drain may still be pressurized if the pressure was not relieved.
- Drain the mainline and the pipe between the irrigation shutoff and the backflow preventer.
- Drain sprinkler bodies, valve bodies, and check-valve heads as required by the system design.
- Drain the backflow preventer separately according to its make and model.
Rain Bird warns that manual drain valves can remain pressurized; never open one abruptly while assuming the line is empty. After draining, close ordinary manual drains unless the irrigation manufacturer specifically directs you to leave them open. Backflow ball valves and test cocks may have different winter positions.
Automatic-drain systems
Automatic drains commonly open when pressure falls. Hunter describes one common type as opening below approximately 10 psi, but that threshold does not apply to every automatic drain. These valves are usually intended for low points in lateral lines downstream of zone valves; they are not automatically a substitute for draining the mainline or backflow assembly. Rain Bird’s guide describes the placement and limitations of automatic drains.
Rank #2

- ALL-IN-ONE WINTERIZATION SOLUTION – Blow out adapter for sprinkler systems, outdoor faucets, RVs, campers, and travel trailers. Includes male-to-male fitting for RV use. Safer alternative to antifreeze
- UNIVERSAL QUICK-CONNECT COMPATIBILITY – ¾"-11 NH hose threads fit standard garden hoses. ¼" Industrial Interchange quick-connect plug works with common air compressor fittings in North America
- FLEXIBLE AND DURABLE CONSTRUCTION – Kink-free Insta-Grip hose (made in USA) accesses tight spaces and reduces stress on fittings. 250 PSI rated. 100% outdoor rated, impervious to water and oil
- LEAD-FREE BRASS WITH USA CRAFTSMANSHIP – All metal parts are solid lead-free brass (less than 0.25% lead). Made in USA with domestic and global parts. Includes sprinkler winterization instructions
- FORGED LEAD-FREE BRASS SHUT-OFF VALVE – Valve is forged brass (not cast) for added strength. Also suitable for winterizing boats, drip irrigation, soaker hoses, and various plumbing applications
To use automatic drainage, shut off the irrigation supply, activate a zone briefly to reduce pressure, and confirm that the automatic drains open and discharge water. Inspect low points and valve boxes for standing water. Automatic drains can stick, low spots can retain water, electric valves can hold water above a diaphragm, and sprinkler heads with check valves can remain full. The backflow preventer and exposed components always need separate attention.
When a blowout is the better choice
A professional blowout is strongly recommended when frost reaches buried pipe, the drainage layout is unknown, the system has many electric valves or check-valve heads, the property has substantial elevation changes, the system includes a pump, or there is no clearly identified downstream blowout fitting. Colorado State University notes that gravity drainage may leave water trapped above electric-valve diaphragms and recommends blowing out systems with electric valves in situations where gravity drainage is insufficient. See Colorado State University’s explanation of drainage limitations.
Step 2: Shut off the water and disable automatic operation
- Close the irrigation system’s main water shutoff, normally located before the backflow preventer.
- Open one zone or control valve briefly to relieve pressure.
- If the system has manual drains, open them only after pressure has been relieved.
- Prevent the controller from starting an irrigation cycle while the system is being drained or serviced.
- If there is a pump, prevent an accidental start and protect the pump from running dry.
For a system without a pump, use the controller’s Rain, Standby, Off, or equivalent mode when available. Exact labels vary. This normally preserves the watering schedule while stopping automatic operation. Many outdoor controllers can remain powered with the dial or switch set to Off, but follow the controller manual; unplugging some models can erase the clock or settings. Rain Bird’s homeowner instructions discuss controller shutdown and insulation, and Hunter also addresses leaving certain controllers powered while Off.
Important exception for an electric-valve blowout
If the compressor will clear zones through electric valves, do not turn the controller Off before the blowout is complete. The controller may need to open each zone. Keep the controller available to operate one zone at a time, shut off and disconnect the compressor first, and then place the controller in Off or Rain mode. Rain Bird’s detailed sequence keeps a zone open while the compressor is shut down.
Pump-fed systems need extra protection
A controller’s Off setting may not be enough if a power event, wiring fault, or controller failure could restart a pump. A dry-running pump can be damaged. Pump systems may require disconnection of master-valve or pump-start wiring, but do not open or rewire a hard-wired controller while it is energized. Follow the pump and controller manuals, shut off the appropriate circuit before electrical work, or hire a qualified professional. Do not use compressed air through the pump.
Quick wins for a faster PC:
Clear out junk files and repair common Windows errorsFree Scan →Scan for outdated or missing drivers - takes under a minuteDriver Scan →Step 3: Drain or blow out every zone
Choose one of the following branches. If the system was designed for manual or automatic drainage and you can verify that water is leaving all vulnerable components, use that method. If frost can reach buried lines or water remains trapped in valves and low spots, a properly controlled blowout is more dependable. Compressed air is not a casual shortcut: improper pressure, inadequate air volume, a wrong connection, or a closed zone can damage equipment or injure someone.
Option A: Manual or automatic drainage
For a manual-drain system:
- Close the irrigation main shutoff.
- Relieve pressure through a zone.
- Open low-point manual drains slowly and allow the mainline and laterals to empty.
- Check valve boxes and low spots for standing water.
- Address sprinkler bodies, check-valve heads, electric valves, filters, and regulators separately where the design requires it.
- Drain the backflow preventer according to its model instructions.
- Return ordinary manual drains to the position specified by the system or manufacturer.
For an automatic-drain system, close the supply, reduce pressure through a zone, and verify that the automatic drains open. Do not assume that a drain opening means the entire zone is empty. The pipe must be graded appropriately, the drain must be located at a low point, and the drain must function. Automatic drains may not clear the mainline, control valves, check-valve heads, backflow preventer, or other above-ground equipment.
Option B: Compressed-air blowout
Use this method only when you understand the system and have a regulated compressor with sufficient sustained air volume. Hunter, Rain Bird, Colorado State University, and water utilities warn that incorrect compressed-air work can damage components or cause serious injury. A professional is the safer choice when any part of the setup is uncertain.
Connect only at a proper downstream blowout fitting
The compressor should connect to a dedicated blowout port downstream of the backflow preventer. Isolate the backflow assembly before introducing air. Never blow compressed air through a pressure vacuum breaker, reduced-pressure assembly, double-check assembly, other testable backflow device, or pump. Do not use a backflow test cock as an improvised compressor connection. Hunter says not to blow through a backflow device or pump, and Medford Water notes that backflow manufacturers recommend against using test cocks for blowout.
If no downstream blowout port exists, do not remove a random plug or force an adapter onto the backflow assembly. Use the installed manual or automatic drains if they are suitable, have a professional install a proper fitting, or have a professional perform the winterization.
Rank #3

- Designed to winterize garden hose, sprinkler systems, faucets, by blowing out water from the water lines/plumbing to prevent freezing of garden water pipes, sprinkler systems,and faucets
- Heavy-duty brass construction with rust proof, Easy to connect,Heavy duty brass ensures no leaks due to deformation.With 2pcs extra Rubber Washer Donut shape conforms to all Hose connections to ensure a watertight seal.
- Compatible with 3/4 inch standard garden hose threading and 1/4" air compressor quick-connect both are widely used in North America.attach air line to water lines/hose system easily.
- Connect the 3/4" adapter side to water lines and connect the quick plug to air compressor' quick female coupler, Turn on the air compressor and rotate around ball valve's stem to open/close and adjust the air flow velocity to blow out the water from the water lines.
- Package include 1x Female Winterize blowout adapter 2 x Silicone extra gasket 1 X Teflon Tape (10 Meter)
Pressure: use the lowest applicable limit
There is no single pressure setting that is safe for every residential irrigation system. The limit is controlled by the lowest-rated pipe, valve, sprinkler, fitting, regulator, or other component in the zone—not by the compressor’s maximum rating and not by the pressure the system normally carries with water.
| Guidance | Published figure | How to interpret it |
|---|---|---|
| Rain Bird detailed homeowner guide | Do not exceed 50 psi | A conservative reference for a residential procedure, subject to the ratings of the actual components |
| Colorado State University and Hunter for rigid PVC | Up to 80 psi maximum | Only if every component in the zone permits it; 80 psi is a ceiling, not a target |
| Colorado State University and Hunter for polyethylene | 50 psi maximum | Do not exceed 50 psi under the cited guidance |
| Unknown pipe material or unknown component ratings | No safe guessed setting | Do not perform the blowout yourself; hire a professional |
Rain Bird’s detailed guide caps its procedure at 50 psi, while Colorado State University and Hunter distinguish between polyethylene and rigid PVC. Follow the component manufacturer’s instructions when available and use the lowest limit that applies. Never assume that a pipe rated for a particular water pressure can safely receive the same compressed-air pressure; air can create more severe stresses than water.
Air volume matters as much as pressure
Pressure tells you how forcefully the compressor can push; CFM, or cubic feet per minute, tells you how much air it can sustain. A small compressor may reach 50 or 80 psi while delivering too little continuous volume to move water through a long zone. Increasing pressure to compensate for inadequate CFM is unsafe.
Outdated Drivers Are Slowing You Down
One free scan finds every outdated or missing driver and matches the right update for your exact hardware.Free scan · exact hardware matchPC Slower Than It Used to Be?
A free scan shows the junk files, broken settings and background clutter dragging Windows down - then fixes them in one click.Free scan · Windows 10 & 11Published recommendations vary because they address different system sizes and procedures:
- Rain Bird’s detailed homeowner guide lists approximately 10–25 CFM and emphasizes high volume at low pressure.
- Hunter lists approximately 80–100 CFM for mainlines of 2 inches or less.
- Medford Water lists approximately 60–100 CFM at 50 psi for systems with 2-inch-and-smaller piping.
- Colorado State University gives the field heuristic zone flow in GPM divided by 7.5 equals approximate CFM, while warning that an undersized compressor may not purge the system effectively.
These figures should not be reduced to one universal compressor size. Choose a compressor for sustained CFM, not merely tank size or maximum PSI, and use the irrigation manufacturer’s or contractor’s recommendation for the particular system. A rental or professional high-volume compressor is often more appropriate than a household pancake compressor.
Safe blowout sequence
- Close the irrigation main water shutoff.
- Isolate the backflow preventer so air cannot enter it. Drain the backflow assembly separately in Step 4.
- Identify the proper downstream blowout fitting. Attach the correct adapter with the compressor valve closed.
- Set the regulator to the selected safe pressure before introducing air.
- Open the zone farthest from the compressor. Starting with the highest or farthest zone is commonly recommended, then work toward the closest zones.
- Start the compressor and gradually introduce air. Never start the compressor with every zone closed.
- Blow one zone at a time. Watch and listen for water discharge, unusual movement, leaks, or heat.
- Run each zone for no more than approximately two minutes per cycle, or stop earlier when the discharge becomes only a fine mist.
- Repeat two or more short cycles if necessary rather than running one long cycle. Stop when the zone is substantially cleared.
- Leave a zone open while shutting down the compressor. Wait for pressure to dissipate before disconnecting the hose.
- After the compressor is off and disconnected, place the controller in Off, Rain, or the manufacturer’s winter mode.
Do not continue until absolutely no mist appears. Moving dry air through a zone for too long can create friction and heat. Some gear-driven sprinkler heads depend on water for lubrication and cooling. Rain Bird recommends short cycles and stopping when only a fine mist remains; Hunter gives similar two- or three-cycle guidance.
Compressed-air stop conditions
Stop immediately if a pipe, fitting, valve, or sprinkler becomes unusually hot; a component moves, deforms, or leaks; the compressor is operating against a closed zone; water is not clearing; or you are unsure whether air is entering the backflow preventer or pump. Wear ANSI-approved eye protection, keep people and pets away from discharge points, and never stand over a pressurized sprinkler, fitting, valve, or pipe. Do not leave the compressor unattended.
Step 4: Drain and protect the backflow preventer, pump, and exposed parts
Backflow preventer
The backflow preventer is a separate task from clearing the irrigation zones. Pressure vacuum breakers, reduced-pressure assemblies, atmospheric vacuum breakers, double-check assemblies, and different models within those categories do not all drain in the same way.
- Keep compressed air isolated from the backflow assembly.
- Close the irrigation water supply upstream as directed by the system design.
- Drain the inlet and outlet piping.
- Open the model-specific test cocks, drain plugs, or other manufacturer-specified drains.
- Position ball-valve handles approximately 45 degrees, or half-open and half-closed, when the manufacturer or water authority specifies that position. This helps prevent water from being trapped inside the valve body.
- Leave the irrigation main shutoff closed for winter.
- Protect exposed piping and the assembly with approved insulation or an enclosure, without blocking vents, test cocks, relief outlets, or drain openings.
Do not assume that opening the test cocks completely drains every assembly. Watts’ Model 765 instructions state that test cocks alone may not adequately drain that assembly and describe additional model-specific inlet and outlet procedures. Salt Lake City Public Utilities also describes isolation and the approximately 45-degree valve position.
Colorado State University and Hunter caution against blowing compressed air through a backflow device. Internal seals and other parts can be damaged, including by heated air. Follow the exact instructions for the make and model, and comply with local water-utility requirements. If the assembly is installed with unions, removal and indoor storage may be possible for some models, but do not remove one unless the manufacturer or qualified professional confirms that procedure is appropriate.
Rank #4

- Blow out plug adapter fitting to winterize underground irrigation sprinkler systems, outdoor pipes, RV, boat, watercraft, motorhome, camper, travel trailer, water lines, homes, cabins, faucets, spigots, garden hoses, sillcocks, and hose bibbs by blow out method.
- Its short and stubby design allows access to tight spaces. Quick-connect attaches to air compressor. Compatible with standard 3/4 inch garden hose threading and air compressor 1/4 inch quick-connect commonly found in North America
- For your health and safety, this sprinkler winterizer is made of lead-free brass. Always wear safety goggles when handling or using compressed air
- Easily connects to air compressor and garden faucet to winterize lawn sprinkler systems, drip irrigation system, soaker hoses, faucets, and plumbing to prevent damage due to freezing
- This heavy duty winterization tool is machined from a solid lead-free brass casting. This blow out plug may also be used to winterize sprinkler systems, drip irrigation systems, soaker hoses, faucets, pipes, spigots, sillcocks, water garden hoses, waterlines, and hose bibbs where applicable
Insulation is supplemental, not a substitute for drainage
Insulate exposed PVC, shutoff valves, backflow piping, above-ground valve assemblies, and other permitted components after draining them. Insulation slows heat loss; it does not remove trapped water or guarantee protection during prolonged freezing. Do not wrap or cover a backflow preventer in a way that blocks an air vent, relief outlet, test cock, or drain opening. Rain Bird’s instructions include this vent and drain-opening caution. In severe exposure, a purpose-built enclosure or approved freeze-protection system may be more reliable than a loose blanket; Watts provides examples of backflow enclosures.
Pump, filters, and regulators
Drain the pump according to its own manual. Where the manufacturer permits it, remove the pump and store it in a protected location. Do not blow compressed air through the pump. Drain or remove exposed filters, pressure regulators, and other components that can retain water. A pump-start circuit also needs to be prevented from accidentally energizing while the system is dry.
Controller position and final winter check
For a non-pump system, leave the controller in its manufacturer-approved Off, Rain, or standby mode. Many outdoor controllers remain powered so programming is preserved, but the controller manual controls. For a pump system, confirm that the pump cannot start unexpectedly and that any electrical work was performed with power safely disconnected.
Before leaving the system, confirm that the water supply is closed, the zones have been drained or cleared, the backflow assembly has been drained separately, exposed parts are protected, the pump is protected, and every winter-positioned valve is labeled or photographed for spring startup.
When to stop and hire an irrigation professional
Professional winterization is the prudent choice when:
What’s actually slowing this PC down?
Pick the symptom - the matching free tool is one click away.
- You cannot locate the irrigation main shutoff or determine which side of the backflow preventer is the irrigation side.
- You do not know whether the buried pipe is PVC or polyethylene.
- The system has no clearly identified downstream blowout port.
- The only apparent connection is a backflow test cock or another connection not approved for compressed air.
- The system has a pump, complex elevations, many check-valve heads, unusual valves, or an unfamiliar backflow assembly.
- You cannot identify the lowest-rated component or obtain a regulated compressor with sufficient sustained CFM.
- Air pressure, water, or heat behaves unexpectedly during the blowout.
- A freeze is imminent and you would need to improvise a connection or pressure setting.
If hiring a contractor, ask where the compressor will connect, how the backflow preventer will be isolated and drained, what pressure and sustained CFM will be used, whether zones will be cleared individually, and whether the pump and exposed equipment will be protected. You can use the EPA WaterSense professional-certification information and the WaterSense contractor directory as starting points. Certification or directory listing does not replace checking local licensing, insurance, references, or backflow requirements.
Special cases
Drip irrigation and soaker hoses
Do not automatically apply the in-ground sprinkler blowout procedure to drip irrigation. Drip systems may contain small emitters, thin-walled tubing, filters, pressure regulators, flush caps, figure-eight end closures, and hose-end timers. A typical approach is to shut off the supply, open flush points, and disconnect and store removable filters, regulators, backflow devices, tubing, and other vulnerable parts according to their instructions. Rain Bird provides separate drip-irrigation winterization guidance.
Oklahoma State University advises draining and storing drip tape or soaker hoses away from sunlight and warns against moving hose while it is frozen. Do not expose delicate drip components to sprinkler-system blowout pressure unless their manufacturer specifically permits it.
No blowout port
Use installed manual or automatic drains if they are appropriate and reliable. Otherwise, have a professional install a proper downstream fitting or perform the winterization. Do not inject air through an unverified plug, valve, or backflow test cock.
Do these 3 things before closing this tab:
1Repair Windows errors before they cause bigger problems2Fix the driver behind crashes, sound loss and screen glitches3Clear out junk files and repair common Windows errorsManual drains left open or closed?
There is no universal position for every drain. Some ordinary manual system drains are closed after draining; some backflow drain valves or ball valves are left partially open; some system designs specify an open drain. Follow the instructions for that particular component. Never apply the approximately 45-degree backflow ball-valve position to every valve in the irrigation system.
Best Value
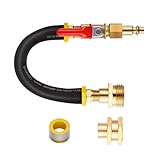
- MULTIPURPOSE:The winterizing kit with shut off valve come with 3/4 male and female garden hose connector,When with male garden hose end is typically used to winterize recreational vehicles(RV), watercraft, garden hose, camper, boat and travel trailer. The fitting with female garden hose end is typically used to winterize sprinkler systems, garden hoses, and outdoor plumbing.
- FLEXIBLE hose allows the adapter to access tight spaces and minimizes stress on pipes and fittings. 100% outdoor rated, virtually indestructible, impervious to water and oil. Easily connects to air compressor and garden faucet to winterize lawn sprinkler systems, faucets,plumbing and winterizing RV to prevent damage due to freezing. Compatible with standard garden hose threading and air compressor quick-connect commonly found in North America.
- LENGTH:The sprinkler blowout kit Pre-assembled length: 12.8 inches (approximate). Longer length than other manufacture,provide extra strength and durability.Easy to do winterize,Blowout water from sprinkler system & RV water line.
- STRONGER:This winterization tool is made from the highest quality parts.All matel parts are solid lead-free brass.Hose is 3/8" nominal diameter InstaGrip,Flexible Reinforced Synthetic Rubber, water and oil resistant, made in USA. Assembled with global parts.
- PROTECTION: Using these sprinkler winterization kit can avoid expensive damage caused by waterline freezing, and save yours headache in the spring.healthier, and environmentally friendlier winterization tool when compared with those winterizing kits that use antifreeze.
Why pressure-only blowout advice can be misleading
Consumer articles sometimes say that a homeowner compressor producing 40–50 psi is enough. That advice focuses on pressure and may omit sustained air volume. A compressor can reach the target PSI while delivering too little CFM to clear a long zone. The result may be trapped water, or a homeowner may respond by increasing pressure beyond a safe component limit.
Published guidance also differs. Rain Bird’s detailed homeowner guide says not to exceed 50 psi, while Hunter and Colorado State University allow up to 80 psi for rigid PVC when the entire zone is rated for it and limit polyethylene to 50 psi. A separate Rain Bird consumer blowout page contains pressure advice that does not align cleanly with the detailed homeowner guide. For that reason, do not copy a single internet number. Use the lowest limit in the component manuals, or hire a professional when ratings and system design are unknown.
Spring restart checklist
Winterization is not complete until you have a safe plan for bringing the system back online:
Free tools Windows power users keep installed
One-click scans. No signup required.
- Wait until freezing conditions have passed and the ground has thawed sufficiently.
- Inspect the backflow preventer, exposed pipes, valve boxes, pump, valves, fittings, and sprinkler heads for splits or cracks.
- Close manual drains and reposition test cocks, backflow valves, and other components according to the manufacturer’s operating instructions.
- Reconnect controller wires or pump controls that were disconnected, with power safely off during electrical work.
- Open the main irrigation valve slowly to avoid water hammer.
- Pressurize the system gradually and check for leaks before starting the schedule.
- Run each zone manually. Look for geysers, broken heads, missing nozzles, weak flow, leaks, and pooling water.
- Restore the automatic schedule only after every station passes inspection.
Rain Bird’s spring guidance recommends slow pressurization and station-by-station testing. If a backflow assembly leaks, fails its normal operation, or appears damaged, keep the supply closed and call a qualified irrigation or backflow professional.
Final winterization checklist
- Climate assessed: You considered frost depth, freeze duration, and exposed components rather than relying only on a hardiness zone.
- System inspected: Every zone was tested and obvious leaks or broken heads were noted or repaired.
- Drain method identified: You know whether the system uses manual drains, automatic drains, a blowout, or a combination.
- Water shut off: The irrigation main shutoff is closed before the backflow preventer.
- Controller controlled: Automatic watering is disabled, with the controller left available during an electric-valve blowout until the compressor is shut down.
- Zones cleared: Draining or blowout was completed zone by zone, without exceeding component limits or running dry air for too long.
- Backflow protected: The assembly was not used as an air connection, was drained according to its model instructions, and has unobstructed vents and drains.
- Pump protected: The pump cannot start dry and was drained or stored as directed.
- Exposed parts protected: Insulation or an approved enclosure supplements drainage without blocking outlets.
- Spring plan recorded: Valve positions, removed parts, wiring, and zone information are labeled or photographed.
Technical references
Frequently Asked Questions
Is turning off the sprinkler controller enough for winter?
No. Turning the controller to Off, Rain, or standby stops scheduled watering but leaves water in pipes, valves, sprinkler bodies, and the backflow preventer. You must use the system’s manual or automatic drains, a properly performed blowout, or a combination of methods. Exposed components need separate protection.
Can I use a small pancake compressor to blow out my sprinkler system?
Not necessarily. A pancake compressor may reach the required pressure but lack the sustained CFM needed to clear a long zone. Published recommendations vary from roughly 10–25 CFM to 60–100 CFM depending on the system and source. If the compressor cannot provide the manufacturer’s required air volume at a safe regulated pressure, hire a professional rather than increasing PSI.
Can I connect the compressor to a backflow preventer test cock?
No. Use a dedicated blowout fitting downstream of the backflow preventer. Isolate and drain the backflow assembly separately according to its model instructions. Blowing air through the backflow device or using a test cock as an improvised connection can damage internal parts and seals.
Should automatic drain valves remove all the water?
Not always. Automatic drains may clear properly designed low-point lateral lines, but they may not drain the mainline, electric valves, low spots, sprinkler heads with check valves, or the backflow assembly. Verify that water actually discharges and treat every exposed or model-specific component separately.
What should I do if I do not know whether my pipe is PVC or polyethylene?
Do not guess at compressor pressure. The cited guidance allows up to 80 psi for rigid PVC in some circumstances but limits polyethylene to 50 psi, and the lowest-rated component governs. Identify the pipe and component ratings or hire an irrigation professional.
What if my system has drip irrigation or soaker hoses?
Use a separate drip procedure. Shut off the supply, open flush points, and disconnect and store removable filters, regulators, tubing, emitters, and other vulnerable components as directed by their manufacturers. Do not automatically apply sprinkler blowout pressure to thin drip tubing or frozen soaker hoses.
Should I leave all the irrigation valves open over winter?
No universal position applies. Ordinary manual drains, backflow ball valves, test cocks, and automatic drains may have different required positions. Follow the system and component manuals. Backflow ball handles are often left approximately 45 degrees after draining when the model instructions call for it, but that does not mean every irrigation valve should be left partially open.
Windows Errors? Fix Them Before They Spread
Repair common Windows errors and clear accumulated junk for a smoother, more stable PC - no reinstall needed.Free scan · no reinstallCrashes, No Sound, or Screen Glitches?
Random freezes, missing sound and display glitches usually trace back to one bad driver. Find and replace yours safely.Free scan · under a minuteWhen should I hire a professional?
Hire one when the system has a pump, an unfamiliar backflow assembly, complex elevations, unknown pipe material, no proper downstream blowout fitting, unreliable drains, or a compressor with insufficient CFM. Also stop if a component becomes hot, moves, deforms, leaks, or if you are unsure whether compressed air is entering the backflow preventer or pump.
The Bottom Line
The safe sequence is to inspect first, shut off the irrigation supply, clear every vulnerable zone using the method the system was designed for, and then drain and protect the backflow preventer, pump, and exposed equipment separately. A controller set to Off is not winterization. Where frost reaches buried pipe—or where the system, compressor, or backflow arrangement is unfamiliar—a professional blowout is usually safer than improvising with excessive pressure or an undersized compressor.
Quick Recap
Product prices and availability are accurate as of the date/time indicated and are subject to change. Any price and availability information displayed on Amazon at the time of purchase will apply.




