
What’s actually slowing this PC down?
Pick the symptom - the matching free tool is one click away.
Some links on this page are affiliate links: if you buy through them we may earn a commission, at no extra cost to you.
A DIY concrete lamp can be a good weekend project, but it needs more planning than most craft tutorials admit. You are making a small precast concrete part that will support an electrical assembly, sit on furniture, carry a shade, and be touched every day. The finished lamp needs to look clean, stay upright, protect the cord, and avoid trapping heat around the socket.
For most homeowners in the United States, a realistic 2026 budget is about $35 to $120 per lamp if you already own basic tools. A more polished version with countertop mix, pigment, sealer, a better lamp kit, and purpose-built forms often lands around $75 to $150. A first-time build can run $100 to $300+ if you need a drill, masonry bits, clamps, respirator, eye protection, sanding supplies, buckets, and mold materials.
As an Amazon Associate I earn from qualifying purchases.
The simplest safe approach is a cast concrete base with a listed make-a-lamp kit. Keep the concrete out of the electrical pathway, design the cord route before you mix, use LED bulbs, and do not improvise hidden splices inside the base. Hardwired fixtures, damp-location lights, commercial installations, rental-property lighting, and anything you are not confident wiring should go to a licensed electrician or lamp repair professional.
What Kind of Concrete Lamp Are You Making?
There are three common ways to make a concrete lamp, and they are not equal in difficulty or risk.
Cast Concrete Base
This is the best starting point for most homeowners. You cast a solid or mostly solid concrete base, leave a vertical hole for a threaded lamp rod, provide a side or bottom exit for the cord, let the concrete cure, then install a listed socket and cord kit. The shade, harp, and finial attach to the rod and socket assembly.
Popular on Amazon

- EXTRA LONG 12 FOOT CORD & QUALITY HARDWARE SET Included - A 12ft Electric Cord with polarized plug fit both Table Lamp and Floor Lamp Making / Repair. Wire ends are fitted with U-shaped connector,which make connection work simple .Qualified hardwares have good color matching and looks upgraded.
- UPGRADED LAMP PARTS IN COMPLETE LAMP SET - The kit includes a 3-way turn knob socket,a 12ft cord,a 8" lamp shade harp,a brass switch knob replacement, 4 kinds of washers and hex nuts, 1 brass pipe coupling, and 3 options of nipples -8", 2.5" ,0.8" for your different assembly needs. All essential parts included.
- UL LISTED ELECTRICAL COMPONENTS -Both the electric cord and the light socket are UL listed. Safe material for electrical installation.
- APPLICATION- Making & fixing table or floor Lamps;repair & rewire vintage lighting fixtures;create your own unique lamp from scratch or to repair an old one;ideal for creating new lamps from vases, bottles, or items with threaded openings.
- WITH INSTRUCTIONS to guide you assembly process. No matter repair a vintage lamp or make a new custom lighting,you will have clear idea on each step through the wiring instructions.
A stable table lamp base often works well at 4 to 6 inches wide, 4 to 8 inches tall, and 3 to 8 pounds finished weight. A tall narrow base can tip once the shade is installed, so test stability with the actual shade in place. On our job sites, we treat this like any other small precast piece: the geometry matters as much as the finish.
PC Slower Than It Used to Be?
A free scan shows the junk files, broken settings and background clutter dragging Windows down - then fixes them in one click.Free scan · Windows 10 & 11Outdated Drivers Are Slowing You Down
One free scan finds every outdated or missing driver and matches the right update for your exact hardware.Free scan · exact hardware matchSkim-Coated Existing Lamp
This method uses a thin cementitious coat over an existing lamp body. It is lighter and often easier, but the finish is more like plaster or microcement than cast concrete. It can be a good cosmetic upgrade when the original lamp is structurally sound and the cord and socket are already listed and in good condition. Do not coat over damaged wiring, loose sockets, cracked plastic, or heat-damaged parts.
Concrete Shade or Box Lamp
A concrete shade, lantern, or box lamp with light holes looks sharp, but it adds heat, weight, and electrical-clearance concerns. Thin concrete sections are more prone to cracks and chipped edges. If you build this style, use LED bulbs only, keep the bulb away from concrete surfaces, and leave ventilation around the socket. For most DIYers, a concrete base is the cleaner and safer first build.
2026 Cost Breakdown for a DIY Concrete Lamp
The numbers below assume U.S. retail pricing in 2026 and a single lamp. Local pricing varies, especially for electrical kits, specialty concrete mixes, and electrician service calls.
| Build Level | Typical 2026 Cost | What Is Included |
|---|---|---|
| Basic DIY lamp | $35-$75 | Small bag of mix or cement, basic listed lamp kit, LED bulb, release agent, felt pads, sandpaper, simple sealer, reused mold |
| Polished DIY lamp | $75-$150 | Countertop mix, pigment, melamine or silicone mold, wet/dry sanding supplies, better socket and cord kit, matte sealer or wax |
| First-time tool-heavy build | $100-$300+ | Drill, masonry bits, clamps, respirator, safety glasses, bucket, trowel, orbital sander, form materials, finishing supplies |
| Professional wiring help | $65-$130 per hour, or $100-$200+ service call | Small wiring work, lamp repair, or electrical consultation; larger visits often average several hundred dollars |
Concrete itself is usually not the expensive part. Small general-purpose bags can be around $5 to $10 in many big-box stores, while 80-pound countertop or decorative mixes commonly run $15 to $35+. A basic make-a-lamp kit is often around $15 to $30. Specialty fabric cords, dimmers, brass sockets, and designer hardware can push the electrical package to $35 to $80+.
Quick wins for a faster PC:
Repair Windows errors before they cause bigger problemsFix Now →Scan for outdated or missing drivers - takes under a minuteDriver Scan →For one lamp, buying an 80-pound bag may feel excessive, but countertop mixes are sold that way because they are designed for larger pours. One 80-pound countertop mix yield is commonly about 0.6 cubic feet. That is far more than a 5-by-5-by-6-inch lamp base, which uses roughly 0.087 cubic feet before accounting for voids and waste. If you are buying a large bag, plan test pucks, spare pours, or multiple bases.
Materials and Tools That Actually Matter
A clean concrete lamp starts with the right mix, a well-designed mold, and a safe electrical kit. The difference between a project that looks built and one that looks improvised is usually decided before the concrete hits the form.
Concrete Mix
For small decorative castings, use a fine mix. Countertop mix, sand/topping mix, or a decorative concrete mix usually finishes better than coarse all-purpose concrete. Coarse aggregate can create exposed gravel, chipped corners, weak thin sections, and large surface voids. It also makes drilling and edge finishing harder.
Countertop mixes are made for precast or cast-in-place work and are commonly marketed as high-strength, flowable products that can be polished or colored. That does not mean you should add water until the mix is soupy. For a lamp base, aim for a peanut-butter to thick-batter consistency. It should pack into the mold and move with tapping, but it should not separate into water, paste, and stone.
The Tool Desk
Outbyte PC Repair FREERepair Windows errors before they cause bigger problemsFix Now →Outbyte Driver Updater FREEScan for outdated or missing drivers - takes under a minuteDriver Scan →Lamp Kit
Use a listed make-a-lamp kit with a medium-base socket, cord, plug, threaded rod, washers, nuts, harp, and finial. Many common kits use an E26 medium-base socket, 18-gauge cord, and a polarized plug. One common style uses a 6-foot SPT-2 polarized cord with 18 AWG wire and a 60-watt maximum bulb rating. Another common kit style uses an 8-foot UL #18 cord set.
Those ratings matter. If the socket is rated for 60 watts, stay under that rating. We recommend LED bulbs because they produce much less heat for the same light output. A typical 8 to 10 watt LED can replace an older 60-watt incandescent in many table-lamp uses, while keeping heat lower inside small shades and concrete cavities.
Mold Materials
Good mold options include plastic containers, milk cartons, mailing tubes, melamine, acrylic, foam board sealed carefully, or reusable silicone molds. Reused containers can cost $0 to $15. Custom melamine or silicone mold setups can run $20 to $80+.
Concrete records every defect in the mold. Wrinkles, tape seams, rough cuts, and unsealed corners show up in the finished lamp. For a sharper product, build the mold square, seal inside corners, and use silicone caulk to create a small radius. Sharp concrete corners chip easily; a 1/8-inch chamfer or radius makes the base more durable.
Recommended Free Tools
Also popular on Amazon

- Extra Long 12 Foot Cord & Quality Hardware Set Included - A 12ft Electric Cord with polarized plug fit both Table Lamp and Floor Lamp Making / Repair. Wire ends are fitted with U-shaped connector,which make connection work simple.Qualified hardwares have good color matching and looks upgraded.
- UPGRADED LAMP PARTS IN COMPLETE LAMP SET - The kit includes a Push ON/OFF Socket,a 12ft cord,4 kinds of washers and hex nuts, 1 brass pipe coupling, and 2 nipples -2.5" ,0.8" for your different assembly needs. Different essential parts to rewire or make a lamp.
- UL Listed Electrical Components -Both the electric cord and the light socket are UL listed. Safe material for electrical installation.
- Application- Making & fixing table or floor Lamps;repair & rewire vintage lighting fixtures;create your own unique lamp from scratch or to repair an old one;ideal for creating new lamps from vases, bottles, or items with threaded openings.
- WITH INSTRUCTIONS to guide you assembly process. No matter repair a vintage lamp or make a new custom lighting,you will have clear idea on each step through the wiring instructions.
Safety Gear
At minimum, use safety glasses, waterproof gloves, long sleeves, and respiratory protection when handling dry mix, sanding, or drilling. Portland cement can irritate skin and eyes, and wet cement can cause caustic burns. Concrete dust can contain respirable crystalline silica. OSHA warns that silica exposure can lead to silicosis, lung cancer, COPD, and kidney disease. Homeowners are not regulated like workers, but the hazard is the same material hazard.
Use wet sanding where practical, or use dust extraction. Do not dry-sand concrete in a closed garage and sweep the dust into the air afterward. Clean with a HEPA vacuum or damp method, not compressed air.
Design the Electrical Path Before You Mix
The biggest mistake we see in DIY concrete lamp builds is treating the wiring hole as an afterthought. Once the base cures, every correction becomes harder. Plan the electrical pathway before mixing concrete.
A typical cast base needs four things: a centered vertical path for the threaded rod, a cord exit channel, enough space for washers and nuts, and strain relief so the cord is not cut by concrete or pulled against the socket terminals.
Threaded Rod Path
Most make-a-lamp kits use a hollow threaded rod. The rod gives the lamp structure and provides a protected route for the cord. For a basic table lamp, a 1/8 IPS lamp pipe is common in lamp hardware, though kit dimensions can vary. Follow the kit instructions and build the mold around the actual hardware you bought.
To form the center hole, use a smooth dowel, plastic tube, drinking straw bundle, or temporary rod wrapped so it can be removed cleanly. Keep it vertical and centered. If the rod leans, the shade will lean.
Cord Exit
The cord needs a smooth exit at the back or bottom of the base. A 3/8-inch to 1/2-inch channel is usually enough for many lamp cords, but measure your cord and plug assembly. Do not pinch the cord under the lamp. If the cord exits the bottom, add a recessed groove and felt pads so the lamp sits flat.
Any edge touching the cord should be smooth. Bare concrete can be abrasive. Use a plastic bushing, rubber grommet, cord grip, or a cleanly finished channel so the cord jacket is protected.
No Hidden Splices in Concrete
Do not bury wire nuts, tape splices, solder joints, or loose connections inside concrete. If something fails later, you cannot inspect or repair it without breaking the lamp. Use the listed kit as designed. Keep connections accessible in the socket assembly.
NEC Article 410 is the electrical-code family that covers luminaires, lampholders, and lamps. The practical homeowner translation is simple: use listed luminaires, lampholders, sockets, and cord components. UL 153 is commonly associated with portable luminaires, while UL 1598 applies to many fixed luminaires. You do not need to memorize those standards to build a table lamp, but you should respect what they are telling you: do not improvise the electrical parts.
Step-by-Step: Cast a Concrete Table Lamp Base
This process is written for a simple cast concrete base using a listed lamp kit. Adjust dimensions to your shade, hardware, and room, but keep the safety principles the same.
1. Choose a Stable Size
For a first lamp, a base around 5 inches wide by 5 inches deep by 5 to 7 inches tall is a good starting point. That gives enough mass for stability without becoming awkwardly heavy. If you want a taller base, widen the footprint or use a smaller shade.
Free tools Windows power users keep installed
One-click scans. No signup required.
Before casting, mock up the lamp height. A common bedside or side-table lamp might finish around 20 to 28 inches tall including shade. A desk accent lamp might be closer to 14 to 20 inches. The shade should not make the lamp top-heavy.
Also popular on Amazon

- PACKAGE INCLUDES - 1 x 12 feet brown lamp cord, 1 x 3-way lamp socket, 1 x lamp harp base, 1 x decorative neck, 1 x 5 cm threaded pipes, 1 x 2.5 cm threaded pipes, 2 x metallic washers, 2 x rubber washers, 2 x lock washers, 2 x hex nuts.
- BEGINNER FRIENDLY LAMP WIRING KIT - Repair a vintage lamp with safe and new electrical components, or make new custom lighting from scratch with this user friendly DIY Kit. No previous knowledge of how to make a lamp is necessary.
- 12 FEET UL-LISTED - Electrical components are polarized and UL-listed, meaning you can rewire or repurpose old vintage or thrift store lamps to make them safer than they were before.
- COMPLETELY CUSTOMIZABLE - Why settle for a lamp that doesn’t perfectly match your style and decor? Making your own custom lamp to suit your unique taste and preferences.
- 100% HAPPINESS GUARANTEE - We are so confident that you’ll love our products that we back them all with our Happiness Guarantee. [NOTE]: If there is any part of damage attachment, please contact us to get free replacement.
2. Build and Seal the Mold
Cut your mold material cleanly and brace it so it cannot bow. Concrete is heavy even in small amounts. Seal corners with silicone caulk and let the caulk cure before pouring. Apply release agent lightly. Cooking spray, paste wax, or a form-release product can work depending on the mold material. Too much release can stain or pit the surface.
If you want a cord groove in the bottom, form it with a removable strip. If you want a side exit, place a short tube from the center rod path to the back face. Make sure these pieces are secured; wet concrete will move loose parts.
3. Dry-Fit the Lamp Hardware
Assemble the threaded rod, washers, nuts, socket base, harp saddle, and cord without concrete. Confirm the rod length. You need enough thread above the concrete for the socket and harp hardware, and enough below or inside the base to tighten the assembly. A common error is casting a base and later discovering the rod is 1/2 inch too short.
Do these 3 things before closing this tab:
1Scan for outdated or missing drivers - takes under a minute2Clear out junk files and repair common Windows errors3Fix the driver behind crashes, sound loss and screen glitchesCheck the socket rating and bulb limit now. If the kit says 60 watts maximum, use an LED bulb well under that limit. Do not assume concrete makes heat irrelevant. Concrete can absorb heat, but small cavities and shades can still trap it.
4. Mix Concrete Consistently
Measure water instead of guessing. Add most of the water first, mix, then adjust in small amounts. For small pours, a margin of a few ounces can change the surface quality. The mix should be workable but not watery. Too much water increases shrinkage, weakens edges, and often creates a dusty surface.
Mix until all dry pockets are gone. Scrape the bucket sides and bottom. Let the mix rest briefly if the product instructions allow, then remix. Follow the bag directions for working time, curing, and thickness limits.
5. Place, Tap, and Vibrate Lightly
Fill the mold in lifts. After each lift, tap the mold with a rubber mallet or use a palm sander without sandpaper against the outside of the form. The goal is to bring air bubbles up without separating the aggregate from the paste. Heavy vibration can cause segregation, especially with wetter mixes.
Work around the center rod form and cord channel carefully. Use a small stick or trowel to consolidate around tight areas. Surface voids often happen because concrete did not fully pack around inserts.
6. Cover and Cure
Do not rush curing. Many small concrete pieces can be demolded after 24 to 48 hours, but that is not the same as fully cured. Concrete continues gaining strength for weeks, and the surface color changes as moisture leaves. For a lamp base, wait at least 2 to 3 days before aggressive handling, drilling, or sanding, and longer if the mix instructions call for it. If the piece feels damp or cool, give it more time before sealing or wiring.
Keep the curing piece out of direct sun and strong airflow. Rapid drying can encourage surface cracking. Covering the mold with plastic for the first day helps retain moisture.
7. Sand, Patch, and Seal
After demolding, knock down sharp edges with wet/dry sandpaper. Start around 120 to 220 grit for rough edges, then move to 320 to 400 grit if you want a smoother finish. Wet-sand to control dust. Let the base dry fully before sealing.
For a higher-end finish, fill pinholes with a cement slurry made from cementitious material and water, pressed into the voids with a gloved finger or plastic spreader. Let it cure, sand again, then seal. Matte acrylic, penetrating concrete sealer, polyurethane, or wax can all work, but each changes the color and sheen. Test the finish on a sample puck first.
8. Wire the Lamp Kit
Only wire the lamp after the concrete is dry, stable, and free of loose dust. Follow the lamp kit instructions exactly. Keep polarity correct on polarized plugs and sockets. The ribbed conductor is commonly the neutral conductor on many lamp cords, but verify your kit instructions instead of relying on memory.
The cord should move through the base without abrasion, then be secured so normal handling does not tug on the socket terminals. After assembly, install felt or cork pads and test the lamp on a flat surface with the shade installed. If it rocks or tips easily, fix that before using it.
Also popular on Amazon
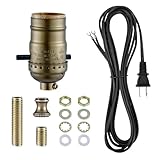
- Extra Long 12 Foot Cord & Quality Hardware Set Included - A 12ft Electric Cord with polarized plug fit both Table Lamp and Floor Lamp Making / Repair. Wire ends are fitted with U-shaped connector,which make connection work simple .Qualified hardwares have good color matching and looks upgraded.
- UPGRADED LAMP PARTS IN COMPLETE LAMP SET - The kit includes a Push ON/OFF Socket,a 12ft cord,4 kinds of washers and hex nuts, 1 brass pipe coupling, and 2 nipples -2.5" ,0.8" for your different assembly needs. Different essential parts to rewire or make a lamp.
- UL Listed Electrical Components -Both the electric cord and the light socket are UL listed. Safe material for electrical installation.
- Application- Making & fixing table or floor Lamps;repair & rewire vintage lighting fixtures;create your own unique lamp from scratch or to repair an old one;ideal for creating new lamps from vases, bottles, or items with threaded openings.
- WITH INSTRUCTIONS to guide you assembly process. No matter repair a vintage lamp or make a new custom lighting,you will have clear idea on each step through the wiring instructions.
Finish Options That Look Intentional
Concrete looks best when the finish matches the form. Trying to make a rough pour look like polished stone usually leads to frustration. Decide the finish before you cast.
Quick wins for a faster PC:
Scan for outdated or missing drivers - takes under a minuteDriver Scan →Repair Windows errors before they cause bigger problemsFix Now →Fix the driver behind crashes, sound loss and screen glitchesFind Drivers →Natural Gray
Natural gray concrete is the most forgiving finish. Use a fine mix, seal it matte, and pair it with brass, black, or warm wood hardware. Expect the color to lighten as it dries. A base that looks dark charcoal on day one may become medium gray after a week.
Pigmented Concrete
Pigment can look excellent, but test first. Make two or three 2-inch sample pucks with measured pigment ratios before casting the lamp. Concrete color shifts as it cures and after sealer is applied. Too much pigment can affect strength and finish, so follow the pigment manufacturer’s dosage limits.
Polished or Filled Surface
A polished look requires more patience. Use a countertop mix, vibrate carefully, fill pinholes with slurry, wet-sand through progressively finer grits, and seal only after the base is dry. For a small lamp, you do not need countertop-level polish, but you do need consistent sanding. Random shiny spots and dull patches make the piece look unfinished.
Felt, Cork, and Furniture Protection
Concrete can scratch wood, stone, painted furniture, and glass. Add felt or cork pads under the base. Use at least four pads on a square base or a continuous cork sheet trimmed cleanly. Pads also give the cord room to exit if the groove runs underneath.
Recommended Free Tools
Safety, Code, and Permits
A plug-in table lamp you make for your own home usually does not involve the same permitting process as building wiring, but that does not make the electrical side casual. The safe line is clear: use listed components, follow the kit instructions, keep connections accessible, and avoid permanent installation unless a qualified person handles it under local code.
Call a pro for hardwired fixtures, wall sconces, ceiling luminaires, damp or wet locations, outdoor lighting, rental units, commercial spaces, damaged cords, damaged sockets, flickering, heat smell, tripping breakers, or any uncertainty about grounding and polarity. In 2026, small electrical work may cost about $65 to $130 per hour nationally, while many electrician visits include a minimum service call around $100 to $200 for the first hour. A full visit can average several hundred dollars depending on market, travel, licensing, and scope.
From a construction standpoint, the health hazards are just as real as the electrical hazards. Dry concrete mix and sanding dust can expose you to respirable crystalline silica. OSHA’s silica standard for workers uses a permissible exposure limit of 50 micrograms per cubic meter averaged over an 8-hour day, with an action level of 25 micrograms per cubic meter. A homeowner project will not be monitored that way, but the dust should still be controlled.
Portland cement exposure can occur by inhalation, ingestion, and skin or eye contact. Symptoms can include irritation, coughing, dermatitis, chronic bronchitis, and breathing difficulty. Wet cement is caustic and can burn skin. Wear gloves, eye protection, long sleeves, and a suitable respirator when dust is present. Wash exposed skin promptly.
When to DIY vs. When to Hire a Pro
| Situation | DIY Makes Sense | Hire a Pro |
|---|---|---|
| Plug-in table lamp with a listed kit | Yes, if you can follow the kit instructions and keep wiring accessible | If you are unsure about polarity, strain relief, or socket assembly |
| Concrete base only, reusing a good lamp assembly | Yes, if the cord and socket are undamaged and rated properly | If the existing lamp has heat damage, loose parts, or brittle wiring |
| Hardwired wall or ceiling fixture | No | Yes, use a licensed electrician under local code |
| Bathroom, exterior, porch, or damp location | No for improvised DIY lighting | Yes, location rating and code compliance matter |
| Rental, office, store, or commercial use | Not recommended | Yes, liability and code requirements are higher |
DIY is appropriate when the project is portable, dry-location, low-heat, and built from listed components. Hire help when the lamp becomes part of the building, serves a public or tenant space, or requires electrical judgment beyond assembling a kit.
Common Mistakes to Avoid
Using coarse concrete for a small base. Large aggregate creates voids, exposed stone, chipped arrises, and weak thin areas. Choose countertop mix, sand mix, or another fine decorative mix.
Adding too much water. Soupy concrete is easier to pour but usually weaker and messier. It shrinks more, bleeds more, and often sands poorly.
Forgetting the cord path. Drilling a clean side exit after curing is possible, but it is not as predictable as casting the path into the base. Plan the route first.
The Tool Desk
Outbyte PC Repair FREERepair Windows errors before they cause bigger problemsFix Now →Outbyte Driver Updater FREEScan for outdated or missing drivers - takes under a minuteDriver Scan →Also popular on Amazon

- 💡 COMPLETE LAMP KIT: Our DIY lamp kit provides all the essentials you need to create your own unique lamp from scratch or to repair an old one.
- 🔧 VERSATILE APPLICATION: This kit is ideal for creating new lamps from vases, bottles, or any item with a threaded opening, as well as for rewiring or restoring old lamps.
- 🔄 3-WAY SOCKET: Includes a 3-way socket that accommodates 3 levels of light intensity for the perfect ambience.
- ⚙️ ALL ESSENTIAL PARTS INCLUDED: The kit comprises an 8ft matching cord, nipple, washer, and two hex nuts. The nipple size is 1/8 IP and 1" long.
- 📝 EASY TO ASSEMBLE: The package comes with clear, step-by-step wiring instructions to guide you through the assembly process.
Casting sharp corners. Sharp concrete corners chip. Use a small chamfer or radius in the mold, or sand the edges after demolding.
Wiring before the base is dry. Moisture and electrical parts do not belong together. Let the concrete dry thoroughly before assembling the lamp.
Ignoring stability with the shade installed. A bare base may feel solid, then become top-heavy once the harp and shade are attached. Test the final assembly.
Using incandescent bulbs in tight shades. Stay below the socket rating and use LED bulbs. Low heat matters in small fixtures.
Dry sanding without dust control. Use wet methods or dust extraction. Concrete dust is not just nuisance dust.
Practical Build Specs for a First Lamp
If you want a reliable starting specification, build a square base about 5 inches by 5 inches by 6 inches. Use a fine countertop or sand/topping mix, a centered lamp pipe path, a rear cord exit, and a listed E26 socket kit with an 18-gauge polarized cord. Install a 6 to 10 watt LED bulb unless your shade and kit call for something different.
Demold after the product’s recommended early cure period, commonly 24 to 48 hours for many small castings, then let the base continue curing and drying before finishing. Sand wet, fill pinholes if desired, seal with a matte product, and add felt or cork pads. Total active labor is usually 3 to 6 hours, spread over several days because curing and drying take time.
That schedule is normal. On construction work, the calendar matters as much as the hands-on time. Concrete rewards patience. The best-looking small pours usually come from measured water, controlled curing, careful finishing, and not rushing the electrical assembly.
Bottom Line
A DIY concrete lamp is worth doing if you respect both parts of the project: concrete and electricity. Use a fine mix, build a clean mold, design the wire path before the pour, control dust, protect your skin from wet cement, and assemble the lamp with listed components. Expect to spend $35 to $120 for a straightforward lamp, or $75 to $150 for a more refined version if you already own tools.
The right standard is not “good enough for a craft project.” The right standard is a stable, finished, dry-location portable lamp that can sit in your home without wobbling, overheating, abrading its cord, or hiding questionable wiring inside concrete. Build to that standard and the result can look custom without being careless.
Frequently Asked Questions
What kind of concrete should I use for a DIY concrete lamp?
Use a fine countertop mix, sand/topping mix, or decorative concrete mix. Coarse all-purpose concrete can leave exposed gravel, chipped corners, large voids, and weak thin sections on a small lamp base.
How much does it cost to make a concrete lamp in 2026?
Most DIY concrete lamps cost about $35 to $120 if you already own basic tools. A more polished version often runs $75 to $150, while a first-time build with new tools and PPE can reach $100 to $300 or more.
Free tools Windows power users keep installed
One-click scans. No signup required.
Is a homemade concrete lamp safe to plug in?
It can be safe if you use a listed lamp kit, keep wiring accessible, provide strain relief, protect the cord from rough concrete edges, use an LED bulb, and follow the kit’s wattage rating. Do not bury splices inside concrete.
How long should a concrete lamp cure before wiring or sealing it?
Many small concrete pieces can be demolded after 24 to 48 hours, but they are not fully cured. Wait at least 2 to 3 days before heavy handling, sanding, or wiring, and let the piece dry fully before sealing.
Do I need a permit to make a concrete lamp?
A plug-in table lamp for your own dry indoor use usually does not require a building permit, but hardwired lighting, damp-location fixtures, rental-property lighting, and commercial installations should be handled under local electrical code.
What safety gear do I need when mixing, sanding, or drilling concrete?
Wear safety glasses, waterproof gloves, long sleeves, and respiratory protection when dust is present. Wet cement can burn skin, and concrete dust can contain respirable crystalline silica, so use wet sanding or dust extraction.
Quick Recap
Product prices and availability are accurate as of the date/time indicated and are subject to change. Any price and availability information displayed on Amazon at the time of purchase will apply.

