Do these 3 things before closing this tab:
1Repair Windows errors before they cause bigger problems2Fix the driver behind crashes, sound loss and screen glitches3Clear out junk files and repair common Windows errorsThe reliable way to install a shade sail is to treat it as a tensioned structure, not as a lightweight piece of fabric. The anchor points must be structural, the sail must be installed with a deliberate slope and twist so rainwater can drain, the hardware must be rated for the expected load, and tension must be added gradually.
A triangular sail needs three anchor points; a square or rectangular sail needs four. Before you drill or dig, confirm the manufacturer’s instructions, check whether the fabric is breathable or waterproof, and determine whether it must be removed during wind, storms, or snow. The steps below apply to a typical residential installation, but they do not replace product-specific engineering, local code, or professional advice for large or permanent structures.
Before you start: confirm that the sail suits the site
Lay out the shade sail and inspect its dimensions, corner rings or webbing, fabric type, and attachment requirements. Consumer shade sails are not all alike: some are designed primarily to block sunlight while allowing air and some rain through; others are marketed as water-resistant or waterproof. Do not assume that a shade sail provides rain protection unless the product documentation says so.
As an Amazon Associate I earn from qualifying purchases.
Crashes, No Sound, or Screen Glitches?
Random freezes, missing sound and display glitches usually trace back to one bad driver. Find and replace yours safely.Free scan · under a minutePC Slower Than It Used to Be?
A free scan shows the junk files, broken settings and background clutter dragging Windows down - then fixes them in one click.Free scan · Windows 10 & 11Count the corners and identify the intended orientation. A triangle has three attachment points. A square or rectangle has four. Check the manufacturer’s advice on whether the sail can remain installed in wind or snow. If the instructions call for seasonal removal, design the connections so the sail can be detached without dismantling the structural anchors.
For a freestanding installation in the United States, call 811 before excavating. The service coordinates the marking of buried utilities before digging, including for residential projects. Allow time for the utility operators to respond and mark the site; do not rely on memory or old property plans.
#1 Best Overall

- Heavy Duty & Premium 304 Stainless Steel: Our shade sail hardware kit is crafted from high-quality 304 marine-grade stainless steel, delivering exceptional strength, durability, and corrosion resistance. Every component—from turnbuckles to wire ropes—is built to withstand harsh outdoor conditions, ensuring long-lasting, rustproof performance. The sleek silver finish is neutral and versatile, blending seamlessly with any patio, garden, or outdoor decor.
- Complete All-In-One Shade Sail Hardware Kit: HYASIA installation set includes 4PCS 304 stainless steel wire ropes ( 6.56Ft each, total 26.25Ft)), 4 x pad eye plates, 6 x snap hooks, 2 x turnbuckles, 18 x screws, 17 x plastic expansion bolts, 4 x double clamps, 1 x socket wrench. Everything you need to install triangular, square, or rectangular shade sail canopy — no extra purchases required! This all-in-one sun shade sail hardware kit is perfect for both residential and commercial use.
- Reliable Tensioning with Heavy Duty Turnbuckles: The included hook-to-hook turnbuckles allow for precise, easy tensioning of your shade sail, ensuring a perfectly taut, wrinkle-free fit. This design provides superior load-bearing capacity and windproof shade sail hardware performance, making it ideal for large shade sails or windy environments. The robust structure guarantees stability, keeping your shade sail securely in place even during strong winds and heavy rain.
- High Strength 7x7 Stainless Steel Wire Rope: Our 304 stainless steel wire ropes feature a 7x7 strand core, offering exceptional flexibility, durability, and rust resistance. This tightly wound construction delivers strong load-bearing capacity, working seamlessly with the turnbuckles to provide reliable tension and stability in any weather. The 7 strands design ensures the wire ropes are both flexible and robust, ideal for shade sail hardware kit with cable applications.
- Endless DIY Versatility & Wide Application: This versatile hardware kit transcends shade sail installation, opening up a world of creative possibilities for your outdoor and indoor spaces. Use it as string light hanging wire to illuminate your patio, also excels as a garden wire kit, anti-sag gate kit, or wire trellis support for climbing plants. Its neutral finish ensures it complements any style, making it the ultimate all-purpose DIY hardware solution for patios, gardens, parking areas
Also check local permit requirements, property-line restrictions, drainage concerns, and any homeowners’ association rules. A large sail attached to a building or tall posts can impose meaningful wind loads even when the fabric itself feels light.
What you need
- Shade sail and its manufacturer’s installation instructions
- Tape measure, stakes, string or marking paint, and a level or laser level
- Appropriate ladder or elevated-access equipment, with a second person to assist where practical
- Drill and bits suitable for the actual framing, masonry, or metal substrate
- Structural Pad eyes or eye bolts selected for the substrate
- Corrosion-resistant shackles, snap hooks, or rated carabiners
- Adjustable turnbuckles or the tensioners specified by the manufacturer
- Rope or wire rope only if specified, with proper terminations
- Posts, braces, gravel, and structural concrete if existing anchors are unsuitable
- Gloves, eye protection, hearing protection, and other appropriate personal protective equipment
If you need a complete set of compatible connectors, a shade sail hardware kit can simplify purchasing. Compare its ratings, material, connector sizes, and intended use with the sail and the supporting structure rather than assuming that every kit is suitable for every installation.
Quick wins for a faster PC:
Clear out junk files and repair common Windows errorsFree Scan →Fix the driver behind crashes, sound loss and screen glitchesFind Drivers →For elevated work, use a ladder on firm, level footing. Face the ladder, keep three points of contact, avoid leaning sideways or overreaching, keep the area below clear, and stay away from overhead electrical hazards. If the work requires unsafe roof access or substantial side loading, stop and use a safer access method or hire a professional.
Step 1: Lay out the sail and anchor positions
Do not begin by installing posts or drilling holes based only on the nominal dimensions printed on the package. Spread the sail on the ground, or mark its corners with stakes, and project each corner toward its proposed structural anchor.
The finished anchor pattern should be slightly larger than the relaxed sail so the tensioning hardware has room to pull the fabric taut. It should not be so large that the hardware has no adjustment travel. Leave space between each sail eyelet or D-ring and the fixed anchor for the selected shackle, connector, or turnbuckle. One supplier recommends about 18 inches of clearance, but the correct distance depends on the product, hardware, and layout.
Measure from the actual points where the hardware will connect, not simply from post center to post center. Mark each proposed anchor and verify:
- The sail will clear roofs, gutters, branches, doors, windows, and walkways.
- The proposed lower corner will not create a head-height hazard.
- Turnbuckles or other tensioners can be installed and adjusted.
- The fabric will not rub against a wall, post, sharp edge, or tree branch.
- Water will drain toward an acceptable location rather than toward a doorway or foundation.
Step 2: Create a three-dimensional drainage shape
Never install the sail flat. A flat membrane can collect water, sag under the added weight, and transfer unnecessary loads into the fabric, hardware, and supports.
Rank #2
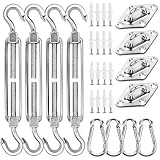
- All-in-One Sun Shade Sail Hardware Kit: Our complete shade sail hardware kit includes everything you need for easy installation: 4 turnbuckles, 4 snap hooks, 4 pad eyes, 16 screws, and 16 expansion anchors. Ideal for sun shades outdoor patio, pergolas, awnings for patio, and outdoor sails for shade waterproof.
- Heavy-Duty 304 Stainless Steel for Durability: Made from high-quality 304 stainless steel, this sun shade sail hardware kit is rust-resistant, weatherproof, and built to last. Suitable for installing backyard sails shade, triangle or rectangle shade cloth hardware kit, and pergolas.
- Adjustable & Secure Turnbuckles for Stability: The adjustable turnbuckles (6-8.4 inches) allow you to achieve suitable tension, keeping your sun sail shade pole supported even in strong winds. Ensures safe and firm outdoor sunshade installation.
- Easy Installation & Universal Fit: Designed for simple DIY setup, our sail canopy installation hardware set works with triangle shade sail, rectangle sunshade, and patio waterproof sun shades. Easily attach to walls, trees, fences, or any sturdy structure.
- Versatile Applications for Outdoor Shade Sails: Great for pergolas, patios, gardens, and backyards, this sun shade hardware kit rectangle with posts is designed for residential and commercial use. Works with waterproof sun shade sails with different size.
Raise and lower alternating corners to create a pronounced three-dimensional shape. With a square or rectangular sail, this is often called a hypar or twisted installation: opposing corners are set at different elevations, producing a taut, shallow architectural twist. A triangular sail also needs a meaningful height difference between its corners so water can run off.
Manufacturer instructions use different ways to describe the required geometry. Examples include approximately 20–30 degrees, 30–40 degrees, or a 30% slope, depending on whether the measurement refers to an angle, a height difference, or a run. These figures should not be treated as one universal rule. The practical requirements are that:
- At least one corner is clearly lower than the others.
- The surface does not form a basin.
- Water has a predictable path off the membrane.
- The slope does not create an unsafe clearance problem.
- The final geometry follows the sail manufacturer’s instructions.
Use stakes, string, a level, or a laser level to compare proposed anchor elevations before committing to the layout. Adjust the heights now; changing a post after concrete has cured is difficult.
Step 3: Inspect existing structures before attaching anything
Suitable anchors may include verified structural beams, properly engineered posts, sound masonry designed to receive the load, established trees where the manufacturer permits them, or other components with a known load path. The key question is not whether an object looks solid. It is whether the tension and wind forces can travel through that object into the building or ground without failure.
Do not use fascia boards, gutters, decorative trim, thin siding, weak fence rails, or unverified railings as anchors. A screw through siding or trim may hold a small accessory but is not automatically a structural connection for a tensioned sail.
For a house attachment, locate the structural framing behind the finish and use fasteners and an anchor fitting appropriate to that framing. For masonry, determine whether it is sound and whether the selected anchor is approved for that type of masonry. Cracked brick, hollow block, deteriorated mortar, or an uncertain wall assembly requires professional evaluation.
Rank #3
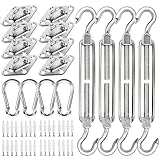
- [One Kit for Any Design]: Conquer any shade sail project—rectangle, triangle, hexagon, or custom shapes—with one comprehensive 80-piece kit. Ditch the confusion of piecing together multiple sets. Plus, when installing common square or triangle sails, the extra hardware acts as your instant backup plan, saving you time and hassle if a replacement is ever needed.
- [Durable 304 Stainless Steel for All Seasons]: Made entirely of premium 304 stainless steel, the shade sail hardware kit resists rust and corrosion. It withstands sun, rain, and time, making it the durable core of your patio shade, garden canopy, or poolside setup for summers to come.
- [Solid Design for Easy Installation]: Designed for a rock-solid hold, each screw uses an extra expansion plug for superior grip in walls or wood. The snap hooks enable tool-free setup and takedown, making seasonal installation of your triangle sun shade or sail shades quick and simple.
- [Heavy-Duty & Fully Adjustable Fit]: The 6-8.4 inch adjustable turnbuckles support up to 64kg (141 lbs) per point, allowing precise tensioning. This ensures your shade cloth, sun shade sail, or tarp stays taut and stable, even in summer breezes.
- [Versatile for Any Outdoor Shade Project]: Ideal for installing rectangle, square, or triangle shade sails, shade cloth and mesh tarps with grommets on patios, decks, pergolas, or in yards. Designed for sails under 215 sq ft (e.g., 10'x10' square, 13'x16' rectangle, 10'x12'x14' triangle), it’s your all-in-one sun sail hardware kit for creating perfect outdoor shade anywhere.
Pad eyes or eye bolts are common anchor components, but they are only as reliable as the beam, post, masonry, or framing that receives them. Select corrosion-resistant hardware for the environment and verify its load rating, fastener pattern, thread engagement, and compatibility with the substrate.
Recommended Free Tools
Step 4: Install freestanding posts when necessary
If the building and existing structures cannot provide reliable anchors, use properly designed freestanding posts. Posts must resist the sail’s continuous tension as well as lateral forces from wind. There is no universal safe post diameter, length, footing diameter, or burial depth: soil, frost, wind exposure, sail size, post material, and local requirements all matter.
- Confirm the final layout. Mark the post centers only after the sail, clearance, drainage, and hardware positions have been checked.
- Call 811 and verify permits. Do this before excavating in the United States, and follow the equivalent utility-location process in other countries.
- Excavate to the specified dimensions. Use the sail manufacturer’s details, local code, or a design from a qualified engineer. Do not automatically apply a generic “one-third below grade” rule to every site.
- Prepare the footing. Follow the specified base, drainage, reinforcement, and concrete requirements. Supplier instructions may call for structural concrete such as a mix meeting at least 20 MPa, but the applicable design controls.
- Set and brace the post. Some manufacturer guidance specifies an outward lean of about 5 degrees. That is a product-specific recommendation, not a universal requirement. Set the post at the angle and alignment required by the design.
- Finish the concrete correctly. Slope the top away from the post so water does not pond against it.
- Allow the footing to cure. One manufacturer recommends waiting at least 72 hours before applying tension. Actual safe loading depends on the concrete, temperature, curing conditions, and structural design. Do not tension a post that can still shift.
Use a galvanized shade sail post or another purpose-designed structural post only after confirming its dimensions and footing requirements for the site. A product sold as a “shade pole” is not automatically suitable for a large, wind-exposed membrane.
Likewise, a structural concrete mix may be appropriate for a footing, but the bagged product does not determine the footing design. Follow the specified strength, volume, reinforcement, curing, and local requirements.
Step 5: Install compatible tensioning hardware
A typical connection may include a structural pad eye or eye bolt, a shackle or rated connector, and a turnbuckle or other adjustable tensioner. Use stainless or other corrosion-resistant materials suited to the site, especially in coastal or persistently damp environments.
Hardware must be compatible with both the anchor and the expected loads. Do not substitute decorative hooks, lightweight hardware-store carabiners, zip ties, or improvised fasteners for rated components. Check that each connector closes and bears in the intended direction rather than being side-loaded or twisted.
Stainless steel turnbuckles provide controlled adjustment at the corners. Install them with sufficient adjustment travel remaining. If a turnbuckle bottoms out before the sail is taut, do not force it, stretch the fabric, or improvise an extension. Recheck the layout and use the manufacturer’s specified extension hardware or a correctly designed connection.
Keep the tensioning hardware partially open when you begin. This gives you room to distribute the load gradually instead of tightening one corner to its limit.
Step 6: Attach and tension the sail gradually
- Orient the sail according to the planned drainage geometry.
- Connect each corner without twisting the fabric, corner webbing, D-rings, shackles, or turnbuckles.
- Confirm that every connector is fully engaged and that no component is bearing against a sharp edge.
- Take up slack in small increments, alternating between opposing or adjacent corners.
- Walk around the installation and watch the fabric, corners, posts, wall connections, and hardware as the load increases.
- Stop when the membrane is firm and generally wrinkle-free, while retaining a deliberate drainage shape.
The goal is a taut sail, not the maximum possible force. Over-tightening can damage seams, corner webbing, eyelets, posts, walls, and fasteners. If one corner appears to be taking substantially more load than the others, stop and correct the layout or connection rather than tightening harder.
What’s actually slowing this PC down?
Pick the symptom - the matching free tool is one click away.
Rank #4

- 🛠️【60 Pcs Sun Shade Hardware Kit】Including 2 x Wall Mount, 2 x Ratchet Winches, 6 x Snap Hook, 2 x Pad Eyes, 4 x Double Rope Clamps, 20 x Screw, 20 x Plastic Expansion Bolts, and 4 x 6.6ft Wire Ropes.
- 🛠️【Easy to Install】This hardware Kit includes all the hardware needed to mount the Rectangle/Square/Triangle shade sail kit to any structure, tree or pole.
- 🛠️【High-quality stainless steel material】High Quality 304 Stainless Steel Material The shade sail hardware kit is made of heavy-duty 304 stainless steel material, which is very durable, strong, and rust-proof, able to withstand harsh weather. Ideal when using them to mount an awning on a patio or outdoors
- 🛠️【Length adjustment at will】Uirway hardware awning accessories provide four 4 ropes and 4 double clips, greatly increasing the adjustable range. Using them together allows your awning to be mounted in a variety of places.
- 🛠️【Hardware with multiple functions】Not only suitable for rectangular/triangular shade sails, but also can be used as other dog leashes, clotheslines, light string hanging or fixing tools, and so on. At the same time, the shade sail kit can also be used in a variety of areas, and you can install it on balconies, terraces, courtyards, etc. wherever you want.
After the fabric has settled, inspect it again and make small adjustments if necessary. Periodic inspection and re-tensioning can remove slack, but recurring slack may indicate that the layout, hardware travel, or support structure is unsuitable.
Weather, fire, and maintenance
Follow the product’s weather instructions. Many consumer sails should be removed and stored during high winds, storms, or snow. Unless the product and support system were specifically designed for permanent exposure, a removable arrangement using shackles, snap hooks, or turnbuckles is easier to protect.
Remove the sail before severe weather rather than waiting for the wind to increase. Wind loads can rise sharply, and snow or standing water adds weight to a membrane that was not designed to carry it.
Keep barbecues, fire pits, heaters, and open flames away from the fabric. Do not assume that a shade sail is fireproof because it is intended for outdoor use.
The Tool Desk
Outbyte Driver Updater FREEFix the driver behind crashes, sound loss and screen glitchesFind Drivers →Outbyte PC Repair FREEClear out junk files and repair common Windows errorsFree Scan →Clean according to the manufacturer’s instructions, commonly with mild detergent and water. Avoid bleach, harsh chemicals, abrasive tools, and pressure washing unless the product documentation expressly permits them. Let the sail dry before storage, and store it where rodents, moisture, and sharp objects cannot damage it.
Independent reader supportYour contribution helps us test, update, and keep practical guides available for everyone.Common installation mistakes
| Mistake | Why it causes trouble | Better approach |
|---|---|---|
| Installing the sail level | Water can collect in a low point, adding weight and strain. | Raise and lower corners to create a clear, manufacturer-approved drainage shape. |
| Attaching to fascia, gutters, siding, or trim | The finish material may not provide a reliable structural load path. | Connect to verified framing, engineered masonry anchors, or purpose-designed posts. |
| Using shallow or unbraced posts | Posts can rotate, bend, or pull out under tension or wind. | Design the footing for the site and brace posts until the concrete has adequately cured. |
| Fully tightening one corner first | Force becomes concentrated and can distort the sail or overload a fitting. | Attach all corners and tension them in small, alternating increments. |
| Over-tightening | Seams, webbing, anchors, walls, and posts may be damaged. | Stop when the sail is firm and wrinkles are controlled, not when every fitting is at maximum force. |
| Leaving no hardware clearance | Turnbuckles may bottom out or connectors may be forced into an unsafe alignment. | Allow adjustment space between each sail corner and fixed anchor. |
| Leaving the sail up in severe weather | Wind, snow, and storms can exceed the design assumptions of a residential setup. | Remove and store it when required by the manufacturer or weather conditions. |
| Digging without utility locating | Post excavation can strike buried services. | Call 811 in the United States before digging and follow local procedures elsewhere. |
When to hire a professional
Get help from a qualified shade-sail installer, contractor, or structural engineer when the sail is large, permanently installed, attached to a roof or masonry wall, supported by tall posts, exposed to high winds or snow, located in poor or unknown soil, near utilities, or intended for a commercial or public area.
Best Value

- Heavy Duty 304 Stainless Steel with Ratchet Winch : HYASIA shade sail hardware kit ratchet winch set is constructed from high-quality 304 marine-grade stainless steel, featuring a robust ratchet winch design for effortless tensioning. Every metal component—from the winch to the rope clamps—is built to withstand harsh outdoor conditions, ensuring maximum strength, durability, and corrosion resistance for years of reliable use. for toldos para patio exterior waterproof applications.
- All-In-One Shade Sail Hardware Kit : This comprehensive installation set includes 2 x stainless steel ratchet winches, 4PCS 6.6FT 304 stainless steel wire ropes, 2 x Pad Eye Plates, 6 x Carabiners, 20 x Screws, 22 x Plastic Expansion Bolts, 4 x Rope Clamps, 1 x Socket Wrench, and 1 steel wrench. Everything you need to install triangular, square, or rectangular shade sail canopy — no extra purchases required! All-in-one sun shade sail hardware kit is perfect for both residential and commercial.
- Effortless Tensioning with Ratchet Winch : The heavy-duty ratchet winch allows for precise, one-handed tensioning of your shade sail, eliminating the need for manual pulling and ensuring a perfectly taut, wrinkle-free fit. This design provides superior load-bearing capacity and windproof shade sail hardware performance, making it ideal for large shade sails or windy environments. The ratchet winch set ensures your installation remains secure, even in harsh weather
- High Strength 7x7 Stainless Steel Wire Rope : Our 304 stainless steel wire ropes feature a 7x7 strand core, offering exceptional flexibility, durability, and rust resistance. This tightly wound construction delivers strong load-bearing capacity, working seamlessly with the ratchet winch to provide reliable tension and stability in any weather. The 7 strands design ensures the wire ropes are both flexible and robust, ideal for shade sail hardware kit with cable applications.
- Versatile Setup: use the included wrenches to secure the ratchet winches and pad eyes to your chosen anchor points (trees, walls, poles, roof, etc). Connect the shade sail to the hardware using carabiners and wire ropes, then use the ratchet winch to adjust tension to your desired level. ensuring a professional-looking installation every time. This versatile setup is perfect for canopy accessories for vendors, gardens, patios, and parking areas, offering endless possibilities for outdoor shade.
Professional assessment is also appropriate when the manufacturer does not provide footing and anchor specifications for the actual site. A generic online dimension cannot account for local wind, frost depth, soil strength, building construction, or the load path through a wall. If you are uncertain whether an existing beam, wall, fence, or post is structural, treat that uncertainty as a reason to stop rather than guess.
Frequently Asked Questions
How much slope does a shade sail need?
There is no single universal number because manufacturers describe slope differently. Instructions may refer to angles, height differences, or percentage slope. Install the sail with a pronounced three-dimensional shape, at least one meaningfully lower corner, and a clear drainage path. Never allow the membrane to form a flat basin, and follow the product’s geometry requirements.
Free tools Windows power users keep installed
One-click scans. No signup required.
Can I attach a shade sail to my house?
Yes, but only to verified structural framing or suitable engineered masonry—not to fascia, gutters, siding, decorative trim, or an unverified railing. The fastener and anchor must match the substrate and expected loads. Have a professional assess the connection if the framing or masonry condition is uncertain.
How deep should shade-sail posts be?
Post depth and footing dimensions are site-specific. Soil, frost, wind exposure, sail size, post height, and local code all affect the design. Some supplier guidance uses roughly one-third of the post length below grade, but that is not a universal rule. Follow the manufacturer’s engineering details or obtain a qualified design.
How long should concrete cure before attaching a shade sail?
One manufacturer recommends waiting at least 72 hours, but the safe loading time depends on the concrete mix, temperature, curing conditions, and footing design. Brace the post and do not tension the sail while the support can still shift.
Can a shade sail stay up all year?
Only if the product and entire support system are specifically intended and rated for permanent exposure. Many consumer products should be removed during high winds, storms, or snow. Follow the manufacturer’s weather instructions and design removable connections when seasonal removal is required.
Are shade sails waterproof?
Not necessarily. Some are breathable shade cloths, while others are designed to resist or block rain. Check the specific product documentation rather than assuming that a fabric marketed as a shade sail is waterproof.
The Bottom Line
A successful shade-sail installation has four fundamentals: structurally verified anchors, a deliberate drainage shape, properly rated and compatible hardware, and gradual tensioning. If the installation is large, permanent, exposed, or structurally uncertain, professional design is cheaper and safer than repairing a failed post, wall connection, or sail.
Quick Recap
Product prices and availability are accurate as of the date/time indicated and are subject to change. Any price and availability information displayed on Amazon at the time of purchase will apply.