Recommended Free Tools
Some links on this page are affiliate links: if you buy through them we may earn a commission, at no extra cost to you.
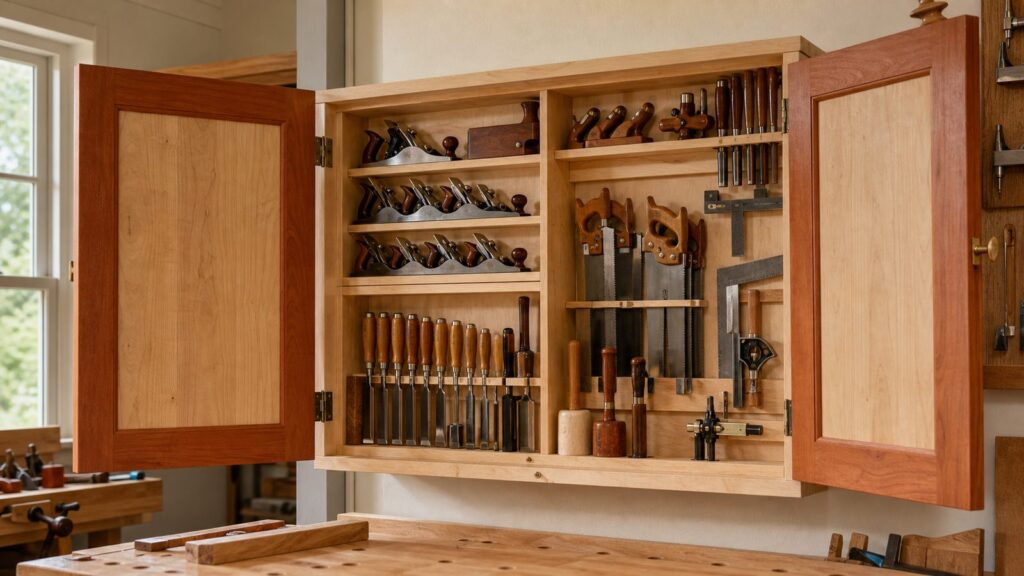
A good hand-tool cabinet is not just storage. It is a working piece of shop furniture that protects sharp tools, keeps layout tools accurate, and makes the next job faster because every chisel, plane, saw, square, and marking gauge has a real home. For most homeowners and serious hobby woodworkers, the right cabinet is a wall-hung case about 30 to 36 inches wide, 34 to 42 inches tall, and 9 to 12 inches deep, with shallow doors, adjustable interior racks, a secure French cleat, and enough open space for the tools you will buy later.
For 2026, a realistic DIY material budget is about $350 to $650 for a practical plywood or poplar cabinet, and $750 to $1,500 for an heirloom version using maple, cherry, oak, walnut accents, quality plywood, better hinges, premium slides, and a more careful finish schedule. A custom professional build typically lands between $1,500 and $5,000 or more, depending on size, species, wall prep, drawer count, finish, lighting, and installation complexity.
On our job sites, the difference between a cabinet that feels permanent and one that becomes a nuisance usually comes down to five things: layout, load, wall anchoring, wood movement, and finish. This plan covers all five in practical terms, with dimensions you can adjust to your own tool kit.
Free tools Windows power users keep installed
One-click scans. No signup required.
As an Amazon Associate I earn from qualifying purchases.
Start With the Tool Inventory, Not the Cabinet Size
Before cutting plywood or buying hardwood, lay every hand tool on a bench and group the tools by how often you use them. A common mistake is designing for maximum density, then discovering that the marking knife is hidden behind a backsaw or the smoothing plane has to be lifted around three other tools every time you need it.
Use kraft paper, cardboard, or a sheet of 1/4-inch plywood as a full-size layout board. Trace each tool and label it. Leave at least 1/2 inch around chisels and marking tools, 1 inch around hand planes, and 1 1/2 to 2 inches around saw handles so your knuckles are not fighting the cabinet. If you own six bench chisels today, leave room for eight or ten. If you own one shoulder plane, assume another specialty plane may show up later.
#1 Best Overall

- 【French Cleat Picture Hanger Max 600 lbs】 : You will get 3 pair of 41in z clips for hanging picture frames. Our french cleat hanger is made of premium aluminum alloy, which is rust-free and durable. 3 pairs picture frame mounting hardware cleat ensures firm support of 600 lbs. If the length is significantly longer than 41 inches, use multiple heavy-duty French cleat picture hangers to distribute the weight
- 【Wide Application】 : The cleat picture hangers heavy duty offers versatility for hanging various items such as picture frames, mirrors, floating cabinets, whiteboards, headboards, wall plants, photo frames, Christmas wall art and clocks. In addition to home decoration, our heavy duty french cleat hanger is also suitable for offices, galleries, exhibition spaces, commercial environments, patio, garden and more, where artworks or other decorations can be hung. Meet a variety of needs of hanging hardware cleat for wall art
- 【Easy to Install with Necessary Tools and Instructions】: The french cleat mirror hanger comes with numbered parts, necessary hardware accessories(anchors for concrete/brick walls only), and step-by-step instructions. The z clip hanging kit fit concisely, and you can easily put on the picture frame after nailing the hanging bars. You may need an impact driver to help you drill holes
- 【Invisible after Installation】: With the aluminum z hanger, you don’t need to drill holes and nails from the front of the frame, and make sure the frame is complete. The Z bar hangers are only 0.2 inches thick and can minimize the distance between the frame and the wall after installation
- 【Interlocking Hook Design】 : Metal french cleats uses Z interlocking hook technology to firmly fix your photo frame to the wall, avoiding shaking and instability, providing hanging convenience for more items. The cleat hanger fulfills all your indoor and outdoor decorating needs
A Practical Cabinet Footprint
For a well-rounded hand-tool cabinet, this is a strong starting size:
- Overall width: 34 inches
- Overall height: 38 inches
- Case depth: 8 inches
- Door depth: 2 to 3 inches each
- Total closed depth: 10 to 12 inches
- Back panel: 1/2-inch or 3/4-inch plywood
- Case sides, top, and bottom: 3/4-inch plywood or solid hardwood
- Doors: frame-and-panel construction, typically 3/4-inch frames with 1/4-inch to 1/2-inch floating panels
That footprint can hold a surprising amount: 4 to 6 hand planes, 8 to 12 chisels, layout squares, marking gauges, dividers, mallets, screwdrivers, rasps, files, sharpening guides, small drawers, and saw storage if the interior is planned carefully. If you add deep doors, remember that you are also adding leverage. A door loaded with steel tools can sag, twist the case, or overload light hinges if it is treated like a shallow cabinet door.
Choose Materials Based on Stability First
An heirloom cabinet can be solid wood, plywood, or a hybrid. The best choice is usually a plywood case with solid hardwood edging, solid door frames, and removable hardwood tool holders. That gives you a stable box, crisp edges, strong screw holding, and enough real wood to make the cabinet feel like furniture instead of shop shelving.
Solid wood is beautiful, but it moves. A 12-inch-wide side panel can expand and contract noticeably through the seasons, especially in a garage or basement shop. If you build the case from solid lumber, pay close attention to grain direction, joinery, and panel movement. Frame-and-panel doors should have floating panels, not glued-in panels trapped on all four edges. Racks mounted to solid panels should use elongated screw holes where movement is expected.
Good Wood Choices
Maple is hard, pale, and durable, which makes tools easier to see against the interior. Cherry machines well and darkens beautifully over time. Red oak is cost-effective and strong, though its open grain can collect dust if left rough. Walnut is excellent for pulls, pegs, and accents, but using walnut for the entire cabinet can push the budget up fast.
Quick wins for a faster PC:
Repair Windows errors before they cause bigger problemsFix Now →Scan for outdated or missing drivers - takes under a minuteDriver Scan →Clear out junk files and repair common Windows errorsFree Scan →Current 2026 hardwood pricing varies by region, grade, width, and milling. As a useful planning range, red oak 4/4 stock can run around $4.99 per board foot before width or milling upgrades, while hard maple can be around $9.00 per board foot in small quantities. Wider boards, color matching, figured maple, walnut, quartersawn white oak, and premium cherry can raise the lumber bill quickly. Commodity lumber indicators were around $615 per 1,000 board feet on July 31, 2026, but cabinet-grade hardwood pricing is driven more by species, quality, local availability, freight, and milling than by futures pricing alone.
2026 Cost Breakdown
The cabinet is small compared with kitchen cabinetry, but the hardware, hardwood, finish, and tooling gaps can add up. The numbers below assume a 34-inch-wide by 38-inch-tall wall cabinet with two doors, interior holders, a French cleat, and a finished exterior.
| Build Level | Typical 2026 Cost | What It Includes | Best For |
|---|---|---|---|
| Budget DIY | $350-$650 | Cabinet-grade plywood or poplar, simple butt or piano hinges, basic pulls, screws, glue, sandpaper, and wipe-on finish | Functional garage or basement shops |
| Heirloom DIY | $750-$1,500 | Maple, cherry, oak, walnut accents, hardwood edging, better plywood, brass or stainless hardware, drawer slides, magnets, and premium finish | Serious woodworkers who want furniture-grade storage |
| Custom Professional Build | $1,500-$5,000+ | Custom sizing, hardwood selection, fitted holders, drawers, wall blocking, cleats, finish schedule, lighting, and installation | High-value tool collections, finished shops, built-ins, or complex walls |
Hardware usually runs $40 to $250. Basic butt hinges and magnetic catches are inexpensive. Heavy-duty hinges, brass hardware, quality drawer slides, rare-earth magnets, shelf pins, and purpose-made French cleat hardware move the number upward. Finish and consumables usually add $40 to $200 for glue, abrasives, shellac, polyurethane, oil, rags, brushes, masking supplies, and replacement blades or bits.
The biggest hidden cost is tooling. If you already own a table saw or track saw, router, drill/driver, clamps, squares, chisels, planes, and dust collection, this is a manageable project. If you need to buy those tools from scratch, startup tooling can exceed the cabinet materials cost.
The Tool Desk
Outbyte PC Repair FREEClear out junk files and repair common Windows errorsFree Scan →Outbyte Driver Updater FREEScan for outdated or missing drivers - takes under a minuteDriver Scan →Plan the Cabinet Around Load, Not Hope
A loaded hand-tool cabinet can easily weigh 100 to 250 pounds. The empty cabinet may weigh 50 to 90 pounds depending on material. Add 30 to 80 pounds for hand planes, 10 to 30 pounds for chisels and layout tools, 10 to 25 pounds for saws, and another 10 to 40 pounds for drawers, hardware, sharpening accessories, and future tools.
Use a simple load calculation before choosing hinges and fasteners:
- Empty cabinet: 75 pounds
- Current tools: 85 pounds
- Future tools and drawers: 40 pounds
- Total estimated load: 200 pounds
- Recommended safety planning factor: at least 2x
- Target support capacity: 400 pounds or more
That does not mean the cabinet will weigh 400 pounds. It means the wall connection, cleat, screws, and case joinery should be chosen with a margin. Construction crews think this way because fasteners fail when loads, leverage, vibration, and poor substrate combine. A hand-tool cabinet may sit quietly for years, but every door swing and every plane removed from a rack adds movement.
Use a French Cleat and a Lower Standoff
For most wall-mounted tool cabinets, a French cleat is the right answer. Use a 3/4-inch plywood or hardwood cleat ripped at 45 degrees. One half is fastened to the wall, the mating half is fastened to the cabinet back. Add a lower standoff strip the same thickness as the wall cleat so the cabinet hangs plumb and bears evenly.
What’s actually slowing this PC down?
Pick the symptom - the matching free tool is one click away.
Fasten the wall cleat into studs or structural blocking, not drywall alone. For a 34-inch-wide cabinet, try to catch at least two studs. Use properly sized structural screws, commonly 1/4-inch diameter by 3 inches or longer depending on wall layers and cleat thickness. Pre-drill hardwood cleats to prevent splitting. If the wall is masonry, use anchors rated for the substrate and the expected load. Drywall anchors are not appropriate for a cabinet that may weigh 100 to 250 pounds loaded with steel tools.
Build the Case Square, Flat, and Serviceable
The case is the backbone. If it is out of square, the doors will fight you. If the back is weak, the cleat will not matter. For a 34 by 38 inch cabinet, 3/4-inch plywood sides, top, and bottom with a 1/2-inch or 3/4-inch plywood back is a dependable approach. Rabbets or dados help alignment and increase glue surface. Pocket screws can work in shop cabinetry, but for an heirloom cabinet, housed joints, rabbets, dados, or dovetails look and perform better.
A practical plywood case cut list might look like this:
- Two sides: 8 inches by 38 inches by 3/4 inch
- Top and bottom: 8 inches by 32 1/2 inches by 3/4 inch
- Back: 34 inches by 38 inches by 1/2 or 3/4 inch
- French cleat: 3/4 inch by 4 inches by 32 to 34 inches, ripped at 45 degrees
- Lower standoff: 3/4 inch by 2 inches by 32 to 34 inches
- Face edging: 3/4 inch thick by 3/4 to 1 inch wide hardwood
Dry-fit the case before glue. Check both diagonals. If the diagonal measurements match, the box is square. If they are off by more than 1/8 inch, correct it before the glue sets. Install the back in a rabbet if possible because it stiffens the case and gives the cleat a better structure to work against.
Design Doors for Weight and Movement
Doors are where hand-tool cabinets either become excellent or annoying. Shallow doors can hold chisels, screwdrivers, small squares, marking knives, and gauges. Deep doors can hold more, but they add torque at the hinges. Keep heavy tools near the hinge side and close to the case. Avoid loading the outside edge of a deep door with small planes or dense steel tools.
Frame-and-panel doors are the best heirloom choice. Use 2-inch to 2 1/2-inch-wide rails and stiles in 3/4-inch hardwood. Panels can be 1/4-inch plywood, 1/2-inch plywood, or solid wood set in grooves. If the panels are solid wood, let them float. Do not glue the full panel into the frame. A small dab of flexible material at the center of the rail can reduce rattle while still allowing movement.
For hinges, light decorative hinges are the wrong place to save money. Use quality butt hinges, piano hinges, or heavy-duty cabinet hinges rated for the expected door weight. A tall, loaded door often benefits from three hinges instead of two. If the door is 38 inches tall and carries tools, three hinges should be the default.
Lay Out the Interior by Frequency of Use
The center of the cabinet should hold the tools you reach for constantly: smoothing plane, block plane, primary chisels, marking gauge, combination square, marking knife, small hammer or mallet, and the layout tools used at the bench. Less-used specialty planes, rasps, files, extra blades, and sharpening accessories can live lower or in drawers.
Removable holders are a major upgrade. Use screwed rails, replaceable blocks, shallow shelves, magnets, and modular tills instead of gluing every holder permanently. A cabinet that cannot adapt will eventually become a museum of your old tool choices. A cabinet with removable racks can evolve for decades.
Useful Holder Dimensions
- Chisel rack slot spacing: 1 to 1 1/4 inches on center for common bench chisels
- Plane shelf depth: 3 to 4 inches for block planes, 4 1/2 to 6 inches for bench planes
- Saw till kerfs: 1/8 to 3/16 inch wide, angled slightly back
- Small drawer depth: 1 1/2 to 3 inches for blades, gauges, files, and sharpening parts
- Door rack projection: keep most holders under 1 1/2 inches unless the door was designed deeper
Use pale interiors or a clear finish over maple, birch, or light plywood. Small tools disappear in dark cabinets. Good visibility matters, especially with marking knives, small squares, card scrapers, router plane blades, and replacement plane irons.
Garage and Basement Shops Need Moisture Planning
A hand-tool cabinet in a conditioned shop has an easier life than one in a garage. Garages and basements see bigger humidity swings, colder surfaces, and more dust. That affects both the cabinet and the tools. Steel tools stored in a damp garage can rust even inside a beautiful cabinet.
Seal all faces, backs, edges, shelves, and door parts before final installation. Do not leave the back raw because it faces the wall. A balanced finish helps slow moisture exchange and reduces uneven movement. Good choices include wiping varnish, polyurethane, shellac followed by wax, or a durable oil-varnish blend. In a garage, prioritize moisture resistance and easy cleaning over a delicate furniture finish.
Do these 3 things before closing this tab:
1Scan for outdated or missing drivers - takes under a minute2Repair Windows errors before they cause bigger problems3Fix the driver behind crashes, sound loss and screen glitchesFor tool protection, keep the cabinet off exterior concrete walls when possible, or add proper blocking and air space. Consider a small desiccant container, camphor blocks, paste wax on plane soles, and a light protective oil on seldom-used tools. Avoid storing wet rags, green lumber, or open water containers nearby. If the shop regularly sits above 60 percent relative humidity, rust prevention needs to be part of the cabinet plan.
Safety and Dust Control During the Build
Even though this is a hand-tool cabinet, building it creates fine dust. Cutting plywood, routing grooves, sanding hardwood, and milling stock all produce dust that should be captured at the source. On our job sites, we treat dust control as an engineering problem first: capture it with local exhaust, use dust collection at saws and sanders, and keep the work area clean. Respirators help, but they should not be the only control.
Rank #2

- Heavy Duty Picture Hangers: AENTGIU 41 inch black heavy duty french cleat hanger is crafted from durable aluminum alloy. Z clips design effortlessly supports picture frames, wall decorations, with a maximum load capacity of 500 lbs
- Invisible Mount: Wall frame cleat hanger features a z-bar design that sits just 0.23 inches from the wall after installation. All hardware is concealed behind decoration, making it ideal for hanging exhibition art, mirrors, and holiday decorations
- Interlocking Z-Hanger Design: Z-clips for hanging profile let you lift your item on or off the wall effortlessly. Once mounted, the cleats lock together securely, while still allowing quick removal whenever needed
- Multi-functional Application: This metal French hook is suitable for mounting artwork, picture frames, mirrors, headboards, display boards, tool boards, wall shelves, and more. Suitable for living rooms, workshops, offices, galleries, and commercial spaces
- 5 Min Installation: Heavy duty wall hangers set includes 2 pairs of 30-inch black aluminum french cleats, matching screws in multiple lengths, wall anchors, and a small level—everything required for a clean and secure setup. (Note: Please measure your item width and length to choose the suitable size cleat)
Use eye protection when cutting, routing, drilling, and installing hardware. Hearing protection matters with saws and routers. Clamp small parts before drilling or shaping them. Keep hands out of the line of cut, especially when making narrow holder blocks or small tool dividers. Small parts are often more dangerous than large panels because they tempt you to hold them too close to the blade or bit.
If you are using oily rags, follow the finish manufacturer’s disposal instructions. Oil-soaked rags can generate heat as they cure. Lay them flat to dry outdoors or store them in a proper metal container with water according to the product guidance.
Permit and Wall Installation Notes
Most wall-mounted tool cabinets in a private garage or shop do not require a building permit when they are simple storage attached to existing framing. That said, rules vary by city and county. Permits become more likely when the work includes new electrical circuits, structural framing changes, major garage conversions, fire-rated wall alterations, or built-ins tied into a larger remodel.
If the wall is finished drywall over studs, locate the studs accurately and verify the wall condition before hanging the cabinet. If the wall lacks good fastening points, install structural blocking. That may mean opening a narrow section of drywall between studs, fastening 2x blocking, patching the wall, and then installing the cleat. In a finished home, attached garage, or high-value shop, hiring a carpenter for blocking and installation is often money well spent.
Step-by-Step Build Sequence
1. Inventory and Full-Size Layout
Trace the tools, mark the door swing, and decide which tools belong in the case, doors, and drawers. Allow at least 15 to 25 percent open space for future tools. Mark the heaviest tools and keep them close to the case body or hinge side.
2. Mill and Cut the Case Parts
Cut the case sides, top, bottom, and back. Add rabbets or dados if your tool setup allows. Edge the visible plywood edges with 3/4-inch hardwood or use solid case parts if you are prepared to manage wood movement.
3. Assemble the Case
Dry-fit everything. Glue and clamp the case square. Install the back securely. Check diagonals before the glue sets. Add the cabinet-side French cleat and lower standoff strip.
4. Build the Doors
Make frame-and-panel doors with 3/4-inch hardwood frames. Keep panels floating if solid wood. For loaded doors, use three quality hinges per door. Before final boring or mortising, confirm that racks and tools will clear the case when the doors close.
5. Build Interior Racks and Drawers
Start with the plane till, chisel rack, saw storage, and layout-tool holders. Use screws where future changes are likely. If adding drawers, shallow drawers from 1 1/2 to 3 inches deep are more useful than one deep drawer that becomes cluttered.
6. Pre-Finish Dense Parts
Pre-finish interior panels, racks, and holders before final installation. It is much harder to apply clean finish around chisel slots, saw kerfs, and tight dividers after they are mounted.
Crashes, No Sound, or Screen Glitches?
Random freezes, missing sound and display glitches usually trace back to one bad driver. Find and replace yours safely.Free scan · under a minuteWindows Errors? Fix Them Before They Spread
Repair common Windows errors and clear accumulated junk for a smoother, more stable PC - no reinstall needed.Free scan · no reinstall7. Install the Wall Cleat
Find studs or blocking. Level the wall cleat and fasten it with structural screws. Hang the cabinet, check for plumb, then add a couple of lower screws through the cabinet into studs or blocking to prevent lift-off if appropriate for your design.
8. Load Gradually and Adjust
Do not load every tool at once and walk away. Add the heaviest tools first, check door swing, verify that the cabinet stays tight to the wall, and adjust holders as needed. After a week of use, retighten hinge screws and inspect the cleat connection.
When to DIY vs When to Hire a Pro
This is a good DIY project if you already have accurate cutting tools, clamps, a reliable square, a drill/driver, basic joinery skills, and a safe way to cut sheet goods. It is also a good project if you enjoy fitting parts carefully and can tolerate a slow build. Expect 25 to 60 hours for a careful DIY build, depending on complexity, finish, and drawer count. A simple plywood cabinet may take two weekends. A hardwood heirloom cabinet with frame-and-panel doors, drawers, and custom holders can take several weeks of evenings.
Hire a carpenter or cabinetmaker if the cabinet will hold a high-value tool collection, the wall needs blocking, the cabinet is unusually large, the installation is in a finished living space, or you want furniture-grade doors and finish. A pro is also worth considering if the cabinet is part of a larger garage or shop renovation involving electrical work, lighting, wall repairs, or built-in storage.
Do these 3 things before closing this tab:
1Repair Windows errors before they cause bigger problems2Scan for outdated or missing drivers - takes under a minute3Clear out junk files and repair common Windows errorsThe dividing line is not pride. It is accuracy, safety, and time. A loaded cabinet falling from a wall can damage tools, walls, vehicles, floors, and people. If you are unsure about the wall structure or fastening method, bring in someone who works with building loads and cabinetry every week.
Common Mistakes to Avoid
The first mistake is building around today’s exact tool collection with no room to grow. Leave open space and make racks replaceable. The second is trusting drywall anchors. A loaded hand-tool cabinet needs studs, blocking, masonry anchors, or another structural fastening method matched to the wall.
Another common mistake is ignoring the door load. Deep doors are useful, but they can become heavy levers. Use stronger hinges, keep heavy tools near the hinge side, and avoid overloading the outer edge. Do not glue every tool block permanently. A better cabinet uses screws, magnets, rails, and modular holders.
Do not skip the full-size layout. Tool handles, door swing, drawer pull-out, and blade clearance are much easier to solve on paper than after finish. Do not use solid panels where plywood would perform better unless you understand seasonal movement. Finally, do not over-sand crisp edges and joinery. A fine cabinet should still look sharp and intentional after finish.
The Bottom Line
An heirloom hand-tool cabinet should be built like a small piece of architecture: stable case, honest joinery, load-rated hanging system, flexible interior, and finish on every surface. For most shops, a 34 by 38 by 10 to 12 inch wall cabinet is large enough to be useful without becoming a wall-mounted burden. Budget $350 to $650 for a practical DIY build, $750 to $1,500 for a furniture-grade hardwood version, and $1,500 to $5,000 or more for a custom professional cabinet.
The best plan is the one that fits your tools, your wall, and your shop environment. Trace the tools, calculate the loaded weight, build the case square, hang it from structure, and make the holders removable. Do that, and the cabinet will serve the way good shop work should: quietly, accurately, and for a very long time.
Frequently Asked Questions
How much does it cost to build a hand-tool cabinet in 2026?
A practical DIY hand-tool cabinet usually costs about $350 to $650 in materials. An heirloom version with hardwood, better plywood, premium hardware, drawers, and a higher-end finish usually costs $750 to $1,500. A custom professional build often ranges from $1,500 to $5,000 or more.
What wood is best for an heirloom hand-tool cabinet?
A stable plywood case with maple, cherry, oak, or walnut hardwood edging and door frames is usually the best balance. Maple is durable and bright inside the cabinet, cherry ages well, red oak is cost-effective, and walnut works well for accents.
How do you safely hang a heavy tool cabinet?
Use a French cleat fastened into studs or structural blocking with properly sized structural screws, then add a lower standoff strip so the cabinet hangs plumb. Do not rely on drywall anchors for a cabinet that may weigh 100 to 250 pounds when loaded.
Should a hand-tool cabinet be plywood or solid wood?
Plywood is usually better for the case because it stays flatter and handles seasonal movement well. Solid wood is excellent for door frames, edging, pulls, and tool holders. If you use solid panels, allow for wood movement with floating panels and elongated screw holes where needed.
How deep should the doors be on a hand-tool cabinet?
Most tool cabinet doors work best at 2 to 3 inches deep. That is enough for chisels, layout tools, screwdrivers, and small holders without putting too much leverage on the hinges. Deeper doors need stronger hinges and careful weight placement.
Do I need a permit to install a tool cabinet in my garage?
Most simple wall-mounted storage cabinets do not require a permit, but local rules vary. Permits are more likely if the work includes new electrical circuits, structural changes, garage conversion work, or alterations to fire-rated walls.
What’s actually slowing this PC down?
Pick the symptom - the matching free tool is one click away.
Quick Recap
Product prices and availability are accurate as of the date/time indicated and are subject to change. Any price and availability information displayed on Amazon at the time of purchase will apply.

