Drywall finish levels describe how much joint treatment and surface preparation is performed on gypsum panels before painting, texturing, or applying wallcovering. They do not rate the board’s strength, fire resistance, durability, contractor skill, or the flatness of the wall.
Under Gypsum Association GA-214-2021, the system runs from Level 0 through Level 5—six numbered levels, although industry shorthand sometimes calls Levels 1 through 5 the five drywall finish levels. For a typical smooth wall with flat paint, Level 4 is the usual starting point. Choose Level 5 when dark colors, sheen or gloss paint, or critical side lighting could reveal differences in texture and porosity.
As an Amazon Associate I earn from qualifying purchases.
The correct level is selected backward from the final decoration and viewing conditions. A Level 2 finish can be correct behind tile, Level 3 can be correct beneath heavy texture, and Level 5 is not a guarantee of a perfectly flat or plaster-like wall.
What drywall finish levels measure
A drywall finish level measures the degree of finishing performed over panel joints, interior angles, fastener heads, accessories, and—at Level 5—the entire panel face. Each higher level adds work intended to make the surface more suitable for a more visually revealing decoration.
#1 Best Overall
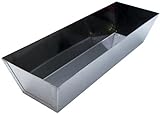
- Sheared edges for quick and easy drywall knife cleaning
- Rust proof galvanized steel
- Perfect size for up to 12” drywall knives - Any pan smaller than 13" is too small
- Mud tight leak proof seams
- Lifetime warranty
The levels are best understood as decoration-specific requirements, not a simple ladder from bad to good. The finish required for a garage, tile substrate, heavily textured wall, flat-painted room, and glossy feature wall is different. The current publicly verifiable GA-214 document covers gypsum board as well as glass-mat and fiber-reinforced gypsum panels. The current ASTM installation and finishing standard listed by ASTM is ASTM C840-25.
Important limitation: Even Level 5 does not promise a flawless plane. Joint compound is built up over joints and fasteners in graduated layers, and a skim coat equalizes surface texture and porosity; it does not correct bowed framing, waves in the substrate, out-of-plumb walls, major dents, or structural movement.
Drywall finish levels at a glance
| Level | Minimum work | Typical use | Not suitable for |
|---|---|---|---|
| 0 | No taping, finishing, or accessories | Temporary or unfinished construction; concealed work awaiting later decoration | Any exposed finished surface |
| 1 | Tape embedded at joints and interior angles | Plenums, attics, concealed areas, and some fire- or smoke-related applications | Ordinary painted rooms or exposed smooth walls |
| 2 | Level 1 work plus one coat over fasteners and accessories, with tape wiped thin | Tile substrates, garages, warehouses, and utility areas | Smooth paint, glossy finishes, light texture, or lightweight wallcovering |
| 3 | Level 2 work plus additional joint treatment and two coats over fasteners and accessories | Medium or heavy texture and heavy-duty wallcovering | Smooth walls, light texture, non-continuous texture, or lightweight wallcovering |
| 4 | Level 3 work plus additional coats over joints, angles, fasteners, and accessories | Smooth walls with flat paint, light texture, non-continuous texture, or suitable wallcovering | Dark or non-flat paint in critical appearance areas without further treatment |
| 5 | Level 4 work plus a thin skim coat over the entire surface | Gloss or sheen paint, dark colors, glossy decorative finishes, and critical lighting | Major substrate irregularities; it is not a plaster replacement |
The exact requirements and typical applications are defined in GA-214-2021. Always check the project documents and the panel manufacturer’s instructions for product-specific requirements.
Level 0: unfinished gypsum panels
Level 0 means no finishing has been performed.
- No tape is required.
- No joint finishing is required.
- No accessories are required.
Level 0 is used for temporary construction, concealed areas, or locations where the final decoration has not yet been selected. It is not a paint-ready surface and should never be described in a contract as ready for ordinary exposure.
Level 1: taped or fire-taped finish
Level 1 is the minimum taped finish. It is sometimes called fire-taping, but that name does not automatically establish a fire rating or mean that every rated wall uses Level 1.
Minimum work
- Embed tape in joint compound at all panel joints and interior angles.
- Excess compound may remain.
- Tool marks are acceptable.
- Fastener heads do not need to be covered.
- Accessories are not required unless the project documents call for them.
Where Level 1 is used
Typical locations include plenums above ceilings, attics, concealed areas, and surfaces that are not normally open to public view. It may also be part of a smoke-barrier or tested fire-resistance application.
For a rated assembly, follow the complete listed design, applicable code, project specification, and authority having jurisdiction. The finish level by itself does not create fire resistance.
What’s actually slowing this PC down?
Pick the symptom - the matching free tool is one click away.
Level 2: basic finish for tile and low-appearance areas
Level 2 adds enough treatment to cover fasteners and remove the most obvious excess compound, but it is not a smooth painted finish.
Minimum work
- Embed tape at all joints and interior angles.
- Wipe the tape with a thin coat of compound using a joint knife, removing excess.
- If the tape was already wiped smooth during Level 1 work, that treatment may satisfy this part of Level 2.
- Apply one coat of joint compound over fastener heads and accessories.
- Remove excess compound.
- Tool marks may remain.
Where Level 2 is used
Level 2 is commonly specified for gypsum panels used as a tile substrate, as well as garages, warehouses, utility rooms, and other areas where appearance is not important. Tile or a substantial wallcovering can conceal irregularities that ordinary paint would reveal.
Level 2 does not decide whether a board is suitable for a wet area. Panel type, tile-backer requirements, waterproofing, and moisture-management details must be checked separately.
Level 3: finish for medium or heavy texture
Level 3 is intended for decorations that provide substantial visual coverage. It is not the correct specification for a smooth wall or a lightly textured wall simply because the wall will receive some texture.
Free tools Windows power users keep installed
One-click scans. No signup required.
Rank #2
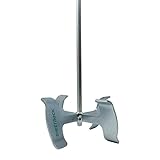
- Premium USG Mud Mixer: Professional-grade drywall mixing tool designed for contractors and finishers who demand reliable performance
- Durable Heavy-Gauge Steel Construction: Built with robust steel materials to withstand demanding jobsite conditions and provide long-lasting durability
- Balanced and Self-Centering Design: Features a self-centering shaft that reduces vibration and prevents bucket gouging during mixing operations
- Bucket Cavity Design Minimizes Splatter: Engineered to reduce mess and shaking while mixing, keeping your work area cleaner
- Tri-Fold Mixing Action: Folds and pulls mud compound from sides, top and bottom for smooth, lump-free results and up to 20% faster mixing
Minimum work
- Embed and wipe tape at joints and interior angles.
- Apply one additional coat over all joints and interior angles.
- Apply two separate coats over fastener heads and accessories.
- Leave the surface smooth and free of tool marks and ridges.
Where Level 3 is used
Typical applications include heavy or medium spray-applied texture, heavy or medium hand-applied texture, and heavy-duty or commercial-grade wallcovering.
GA-214 identifies Level 3 as unsuitable for smooth wall designs, light textures, non-continuous textures, and lightweight wallcoverings. A discontinuous pattern or thin wallcovering can expose joint and porosity differences instead of hiding them.
Level 4: the standard smooth-wall starting point
Level 4 is the common starting point for an exposed smooth wall receiving flat paint, but it is not a universal residential default. The appropriate level still depends on color, sheen, lighting, wallcovering, panel type, and the project specification.
Minimum work
- Embed and wipe tape at all joints and interior angles.
- Apply two separate coats over flat joints.
- Apply one additional coat over interior angles.
- Apply three separate coats over fastener heads and accessories.
- Leave the surface smooth and free of tool marks and ridges.
Primer is recommended before final decoration. Primer helps reduce the difference in absorption between gypsum-board paper, joint compound, fastener treatments, and accessories.
The Tool Desk
Outbyte Driver Updater FREEScan for outdated or missing drivers - takes under a minuteDriver Scan →Outbyte PC Repair FREERepair Windows errors before they cause bigger problemsFix Now →Typical Level 4 decoration
- Smooth walls with flat paint.
- Light texture.
- Non-continuous texture.
- Suitable wallcoverings.
Level 4 can be properly executed and still show joint photographing or porosity differences under a dark color, a semi-gloss coating, a glossy finish, or severe grazing light. Those conditions may call for Level 5 or a separately specified surfacing system.
Level 5: full-surface skim coat
Level 5 includes all Level 4 work plus a skim coat over the entire panel surface. That full-surface operation is what distinguishes Level 5 from a very well-executed Level 4.
Minimum work
- Complete all Level 4 joint, angle, fastener, and accessory treatment.
- Apply a skim coat of joint compound or a purpose-made surfacing material over the entire surface.
- Leave the surface smooth and free of tool marks and ridges.
- Prime before finish paint where appropriate and as required by the paint or surfacing system.
The skim coat is intended to equalize surface texture and porosity and reduce the contrast between the gypsum-board face and areas treated with joint compound. GA-214 does not prescribe one universal skim-coat thickness in mils. The objective is complete surface coverage, commonly achieved by forcing material into pores and minor imperfections and shearing off the excess.
Where Level 5 is used
- Non-flat, sheen, or gloss paints.
- Dark or deep-tone colors.
- Glossy decorative finishes.
- Walls and ceilings exposed to critical lighting.
- High-visibility spaces where joint photographing must be minimized.
Level 5 is the most uniform of the GA-214 finish levels for reducing the visual contrast caused by joints, fasteners, and different surface porosity. It is not a plaster finish, does not guarantee a perfectly flat wall, and cannot correct poor framing or a wavy substrate.
Quick wins for a faster PC:
Scan for outdated or missing drivers - takes under a minuteDriver Scan →Repair Windows errors before they cause bigger problemsFix Now →Level 4 versus Level 5: the practical difference
| Question | Level 4 | Level 5 |
|---|---|---|
| Joint, angle, fastener, and accessory treatment | Complete Level 4 treatment | The same Level 4 treatment |
| Full-surface skim coat | No | Yes |
| Best match | Flat paint, ordinary smooth walls, light texture, and suitable wallcovering | Gloss or sheen paint, dark colors, glossy finishes, and critical lighting |
| Primary benefit | Provides a smooth, paintable substrate at lower finishing effort | Reduces differences in surface texture and porosity across the whole panel |
| Does it guarantee perfection? | No | No |
| Does it equal plaster? | No | No |
| Can it correct bowed framing or wall waves? | No | No |
Level 5 generally requires more material, drying time, labor, and coordination than Level 4 because the full panel face must be treated. It is most valuable when the final finish or lighting is likely to magnify small differences—not simply because a higher number sounds better.
Specialty products can provide an alternative to traditional skim coating and priming, but they do not automatically upgrade an inadequate substrate. For example, USG Tuff-Hide guidance describes the product as a full-surface surfacing system intended for at least a Level 4 substrate. Its technical FAQ should be followed when that type of system is specified.
How to choose the right drywall finish level
Use the following decision process before drywall work begins. If multiple conditions apply, use the more demanding condition as the starting point and confirm it with a representative mock-up.
Rank #3

- [Sophisticated Technology] - The dry wall mud is made of 3CR13 stainless steel with high hardness, which is durable, rust proof and corrosion-resistant
- [Ergonomic Design] - The joint compound drywall mud is designed with sheared edges and contoured bottom for quickly mixing mud and cleaning drywall knives. The tapered ends and sides is easy and comfortable to hold
- [Suitable Size] - The dimension of drywall mud pan is 12.6" L x 2.6" W x 3.6" H, perfect size for meeting your needs for indoor and outdoor finishing activities
- [Easy Cleanup] - Mirror polished with electroplating quenching treatment for rust resistance, easy to clean and swipe, can be used for longer life
- [Practical Application] -The plastering mud pan allows a wide speader into the mixed filler, making it a lot easier spread on the wall than using a ice cream tub and a filler blade
- Identify the final decoration. Tile and heavy wallcovering may permit Level 2. Medium or heavy texture may permit Level 3. Smooth flat paint commonly starts at Level 4. Sheen, gloss, dark color, or a glossy decorative finish commonly points to Level 5.
- Evaluate the texture honestly. Heavy and medium textures hide more minor variation. Light, thin, partial, or non-continuous textures can reveal joints and porosity differences and may require Level 4 or Level 5.
- Check the paint sheen. Flat paint is less revealing than eggshell, satin, semi-gloss, gloss, or other non-flat coatings. GA-214 describes flat paint as 0–5 gloss units at 60 degrees and 0–10 gloss units at 85 degrees; finishes exceeding those ranges are non-flat for this guidance.
- Check the color. Dark and deep-tone colors can make joint photographing and surface differences more noticeable, even when the paint itself is flat.
- Map the lighting. Look at windows, wall washers, surface-mounted fixtures, spotlights, floods, and large areas of natural light. Strong light traveling across a wall can reveal variations that ordinary diffuse light does not.
- Consider the wallcovering. Heavy, patterned wallcoverings conceal more variation than thin, lightweight, low-pattern, glossy, or unbacked vinyl products.
- Confirm the panel type. Paper-faced board, glass-mat panels, and fiber-reinforced gypsum panels can require different finishing products or additional preparation. Follow the manufacturer’s instructions.
- Check assembly requirements separately. Fire, smoke, sound, moisture, and tile requirements may control the panel and joint treatment independently of appearance.
| Final condition | Reasonable starting point | Qualification |
|---|---|---|
| Temporary or unfinished area | Level 0 | It is not ready for exposed decoration. |
| Concealed plenum or attic | Level 1 | Verify any smoke or fire requirement separately. |
| Tile substrate or utility area | Level 2 | Confirm board suitability, waterproofing, and tile-backer requirements. |
| Heavy or medium texture | Level 3 | Use a texture mock-up; do not assume all texture hides defects. |
| Smooth wall with flat paint | Level 4 | Review color, lighting, wallcovering, and project expectations. |
| Gloss, sheen, dark color, or critical side lighting | Level 5 | Still requires a sound substrate, suitable primer, correct paint system, and realistic inspection conditions. |
| Glass-mat or fiber-reinforced panel | Manufacturer-specific | GA-214 applies, but the product instructions may require additional treatment. |
| Fire-, smoke-, or sound-rated assembly | Listed design and project specification | Do not select the level by appearance alone. |
Keep drywall finish, primer, paint, texture, and wallcovering separate
A finish level is not a paint specification
Level 4 or Level 5 describes the prepared gypsum-panel substrate. It does not specify the primer brand, number of finish-paint coats, paint film thickness, color, durability, exact texture pattern, or wallcovering installation method.
PC Slower Than It Used to Be?
A free scan shows the junk files, broken settings and background clutter dragging Windows down - then fixes them in one click.Free scan · Windows 10 & 11Outdated Drivers Are Slowing You Down
One free scan finds every outdated or missing driver and matches the right update for your exact hardware.Free scan · exact hardware matchThe number of paint coats depends on the primer, paint, color, sheen, coverage, and the paint manufacturer’s instructions. The Drywall Finishing Council paint-system guidance treats those as separate decisions. Applying extra paint does not convert Level 4 into Level 5 because Level 5’s defining operation is full-surface treatment before decoration.
Primer matters
Primer or an approved equivalent helps equalize absorption between the board face and treated areas. For Levels 3, 4, and 5, the DWFC inspection method calls for drywall primer or an approved equivalent before inspection. The project’s paint manufacturer and specification still control the final coating system.
Texture is not one category
Saying a room will be textured is not enough to select a level. Heavy texture may be appropriate over Level 3; light or discontinuous texture can be more revealing and may require Level 4 or Level 5. A texture mock-up is the safest way to establish the appearance before production work is repeated throughout a project.
Inspection and acceptance: how to judge the finished work
Set the standard before work begins
A contract that says perfect drywall leaves too much room for disagreement. Identify the finish level by room or surface, the final decoration, the lighting condition, and the inspection method.
Do these 3 things before closing this tab:
1Scan for outdated or missing drivers - takes under a minute2Clear out junk files and repair common Windows errors3Fix the driver behind crashes, sound loss and screen glitchesFor appearance areas at Levels 3, 4, or 5, GA-214 provides a jobsite mock-up process when the design professional specifies one. The mock-up should be large enough to represent the actual work, use the representative wall or ceiling configuration, include the final decoration, and simulate occupied lighting. Once accepted, it becomes the visual benchmark for the rest of the work. USG also recommends mock-ups for appearance areas finished to Levels 3 through 5 in its finishing and decorating guidance.
Use realistic viewing conditions
- Inspect under lighting representative of the completed room.
- Account for natural light, windows, wall washers, spotlights, floods, and window treatments.
- Inspect without magnification.
- Use a normal viewing position at least 5 feet / 1.5 meters perpendicular to the surface.
- For Levels 3 through 5, use drywall primer or an approved equivalent before inspection where the inspection procedure requires it.
A flashlight held close to a wall at a sharp angle is useful for finding defects during production, but it can exaggerate minor variations beyond what an occupant sees. If the finished room will have severe grazing light, that condition should be represented in the mock-up and written specification rather than introduced only during a dispute.
Separate workmanship defects from finish-level limitations
A finish level does not excuse workmanship that fails the specified level. Examples of defects include visible ridges where the surface is required to be smooth, unfilled fastener heads, loose or poorly embedded tape, cracked joints caused by improper work, damaged corner bead, gouges, holes, obvious tool marks, and poorly feathered compound.
Other conditions may be caused by the decoration or substrate rather than a failure to perform the specified joint treatment. Examples include joint photographing beneath a dark coating, porosity differences beneath glossy paint, shadows caused by severe side lighting, minor variation visible only under abnormal close-range light, and waves caused by framing or panel installation. Compare the work with the written specification and approved mock-up instead of treating every visible variation as proof that the contractor missed the finish level.
Special cases that need separate specifications
Fire-rated and smoke-rated assemblies
The finish level alone does not establish a fire-resistance rating. Fire performance belongs to the complete tested or listed assembly, including panel type and thickness, framing, fasteners, joints, penetrations, perimeter treatment, and other components. GA-214 directs users to the assembly requirements, applicable codes, and Gypsum Association guidance when fire resistance, smoke resistance, or sound control is required.
Level 1 is often called fire-taping, but there is no universal rule that every fire-rated wall is Level 1. For example, National Gypsum’s current FAQ states that certain one-hour fire-rated wall assemblies and fire barriers require at least Level 2, while other listed shaftwall or fire-taping applications may specify Level 1 treatment. These requirements vary by assembly. Use the exact listed design, project documents, code, and authority having jurisdiction.
Rank #4

- EFFICIENT BUCKET SCRAPER – A nylon bucket scoop and scraper with a curved edge, specifically designed to fit standard 5-gallon buckets ensuring thorough scraping and cleaning with minimal effort
- EASY TO USE – Designed for effortless scooping and scraping, this versatile bucket trowel handles drywall compound, paint, mortar, epoxy, carpet glue, and more with ease. Its lightweight build ensures quick and easy cleanup
- HIGH-QUALITY NYLON - Constructed from lightweight, unbreakable nylon, the Scoop-N-Scrape won’t nick plastic and never rusts. This durable material ensures long-lasting reliability and performance
- ERGONOMIC HANDLE - Designed for comfort, the Scoop-N-Scrape features a secure grip handle that reduces hand fatigue. Its flexible design enhances usability, making scooping and scraping more efficient
- TRUSTED BRAND - Proudly brought to you by Buddy Tools, a brand known for quality and innovation. Trusted choice by DIY enthusiasts and professionals for efficient and effortless scooping and scraping
Tile substrates
Level 2 is commonly used where gypsum panels are serving as a tile substrate, but the finish level does not establish wet-area suitability or waterproofing. Confirm that the selected panel is approved for the location and follow the tile-backer and waterproofing requirements. A Level 2 finish is a surface-treatment description, not a moisture-resistance rating.
Sound-control assemblies
A drywall finish level does not create an STC rating. Sound performance depends on the complete tested assembly and on details such as sealing penetrations, controlling flanking paths, maintaining required layers, and following the assembly design. Do not use Level 5 as a substitute for sound-control construction.
Recommended Free Tools
Glass-mat and fiber-reinforced gypsum panels
GA-214 includes glass-mat and fiber-reinforced gypsum panels, but their face textures and absorption can differ from paper-faced board. The manufacturer may require a particular finishing product, an additional skim coat, or a different preparation sequence. For example, USG’s glass-mat panel guide provides product-specific finishing recommendations, and National Gypsum notes that some of its glass-mat products may require Level 5 before painting. Do not generalize one manufacturer’s requirement to every glass-mat product.
Independent reader supportYour contribution helps us test, update, and keep practical guides available for everyone.Environmental conditions and sequencing
Finish levels are not independent of jobsite conditions. GA-214 says temperature, humidity, and airflow should remain constant and close to anticipated occupancy conditions. It calls for a minimum temperature of 50°F / 10°C continuously for 48 hours before and throughout finishing until the project is completed or occupied, while directing users to additional guidance for extreme conditions.
Paper-faced gypsum board should not be installed and finished before the building is adequately weather-protected. National Gypsum notes that ASTM C840, the International Building Code, and GA-216-2024 do not permit paper-faced gypsum installation before weather protection is provided. Product-specific glass-mat panels may have different allowances, so follow their instructions.
Common sequencing and environmental failure modes
- Cold or humid conditions: Compound dries slowly and may finish inconsistently.
- Changing airflow or temperature: Different areas can dry at different rates, producing uneven surfaces or sheen differences.
- Finishing before enclosure: Moisture exposure can damage paper-faced panels and compromise the work.
- Painting before compound is thoroughly dry: Defects, color differences, and sheen variation can become locked into the finish.
- Touch-ups after final decoration: Repairs can be difficult to conceal, especially at Levels 3 through 5.
- Over-sanding: Sanding through compound can expose previously concealed differences, scuff the board, or raise the gypsum-board paper.
- Assuming skim coat repairs the substrate: A skim coat cannot correct non-plumb walls, framing waves, major dents, or structural movement.
Common myths and disputes
- Level 5 means flawless drywall.
- It means Level 4 treatment plus a full-surface skim coat. It is the most uniform GA-214 finish, but it does not promise a flawless plane or hide major substrate problems.
- Level 5 means plaster.
- It does not. A Level 5 skim coat reduces texture and porosity differences on gypsum panels; GA-214 does not describe it as a plaster surface.
- Level 4 is always the standard residential finish.
- Level 4 is a common starting point for smooth walls with flat paint, but regional practice and project requirements vary. Color, sheen, lighting, texture, wallcovering, panel type, and the contract control.
- Level 3 is poor workmanship.
- Level 3 can be the correct finish beneath medium or heavy texture or heavy-duty wallcovering. It is unsuitable for a smooth or lightly textured design, not inherently defective.
- Level 1 automatically provides a fire rating.
- No. Level 1 may be called fire-taping, but fire performance comes from the complete listed assembly and its required treatment.
- A thick primer can turn Level 3 into Level 5.
- Primer and paint are separate from the drywall finish level. Level 5 requires full-surface treatment, although an approved specialty surfacer system may replace traditional skim-coat and primer steps when its manufacturer’s requirements are met.
- A flashlight proves the contractor failed.
- Close, sharp-angle light is useful during production but can exaggerate conditions. Acceptance should use the specified lighting, no magnification, and a normal viewing distance of at least 5 feet unless the contract establishes a different defensible procedure.
- More paint coats equal a higher drywall finish.
- Paint-coat count depends on the primer, paint, color, sheen, and manufacturer’s instructions. It does not change the specified drywall finish level.
- Skim coating fixes bowed walls.
- No. Skim coating can reduce minor surface texture and porosity differences, but it does not correct framing, panel alignment, out-of-plane walls, or movement.
- Any texture makes a lower finish level acceptable.
- Heavy texture hides more variation, while light and discontinuous texture can reveal it. Select the level based on the actual texture pattern and use a mock-up where appearance matters.
Specification checklist for owners, builders, and designers
Before work starts, record the conditions that determine the finish rather than writing only smooth drywall or perfect drywall.
- Panel type: paper-faced gypsum board, glass-mat, fiber-reinforced, or another product.
- Finish level by room, wall, ceiling, or other surface.
- Final paint type, color, and sheen.
- Texture pattern, application method, or wallcovering type.
- Locations with critical natural or artificial lighting.
- Primer or approved surfacer requirements.
- Mock-up size, location, decoration, lighting, and acceptance procedure.
- Inspection lighting and normal viewing distance.
- Fire-, smoke-, sound-, and moisture-assembly references where applicable.
- Manufacturer-specific requirements for the panel, compound, primer, surfacer, paint, texture, or wallcovering.
- Responsibility for damage, repairs, and touch-ups after finishing or decoration.
- Environmental and enclosure requirements before installation and finishing.
Example specification language
Provide gypsum-panel finishing in accordance with GA-214-2021. Provide Level 4 finish at [identified rooms and surfaces] for [specified final decoration]. Provide Level 5 finish, including full-surface skim coat or approved specified surfacing system, at [identified rooms and surfaces] receiving [dark/non-flat/gloss finish or critical lighting]. Provide manufacturer-approved primer and final decoration system. Submit a representative mock-up including final decoration and occupied lighting for acceptance before production work. Inspect under representative completed-room lighting from a normal viewing position at least 5 feet from the surface. For fire-, smoke-, sound-, tile-, or moisture-related assemblies, comply with the complete listed design and applicable manufacturer instructions.
Finish levels are industry guidance and become contractually enforceable when incorporated into the project specifications, contract, code, or other governing documents. They should not be treated as a universal legal standard without checking the project’s jurisdiction and documents.
Reference standards and guidance
- Gypsum Association GA-214-2021: Levels of Finish for Gypsum Panel Products
- ASTM C840-25: Standard Specification for Application and Finishing of Gypsum Board
- Drywall Finishing Council inspection method
- CertainTeed finish-level summary
- National Gypsum Level 4 versus Level 5 comparison
Frequently Asked Questions
Which drywall finish level should a typical house use?
For an exposed smooth wall with flat paint and ordinary lighting, Level 4 is a common starting point. It is not a universal residential requirement: dark colors, non-flat paint, light texture, thin wallcovering, or strong side lighting may justify Level 5 or another specified system.
Is Level 5 drywall worth the extra work?
It can be worthwhile where gloss or sheen paint, dark colors, glossy finishes, or critical lighting could reveal joint photographing and porosity differences. It offers less benefit beneath heavy texture or substantial wallcovering, and it cannot correct a wavy or poorly aligned substrate.
Can Level 2 drywall be used in a bathroom?
Level 2 describes the amount of joint treatment; it does not establish wet-area suitability or waterproofing. Confirm the panel type, tile-backer requirements, moisture-management system, and manufacturer’s instructions separately.
How should a drywall finish dispute be inspected?
Compare the work with the written finish level and any approved mock-up. For Levels 3 through 5, use primer or an approved equivalent where required, inspect under representative occupied lighting, avoid magnification, and view the surface from at least 5 feet perpendicular to it. A close flashlight at a sharp angle is not automatically the acceptance standard.
The Bottom Line
Choose the drywall finish level from the final decoration and lighting: Level 2 for appropriate tile or utility applications, Level 3 for medium or heavy texture, Level 4 for many smooth flat-painted walls, and Level 5 for dark, glossy, non-flat, or critically lit surfaces. Specify the level, panel and coating systems, mock-up, lighting, and inspection method in writing. Level 5 adds a full-surface skim coat, but no drywall finish level can repair bad framing or guarantee a plaster-like, perfectly flat wall.
Quick Recap
Product prices and availability are accurate as of the date/time indicated and are subject to change. Any price and availability information displayed on Amazon at the time of purchase will apply.
What’s actually slowing this PC down?
Pick the symptom - the matching free tool is one click away.




