What’s actually slowing this PC down?
Pick the symptom - the matching free tool is one click away.
DIY garden stepping stones are one of the better weekend hardscape projects for a homeowner because the scope can stay small, the materials are easy to find, and the result is immediately useful. A simple path through a mulch bed, side yard, vegetable garden, hose route, or shed approach can often be built for a few hundred dollars or less.
The difference between a path that looks good for one season and one that stays flat is not the decorative mold. It is the base. Stones set directly on soil or mulch tend to rock, sink, hold water, crack, or become trip hazards. On our job sites, we treat even small pedestrian hardscape work as a drainage and bearing problem first, then a finish choice second.
For most residential garden paths, plan on 12-inch to 24-inch stones, centers spaced roughly 20 to 24 inches apart, a finished surface set flush or slightly proud of grade, and a compacted setting bed under every stone. Poured DIY concrete stones should generally be at least 2 inches thick, and thicker is better in freeze-thaw climates or soft soils. This guide covers the practical way to design, build, price, and maintain stepping stones without turning a simple project into a full patio installation.
Where DIY Stepping Stones Make Sense
Stepping stones work best where the path is informal, low speed, and pedestrian only. Good uses include garden paths, mulch-bed walkways, side-yard access, shed paths, hose routes, trash-can paths, and shortcuts through lawn areas that are already getting worn down.
#1 Best Overall

- 🌻 This versatile 6-pack includes 6 pcs concrete stepping stone molds in 3 sizes (10", 11", 12.6"), ideal for creating unique garden pathways. The contrasting sizes enable creative layouts to enhance your outdoor decor. Perfect for DIY enthusiasts seeking durable, reusable path makers.
- 🌻 The cement mold features a smooth base for a sleek finish. Mix and match designs to create visually appealing stepping stones. Suitable for concrete, resin, or plaster casting.
- 🌻 Made from high-quality, flexible yet sturdy plastic, these stepping stone molds resist cracking and warping for long-lasting use. The durable material ensures easy release of hardened stones without damage. Ideal for repeated projects in any season.
- 🌻 Simply fill the concrete stepping stone molds with your chosen material, allow it to set, and remove your custom stepping stone. The lightweight design makes handling easy, and cleaning is simple. No special tools needed—great for beginners and experts alike.
- 🌻 Beyond stepping stones, these cement molds can be used for coasters, wall art, or decorative tiles. The compact size allows easy storage when not in use. A must-have for crafters, gardeners, and home improvement lovers!
They are not a substitute for a driveway, parking pad, public sidewalk, accessible commercial route, or heavily used front walk unless they are designed as a real paver system with proper excavation, base thickness, edging, drainage, and compaction. A loose set of garden stones is different from an interlocking paver walkway.
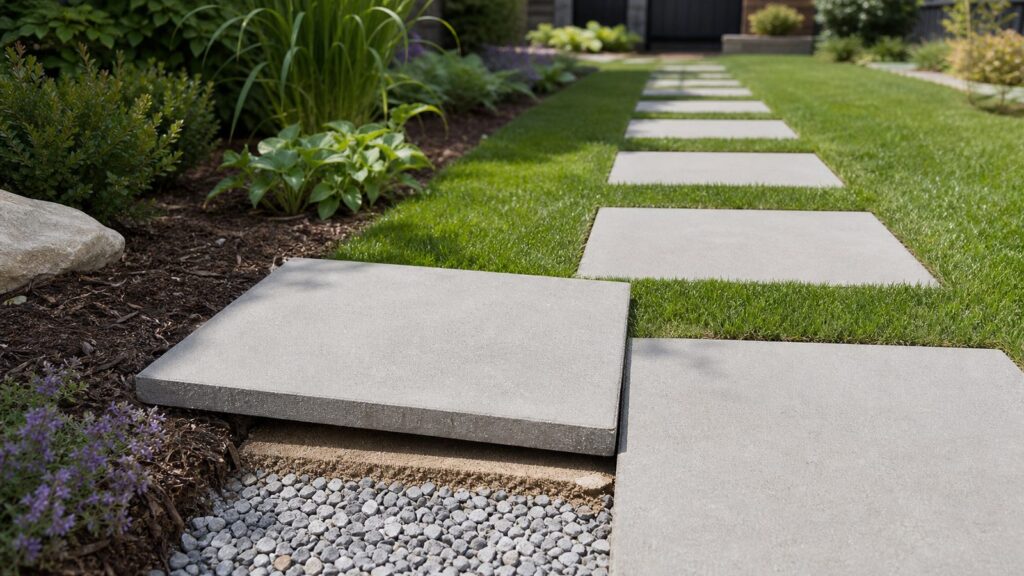
The most common DIY mistake is treating stepping stones like lawn decorations instead of small slabs that need support. A 16-by-16-inch concrete stone may only be a few square feet, but when someone steps on one corner, all that load has to transfer into the soil below. If the base is uneven or soft, the stone rocks. Once it rocks, it pumps water and fines out from underneath. Then it settles more, and eventually the corner chips or the whole stone cracks.
Choosing the Right Stepping Stone Material
You have three practical options: buy precast concrete stepping stones, cast your own concrete stones, or use natural stone such as flagstone. Each can work, but they behave differently in the ground.
Precast concrete stepping stones
Precast concrete is the most straightforward choice. Big-box retailers commonly sell 12-by-12-inch, 16-by-16-inch, 18-by-18-inch, 20-by-20-inch, and 24-by-24-inch concrete step stones. Many retail units are about 1.5 to 2 inches thick. Basic 16-by-16-inch concrete stones often cost about $5 to $15 each in 2026, with common listings around $5.47 to $5.97 per stone. Larger pieces, textured finishes, and palletized products cost more, with some products around $6.59 per square foot.
Do these 3 things before closing this tab:
1Repair Windows errors before they cause bigger problems2Fix the driver behind crashes, sound loss and screen glitches3Clear out junk files and repair common Windows errorsFor a garden path, precast concrete is fast, predictable, and usually the best value. The shape is consistent, the thickness is known, and it is easier to set a clean finished grade.
Cast-in-place or molded DIY concrete stones
Casting your own stones gives you control over shape, texture, color, and decoration. It also takes more time and creates more opportunity for weak edges, trapped air, poor curing, or stones that are too thin.
Use concrete mix when strength matters more than fine surface detail. A 60-pound bag of general concrete mix commonly costs about $4.85 in 2026 and yields about 0.45 cubic feet. A 2-inch-thick 16-by-16-inch stone uses about 0.30 cubic feet before waste, so one bag makes roughly one large 16-by-16 stone with margin. For smoother decorative molds, sand/topping mix usually finishes better because it does not contain larger gravel. The tradeoff is that it is better suited to detail work than heavy abuse.
Do not confuse cement with concrete. Cement is one ingredient. For stepping stones, most homeowners should buy a concrete mix or sand/topping mix, not a bag of cement by itself.
Recommended Free Tools
Natural stone
Natural stone has the most character but takes the most patience to set well. Irregular flagstone varies in thickness, which means more bedding adjustment under each piece. Choose stones with consistent thickness, textured walking faces, and enough mass to resist rocking. Thin, flaky pieces may look good in a stack at the yard but break under foot traffic once set over a small void.
Stepping Stone Size, Thickness, and Spacing
For a comfortable garden path, stone size and spacing matter more than pattern. A small 12-by-12-inch stone can work in a decorative bed, but many adults find 16-by-16 inches or larger more comfortable because there is enough landing area for a full foot. A 20-by-20-inch or 24-by-24-inch stone feels more stable and is easier to use when carrying tools, a hose, or garden supplies.
For loose stepping stones, start with centers about 20 to 24 inches apart. That is a planning range, not a rule. Dry-lay the full path on the grass or mulch, then walk it both directions. Have the shortest and tallest regular users walk it too. Adjust the stones before digging, because it is much easier to move a stone on the surface than after excavation.
For a path meant to feel more like a continuous walkway, reduce the gaps and keep the joints consistent. Wider gaps look natural in a garden, but they are less comfortable for small children, older adults, guests in dress shoes, and anyone carrying something heavy.
The Tool Desk
Outbyte Driver Updater FREEFix the driver behind crashes, sound loss and screen glitchesFind Drivers →Outbyte PC Repair FREEClear out junk files and repair common Windows errorsFree Scan →Thickness depends on material and climate. Many store-bought concrete step stones are about 1.5 to 2 inches thick. For poured DIY stones, 2 inches should be treated as a practical minimum. In freeze-thaw regions, clay soils, or areas that stay wet, 2.5 to 3 inches gives you a stronger piece and more forgiveness. More thickness also means more weight, so plan handling accordingly.
Rank #2

- Set of 6 pcs Betonex Reusable Paver molds for concrete flagstone. DIY Precast Concrete Forms - Easy to use to create wonderful flagstone pavers, garden walkway, garden path stones, stone pavers, stepping stones, pathway, backyard path.
- Easy to use. Paver molds for concrete are reusable. You can produce more than 50 tiles for arranging garden paths.
- This is a perfect patio paving mold to use for making a garden cement stone for your garden. Be original to surprise your neighbors! DIY Stepping Stone Mold has 6 different textures. These casting molds for concrete, garden cement molds have area - 0.37 square meters.
- Stampcrete pattern molds are made of ABS plastic thickness 1,9-2 mm. Depending on the geometry of the concrete molds for walkways wall thickness can form less than the above dimensions. Made in Europe.
DIY Garden Stepping Stone Costs in 2026
A small stepping-stone path can be inexpensive, but the total depends on whether you already own tools and whether you use bagged materials or bulk material. Bagged base and sand are convenient for 10 to 20 stones. Bulk gravel and sand are cheaper per cubic foot but may require a truck, trailer, or delivery fee.
| Item | Typical 2026 Cost | Practical Notes |
|---|---|---|
| Basic concrete step stones | About $5-$15 each | Common 16-by-16-inch units often run about $5.47-$5.97 each; larger and decorative stones cost more. |
| 60-lb concrete mix | About $4.85 per bag | Yields about 0.45 cu. ft.; enough for roughly one 2-inch-thick 16-by-16-inch stone with margin. |
| Bagged paver base | About $6.47 per 0.5 cu. ft. bag | Useful under individual stones, especially in soft or wet areas. |
| Leveling or paver sand | Often covers about 5.5-6 sq. ft. at 1 inch thick | Used as a thin bedding layer, not as a deep structural base. |
| Polymeric sand | About $20-$30 per budget bag; premium 40-lb products can exceed $90 | Usually unnecessary for widely spaced garden stones; more useful for tight paver-style joints. |
| Basic tools | About $40-$150+ if starting from nothing | Shovel, hand tamper, level, rubber mallet, gloves, eye protection, mixing tub, and trowel. |
| Professional paver walkway | Often about $8-$27 per sq. ft.; complex work can run higher | Installed pricing varies with region, base depth, access, cuts, drainage, edging, and stone selection. |
As a realistic example, a 12-stone garden path using basic 16-by-16-inch concrete stones may cost roughly $70 to $180 for the stones. Add $25 to $100 or more for bagged base and bedding sand. If you own no tools, another $40 to $150 is easy to spend on a hand tamper, shovel, level, mallet, gloves, eye protection, mixing tub, and trowel.
A decorative cast-concrete version may save money on finished stones but costs more in time. You need molds, mix, curing space, and several days before the stones should be handled aggressively. If the goal is a quick, durable path, buying precast stones is often the better value. If the goal is a custom garden feature, casting your own can be worth it.
Tools and Materials
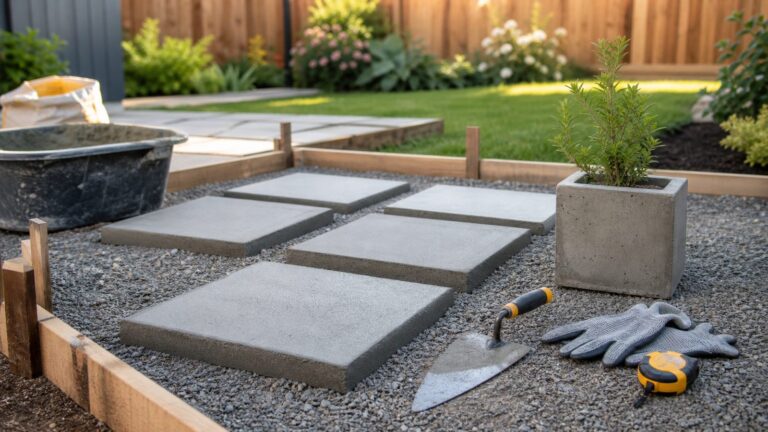
For a typical stepping-stone installation using precast stones, gather the following:
- Stepping stones, usually 12-by-12 inches to 24-by-24 inches
- Paver base or compactable crushed stone for soft or wet areas
- Leveling sand or stone dust for a thin bedding layer
- Shovel or spade
- Hand tamper
- Rubber mallet
- 2-foot level or torpedo level
- Tape measure
- Garden hose, stakes, marking paint, or string line
- Work gloves and eye protection
For cast concrete stones, add a mixing tub or wheelbarrow, margin trowel or finishing trowel, concrete mold, release agent if needed, concrete mix or sand/topping mix, water, and plastic sheeting for curing.
For a longer path, a rented plate compactor may be worth the cost. A hand tamper is fine for a short garden route. For a long side-yard path, a compacted base is the difference between a finished walkway and an annual reset project.
Plan the Path Before You Dig
Start by deciding how the path will actually be used. A route to a shed should be straighter and more stable than a decorative curve through a flower bed. A hose route should avoid tight turns that snag the hose. A side-yard access path should consider wheelbarrows, trash bins, and drainage from downspouts.
Windows Errors? Fix Them Before They Spread
Repair common Windows errors and clear accumulated junk for a smoother, more stable PC - no reinstall needed.Free scan · no reinstallCrashes, No Sound, or Screen Glitches?
Random freezes, missing sound and display glitches usually trace back to one bad driver. Find and replace yours safely.Free scan · under a minuteLay the stones directly on the ground first. Do not dig yet. Set the first and last stone where the path must start and stop, then fill in the middle. Walk it several times at normal pace. Carry a watering can, tool bag, or trash bin if that is how the route will be used. Adjust the centers until the stride feels natural.
Keep the top of each stone flush with the surrounding grade or just slightly proud. If the stone is too high, it catches mower blades and toes. If it is too low, it collects mulch, soil, and water. In turf areas, flush is usually best. In mulch beds, slightly proud can help keep mulch from washing over the surface.
Prepare the Base Correctly
Base preparation is the part that separates durable work from temporary work. The goal is simple: remove soft organic material, create a stable pocket, provide drainage where needed, and support the whole stone evenly.
Step 1: Mark each stone
Once the dry layout feels right, cut around each stone with a spade or mark the perimeter with paint. Numbering the stones with painter’s tape can help if the sizes or shapes vary.
Step 2: Excavate to the right depth
Remove the stone and dig out the marked area. Your excavation depth should include the stone thickness, a thin bedding layer, and any compacted base. For example, a 2-inch-thick stone over 1 inch of bedding sand and 2 inches of paver base needs roughly 5 inches of excavation before final adjustment.
For firm, well-drained soil and light garden use, some homeowners use only a compacted subgrade and a thin bedding layer. For soft soil, clay, wet areas, freeze-thaw climates, or paths that will be used often, add compacted paver base or crushed stone. Do not rely on a thick layer of loose sand to fix poor soil. Thick uncompacted sand shifts.
Rank #3

- Create Beautiful Sunflower Pathways: Transform your outdoor space with this 15-inch sunflower stepping stone mold. It forms a distinctive flower-shaped concrete stepping stone that brings a warm, natural accent to gardens, yards, patios, pathways, and other outdoor areas.
- Reusable Silicone Mold: Made from sturdy, flexible silicone, this concrete mold is designed for repeated use. Simply pour in your preferred cement, concrete, or casting material, let it set, and easily remove the finished stepping stone without damaging the mold.
- Easy to Use: No special skills are required to use this stepping stone mold. It's perfect for beginners, craft enthusiasts, and families. Personalize each garden stone by adding colors, pebbles, glass pieces, or other decorative elements to create a one-of-a-kind design.
- Versatile Concrete Casting Mold: Ideal for creating garden pathways, lawn decorations, patio accents, memorial stones, and a variety of outdoor landscaping projects. This reusable mold helps you create beautiful handmade concrete crafts for any season or occasion.
- Fun and Thoughtful Gift: A great gift for gardening enthusiasts, DIY lovers, and families who enjoy outdoor projects. Create memorable handmade stepping stones that add personality, creativity, and a decorative touch to any garden or walkway.
Step 3: Compact the subgrade
Compact the bottom of the excavation with a hand tamper. Remove roots, loose soil, and organic debris. If the soil pumps water or feels spongy, the path needs better drainage, more base, or a different route.
Step 4: Add base and bedding
Add paver base in thin lifts and compact it. For small individual stones, 2 to 4 inches of compacted base is a practical range where conditions call for it. Add a thin layer of leveling sand or stone dust on top, usually about 1 inch or less. Screed it roughly level, then set the stone.
Step 5: Set and test each stone
Place the stone, press it into the bedding, and tap it with a rubber mallet. Check that it does not rock. Check height against surrounding grade. Step on all corners. If it moves, lift it and correct the bedding. Do not wedge a rocking corner with a pebble; that creates a point load and can crack concrete or stone.
Drainage, Slope, and Freeze-Thaw Movement
Water is the main reason stepping stones fail. It softens soil, washes out bedding, grows algae on shaded surfaces, and expands during freeze-thaw cycles. A garden path does not need highway-level drainage design, but it does need a place for water to go.
Keep the path from becoming a dam. If stones are set across a slope, leave enough space or drainage path for surface water to pass. Avoid creating a raised edge that traps water against a foundation, fence, or planting bed. Near a house, respect the existing grading that moves water away from the structure.
A small slope helps shed water, but the walking surface should still feel comfortable. Avoid steep cross slopes on individual stones. Accessibility standards for formal accessible routes use a maximum 2% cross slope and 5% running slope unless designed as a ramp. Your private garden path may not be required to meet those rules, but the numbers are useful because they reflect what feels stable underfoot.
Free tools Windows power users keep installed
One-click scans. No signup required.
In cold climates, thicker stones and a drainable base matter. Frost heave is not eliminated by wishful thinking. Water trapped under a thin stone can lift it during winter and leave it uneven in spring. Use exterior-rated materials, avoid water-trapping decorative inlays, and keep the bedding layer consistent.
How to Cast Your Own Concrete Stepping Stones
Casting stones is a separate project from installing them. Give yourself enough time. Fresh concrete is not simply drying; it is curing through a hydration process. Concrete needs moisture and time to gain strength.
Choose the mix
Use general concrete mix for stronger plain stones where detail is not the priority. Many common concrete mixes sold for residential work are 4,000 psi formulations and are used for slabs, sidewalks, patios, curbs, and other general concrete work at 2 inches thick or more. Use sand/topping mix when you want smoother decorative surfaces and sharper mold detail.
Use a proper mold depth
Set your mold for at least 2 inches of finished thickness. For a 16-by-16-inch stone, that is about 0.30 cubic feet of concrete. A 60-pound bag yielding about 0.45 cubic feet gives you some margin for waste and edge variation.
Mix, place, and consolidate
Mix to the consistency recommended on the bag. Soupy concrete is easier to pour but weaker and more prone to shrinkage problems. Fill the mold, tap the sides, and vibrate or jiggle the mold to release trapped air. Consolidate the edges with a trowel because weak edges are the first part to chip.
Cure before installation
Cover the stones with plastic and keep them damp while they cure. Common concrete guidance calls for water curing freshly placed concrete for at least 3 to 5 days, with product data often pointing to about 5 days in warm weather around 70 degrees F and above, or 7 days in cooler 50 to 70 degree conditions. Do not cast stones in the morning and set them into a path the same afternoon. They may look hard before they have meaningful strength.
If you plan to seal decorative concrete, wait until the concrete has properly cured and use an exterior-rated, slip-resistant sealer. Glossy sealers can make garden paths slick, especially in shade, rain, or irrigation overspray.
Rank #4

- APPLICATION: Reusable mold for concrete, cement. Easy to use to create a beautiful stepping stone, pathway, garden walkway. Molds are made of plastic which allows you to use the molds over and over.
- DO IT YOURSELF: Make your own stepping stone! Paint your own stepping stone! Make your own personalized garden stepping stone! Enjoy your DIY stepping stone and your awesome garden walkway. Concrete paw maker.
- DIMENSIONS: This concrete mold will make a finished piece that measures 12 3/4 IN x 11 1/4 and is 1 3/4 IN thick. This is a great mold to use for making a walkway or creating paths through your garden area, This is Textured Mold for NON-SLIP Stepping Stones.
- EASY TO MAKE, no experience needed. Very simple instruction for creating your pieces. Enjoy your unique DIY path in your garden, patio stepping stones, stone paw for garden, paw stepping stones, garden paw outdoor.
- MADE IN USA: AUTUMN is an American manufacturing company. We believe that every product can be produced efficiently locally at an affordable price. Our mission is to bring manufacturing back home to the USA.
Joints, Mulch, Gravel, Grass, and Polymeric Sand
The material around the stones affects both appearance and maintenance. Grass looks clean but requires trimming. Mulch is forgiving but migrates onto the stone surface. Gravel drains well but can scatter. Tight paver-style joints can look formal but require more precise installation.
Quick wins for a faster PC:
Repair Windows errors before they cause bigger problemsFix Now →Fix the driver behind crashes, sound loss and screen glitchesFind Drivers →Clear out junk files and repair common Windows errorsFree Scan →For widely spaced garden stones, polymeric sand is usually overkill. It is designed for joints between pavers, not large gaps between isolated stones. It can be useful when stones are set close together with consistent joint widths and a proper base. Budget polymeric sand commonly costs about $20 to $30 per bag, while premium 40-pound specialty products can exceed $90 depending on color, joint width, performance claims, and retailer.
If the path crosses lawn, set the stones flush enough that a mower can pass over them without hitting an edge. If the path sits in mulch, keep the mulch slightly below the top surface. If the path is in gravel, use edging where needed to prevent gravel from spreading into lawn or planting beds.
Independent reader supportYour contribution helps us test, update, and keep practical guides available for everyone.Safety, Permits, and Stormwater Issues
Most small private garden stepping-stone paths do not need a building permit, but local rules vary. The more your project starts to behave like a formal walkway, patio, drainage change, or impervious surface addition, the more you should check local requirements before building.
Permit and review questions become more likely when the work connects to a public sidewalk, changes drainage, adds substantial hard surface area, affects a right-of-way, sits near a protected tree or easement, or is part of a larger exterior renovation. Some cities specifically review outside work based on location, drainage impact, zoning, and impervious-surface limits. Stormwater rules can also apply when hard surfaces change runoff patterns on the lot.
Even where ADA rules do not apply to a private single-family garden path, use the safety lessons. Level changes over 1/4 inch are a trip-risk concern. Keep stones stable, avoid abrupt height changes, and do not create a path that becomes slick when wet. For older adults or frequent guests, a continuous walkway may be safer than widely spaced stepping stones.
When to DIY and When to Hire a Pro
DIY is reasonable for 10 to 20 loose garden stones in a low-traffic area, especially when the route is flat, drainage is already good, and the stones are small enough to handle safely. A careful homeowner can lay out, excavate, base, and set a short path over a weekend. Casting custom stones adds several curing days but is still manageable.
Hire a professional when the path is long, highly visible, used as a primary entrance route, on a steep grade, or tied into drainage corrections. Also bring in help for accessibility-sensitive routes, public sidewalk connections, premium natural stone layouts, retaining edges, steps, or sites with soft soils that need deeper excavation and mechanical compaction.
Professional paver walkway pricing often lands around $13 to $27 per square foot, with some guides showing concrete paver materials around $3 to $6 per square foot and installed costs around $8 to $15 per square foot. Complex projects can run $15 to $50 per square foot or more depending on region, access, excavation, base depth, cuts, edging, drainage, and disposal. That is much more than a simple DIY garden path, but it buys layout control, compaction, drainage planning, production speed, and accountability for a path that has to perform every day.
The Tool Desk
Outbyte PC Repair FREERepair Windows errors before they cause bigger problemsFix Now →Outbyte Driver Updater FREEFix the driver behind crashes, sound loss and screen glitchesFind Drivers →Common Mistakes We See
The first mistake is skipping the dry layout. A path that looks good from above may feel awkward underfoot. Always walk it before digging.
The second mistake is setting stones directly on mulch or topsoil. Organic material moves, decomposes, holds water, and invites settlement. Remove it under each stone.
The third mistake is making the stones too thin. Decorative concrete disks that are 1 inch thick may survive as ornaments, but they are not dependable walking surfaces. Use 2 inches as a practical minimum for cast stones.
The fourth mistake is using too much loose sand. Sand is a leveling layer, not a structural fix for bad soil. If you need height and support, use compacted base first.
Quick wins for a faster PC:
Fix the driver behind crashes, sound loss and screen glitchesFind Drivers →Repair Windows errors before they cause bigger problemsFix Now →Scan for outdated or missing drivers - takes under a minuteDriver Scan →Best Value

- Stop Worrying About Missing Parts: Unlike many kits that only provide a single-use mold and no decorations, our set includes 5.5 Lb cement mix, a mold, 7oz of vibrant mosaic tiles, 3 carving tools, letter & number stamps, a waterproof mat, and a pairs of glove
- Family DIY, Handprints & Forever Memories: A fun family DIY project! Press your child's handprints or footprints into the cement, then use the included letter and number stamps to add names and dates. Perfect for backyard walkways, garden markers, or rainy-day fun. Cherish those tiny prints forever
- All-In-One Crafting Protection: We've solved the "messy cleanup" complaint by including a 19.6inx19.6in waterproof gardening mat and a pair of XL protective gloves. This ensures a clean workspace and keeps hands safe from concrete irritation while you focus on the artistic arrangement of the mixed-color mosaics
- Durable & Weather Resistant Design: Our 10-inch sturdy plastic mold is built for longevity. Whether placed in a sun-drenched patio or a rainy garden, the resulting stones are heavy-duty and permanent. The 3-piece carving tool set allows for precise smoothing and detail work that standard sticks can't achieve
- The Ultimate Personalized Gift: A thoughtful DIY gift for Mother's Day, Father's Day, or Grandparents. Ready to be turned into a lasting keepsake that captures families' growth or pet paws for years to come
The fifth mistake is ignoring water. Downspouts, irrigation, low spots, clay soil, and shade all affect how a path performs. If water sits there now, stepping stones alone will not solve it.
Maintenance After Installation
Check the path after the first heavy rain and again after the first freeze-thaw season if you live in a cold climate. A little settlement can be corrected by lifting the stone, adding or removing bedding material, and resetting it. Do not keep adding material around a sunken stone while leaving the unsupported base in place.
Keep soil, mulch, and moss from building up over the surface. Trim grass edges so the walking area stays visible. If a stone rocks, fix it early. Rocking gets worse with every step because the movement loosens the bedding underneath.
For sealed decorative concrete, monitor slip resistance. A sealer that looked attractive when dry can become slick after irrigation or rain. Use exterior-rated products and avoid glossy finishes on walking surfaces.
Free tools Windows power users keep installed
One-click scans. No signup required.
Bottom Line
A good DIY stepping-stone path is not complicated, but it does need construction thinking. Pick stones large enough to walk on comfortably, space them based on real stride, excavate for the full assembly, compact the subgrade, use base where soil or moisture calls for it, and set each stone so it is stable and flush with grade.
For a small garden route, that work can be done with basic tools and a modest budget. For a primary walkway, steep site, drainage problem, or accessibility-sensitive route, the smarter move is to treat it as a professional hardscape project. The path may look simple from the surface, but the performance is built underneath.
Frequently Asked Questions
How thick should DIY concrete stepping stones be?
Use 2 inches as a practical minimum for poured concrete stepping stones. In freeze-thaw climates, wet soils, or higher-use paths, 2.5 to 3 inches is more durable.
How far apart should garden stepping stones be?
Start with centers about 20 to 24 inches apart, then dry-lay the full path and walk it both directions. Adjust spacing for the actual users and the way the path will be used.
What’s actually slowing this PC down?
Pick the symptom - the matching free tool is one click away.
Can I set stepping stones directly on soil?
You can, but it is usually the reason stones sink, rock, or crack. A better method is to excavate, compact the subgrade, add compacted paver base where needed, and use a thin leveling layer of sand or stone dust.
Is polymeric sand needed for stepping stones?
Usually not for widely spaced garden stones. Polymeric sand is more useful for tight, consistent paver-style joints over a proper base.
How long should concrete stepping stones cure before use?
Keep freshly cast concrete damp and protected for at least 3 to 5 days. In cooler 50 to 70 degree conditions, plan closer to 7 days before handling and installation.
Do garden stepping stones need a permit?
Small private garden paths often do not, but local rules vary. Check requirements if the project connects to a public sidewalk, changes drainage, adds significant hard surface area, or affects a right-of-way or easement.
Quick Recap
Product prices and availability are accurate as of the date/time indicated and are subject to change. Any price and availability information displayed on Amazon at the time of purchase will apply.