Quick wins for a faster PC:
Fix the driver behind crashes, sound loss and screen glitchesFind Drivers →Repair Windows errors before they cause bigger problemsFix Now →A DIY witch broom is a simple backyard Halloween project: use a 4.5- to 6-foot branch or old tool handle, bundle raffia or thin twigs around one end, fasten it with zip ties or wire, cover the fastening with jute twine, and anchor the finished broom so wind cannot turn it into a loose yard hazard. Done well, it costs about $0 to $25 for a basic full-size broom and $25 to $60 if you add lights, ribbon, florals, or a freestanding base.
The craft itself is easy. The part most homeowners underthink is outdoor performance. Natural raffia, jute, straw, broomcorn, twigs, and dried grasses look right for Halloween, but they also absorb moisture, loosen through wet-dry cycles, and can be combustible. On our job sites, we treat every temporary exterior decoration the same way we treat a temporary work-zone item: it should be stable, visible, clear of walking paths, and attached without damaging the building envelope.
This guide walks through a yard-ready build, not just a tabletop craft. You will get the material list, real 2026 cost ranges, construction steps, anchoring options, lighting safety, and the common mistakes that make seasonal decorations look messy or create avoidable risk.
Why a DIY Witch Broom Works So Well for Backyard Decor
Halloween has become a serious home-decor season. The National Retail Federation projected 2025 Halloween spending at a record $13.1 billion, including about $4.2 billion on decorations. It also reported that 78% of Halloween shoppers planned to buy decorations and 51% planned to decorate the home or yard. That tracks with what we see in residential neighborhoods: homeowners want curb appeal that is seasonal, affordable, and easy to remove after a few weeks.
Crashes, No Sound, or Screen Glitches?
Random freezes, missing sound and display glitches usually trace back to one bad driver. Find and replace yours safely.Free scan · under a minutePC Slower Than It Used to Be?
A free scan shows the junk files, broken settings and background clutter dragging Windows down - then fixes them in one click.Free scan · Windows 10 & 11#1 Best Overall

- ESSENTIAL MATERIAL FOR BROOM MAKING Natural broomcorn hurl commonly used as the outer fiber when making traditional corn brooms. Ideal for beginners, experienced broom makers, and workshops.
- NATURAL CORN BROOM FIBER – 20 INCH LENGTH Carefully prepared broomcorn hurl with strong, flexible fibers for shaping, stitching, and binding handmade brooms.
- PERFECT FOR DIY, HOMESTEAD & CRAFT PROJECTS Use for broom making, traditional crafts, homestead skills, educational demonstrations, and heritage projects.
- EASY TO WORK WITH FOR FIRST-TIME MAKERS The hurl portion is the most forgiving and beginner-friendly broomcorn material, making it an excellent starting point for learning broom construction.
- Prepared by Parker Homestead using traditional methods and real-world experience in broom making. Natural variation in color and texture reflects authentic material—not mass-produced fiber.
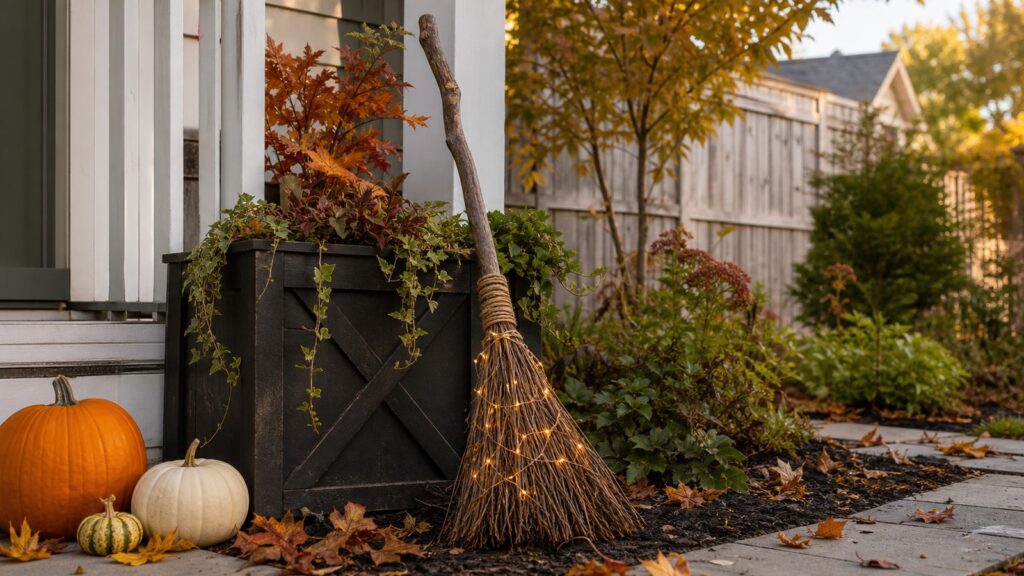
A witch broom checks all three boxes. It is tall enough to read from the street, narrow enough for a porch corner or garden bed, and flexible enough to match different styles. A crooked branch and twig bundle looks rustic. A clean dowel with raffia, black ribbon, and battery LEDs looks more polished. A group of three brooms near a fence, gate, or planter creates a fuller scene without filling the yard with plastic decor.
The best broom for outdoor use is not the one with the most glue or the most decorations. It is the one with a strong hidden structure, natural-looking outer wrap, and a display method that keeps it away from doors, stairs, grills, heaters, fire pits, candles, and lawn equipment.
Materials and Tools for a Full-Size Outdoor Witch Broom
For a backyard display, build the broom close to real broom scale. A finished length of 4.5 to 6 feet looks intentional outdoors. Anything shorter can disappear in landscaping, especially if viewed from the street. For the handle, choose a fallen branch, old broom handle, rake handle, sapling limb, or 1- to 1.25-inch wood dowel. The handle should be dry, reasonably straight where your hand would hold it, and free of soft rot, thorns, active insects, poison ivy or poison oak residue, and excessive loose bark.
For the bristles, use raffia, broomcorn, dried grasses, thin twigs, willow cuttings, corn stalk strips, or a disassembled straw broom. For the structural fastening, use UV-resistant zip ties, coated wire, or stainless wire. Then cover that structural wrap with jute twine so the broom still looks handmade instead of hardware-heavy.
Do these 3 things before closing this tab:
1Fix the driver behind crashes, sound loss and screen glitches2Clear out junk files and repair common Windows errors3Scan for outdated or missing drivers - takes under a minute| Item | Recommended spec | Typical 2026 cost |
|---|---|---|
| Handle | 4.5-6 ft branch, dowel, broom handle, or rake handle; about 1-1.25 in diameter | $0-$15 |
| Raffia, broomcorn, twigs, or dried grasses | Enough to form a 6-10 in diameter bristle bundle | $0-$15 per bundle |
| Jute twine | Natural twisted jute; one 190 ft roll is more than enough for several brooms | About $4.90-$4.98 |
| UV-resistant zip ties | 8 in ties for hidden structural wraps; black blends well | About $3.44 for 20, or $19.98-$24.96 for bulk packs |
| Wire | Coated or stainless wire for stronger outdoor fastening | $5-$15 |
| Battery LED fairy lights | Battery-powered, low-heat LEDs with weather-resistant battery pouch | $6-$20 |
| Exterior-rated hook, stake, or base | Removable hook, short landscape stake, or weighted planter | $4-$25 |
| Pruning shears and gloves | For trimming branches and protecting hands | $15-$50 if purchased new |
If you already have branches, twine, scissors, and zip ties, the project can cost almost nothing. A clean, full-size broom using purchased raffia, jute, and UV zip ties usually lands around $10 to $25. Add fairy lights, faux florals, ribbon, matte exterior spray, or a weighted base and the total commonly reaches $25 to $60. Store-bought decorative witch brooms often fall in the $20 to $60-plus range depending on size and finish, so DIY makes the most sense when you can source at least some materials from the yard or garage.
Prep the Handle and Bristles Before You Build
Do not build with fresh green branches if you can avoid it. Green wood shrinks, warps, leaks sap, and can loosen the bristle bundle as it dries. For a better result, collect your handle and twig bristles several days ahead of time. Let them dry in a garage, covered porch, or shed with airflow. Brush off loose bark, soil, and debris before assembly.
For a natural witch-broom shape, do not make every bristle the same length. Aim for a bristle section about 18 to 28 inches long on a full-size broom. Put thicker twigs or stiff material near the center, then layer lighter raffia, broomcorn, or grasses around the outside. This gives the broom body without making it look like a tight cylinder.
If the broom will lean against painted trim, a door, porch column, fence, or siding, add a clear rubber bumper or felt pad at the contact point. A dry branch can still scuff paint, and damp bark can stain porous surfaces. This is a small detail, but it is the type of small detail that separates a neat seasonal display from a cleanup problem in November.
Step-by-Step: Build the Witch Broom
1. Cut and clean the handle
Choose a handle between 4.5 and 6 feet long. For a porch, 4.5 to 5 feet is usually enough. For a garden bed, fence line, or yard display viewed from the street, 5.5 to 6 feet reads better. Trim off sharp side branches, thorns, and weak bark. Leave small knots and irregularities if you want a more crooked, handmade look.
Rank #2

- 5 Pound DIY Craft Bundle
- Natural Processed Broomcorn
- 20 inch length
- Broomcorn Hurl
- Naturally grown and hand harvested.
2. Arrange the bristles around the handle
Lay the handle on a work surface with the bottom 18 to 24 inches exposed. Place thicker twigs or straw strips around the lower end first. Then add raffia, broomcorn, or dried grasses around the outside. The bristle bundle should extend past the end of the handle by several inches so the handle disappears inside the bundle.
For a fuller silhouette, build the bundle to about 6 to 10 inches wide before fastening. The bundle will compress when tied, so start slightly larger than the final size you want.
3. Add the hidden structural wrap
Use two UV-resistant zip ties or wire wraps for the actual hold. Place the first wrap about 2 to 3 inches below the top of the bristle bundle. Place the second wrap 3 to 5 inches below that. Tighten both firmly. If you use wire, twist the cut ends inward so nobody gets scratched when moving the broom.
Free tools Windows power users keep installed
One-click scans. No signup required.
This is the most important construction step. Hot glue can help position decorative pieces, but it should not be the primary fastening outdoors. Heat, humidity, rain, and surface dust can weaken glue. Zip ties or wire provide the mechanical grip; the twine provides the finished look.
4. Cover the fasteners with jute twine
Start below the lower zip tie or wire wrap and wind jute twine upward in tight, even passes until all fasteners are hidden. A wrap height of 4 to 7 inches looks proportional on a full-size broom. Tie the twine with a square knot on the back side or tuck the end under the last few wraps. A small dot of hot glue can hold the tail in place, but the broom should remain structurally sound without relying on glue.
5. Shape the bottom
Stand the broom upright and trim the bristles with pruning shears or heavy scissors. Do not cut the bottom perfectly flat unless you want a clean prop look. A slightly uneven bottom looks more natural and photographs better. Remove any twig ends that point into walkways or could scratch someone brushing past.
6. Add optional finish or decoration
If the broom will sit outside for several weeks, a light coat of matte clear exterior finish can help slow moisture absorption and shedding. Spray outdoors or in a well-ventilated area and follow the product label. Do not treat finish as fireproofing. Raffia, dried grasses, twigs, corn stalks, and jute remain combustible even after a clear coat.
For decoration, keep additions light. Ribbon, faux leaves, small florals, black fabric strips, or a few battery LED fairy lights are plenty. A top-heavy broom is harder to secure and more likely to twist in wind.
How to Make It Look Intentional Outdoors
Before final placement, carry the broom to the street or the far side of the yard and look back at it. A broom that looks full up close may disappear against dark mulch, brown fencing, or shaded siding. If the silhouette is weak, add contrast: darker twine, a black wash on the handle, lighter bristles, or a second broom of a different height.
Rank #3
- Hand Dyed
- #1 Broomcorn Hurl
- Naturally Grown and Hand Harvested
- 1 Pound Bundles
- Sold by the Pound. Multiple Pounds will be Combined in Larger Bundles
For a stronger display, use odd-number groupings. Three brooms at 4.5, 5, and 6 feet look better than two identical brooms. Place them near a planter, garden gate, fence post, porch column, or tree trunk so they feel connected to the landscape. Avoid setting one lonely broom in the middle of a lawn unless it is anchored into a larger Halloween scene.
Backyard placement should account for normal use. Keep the broom out of mower paths, irrigation spray, pet runs, gate swings, stair nosings, and the edge of a patio where people step off in low light. A 5- or 6-foot stick acts like a lever in wind, so leaning it loosely against a wall is not enough for many yards.
Recommended Free Tools
Best Ways to Secure a Witch Broom Without Damaging the House
The safest attachment is usually not an attachment to the house at all. Temporary nails and screws into siding, fascia, trim, deck rail caps, stucco, masonry, or waterproofing membranes can create water-entry points. If a homeowner accepts permanent penetrations, they need to be placed and sealed correctly. For a seasonal broom, that is usually not worth it.
Ground stake method
Drive a short landscape stake into soil behind the broom, then wire the broom to the stake at two points: one low near the bristle bundle and one at mid-handle. Two tie points stop the broom from twisting. This works well in garden beds, along fences, and beside walkways as long as the broom does not lean into the path.
Weighted planter method
Place the broom handle in a heavy planter filled with soil, gravel, or sand. Use the bristle end up or down depending on the look you want, but make sure the handle is buried or braced deeply enough that it cannot tip. For a 5- to 6-foot broom, a planter with at least 12 to 16 inches of stable depth is a better choice than a lightweight decorative pot.
Removable exterior hook method
On smooth trim or another approved surface, an exterior-rated removable hook can work for a lightweight broom. Check the hook’s weight rating and surface instructions. Do not use this method on rough masonry, peeling paint, dusty siding, or surfaces where adhesive failure could drop the broom onto steps or a walkway.
The Tool Desk
Outbyte PC Repair FREEClear out junk files and repair common Windows errorsFree Scan →Outbyte Driver Updater FREEScan for outdated or missing drivers - takes under a minuteDriver Scan →Fence or rail tie method
If you have a sturdy fence post or rail, tie the broom with coated wire, jute over wire, or outdoor-rated zip ties. Avoid crushing soft wood, scratching painted metal, or trapping wet raffia against a finished surface for weeks. Add a rubber bumper where the handle touches the surface.
Can You Add Lights to a DIY Witch Broom?
Yes, but use the simplest safe lighting first: battery-powered LED fairy lights. They stay cool, avoid extension cords, and are easy to remove. Hide the battery pack inside the bristle bundle in a small plastic bag or weather-resistant pouch, but leave the switch accessible. Do not bury the battery pack where water can collect around it.
If you use plug-in lights outdoors, use lights marked for outdoor use, plug them into a GFCI-protected receptacle, keep all connections off wet mulch and grass, and do not run cords across walking paths. Remove temporary holiday lighting after the season. Indoor cords, indoor fairy lights, and unlisted bargain lights do not belong outside.
Rank #4

- 10 Pound DIY Craft Bundle
- Natural Processed Broomcorn
- 20 inch length
- Broomcorn Hurl
- Naturally grown and hand harvested.
Keep all dried vegetation away from candles, jack-o-lantern flames, grills, fire pits, patio heaters, and hot bulbs. Fire-safety agencies warn every year about Halloween hazards because seasonal displays often combine fabric, dried material, electrical products, and open flame. For this project, skip real candles entirely. Use battery candles or LEDs if you want a glow.
What’s actually slowing this PC down?
Pick the symptom - the matching free tool is one click away.
Weather, Wind, and Durability Expectations
A natural-material witch broom can stay outside for the Halloween season, but it is not a permanent exterior fixture. Raffia and jute absorb moisture. Twigs and grasses swell and shrink. Sun can bleach the color. Wind can loosen anything that is tied at only one point.
For a display lasting 2 to 6 weeks, build with hidden UV zip ties or wire, cover with jute, and anchor the broom at two points. In humid, coastal, or rainy climates, expect more fraying and sagging. If a storm is forecast, move the broom to a garage or covered porch. Seasonal decor is easier to reset than repair after it has been soaked and blown across the yard.
When the season is over, inspect the broom before storing it. If it smells musty, has mold, sheds heavily, or shows insect activity, do not bring it into finished living space. Store clean, dry decorations in a bin with airflow or dispose of natural materials according to local yard-waste rules.
Permits, HOA Rules, and Neighbor Considerations
Most homeowners do not need a building permit for a small temporary Halloween broom display. That does not mean every display is rule-free. HOA communities may regulate seasonal decoration dates, attachment methods, lighting, noise, height, and placement. Some local rules can also apply if decorations block sidewalks, create traffic sightline issues, include signage, or become a nuisance.
Use a practical standard: keep decorations on your property, do not block public sidewalks, do not create a trip hazard, and do not attach anything to shared fencing or common-area structures without permission. If your neighborhood has written rules, check them before installing a large display, adding lights, or placing decorations near the street.
Independent reader supportYour contribution helps us test, update, and keep practical guides available for everyone.Common Mistakes to Avoid
The biggest mistake is using only hot glue to hold the bristle bundle. Glue can be useful for small decorative pieces, but it is not a structural outdoor fastener. Use zip ties or wire first, then hide them with twine.
The second mistake is placing dried material near ignition sources. Raffia, straw, hay, dried grasses, corn stalks, twigs, and jute are combustible. Keep the broom away from candles, grills, heaters, fire pits, and hot bulbs.
Another common issue is poor placement. Do not block a door swing, stair path, gate latch, emergency exit, or walkway. Do not run light cords through wet grass or across a path. Do not lean a tall broom loosely against a wall in a windy yard.
Best Value

- #1 Grade Natural Broomcorn for Traditional Broom Making, Whisk Brooms, Turkey Wing Brooms & Craft Projects
- Processed 20" Broomcorn Outsides (Hurl) Ready for Weaving, Stitching, Wrapping & Decorative Crafts
- Ideal for Primitive Crafts, Colonial Demonstrations, Living History Programs, Floral Arrangements & Fall Décor
- Sold by Weight, 1 Full Pound of Natural Broomcorn Fibers with Consistent Quality and Color. Multiple pounds of the same color will be bundled and shipped together.
- Provided by Parker Homestead, Supporting Traditional American Broom Making and Heritage Crafts
Finally, avoid damaging the house for a short-term decoration. Nails and screws in siding, stucco, fascia, trim, masonry, deck caps, or waterproofing can outlast the Halloween season in the worst way. Use stakes, planters, removable exterior-rated hooks where appropriate, or existing sturdy structures that can handle temporary ties.
When to DIY and When to Hire a Pro
DIY is the right choice for one to five decorative brooms, a porch corner, a backyard planter scene, or a small garden display. The tools are basic, the material cost is low, and the project takes about 45 to 90 minutes for the first broom. After that, each additional broom usually takes 20 to 45 minutes if your materials are already sorted.
Consider hiring a pro or asking a qualified handyman for help when the display gets tall, heavy, elevated, wired into a larger lighting plan, or attached to finished exterior materials. If the broom is part of a larger porch installation, roofline lighting, commercial storefront display, or HOA-visible entry feature, professional installation can prevent damage and reduce liability. You should also bring in help if the display needs ladder work, electrical troubleshooting, masonry anchors, or penetrations through exterior finishes.
As a construction company, we look at temporary decor through a simple lens: the house should look better for the season and be unchanged after the season. If the display requires holes, exposed cords, unstable props, or blocked access, revise the plan.
Quick Build Plan for a Yard-Ready Witch Broom
For the most reliable backyard version, use a 5- to 6-foot dry branch or handle, a bristle bundle 18 to 28 inches long, two hidden UV zip ties or wire wraps, a 4- to 7-inch jute cover wrap, and a ground stake or weighted planter for support. Add battery LED lights only if you can keep the battery pack dry and accessible. Keep the finished broom clear of flames, heat, doorways, stairs, gates, sidewalks, and mower paths.
That build gives you the handmade Halloween look without ignoring the outdoor details that matter. It is inexpensive, easy to customize, and sturdy enough for a normal seasonal backyard display when placed and anchored properly.
Frequently Asked Questions
How do you make a DIY witch broom for outdoor Halloween decor?
Use a 4.5- to 6-foot dry branch, dowel, or old tool handle. Bundle raffia, broomcorn, dried grasses, or thin twigs around one end, fasten the bundle with two UV-resistant zip ties or wire wraps, then cover the fasteners with jute twine. Anchor it with a ground stake, weighted planter, or exterior-rated hook where appropriate.
How much does it cost to make a DIY witch broom in 2026?
A basic broom can cost $0 to $10 if you use fallen branches and leftover twine. A cleaner full-size version with purchased raffia, jute, and UV zip ties usually costs $10 to $25. With battery lights, ribbon, faux florals, spray finish, or a weighted base, expect about $25 to $60.
Crashes, No Sound, or Screen Glitches?
Random freezes, missing sound and display glitches usually trace back to one bad driver. Find and replace yours safely.Free scan · under a minuteWindows Errors? Fix Them Before They Spread
Repair common Windows errors and clear accumulated junk for a smoother, more stable PC - no reinstall needed.Free scan · no reinstallCan a DIY witch broom stay outside in rain and wind?
Yes, for a short Halloween season, but natural materials will absorb moisture and loosen over time. Use zip ties or wire under the decorative twine, anchor the broom at two points in windy areas, and bring it under cover before major storms.
How do you secure a witch broom outside without damaging siding?
Use a landscape stake in soil, a weighted planter, or an exterior-rated removable hook on a suitable smooth surface. Avoid nails or screws into siding, fascia, stucco, masonry, deck rail caps, or waterproofing membranes for temporary decor unless you are prepared to seal permanent penetrations correctly.
Are lights safe to add to a DIY witch broom?
Battery-powered LED fairy lights are the safest and simplest option. If using plug-in lights outdoors, use products marked for outdoor use, plug into a GFCI-protected receptacle, keep connections off wet ground, and keep cords out of walking paths.
Do Halloween yard decorations need permits or HOA approval?
Small temporary decorations usually do not require building permits, but HOA rules may control dates, lighting, height, and placement. Keep decorations on your property, clear of sidewalks and sightlines, and check written rules before installing a large or lighted display.
Quick Recap
Product prices and availability are accurate as of the date/time indicated and are subject to change. Any price and availability information displayed on Amazon at the time of purchase will apply.