Recommended Free Tools
You can make a concrete lamp by casting a fine concrete mix around a secured inner mold, leaving a protected route for the cord, curing the body, then fitting a socket-and-cord assembly. Disposable bottles, cartons and food containers provide inexpensive molds; a sealed wood or plastic box is better when you want a reusable form.
Choose the lamp design and mold
The mold determines the lamp’s silhouette and how easily you can remove it.
| Design | Typical mold approach | What to plan |
|---|---|---|
| Pendant | Large soda bottle outside, smaller water bottle inside | A centered void for the socket or threaded tube and a protected cord exit |
| Box or table lamp | Milk carton, plastic food container or reusable wood/plastic box with a plastic bottle or insert inside | A stable base, straight cord route and enough wall thickness for drilling |
Use a fine concrete mix or QUIKRETE 5000 concrete mix. Gather the outer and inner containers, lamp socket, two-conductor cord, plug, optional switch, threaded tube, nuts, screws, caulk or silicone, tape and a cord-protection sleeve where appropriate.
Tools and protective equipment
- Mixing bucket, spoon or trowel
- Box cutter or scissors for disposable molds
- Drill, screwdriver, wire cutters and wire strippers
- 120-grit sandpaper
- Masonry bits for optional decorative holes
- Waterproof gloves and safety glasses
- Particulate dust mask or respirator for dry powdered mix
QUIKRETE’s official project guidance says: “When working with cement-based products, always wear eye protection and waterproof gloves.” Keep dry cement dust away from your eyes and lungs, and follow the product label.
Quick wins for a faster PC:
Scan for outdated or missing drivers - takes under a minuteDriver Scan →Repair Windows errors before they cause bigger problemsFix Now →Fix the driver behind crashes, sound loss and screen glitchesFind Drivers →#1 Best Overall

- EXTRA LONG 12 FOOT CORD & QUALITY HARDWARE SET Included - A 12ft Electric Cord with polarized plug fit both Table Lamp and Floor Lamp Making / Repair. Wire ends are fitted with U-shaped connector,which make connection work simple .Qualified hardwares have good color matching and looks upgraded.
- UPGRADED LAMP PARTS IN COMPLETE LAMP SET - The kit includes a 3-way turn knob socket,a 12ft cord,a 8" lamp shade harp,a brass switch knob replacement, 4 kinds of washers and hex nuts, 1 brass pipe coupling, and 3 options of nipples -8", 2.5" ,0.8" for your different assembly needs. All essential parts included.
- UL LISTED ELECTRICAL COMPONENTS -Both the electric cord and the light socket are UL listed. Safe material for electrical installation.
- APPLICATION- Making & fixing table or floor Lamps;repair & rewire vintage lighting fixtures;create your own unique lamp from scratch or to repair an old one;ideal for creating new lamps from vases, bottles, or items with threaded openings.
- WITH INSTRUCTIONS to guide you assembly process. No matter repair a vintage lamp or make a new custom lighting,you will have clear idea on each step through the wiring instructions.
Prepare the mold and cord path
- Cut or drill the openings. Make the hole for the threaded tube, socket or cord before filling. A disposable bottle or carton can be cut with a box cutter; reusable forms can be drilled.
- Position the inner mold. Center the bottle or insert so the concrete wall is even. The inner mold creates the cavity for the electrical hardware.
- Secure against floating. Wet concrete can lift a light inner container. Brace it with tape, screws, a threaded tube or a temporary support attached to the outer mold.
- Seal leaks. Apply caulk or silicone to joints and around cord openings where needed. Use tape to close gaps that could allow cement paste to escape.
- Protect the cord route. Fit a sleeve or other protective barrier where the cord passes through concrete, and make sure the finished arrangement will provide strain relief rather than pulling on the socket terminals.
Mix and cast the concrete
- Measure water from the package directions. The correct ratio depends on the selected concrete product; adding excess water can weaken the casting.
- Combine until workable. Mix in a bucket, scraping the sides and bottom so dry powder is incorporated.
- Fill gradually. Spoon or pour concrete around the inner mold, pushing it into corners and narrow areas.
- Release trapped air. Tap the outside of the mold or vibrate it gently. This reduces surface voids, but avoid shifting the secured inner mold.
- Level the top. Strike off excess mix and check that the cord opening and inner cavity remain clear.
Cure before demolding
Leave the casting undisturbed for the time specified by the concrete label and project instructions. QUIKRETE’s pendant project specifies at least 20 hours, while its box-lamp project specifies 48 hours; another tutorial also waits 48 hours before disassembly. Thick sections or cool conditions may require more time. Demolding early can chip edges or distort the body.
Remove the mold and finish the body
- Strip disposable material carefully. Cut and peel away the bottle or carton rather than levering hard against thin concrete.
- Remove the inner insert. Work around the cavity gradually so you do not break the walls.
- Sand sharp or rough edges. The QUIKRETE pendant instructions specify 120-grit paper. Wear eye and dust protection while sanding.
- Add optional holes only after curing. Use a masonry bit and light pressure. QUIKRETE’s box-lamp instructions advise leaving at least 3/4 inch between holes to reduce breakage risk.
- Seal and pad the base. A concrete sealer can reduce dusting and staining. Attach felt pads beneath a table lamp to help prevent scratches on furniture.
Install the socket, cord and switch
- Keep everything unplugged. Do not connect the plug to power during assembly, testing or adjustment.
- Thread the cord and hardware. Pass the cord through the protected opening, install the threaded tube or socket fitting, and tighten nuts without crushing the concrete.
- Wire the socket and switch. Follow the component manufacturer’s wiring diagram, including polarity where the components distinguish hot and neutral conductors.
- Add strain relief. The cord should be secured so movement at the plug or cable cannot pull on internal terminals.
- Inspect before energizing. Check insulation, terminal tightness, exposed conductors, sharp concrete edges and the integrity of the cord exit.
Mains-voltage wiring must comply with local electrical rules. If you are not comfortable identifying conductors, making terminations or checking grounding and strain relief, have a qualified electrician complete or inspect the electrical work. Use a socket, cord and plug rated for the lamp and its bulb, and select the correct bulb type and wattage for that socket.
Rank #2

- EXTRA LONG 12 FOOT CORD & QUALITY HARDWARE SET Included - A 12ft Electric Cord with polarized plug fit both Table Lamp and Floor Lamp Making / Repair. Wire ends are fitted with U-shaped connector,which make connection work simple .Qualified hardwares have good color matching and looks upgraded.
- UPGRADED LAMP PARTS IN COMPLETE LAMP SET - The kit includes a 3-way turn knob socket,a 12ft cord,a 8" lamp shade harp,a brass switch knob replacement, 4 kinds of washers and hex nuts, 1 brass pipe coupling, and 3 options of nipples -8", 2.5" ,0.8" for your different assembly needs. All essential parts included.
- UL LISTED ELECTRICAL COMPONENTS -Both the electric cord and the light socket are UL listed. Safe material for electrical installation.
- APPLICATION- Making & fixing table or floor Lamps;repair & rewire vintage lighting fixtures;create your own unique lamp from scratch or to repair an old one;ideal for creating new lamps from vases, bottles, or items with threaded openings.
- WITH INSTRUCTIONS to guide you assembly process. No matter repair a vintage lamp or make a new custom lighting,you will have clear idea on each step through the wiring instructions.
Compare the main design decisions
| Decision | Lower-effort choice | When to choose the alternative |
|---|---|---|
| Form | Disposable bottle or carton | Use a reusable wood or plastic box for repeat builds or consistent dimensions |
| Shape | Simple pendant or solid-sided box | Choose drilled patterns when you want decorative light openings and can preserve adequate spacing |
| Finish | Light sanding with a natural concrete surface | Add sealer when dusting, staining or cleaning is a concern |
| Electrical layout | Socket-and-cord kit with a straightforward cord exit | Add a switch or a more complex threaded-tube arrangement only when you can provide secure strain relief and follow its instructions |
Troubleshooting common failures
The inner mold rises
Stop filling, reposition it and add stronger braces or a temporary fastener. A light insert must be held down before more concrete is added.
Voids appear on the surface
Tap or vibrate the mold during filling and work the mix into corners. Do not compensate by adding unapproved extra water.
The Tool Desk
Outbyte Driver Updater FREEFix the driver behind crashes, sound loss and screen glitchesFind Drivers →Outbyte PC Repair FREERepair Windows errors before they cause bigger problemsFix Now →Rank #3

- 🛠️ ALL-IN-ONE DIY LAMP KIT: Our kit includes everything you need to create a custom lamp or refurbish an old one. Perfect for adding a personal touch to your space.
- ⏰ QUICK & EASY ASSEMBLY: With all parts included and clear, step-by-step instructions, you can create or restore a lamp in minutes.
- 🔩 COMPLETE SET OF COMPONENTS: The kit includes an 8-inch harp with base and finial cap knob, a 3-way socket, an 8-foot cord, and necessary hardware.
- 💡 UL LISTED & SAFE: Our cord set and fittings are UL Listed for your safety. A 75-watt max household bulb is recommended.
- 🎨 ANTIQUE BRASS FINISH: The components come in a sophisticated antique brass finish, offering a vintage touch to your lamps.
The casting chips during removal
Allow more curing time, cut disposable molds away in small sections and avoid twisting the concrete around the cavity.
The cord rubs on concrete
Stop assembly and add a suitable sleeve or grommet-like protection. A sharp edge can damage insulation over time.
Rank #4
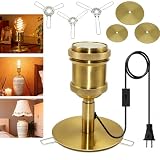
- 3 Table Lamp Bases in Different Sizes—Compatible with various ceramic vase and vase: Having studied the opening sizes of most ceramic jars, vases and decorative bottles, we have designed 3 metal bases with different diameters (6cm, 9cm and 12cm). Whether you’re using a narrow-necked vase or a wide-necked ceramic vase, this table lamp fitting will sit securely on the opening, providing you with a warm glow
- Retractable Metal Clamp—No complicated installation required: The table lamp base features a retractable metal clamp, designed to fit various hole sizes, allowing it to slide easily into ceramic vases or other containers, providing secure support for the lamp without damaging the vessel. No drilling, no tools, and no need for a professional. Simply select the right size base , place it over the mouth of the bottle, and transform your decorative bottle into a practical table lamp
- Table Lamp & Vase-Lamp Conversion Kit — One lamp, multiple uses: The E27 lamp kit can be placed directly on a table to serve as a table lamp(as a bedside lamp in the bedroom, a night light in the hallway, a reading lamp in the study, or a task light in the office...) The lamp kit can also transform vases, ceramic jars, or other decorative containers into a beautiful, unique lamp that is all your own. Furthermore, with metal adhesive, you can also attach it to walls to use as a wall lamp
- Metal E27 Lamp Holder — Install lampshade: Metal light socket, heat-resistant and it will not melt. The E27 bulb holder is fitted with a locking ring, allowing for the secure attachment of any style of lampshade (bulb not included). Whether you’re looking for an industrial metal shade, a minimalist paper shade or a boho woven shade, our table lamp kit has you covered. This table lamp base is compatible with all types of E26/E27 bulbs (bulb not included) and is simple to use
- 240cm Lamp Cable & Available in Multiple Colours—Unrestricted use: The 240cm lamp cable with switch and plug, offering a practical length that is neither too short to be restrictive nor too long to take up unnecessary space on your desk, thus saving space. The plug design allows for plug and play use, requiring no installation. It features a built-in toggle switch for ease of use. Available in various colours, allowing you to choose the favorite desk lamp to complement your décor
The lamp rocks or scratches furniture
Sand the base flat and install felt pads. A sealer can address dusting or staining but will not correct an uneven base.
Quick Recap
Best Value
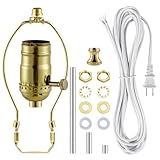
- EXTRA LONG 12 FOOT CORD & QUALITY HARDWARE SET Included - A 12ft Electric Cord with polarized plug fit both Table Lamp and Floor Lamp Making / Repair. Wire ends are fitted with U-shaped connector,which make connection work simple .Qualified hardwares have good color matching and looks upgraded.
- UPGRADED LAMP PARTS IN COMPLETE LAMP SET - The kit includes a 3-way turn knob socket,a 12ft cord,a 8" lamp shade harp,a brass switch knob replacement, 4 kinds of washers and hex nuts, 1 brass pipe coupling, and 3 options of nipples -8", 2.5" ,0.8" for your different assembly needs. All essential parts included.
- UL LISTED ELECTRICAL COMPONENTS -Both the electric cord and the light socket are UL listed. Safe material for electrical installation.
- APPLICATION- Making & fixing table or floor Lamps;repair & rewire vintage lighting fixtures;create your own unique lamp from scratch or to repair an old one;ideal for creating new lamps from vases, bottles, or items with threaded openings.
- WITH INSTRUCTIONS to guide you assembly process. No matter repair a vintage lamp or make a new custom lighting,you will have clear idea on each step through the wiring instructions.
Final safety checklist
- Concrete was mixed and cured according to the selected product’s label.
- Gloves, eye protection and suitable dust protection were used.
- The inner cavity and cord route have no sharp edges or loose debris.
- Socket connections match the component instructions and polarity requirements.
- Strain relief prevents cable movement at the socket and cord exit.
- All electrical work was completed unplugged and meets local code.
- The socket, cord, plug and bulb are appropriately rated.
- The base is stable and protected against surface damage.
Product prices and availability are accurate as of the date/time indicated and are subject to change. Any price and availability information displayed on Amazon at the time of purchase will apply.