What’s actually slowing this PC down?
Pick the symptom - the matching free tool is one click away.
Some links on this page are affiliate links: if you buy through them we may earn a commission, at no extra cost to you.
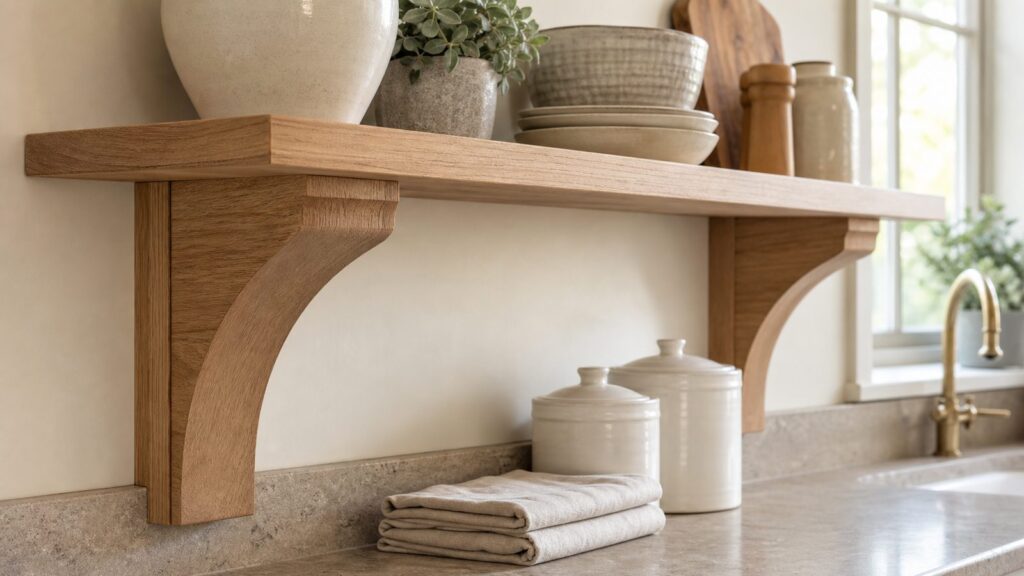
A curved corbel wall shelf is a small project, but it should not be treated like a decorative afterthought. In a kitchen or bathroom, that shelf may hold dishes, cookbooks, jars, bath linens, plants, or toiletries. It also lives near moisture, tile, steam, cleaning chemicals, outlets, plumbing, and sometimes hidden mechanical lines. The shelf has to look good, stay flat, and transfer weight into framing or masonry.
For most homeowners, the best version is a 30-inch-wide shelf, 8 to 10 inches deep, supported by two 3/4-inch-thick to 1-inch-thick wood corbels and a rear mounting cleat tied into studs. That size is useful over a toilet, beside a vanity, above a kitchen counter, or as a small open shelf near a coffee bar. For heavier use, such as dishes or cookbooks, we increase the shelf thickness, add a third corbel, reduce the span, or use a stronger concealed rail.
As an Amazon Associate I earn from qualifying purchases.
Quick wins for a faster PC:
Repair Windows errors before they cause bigger problemsFix Now →Scan for outdated or missing drivers - takes under a minuteDriver Scan →Clear out junk files and repair common Windows errorsFree Scan →On our job sites, we plan shelves from the wall outward. The curve matters, but the load path matters first: shelf into corbel, corbel into cleat or wall, fasteners into framing, and framing into the structure. If any one part is weak, the shelf rating is weak.
Project Snapshot: Size, Cost, and Skill Level
This plan is for one decorative curved-corbel shelf that can be painted or clear finished. The baseline shelf is sized for practical kitchen and bath storage without becoming so deep that it creates excessive leverage on the wall.
Popular on Amazon

- Ample Supply and Effortless Installation: the kit offers you with a set of 4 wood corbels to cater to your varying applications, accompanied by practical hanging hooks, simply choose the mounting screw (not included) to install, to make your fix and installation process a breeze, whether it be bars, kitchens, living rooms, schools, offices or study rooms, our corbels seamlessly fit into your space
- Well Sized for Convenience: our wood brackets have a convenient size of about 6 x 6 x 1.75 inches/ 15.24 x 15.24 x 4.45 cm, which makes them ideal to be applied around diverse spaces, their triangular shape is designed to offer better load bearing capacity, ensuring your space remains tidier and cleaner
- Rubber Wood Material: constructed from quality rubber wood, these decorative shelf brackets show an exquisite sense of beauty and elegance; Their natural texture adds a rustic and beautiful charm to your living space and can be easily dyed or painted over in DIY color of your choice to complement your home's style
- Versatile Home Decoration Pieces: unlike others, our triangle brackets corbels offer multi functionality; They can be applied as decorative countertop brackets, or for installing various types of countertops and shelves, including mantels, its elegance and sophisticated design are universal, making it ideal for multiple feelings
- Ideal for Assorted Applications: not limiting to just supporting your shelves, our corbels for doorway can be applied in a wide range of applications, from installing countertops around the home to mantels; Their versatility allows you to use them in many rooms or spaces of choice, be it bars, kitchens, living rooms, offices, or schools
- Finished size: 30 inches wide by 9 inches deep by about 10 inches tall at the corbels
- Shelf board: 3/4-inch hardwood, 3/4-inch plywood with solid nosing, or 5/4 stock milled to about 1 inch thick
- Corbels: two matching curved supports, each about 8 inches deep by 8 to 9 inches tall
- Back cleat: 3/4 inch by 2 1/2 to 3 1/2 inches by 30 inches, screwed into studs where possible
- Typical DIY time: 5 to 8 hours of shop time plus finish drying time
- Typical install time: 45 minutes to 2 hours on standard drywall; longer on tile, plaster, brick, or concrete
- DIY material cost in 2026: about $35 to $150 for paint-grade pine, poplar, or birch plywood; about $90 to $300 or more for premium hardwood
- Professional custom shelf cost in 2026: commonly $250 to $900 or more per shelf depending on wood, finish, wall type, and curved detail
If you already own a jigsaw or bandsaw, drill/driver, level, clamps, sander, and basic layout tools, this is a reasonable weekend woodworking project. If you need to buy all of those tools for one shelf, the tool cost can exceed the price of hiring a carpenter for a simple install.
Choose the Shelf Size Based on What It Will Hold
Do not start with the prettiest corbel curve. Start with the shelf’s job. Depth drives leverage. A shallow shelf loaded near the wall is easy to support. A deep shelf loaded at the front edge creates a much larger bending moment at the fasteners and corbels.
| Use | Recommended Depth | Typical Width | Support Plan |
|---|---|---|---|
| Spices, candles, small decor | 6 to 8 inches | 18 to 36 inches | Two corbels and a cleat into studs or rated anchors |
| Coffee mugs, toiletries, folded hand towels | 8 to 10 inches | 24 to 36 inches | Two corbels into a cleat; avoid drywall-only support for regular use |
| Cookbooks, dishes, bath linens | 10 to 12 inches | 24 to 42 inches | Stud-fastened cleat, thicker shelf, and possibly three corbels |
| Plants, stoneware, storage baskets | 10 to 12+ inches | Depends on weight | Engineer the load path; use studs, blocking, masonry anchors, or a metal hidden bracket system |
For a general kitchen or bath shelf, 9 inches deep is a good middle ground. It fits jars, towels, and smaller dishes without projecting so far that people clip it with shoulders or elbows. In tight bathrooms, we often use 7 1/2 to 8 inches deep above toilets or beside vanities to preserve clearance.
Materials and Cut List for One 30-Inch Shelf
The following cut list assumes a 30-inch shelf with two curved corbels and a rear cleat. Adjust the width to hit studs or fit the room, but keep the support spacing reasonable. A 30-inch shelf usually allows at least one stud connection and often two, depending on layout.
Paint-Grade Version
- Shelf top: one piece of 3/4-inch poplar, pine, or birch plywood, 30 inches by 9 inches
- Front nosing: one piece of 3/4-inch by 1 1/2-inch solid wood, 30 inches long
- Back cleat: one piece of 3/4-inch by 3-inch stock, 30 inches long
- Corbels: two pieces of 3/4-inch poplar or laminated plywood, each 8 inches by 9 inches
- Fasteners: #8 or #10 wood screws, 1 1/4 inches for assembly and 2 1/2 to 3 inches for stud fastening
- Adhesive: interior wood glue for dry areas; Type II or Type III water-resistant glue for bath or sink-adjacent shelves
- Finish: primer plus enamel paint, waterborne polyurethane, conversion varnish, or a durable cabinet-grade clear finish
Stain-Grade Version
For a stained shelf, choose boards that look good from the front and bottom. Maple, white oak, cherry, and walnut all work, but they change the budget quickly. In 2026, regional hardwood examples show red oak around $3.85 to $6.00 per board foot, white oak around $6.00 to $13.00 per board foot depending on grade and sawing, walnut around $8.50 to $12.50 or more per board foot, and hard maple commonly around $9.00 to $16.00 per board foot at premium hardwood dealers.
Commodity lumber was around $615 per 1,000 board feet on July 31, 2026, down about 11.6 percent year over year, but that number does not tell you what a clear, dry, wide white oak shelf board will cost locally. Retail hardwood pricing is driven by species, grade, width, thickness, drying, and local supply.
Best Wood Choices for Kitchens and Bathrooms
Kitchens and bathrooms punish wood differently than living rooms. Steam, sink splash, cooking oil, soap residue, and cleaning chemicals all shorten the life of a weak finish. The wood species matters, but the finish and sealing routine matter just as much.
- Poplar: good for painted shelves, stable enough, affordable, and easy to shape. Not ideal for clear finish.
- Pine: budget-friendly and workable, but dents easily. Use it for light-duty painted shelves, not heavy dish storage.
- Birch plywood: a strong choice for paint-grade or modern clear-finished shelves if edges are banded or covered with nosing.
- Maple: durable and clean-looking for kitchens. Harder to stain evenly, but excellent under clear finish.
- White oak: strong, attractive, and more moisture-tolerant than many common hardwoods when properly sealed.
- Walnut: beautiful and stable, but expensive. Best for feature shelves rather than utility storage.
- MDF: acceptable only for dry, painted display shelves. We avoid it near showers, sink splash zones, and heavy loads.
- Marine-grade plywood: useful near moisture when a painted or edge-banded look is acceptable.
Seal all six sides before installation when possible: top, bottom, front, back, both ends, screw holes, and any exposed end grain. The wall-facing edge is often skipped, but it is exactly where condensation and trapped moisture can sit.
Designing the Curved Corbel
A corbel is both structure and trim. The curve should look intentional, but it also needs enough wood left in the right places. A thin scroll shape may look graceful on paper and still be weak at the neck or split along the grain.
For this plan, use an 8-inch-deep by 9-inch-tall corbel blank. Keep at least 1 1/2 inches of solid material at the back vertical leg and at least 1 1/4 inches near the top bearing area. The front curve can sweep inward, but avoid a narrow waist under 1 1/4 inches if the shelf will hold anything heavier than light decor.
The Tool Desk
Outbyte PC Repair FREERepair Windows errors before they cause bigger problemsFix Now →Outbyte Driver Updater FREEFix the driver behind crashes, sound loss and screen glitchesFind Drivers →Simple Corbel Layout
- Draw an 8-inch by 9-inch rectangle on 1/4-inch plywood or hardboard for a template.
- Mark a 3-inch flat bearing area along the top rear corner where the shelf will sit.
- Mark a 4-inch to 5-inch vertical bearing area along the back where the corbel meets the cleat or wall.
- Use a paint can, compass, flexible strip, or French curve to draw a smooth concave sweep from the lower front area toward the top bearing point.
- Leave enough thickness through the middle so the corbel does not become a decorative hook instead of a support.
- Cut and sand the template once, then trace both corbels from it.
Grain direction matters. For solid wood corbels, orient the grain so it runs generally from the wall bearing point toward the front of the support, not vertically through a thin curved neck. For plywood corbels, use high-quality plywood without voids and consider laminating two layers if the shelf will carry heavier items.
Load Capacity: Use a Conservative Worksheet
No honest contractor should give one universal weight rating for a wood corbel shelf without seeing the wall, fasteners, material, and installation. Capacity is limited by the weakest element: shelf span, shelf thickness, corbel strength, fasteners, wall substrate, and installation quality.
Also popular on Amazon

- Ample Supply and Effortless Installation: the kit offers you with a set of 8 wood corbels to cater to your varying applications, accompanied by practical hanging hooks, simply choose the mounting screw (not included) to install, to make your fix and installation process a breeze, whether it be bars, kitchens, living rooms, schools, offices or study rooms, our corbels seamlessly fit into your space
- Well Sized for Convenience: our wood brackets have a convenient size of about 6 x 6 x 1.75 inches/ 15.24 x 15.24 x 4.45 cm, which makes them ideal to be applied around diverse spaces, their triangular shape is designed to offer better load bearing capacity, ensuring your space remains tidier and cleaner
- Rubber Wood Material: constructed from quality rubber wood, these decorative shelf brackets show an exquisite sense of beauty and elegance; Their natural texture adds a rustic and beautiful charm to your living space and can be easily dyed or painted over in DIY color of your choice to complement your home's style
- Versatile Home Decoration Pieces: unlike others, our triangle brackets corbels offer multi functionality; They can be applied as decorative countertop brackets, or for installing various types of countertops and shelves, including mantels, its elegance and sophisticated design are universal, making it ideal for multiple feelings
- Ideal for Assorted Applications: not limiting to just supporting your shelves, our corbels for doorway can be applied in a wide range of applications, from installing countertops around the home to mantels; Their versatility allows you to use them in many rooms or spaces of choice, be it bars, kitchens, living rooms, offices, or schools
Use this conservative planning worksheet before cutting:
- Step 1: Estimate the load. Spices and decor may be 5 to 15 pounds. A row of cookbooks can be 25 to 50 pounds. Dishes or plants can exceed that quickly.
- Step 2: Add a safety margin. Design for at least 2 times the expected load for normal household use. If you expect 30 pounds, plan the shelf and anchors around 60 pounds.
- Step 3: Account for depth. Weight near the front edge stresses the wall more than weight near the back. A 12-inch shelf loaded at the front is much harder on fasteners than an 8-inch shelf loaded near the wall.
- Step 4: Check support spacing. For a 30-inch shelf, two corbels can work for light to moderate loads. For 36 to 42 inches or heavier storage, add a center corbel or thicken the shelf.
- Step 5: Verify substrate. Studs, blocking, masonry, and rated anchors are not interchangeable. Drywall alone is not a plan for heavy dishes, books, or plants.
As a practical residential target, we often treat a 30-inch by 9-inch shelf with two stout wood corbels and a stud-fastened cleat as suitable for moderate distributed storage, not as a place for a child to climb, lean, or hang. If the intended load is valuable, fragile, or heavy, build in more support than the math says you barely need.
Windows Errors? Fix Them Before They Spread
Repair common Windows errors and clear accumulated junk for a smoother, more stable PC - no reinstall needed.Free scan · no reinstallCrashes, No Sound, or Screen Glitches?
Random freezes, missing sound and display glitches usually trace back to one bad driver. Find and replace yours safely.Free scan · under a minuteSag Control: Keep the Shelf Flat
Wood shelves sag when the span is long, the material is thin, the load is heavy, or the grain and joinery are poorly planned. A small curve in a shelf may not look dramatic at first, but in a kitchen it can make jars wobble and in a bathroom it can trap water against the wall.
For a 30-inch shelf, 3/4-inch hardwood or good plywood is usually acceptable for light and moderate loads. For 36 inches and beyond, use one or more of the following upgrades:
- Add a third corbel at the center.
- Use 5/4 material milled to about 1 inch thick.
- Add a 1 1/2-inch front nosing to stiffen the front edge.
- Use a thicker laminated shelf build-up.
- Reduce the shelf depth from 12 inches to 9 or 10 inches.
- Install blocking during a remodel so every support has real structure behind it.
A front nosing does more than hide plywood edges. It acts like a small beam at the front of the shelf. For paint-grade work, a 3/4-inch by 1 1/2-inch poplar nosing glued and pinned to the front edge is one of the easiest stiffness upgrades.
Wall Layout and Fastening
Before cutting the shelf, map the wall. In kitchens and baths, the wall may contain supply lines, drain lines, vent stacks, electrical wiring, exhaust ducting, fire blocking, or tile over backer board. Do not drill blindly.
Free tools Windows power users keep installed
One-click scans. No signup required.
Use a quality stud finder, small finish nail probing where appropriate, inspection from adjacent cabinets or access panels, and common sense about what is above and below. Photograph the layout marks before installation. It gives the homeowner a record of where the fasteners went and helps future work avoid the same hidden utilities.
Drywall Over Wood Studs
The preferred method is a rear cleat fastened into studs with #10 screws, typically 2 1/2 to 3 inches long depending on drywall thickness and cleat thickness. The cleat spreads the load and gives the corbels and shelf a solid assembly point. If the studs do not align with the ideal visual corbel spacing, let the cleat solve the structural problem and place the corbels where they look right, provided the corbels are properly tied into the cleat and shelf.
Tile Walls
Tile adds risk. Use the correct bit for the tile type, start holes cleanly, avoid drilling near tile edges, and verify what is behind the tile before choosing anchors. Porcelain, ceramic, stone, mortar bed, cement board, drywall, and masonry all behave differently. Cracked tile can cost more than the shelf.
Brick, Block, or Concrete
Use masonry anchors rated for the expected load and edge distances. A decorative screw into mortar is not the same as a properly selected anchor. For heavy kitchen storage, we prefer a continuous rail or cleat with multiple anchor points rather than two isolated fasteners.
Plaster Walls
Older plaster can be brittle, thick, and inconsistent. Locate framing carefully and predrill cleanly. Do not assume a standard drywall anchor rating applies to plaster in poor condition.
Also popular on Amazon

- Ample Supply and Effortless Installation: the kit offers you with a set of 2 wood corbels to cater to your varying applications, accompanied by practical hanging hooks, simply choose the mounting screw (not included) to install, to make your fix and installation process a breeze, whether it be bars, kitchens, living rooms, schools, offices or study rooms, our corbels seamlessly fit into your space
- Well Sized for Convenience: our wood brackets have a convenient size of about 5 1/2 x 5 1/2 x 3 1/2 inches/ 14 x 14 x 8.89 cm, which makes them ideal to be applied around diverse spaces, their triangular shape is designed to offer better load bearing capacity, ensuring your space remains tidier and cleaner
- Quality Material: constructed from quality cedar wood, these decorative shelf brackets show an exquisite sense of beauty and elegance; Their natural texture adds a rustic and beautiful charm to your living space and can be easily dyed or painted over in DIY color of your choice to complement your home's style; NOTE: the surface of the cedar wood will be oxidized, and the surface sealing treatment is needed
- Versatile Home Decoration Pieces: unlike others, our triangle brackets corbels offer multi functionality; They can be applied as decorative countertop brackets, or for installing various types of countertops and shelves, including mantels, its elegance and sophisticated design are universal, making it ideal for multiple feelings
- Ideal for Assorted Applications: not limiting to just supporting your shelves, our corbels for doorway can be applied in a wide range of applications, from installing countertops around the home to mantels; Their versatility allows you to use them in many rooms or spaces of choice, be it bars, kitchens, living rooms, offices, or schools
Joinery and Assembly Plan
Dry-fit everything before glue. A curved corbel shelf looks simple, but small alignment errors are easy to see once it is on the wall.
- Cut the shelf top to 30 inches by 9 inches.
- Cut the rear cleat to the same width as the shelf or slightly narrower if the ends need to be hidden.
- Make one corbel template, refine it, then cut two matching corbels.
- Sand the corbels while they are still easy to hold. Start around 120 grit and finish at 180 or 220 depending on finish.
- Attach the front nosing with glue and 18-gauge brads or clamps. Keep the top flush.
- Attach the shelf to the cleat with glue and screws from the back or underside where they will not show.
- Attach the corbels to the underside of the shelf and to the cleat. Use glue plus screws or dowels where the fasteners can be hidden.
- Fill, sand, ease sharp edges with a small roundover, then finish all sides.
In kitchens and baths, we avoid dust-catching profiles unless the client specifically wants a historic or ornate look. A small roundover or eased edge is easier to wipe and holds finish better than a sharp corner.
Finishing for Moisture, Steam, and Cleaning
The finish should match the room. A powder room display shelf does not need the same system as a shelf beside a shower or above a working kitchen counter.
Do these 3 things before closing this tab:
1Repair Windows errors before they cause bigger problems2Scan for outdated or missing drivers - takes under a minute3Clear out junk files and repair common Windows errors| Location | Recommended Finish | Notes |
|---|---|---|
| Dry kitchen wall or coffee bar | Waterborne polyurethane, enamel paint, or cabinet-grade clear coat | Good balance of durability and easy cleaning |
| Near sink splash | High-quality enamel paint or multiple coats of water-resistant clear finish | Seal screw holes and end grain carefully |
| Bathroom away from shower | Primer and enamel paint, or clear finish over stable hardwood | Ventilation matters as much as finish |
| Near shower or tub | Moisture-resistant plywood or hardwood with robust sealing | Avoid MDF and unsealed end grain |
Let finishes cure before loading the shelf. Dry-to-touch is not the same as cured. Many paints and clear coats need several days before they resist abrasion and cleaning well. Follow the manufacturer’s recoat and cure window, especially in humid bathrooms.
2026 Cost Guide
A small curved-corbel shelf can be inexpensive if you use paint-grade stock and already own tools. It can also become a custom finish-carpentry item if you choose premium hardwood, stain-grade joinery, tile installation, or multiple shelves.
| Scope | Typical 2026 Cost | What Drives the Price |
|---|---|---|
| DIY paint-grade shelf | $35 to $150 materials | Pine, poplar, birch plywood, screws, glue, sandpaper, primer, paint |
| DIY hardwood shelf | $90 to $300+ materials | Maple, white oak, cherry, walnut, clear boards, premium finish |
| Install-only labor for prefab or prebuilt shelf | $125 to $400 per small project, or about $65 to $150 per shelf on standard drywall | Wall type, number of shelves, layout time, anchors, access |
| Custom carpenter-built decorative shelf | $250 to $900+ per shelf | Curved template work, species, finishing, site conditions, minimum trip charge |
| Full custom built-in shelving comparison | $300 to $850 per linear foot installed; fully custom work often $400 to $1,200 per linear foot | Cabinet-grade construction, scribing, doors, lighting, finish, room complexity |
Tile, plaster, brick, concrete, out-of-level walls, and hidden utilities can add 25 to 50 percent or more to installation labor. That is not padding; it is time spent drilling carefully, selecting the right anchors, protecting finishes, and avoiding damage that can be expensive to repair.
Independent reader supportYour contribution helps us test, update, and keep practical guides available for everyone.Safety, Dust, and Permit Notes
For a simple shelf installation, a building permit is usually not required when you are fastening decorative shelving to an existing wall and not changing structure, electrical, plumbing, mechanical systems, fire blocking, or rated assemblies. Permit requirements are local, and the line changes if the work becomes built-in cabinetry tied to electrical, major remodeling, or structural alteration.
Recommended Free Tools
The bigger concern is hidden utilities. Kitchens and baths are dense walls. Before drilling, think about what is on the other side, what fixtures are above and below, and where wiring or plumbing would logically run. Use cautious pilot holes and stop if you hit anything unexpected.
Wood dust is also a real job-site issue. Cutting, sanding, and routing create fine dust. Use dust collection where possible, wear eye protection, and use a properly fitted respirator when sanding or cutting for extended periods. If drilling into concrete, brick, stone, mortar, or tile products that may contain silica, control dust with wet methods or a vacuum attachment and use appropriate respiratory protection. On older homes, painted surfaces may require lead-safe work practices before disturbing them.
When to DIY and When to Hire a Pro
This is a good DIY project if the shelf is light to moderate duty, the wall is standard drywall over wood studs, you can locate framing confidently, and you are comfortable cutting curves accurately. It is also a satisfying project if you want a custom profile that off-the-shelf brackets do not provide.
Hire a pro when the shelf is going on tile, stone, brick, plaster in poor condition, or a wall likely to contain plumbing or wiring. Also hire out the work if the shelf will carry heavy dishes, cookbooks, large plants, or expensive objects. A professional can add blocking during a remodel, select anchors for the actual substrate, and build the shelf so the visible corbels are backed by real structure.
Also popular on Amazon

- Robust and Elegant Wood Shelf Bracket: constructed from quality wood, this shelf bracket adds not only support but a touch of elegance as well; The light brown color of the wood bracket suits many styles and designs of your home; Its size, approximately 1 3/4 x 6 1/2 x 9 inches, is well proportioned to host shelves or countertops
- Versatile Pack of Traditional Wooden Corbels: the package includes 4 traditional wood brackets, skillfully designed for a wide range of applications; They can be used as shelf support brackets in the kitchen, living area, or even in the bedroom; Made of rubberwood, these corbels for shelves lend a rich and timeless appeal to your space
- Sturdy Wood Brackets with Convenient Features: each wooden corbel measures 1 3/4"W x 6 1/2"D x 9"H and features a sanded finish that offers a smooth surface, easy to paint, stain, or varnish; They are also designed with back mounted metal holes that ensure strong and steady attachment to your walls
- Versatile Decorative and Load Bearing Accessory: these wood shelf brackets are suitable for supporting countertops, bars, kitchen islands, and mantels while also adding depth and interest to walls and entryways; Carved wood corbels and brackets can be utilized for decorative or load bearing applications
- Easy Installation Shelf Support Brackets: installation is straightforward and convenient, all you need are nails and wood glue; In just a few steps, you can change the look of your space without investing too much time; With this wooden corbels, you have the tools to transform your walls, mantels, or any flat surface into a striking point
For one shelf, minimum trip charges often dominate the price. For several shelves in one room, the per-shelf labor usually becomes more efficient because layout, setup, and finishing are shared across the project.
Common Mistakes to Avoid Before Cutting the Curves
- Designing the curve before the structure. A thin decorative shape can split or deflect if the grain direction, screw placement, and shelf depth are ignored.
- Depending on drywall anchors for heavy loads. Drywall-only mounting is not appropriate for dishes, cookbooks, plants, or bath storage that will be handled regularly.
- Making the shelf too deep. A 12-inch shelf loaded at the front edge stresses the fasteners far more than an 8-inch shelf with weight near the wall.
- Skipping the back cleat. A cleat makes the installation stronger, cleaner, and more forgiving when studs do not align with the ideal corbel locations.
- Forgetting to seal hidden faces. The wall-facing edge, underside, end grain, and screw holes need finish too, especially in kitchens and baths.
- Drilling tile casually. Tile work requires the right bit, careful layout, and patience. One cracked tile can turn a small shelf project into a repair job.
- Ignoring clearances. Keep shelves away from burners, faucet swing, medicine cabinet doors, outlets, towel movement, and normal walking paths.
Recommended Plan for a Reliable Finished Shelf
For most homeowners, our recommended build is a 30-inch by 9-inch shelf made from 3/4-inch birch plywood or poplar for paint-grade work, with a 1 1/2-inch front nosing, two 8-inch by 9-inch curved corbels, and a 3-inch rear cleat. Fasten the cleat into studs wherever possible using 2 1/2-inch to 3-inch screws, then tie the shelf and corbels into that cleat with glue and screws.
If the shelf is going near moisture, upgrade the material to maple, white oak, sealed birch plywood, or marine-grade plywood, and finish all sides before installation. If the shelf will hold dishes, cookbooks, or plants, either add a third corbel, thicken the shelf, reduce the span, or add blocking. The finished shelf should look decorative, but it should be built like a small structural assembly.
That is the difference between a shelf that photographs well on day one and a shelf that still sits flat, tight, and useful after years of kitchen steam, bathroom humidity, and daily use.
Frequently Asked Questions
How much does it cost to build or install a curved corbel wall shelf in 2026?
DIY materials usually run $35 to $150 for paint-grade pine, poplar, or birch plywood, and $90 to $300 or more for premium hardwood. Professional install-only work commonly costs $125 to $400 for a small project, while custom carpenter-built shelves often run $250 to $900 or more per shelf.
Do wood corbel wall shelves need to be screwed into studs?
For anything beyond light decor, yes. The best practice is to fasten a rear cleat into studs, blocking, or properly rated masonry anchors. Drywall anchors alone are not a reliable plan for dishes, cookbooks, plants, or regularly used bathroom storage.
What is the best wood for kitchen or bathroom wall shelves?
For painted shelves, poplar and sealed birch plywood are practical choices. Near sinks, showers, or heavy-use areas, maple, white oak, sealed birch plywood, or marine-grade plywood are better options. MDF should be limited to dry, painted display shelves.
How much weight can a curved corbel shelf hold?
There is no single safe rating without knowing the shelf thickness, corbel size, fasteners, wall substrate, and installation quality. Capacity is limited by the weakest part of the system. For planning, estimate the expected load, double it as a safety margin, and design the cleat, corbels, and anchors around that number.
Can I mount corbel shelves on tile, brick, plaster, or drywall?
Yes, but the fastening method changes. Drywall over studs should be fastened into framing. Tile requires the correct bit and substrate verification. Brick, block, and concrete need rated masonry anchors. Older plaster requires careful drilling and framing location.
Do I need a permit to install wall shelves in a kitchen or bathroom?
A simple decorative shelf usually does not require a permit if it does not alter structure, plumbing, electrical, mechanical systems, or rated assemblies. Local rules vary, and permits may apply if the work becomes part of a larger remodel or built-in installation.
Quick Recap
Product prices and availability are accurate as of the date/time indicated and are subject to change. Any price and availability information displayed on Amazon at the time of purchase will apply.

