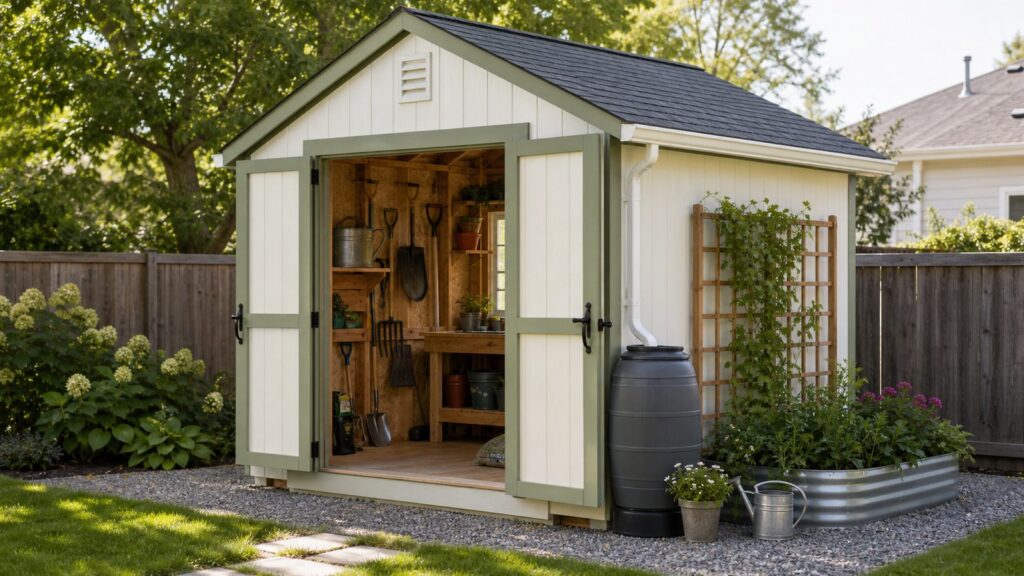
A small garden shed is one of the best backyard projects a homeowner can take on, but the successful ones are not built like oversized craft projects. They are planned like small buildings. That means a dry base, a stiff floor, a door that fits the equipment, ventilation, roof overhangs, anchoring, and a layout that matches how you actually garden.
For most homeowners, the sweet spot is a 6×8 or 8×10 garden shed. A 4×8 lean-to can handle hand tools and pots. A 6×8 shed gives you room for a potting bench and shelves. An 8×10 shed can usually hold a mower, wheelbarrow, long-handled tools, and a compact work surface without turning every trip inside into a wrestling match.
| # | Preview | Product | Price | |
|---|---|---|---|---|
| 1 |

|
Patiowell 5x3 FT Outdoor Storage Shed, Brown | $109.99 | Buy on Amazon |
| 2 |

|
Polar Aurora 8 x 12 FT Outdoor Storage Shed | $209.99 | Buy on Amazon |
In 2026, a practical small DIY garden shed budget is usually $1,000 to $3,500 for a kit or stick-built materials, base, fasteners, roofing, paint, shelving, and a few upgrades. Hiring out assembly, adding a slab, matching the house exterior, or running power can push many small shed projects into the $3,500 to $8,000 range. Full custom sheds, difficult sites, utilities, and premium finishes can go much higher.
On our job sites, we treat even a compact shed as a permanent exterior structure. The homeowners who are happiest later are the ones who spend more time on layout, drainage, and door placement than on decorative trim. Creativity matters, but buildability matters more.
Quick wins for a faster PC:
Scan for outdated or missing drivers - takes under a minuteDriver Scan →Repair Windows errors before they cause bigger problemsFix Now →#1 Best Overall
- Multiple Uses: The Patiowell compact storage room is versatile, fitting perfectly in your backyard, garden, or anywhere you need. It can be utilized as a storage room or tool room, to keep your yard tidy
- Durable Material and Stable Structure Its strong construction and the thick galvanized steel we used make this shed long-lasting, non-corrosive, and UV resistant. The overlapped wallboard is waterproof and moisture-proof, making it suitable for usage in all-weather circumstances.
- Lockable Door and Sloping Roof: The lockable door provides security, keeps your tools away from being stolen, and avoids small animals from entering accidently. The sloping roof of this outdoor storage shed gives extra storage space while also preventing the rainwater accumulation and rusting.
- Protection Cap for Corners and Screws: The storage room is designed with plastic protective caps at the sharp corners of the ceiling and each screw, preventing any potential injuries during construction or use.
- Detailed Installation Instructions: The Patiowell storage shed comes with detailed installation instructions, and following the instructions allows for a quick and hassle-free setup.
Start With What the Shed Must Hold
Before picking a shed from a catalog or sketching a charming little backyard building, measure the items that need to go inside. This is where small sheds usually succeed or fail.
Measure the mower, wheelbarrow, spreader, storage bins, bags of soil, seed trays, hand tools, rakes, shovels, brooms, and any seasonal items you want out of the garage. Then add working clearance. A mower may only be 24 inches wide, but you still need room to roll it through the door, turn it, and access shelves without dragging everything into the yard.
A few useful planning dimensions:
- Door width: Use at least a 36-inch door for hand tools and bins. Use 48 to 60 inches for a mower, wheelbarrow, or garden cart.
- Interior aisle: Keep 30 to 36 inches of clear walking space if you want the shed to feel usable.
- Potting bench: A 20- to 24-inch-deep bench works well in a small shed. Standard counter height, about 34 to 36 inches, is comfortable for most adults.
- Shelf depth: Use 10 to 12 inches for small pots and chemicals, 16 to 18 inches for bins, and avoid shelves so deep that items disappear in the back.
- Wall hooks: Long-handled tools need about 18 inches of wall width per cluster and 60 to 72 inches of vertical clearance.
Design from the inside out. A pretty 6×6 shed can look perfect in the corner of the yard and still be too cramped for a mower, soil storage, and a potting station. In many gardens, an 8×10 shed with vertical storage is more useful than a smaller shed packed wall to wall.
Choose the Right Small Shed Size
Small sheds work best when the footprint matches the job. Bigger is not automatically better, especially if permits, setbacks, tree roots, drainage, or yard circulation are tight. But too small becomes frustrating fast.
| Size | Best Use | What Usually Fits | Common 2026 Budget |
|---|---|---|---|
| 4×6 | Basic garden storage | Hand tools, pots, small shelves, hose, seed trays | $500-$1,500 for many prefab or simple DIY builds |
| 4×8 | Lean-to garden wall shed | Rakes, shovels, broom, potting supplies, narrow fold-down bench | $700-$2,000 depending on materials and base |
| 6×8 | Tools plus potting bench | Long tools, soil bins, shelves, 4-foot bench, small mower if carefully arranged | DIY kit about $400-$900; pro/custom often $1,200-$4,500 |
| 8×10 | Mower and garden workhorse | Mower, wheelbarrow, shelves, tool wall, compact workbench | DIY kit about $700-$1,800; pro/custom often $2,000-$7,000 |
| 10×12 | Garden hub or compact workshop | Storage, bench, mower, bikes, seed-starting area, optional power | DIY kit about $1,200-$3,000; pro/custom often $3,000-$12,000 |
If the shed is mainly for hand tools, pots, and a hose, a 4×6 or 4×8 can work. If you want a potting bench, start at 6×8. If a mower or wheelbarrow is part of the plan, an 8×10 is usually the first size that feels comfortable.
For a creative shed, do not spend every square foot on floor storage. Wall storage, exterior hooks under an overhang, a narrow loft shelf, and a fold-down bench can make a small footprint behave like a larger shed.
Plan the Budget Before You Fall in Love With the Look
Current 2026 cost data puts typical shed construction across the United States around $1,000 to $15,000, with a common national average near $3,500. Utility shed ranges often land around $1,875 to $8,250, while very small prefab sheds can start around a few hundred dollars. Large custom sheds with utilities can exceed $30,000.
Those numbers cover a wide range because a shed can be anything from a plastic box on a gravel pad to a framed, insulated, wired outbuilding with a slab and custom doors. For a small garden shed, the realistic planning range is narrower.
- Basic resin or metal prefab under 50 square feet: often a few hundred dollars to about $1,500, depending on size and quality.
- 6×8 DIY kit: commonly about $400 to $900 before base upgrades, paint, shelving, and tools.
- 8×10 DIY kit: commonly about $700 to $1,800 before site work and upgrades.
- Creative 6×8 or 8×10 DIY garden shed: plan about $1,000 to $3,500 for the kit or lumber, base, fasteners, roofing, finish, shelves, hooks, and small upgrades.
- Pro assembly or custom small shed: often $3,500 to $8,000 once labor, site prep, foundation, and better finishes are included.
- Electrical add-on: roughly $800 to $2,000 for a basic circuit, light, and outlets, plus a separate electrical permit that may be around $50 to $150.
Foundation choice can swing the price. A gravel pad is usually the budget-friendly option and works well for many small sheds when properly excavated, compacted, and edged. Concrete slabs are more permanent and better for heavy equipment, but published slab ranges often run from about $600 to $4,800. A reinforced 10×12 slab commonly lands around $1,100 to $2,200, depending on excavation, thickness, reinforcement, access, and local labor.
High-cost areas such as parts of the Northeast and Pacific Coast can run 25% to 50% higher than national averages. Rural sites may pay more for delivery and travel. Tight urban lots may pay more for access, permitting, and hand-carry labor.
Pick a Shed Type: Prefab, Kit, or Stick-Built
There is no single best shed type. The right answer depends on budget, tools, schedule, customization, and how permanent you want the structure to be.
Prefab Resin or Metal Shed
Prefab sheds are fast. Many small models can be assembled over a weekend with two adults, basic tools, and a prepared base. Resin is low maintenance and does not need paint. Metal is economical and durable for storage.
Recommended Free Tools
The tradeoff is customization. Resin panels are not friendly to custom windows, shelves, or heavy wall-mounted racks unless the manufacturer provides attachment points. Metal sheds can dent, rattle, and sweat with condensation if ventilation is poor. They can also feel less integrated into a garden unless you soften them with paint-compatible trim, a trellis, planters, or screening.
DIY Wood Shed Kit
A wood kit is a strong middle ground. You get pre-planned dimensions and material lists, but you can still paint, trim, modify shelving, improve the door, and add details that make the shed fit the yard. Wood is also easier to repair later.
Read the kit details carefully. Some kits include framing and siding but not shingles, paint, drip edge, floor decking, or fasteners. Others include most of the package but still require a foundation. A low kit price is not the real project price until the base, roofing, hardware, finish, and storage interior are counted.
Stick-Built Shed
A stick-built shed gives the most control. You can frame taller walls, use wider doors, match the house siding, place windows where they help, and build the storage layout around your actual tools. This is the best route when the shed needs to look intentional beside the house or handle heavier use.
Free tools Windows power users keep installed
One-click scans. No signup required.
The cost is time and skill. A small stick-built shed still requires layout, squaring, cutting, fastening, roof framing, weatherproofing, and finish work. A capable DIYer can build a simple 6×8 or 8×10 shed over several weekends. A first-time builder should not underestimate the time required to make doors hang correctly, keep water out, and prevent the structure from racking in wind.
Build the Base Like It Matters
The base is where many small sheds fail. A shed built directly on grass or soil will settle, hold moisture, invite pests, and eventually bind at the doors. Wood needs air, drainage, and separation from grade.
For many garden sheds, a compacted gravel pad is the best balance of cost and performance. We like the gravel pad to extend at least 12 inches beyond the shed footprint on all sides when space allows. That wider pad reduces splashback, improves drainage, and gives you a clean edge around the shed.
A typical gravel base process looks like this:
- Remove sod and organic material.
- Excavate several inches below finished grade.
- Install landscape fabric where appropriate to separate soil from stone.
- Add compactable crushed stone in lifts.
- Compact thoroughly and check for level.
- Keep surrounding soil sloped away from the shed.
For a wood floor system, keep framing several inches above grade. Use pressure-treated skids or joists where the structure is close to the ground, and use exterior-rated fasteners. For floor decking, exterior-rated plywood is common. A 3/4-inch pressure-treated plywood floor is a practical choice where the shed will carry mowers, bins, and repeated foot traffic. Thin decking may save money upfront but can feel springy and age poorly under rolling loads.
The Tool Desk
Outbyte PC Repair FREEClear out junk files and repair common Windows errorsFree Scan →Outbyte Driver Updater FREEFix the driver behind crashes, sound loss and screen glitchesFind Drivers →A concrete slab makes sense when the shed will store heavy equipment, serve as a workshop, or receive a more permanent custom build. It also helps with cleanability. The slab needs proper thickness, reinforcement where required, a stable subbase, drainage, and anchor planning. If water can run across the slab into the shed, the slab is not doing its job.
Creative Ideas That Still Build Cleanly
Creative does not have to mean complicated. The best small garden shed ideas improve storage, daylight, workflow, or appearance without making the shed harder to maintain.
Fold-Down Potting Bench
A fold-down bench is ideal for a 4×8 or 6×8 shed. Build it 20 to 24 inches deep and 36 to 48 inches wide. Use sturdy hinges, a positive latch, and either folding brackets or chain supports rated for the load. When it is folded up, the floor stays open for the mower or wheelbarrow.
Salvaged Window or Dutch Door
A salvaged window can bring character and daylight, but treat it like a real exterior opening. Flash it properly, slope the sill, and make sure the wall remains braced. A Dutch door is useful in a potting shed because the upper half can stay open for air while the lower half keeps pets, kids, or windblown debris out.
Greenhouse-Style Light
One translucent roof panel or a narrow skylight can make a small shed feel larger. Do not turn the whole roof into a greenhouse unless the shed is designed for heat and condensation. Garden supplies, fertilizers, plastics, and finishes can suffer in a shed that bakes all afternoon.
Exterior Tool Wall Under an Overhang
If local rules and appearance allow it, add a 12- to 18-inch roof overhang on one side and mount exterior hooks for muddy tools. Keep the hooks under cover so rain does not sit on handles and metal heads. This keeps the dirtiest items out of the interior.
Rain Barrel Connection
A small shed roof can feed a rain barrel for watering beds. Use a gutter, downspout, screened inlet, overflow path, and a stable raised base for the barrel. A full 50-gallon barrel weighs more than 400 pounds, so do not set it on loose pavers or soft soil.
Trellis or Planter Wall
A trellis side wall helps the shed feel connected to the garden. Leave an air gap between vines and siding so the wall can dry. Window boxes and planter shelves should be mounted with corrosion-resistant hardware and should not trap wet soil against wood siding.
Three Practical Small Shed Layouts
These layouts are realistic for typical backyards and can be adapted to kits or stick-built sheds.
Rank #2
- 【Enhanced Structural Integrity】Polar Aurora outdoor shed boasts a reinforced structure, methodically tested to facilitate a 29% easier and more stable assembly, aligning with practicality and durability.
- 【Ample and Organized Storage】Spanning dimensions of 138.98"D x 92.52"W x 76.38"H, the shed by Polar Aurora offers expansive storage, neatly accommodating your tools and outdoor essentials.
- 【Durability Through Quality Materials】Crafted with superior, resilient metal, the Polar Aurora shed provides robust weatherproof protection, ready to withstand the elements with waterproof and UV-resistant features.
- 【Thoughtful Design Elements】The Polar Aurora shed merges security and efficiency with a lockable door, water-shedding sloped roof, ample ventilation, and tough corner protectors for a lasting utility.
- 【Dedicated Support and Simple Assembly】Polar Aurora is dedicated to enriching your outdoor experience with products that promise quality. For any assistance post-purchase, our team is here to support you.
4×8 Lean-To Garden Wall Shed
This is a narrow shed for the side yard, fence line, or garage wall area where local rules allow. Use the long wall for vertical storage: rakes, shovels, loppers, hose, broom, and a narrow shelf above. Add a 16- to 20-inch-deep fold-down work surface near the door for potting or tool cleanup.
Keep the door on the short end if the shed sits along a fence, or use double doors on the long face if the approach is from the yard. A lean-to roof should shed water away from the house, fence, and neighboring property. Check setbacks before placing anything close to a lot line.
6×8 Potting Shed
A 6×8 shed is the smallest size that can feel like a true garden workspace. Put a 4-foot potting bench along one wall, shelves above it, and soil bins below. Keep messy supplies near the entrance so you are not carrying wet pots and open soil bags through the shed.
Do these 3 things before closing this tab:
1Scan for outdated or missing drivers - takes under a minute2Repair Windows errors before they cause bigger problems3Fix the driver behind crashes, sound loss and screen glitchesUse one window or translucent panel for daylight, but preserve one full wall for storage. A common mistake is adding windows on every side and then having nowhere to hang tools.
8×10 Mower-Plus-Workbench Shed
An 8×10 shed is the workhorse. Use double doors at least 48 inches wide, with a low, durable threshold for rolling equipment. Park the mower straight in, hang long tools on one side, and place a compact 24-inch-deep bench at the back or opposite wall.
If you store fuel, chemicals, or battery chargers, plan ventilation and follow product storage instructions. Do not pack flammable materials around electrical devices or block vents with bins.
Independent reader supportYour contribution helps us test, update, and keep practical guides available for everyone.Permits, Setbacks, Utilities, and HOA Rules
Small does not automatically mean exempt. Many cities and counties allow small accessory structures without a building permit below a certain size, but the rules vary widely. Some areas use thresholds such as 120 or 200 square feet. Others have different requirements based on height, foundation type, electrical work, plumbing, zoning district, flood zone, historic district, easements, or distance from property lines.
Windows Errors? Fix Them Before They Spread
Repair common Windows errors and clear accumulated junk for a smoother, more stable PC - no reinstall needed.Free scan · no reinstallOutdated Drivers Are Slowing You Down
One free scan finds every outdated or missing driver and matches the right update for your exact hardware.Free scan · exact hardware matchA building permit exemption also does not override zoning. You may still need to meet setbacks, lot coverage limits, easement restrictions, drainage rules, utility clearances, and HOA requirements. If the shed is in a side yard, near a fence, near a drainage swale, or close to buried utilities, check before you build.
Before digging, call 811 for utility locating. Even a shallow gravel base or anchor installation can create risk if you are near service lines, irrigation, low-voltage lighting, or drainage pipes.
Electrical work changes the project. A simple solar light kit is different from a hardwired circuit with outlets. If you want lights, receptacles, a heater, a fan, or battery charging, expect electrical code requirements and a separate permit in many jurisdictions. Outdoor wiring, trench depth, GFCI protection, conduit, disconnects, and panel capacity are not good guesswork projects.
Wind, Snow, Water, and Rot Prevention
A shed has a lot of surface area for its weight. Wind can move or rack a lightly built shed, especially a metal or resin structure that is not anchored correctly. Anchor the shed as part of the build, not after the first storm. In high-wind regions, open sites, coastal areas, and exposed rural lots, anchoring deserves professional attention. FEMA severe-wind guidance recommends professional design and installation for anchoring systems when needed.
What’s actually slowing this PC down?
Pick the symptom - the matching free tool is one click away.
Water control is just as important. The shed should sit above grade, the surrounding soil should slope away, and the roof should move water off the walls. Use drip edge, roof overhangs where practical, exterior-rated siding and trim, and caulk only where caulk belongs. Do not rely on caulk to compensate for missing flashing.
For wood sheds, rot prevention comes down to simple details:
- Keep wood off soil and grass.
- Use pressure-treated material close to grade.
- Use exterior-rated fasteners and connectors.
- Prime cut ends where appropriate.
- Maintain paint or stain before the coating fails.
- Vent the shed so trapped humidity can escape.
- Keep mulch and planter soil away from siding.
Condensation is a common issue in metal sheds and tightly sealed sheds. Add vents high and low when possible. Avoid storing wet tools, open soil bags, or soaked hoses in a closed shed with no airflow.
When to DIY and When to Hire a Pro
A small shed is a good DIY project when the site is level, the shed is under local permit thresholds, you are using a straightforward kit, and you do not need electrical, plumbing, a complex slab, or structural customization. A two-person team can often assemble a small prefab shed in a weekend after the base is ready. A stick-built 8×10 shed may take several weekends for a careful DIYer, especially with roofing, doors, trim, paint, and interior storage.
Do these 3 things before closing this tab:
1Scan for outdated or missing drivers - takes under a minute2Repair Windows errors before they cause bigger problems3Fix the driver behind crashes, sound loss and screen glitchesHire a pro when the project needs grading, drainage correction, concrete, electrical, custom doors or windows, structural tie-downs, or exterior finishes that should match the house. Pro help also makes sense in high-wind, heavy snow, coastal, flood-prone, or wildfire-prone areas where local requirements affect framing, anchoring, roofing, or placement.
On our construction projects, the most valuable professional time is often spent before the shed goes up: checking slope, setting a durable base, planning drainage, confirming access, and making sure the structure will not fight the site. A clean shed on a bad base is still a bad project.
A Simple Build Sequence for a Better DIY Shed
Use this sequence whether you are assembling a kit or building from scratch.
- Confirm rules: Check zoning, setbacks, easements, HOA restrictions, height limits, and permit requirements.
- Measure the contents: Lay out the mower, bins, tools, and bench footprint with tape on the garage floor or driveway.
- Choose the footprint: Pick the smallest size that still works with a clear aisle and usable door.
- Prepare the site: Remove organics, correct drainage, build a gravel pad or slab, and keep the shed above grade.
- Frame or assemble square: Check diagonals, level, and plumb repeatedly. Small errors show up later at the doors and roof.
- Weatherproof from the top down: Install roofing, drip edge, flashing, trim, and siding details that shed water.
- Anchor the structure: Use the anchoring method appropriate for the shed type, foundation, and local wind exposure.
- Build the interior last: Add shelves, hooks, French cleats, pegboard, bins, and the potting bench after the shell is dry.
For a small garden shed, a French cleat wall is often more useful than fixed shelves alone. It lets you rearrange tool holders, small cabinets, baskets, and hooks as the seasons change. Use plywood backing or blocking where heavy items will hang. Do not rely on thin shed siding to hold loaded shelves.
Final Contractor Advice
The best small garden shed is not the fanciest one. It is the one that stays dry, opens easily, holds the right equipment, and makes yard work faster. Spend money first on the base, floor, roof, door, and anchoring. Then add the creative features that make the shed yours: a salvaged window, painted door, fold-down bench, cedar trim, trellis wall, rain barrel, or tidy seed-starting shelf.
If you are trying to keep the project affordable, build a simple rectangle and make it work harder inside. A 6×8 or 8×10 shed with a dry gravel base, wide door, strong floor, one daylight opening, and smart vertical storage will outperform a more decorative shed that leaks, settles, or cannot fit the mower.
Treat the shed as a small building from day one, and the creative details will have something solid to attach to.
Frequently Asked Questions
How much does it cost to build a small garden shed in 2026?
A practical 6×8 or 8×10 DIY garden shed usually costs about $1,000 to $3,500 for the kit or materials, base, fasteners, roofing, paint, shelving, and small upgrades. Hiring assembly or adding premium finishes often brings the project to $3,500 to $8,000. National shed construction ranges are much wider, about $1,000 to $15,000, with many averages near $3,500.
Is it cheaper to build a shed or buy a prefab shed kit?
A prefab resin or metal shed is usually cheaper and faster upfront. A DIY wood kit or stick-built shed costs more in time and materials, but it is easier to customize, repair, paint, insulate, and match to the house. For a creative garden shed with custom doors, windows, shelves, and trim, wood is usually the better long-term choice.
What size shed is best for a small garden?
Use 4×6 or 4×8 for hand tools, pots, and narrow storage. Choose 6×8 if you want tools plus a potting bench. Choose 8×10 if you need to store a mower, wheelbarrow, shelves, and a small workbench. A 10×12 shed makes sense when it becomes a garden hub or compact workshop.
What is the best foundation for a small garden shed?
A compacted gravel pad is often the best value for a small garden shed because it drains well, costs less than concrete, and helps keep the floor dry. Extend the gravel about 12 inches beyond the shed footprint when possible. Use a concrete slab for heavier equipment, permanent custom sheds, or workshop use.
Do I need a permit for a small shed?
Maybe. Many areas exempt small sheds below a certain square footage from a building permit, but zoning setbacks, easements, lot coverage limits, HOA rules, flood zones, and utility restrictions can still apply. Electrical work often requires a separate permit. Check local rules before buying materials.
PC Slower Than It Used to Be?
A free scan shows the junk files, broken settings and background clutter dragging Windows down - then fixes them in one click.Free scan · Windows 10 & 11Crashes, No Sound, or Screen Glitches?
Random freezes, missing sound and display glitches usually trace back to one bad driver. Find and replace yours safely.Free scan · under a minuteHow do I keep a shed floor from rotting?
Keep the shed above grade, use a draining gravel base or properly built slab, slope soil away from the shed, use pressure-treated framing near the ground, install exterior-rated floor decking and fasteners, and maintain airflow. Do not build directly on grass or soil.
Quick Recap
Product prices and availability are accurate as of the date/time indicated and are subject to change. Any price and availability information displayed on Amazon at the time of purchase will apply.