Do these 3 things before closing this tab:
1Clear out junk files and repair common Windows errors2Scan for outdated or missing drivers - takes under a minute3Repair Windows errors before they cause bigger problemsSome links on this page are affiliate links: if you buy through them we may earn a commission, at no extra cost to you.
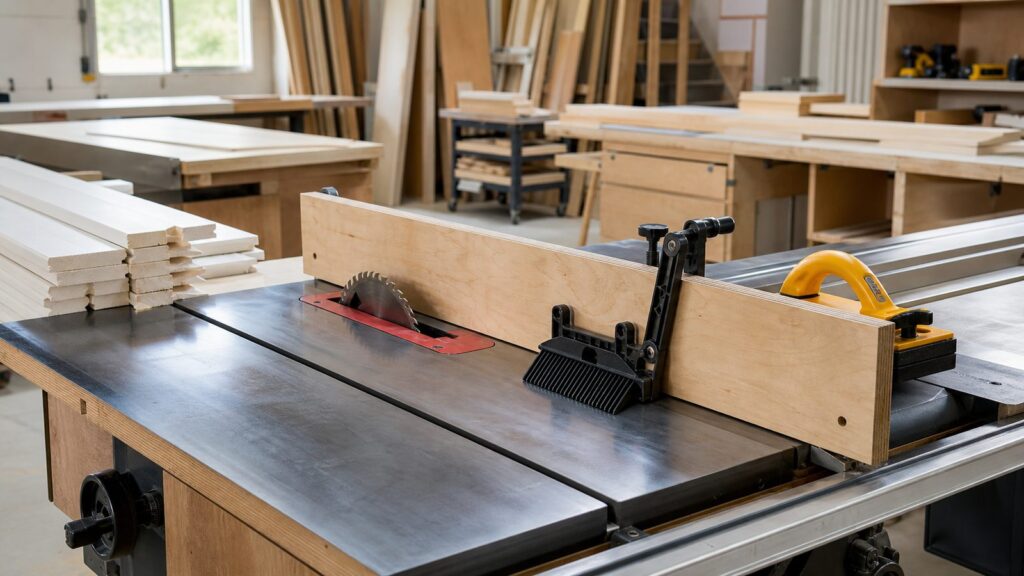
An auxiliary rip fence is a shop-made face that attaches to your table saw’s factory rip fence. It gives you a taller, flatter, sacrificial, or more clamp-friendly reference surface for cuts the factory fence does not handle well. For a homeowner building deck details, fence boards, pergola trim, planter boxes, or exterior casing, it is one of the cheapest upgrades you can make to a table saw.
The basic version is simple: a straight 3/4 in. MDF, melamine, or cabinet-grade plywood face fastened to a cleat or cap that clamps over the factory fence. Done carefully, it improves support, repeatability, and safety. Done carelessly, it can make kickback more likely. The difference is not fancy hardware. It is straight material, square assembly, solid attachment, and enough respect for the blade path.
As an Amazon Associate I earn from qualifying purchases.
Free tools Windows power users keep installed
One-click scans. No signup required.
On our job sites and in the shop, we treat an auxiliary fence as a replaceable fixture, not a permanent modification to the saw. The best setup is a stable saddle or clamp bar that stays with the saw, plus sacrificial faces you can swap when they get cut up. That lets you use the right face for ripping, rabbeting, tall narrow stock, and specialty work without compromising the factory fence.
What an Auxiliary Rip Fence Does
A table saw rip fence guides the workpiece parallel to the blade. An auxiliary rip fence adds a custom working surface to that fence. It can be taller, longer, smoother, replaceable, or cut into by the blade when the operation calls for it.
#1 Best Overall

- SPECS - ARF-BSCS | 36 Inch Table Saw Fence | 3-1/2" Tall | Built In T-Track Slots | 7" Material Support | 2 Sliding Clamping Blocks | Fence & Clamping Block Thickness Measure Exactly 2" | Made in USA
- SIZED FOR COMPACT MACHINES - 36" fence length, ideal for job site table saws, band saws, vintage contractor’s saws, router tables, and more.
- QUICK SETUP & REMOVAL - Installs in seconds without modifying your existing fence. Just use standard track clamps (not included).
- ENHANCED SUPPORT - Includes two 7" material supports to stabilize workpieces on the infeed and outfeed side of the blade.
- AMERICAN MADE QUALITY - Like all Woodpeckers products, the Compact Auxiliary Rip Fence is precisely built and carefully inspected in our Strongsville, Ohio facility.
The most common uses are:
- Sacrificial cuts: Rabbets, dadoes, or zero-clearance rips where the blade partially enters the fence face.
- Tall-stock support: Narrow boards ripped on edge for trim, fascia details, rail parts, or laminated outdoor components.
- Cleaner repeat cuts: A flat, slick face that supports trim and narrow material without catching on factory fence slots or seams.
- Accessory mounting: A surface for featherboards, stops, hold-downs, L-fences, and shop-made guides.
- Fence protection: The replaceable face takes clamp dents, blade kerfs, and glue squeeze-out instead of your saw’s main fence.
For general ripping, a 4 to 6 in. tall auxiliary face is usually enough. For vertical work, raised panels, or narrow boards standing on edge, 8 to 12 in. is more useful. Taller is not automatically better. The face still has to stay rigid and square to the table.
Materials and 2026 Cost Range
Use engineered sheet goods when accuracy matters. A straight-looking 2×4 is tempting because it is cheap, but construction lumber cups, twists, and changes with humidity. If the auxiliary face is bowed, every rip follows that bow. MDF, melamine, and cabinet-grade plywood are usually flatter and more predictable.
The Tool Desk
Outbyte PC Repair FREERepair Windows errors before they cause bigger problemsFix Now →Outbyte Driver Updater FREEScan for outdated or missing drivers - takes under a minuteDriver Scan →For most homeowners, a 2 ft. x 4 ft. project panel is enough. In 2026 US retail pricing, project panels commonly run about $25 to $38 depending on material. Full 4 ft. x 8 ft. sheets are more economical if you will make several fixtures: 3/4 in. MDF is commonly around $47 to $50 per sheet, 3/4 in. melamine around $47, and 3/4 in. maple or birch plywood around $70 to $75.
| Build Type | Typical Cost | Best For | Notes |
|---|---|---|---|
| Basic scrap build | $15-$45 | Occasional DIY ripping and rabbets | Uses scrap MDF or plywood, screws, glue, and existing clamps. |
| New project-panel build | $35-$90 | Most homeowners | Includes a 2 ft. x 4 ft. panel, screws, glue, and dedicated fence clamps. |
| Upgraded replaceable-face build | $60-$160 | Frequent shop use | Adds T-track, knobs, threaded inserts, UHMW slick tape, and multiple faces. |
| Pro-built or tuned jig | Varies by minimum call | Small shops or homeowners who need precision setup | BLS lists the May 2024 median carpenter wage at $59,310, about $28.51/hour, but billable contractor rates are higher after overhead, travel, insurance, and minimums. |
Hardware costs are modest. Adjustable table featherboards are often around $25, double featherboards around $35, push blocks around $13 to $25, and universal fence clamps around $14 to $20 per pair depending on sale pricing. Those safety accessories are not luxuries. If you are ripping narrow stock or treated lumber that wants to move, featherboards and push blocks are part of the setup.
Recommended Design: Saddle With Replaceable Faces
The strongest simple design is a U-shaped saddle that slips over the factory fence. One side becomes the working face. The top cap and rear cleat keep it aligned. Clamps, knobs, or bolts hold it tight. The face can be replaced when it gets chewed up.
Good Starting Dimensions
- Length: Match the factory fence length, or extend 2 to 4 in. past the infeed side if your saw table supports it.
- General face height: 4 to 6 in.
- Tall-stock face height: 8 to 12 in.
- Face thickness: 3/4 in. MDF, melamine, Baltic-birch plywood, or cabinet-grade plywood.
- Top cap width: Factory fence width plus the thickness of both side pieces, with about 1/32 to 1/16 in. clearance so it slides on without binding.
- Fastener spacing: Every 8 to 12 in., kept well outside the blade path.
Before cutting, measure your actual fence. A common jobsite saw fence might be about 2 to 3 in. wide and 2-1/2 to 3-1/2 in. tall, but do not build from averages. Measure the top width, side height, and any protruding adjustment parts. The auxiliary fence should fit snugly without forcing the factory fence out of alignment.
PC Slower Than It Used to Be?
A free scan shows the junk files, broken settings and background clutter dragging Windows down - then fixes them in one click.Free scan · Windows 10 & 11Outdated Drivers Are Slowing You Down
One free scan finds every outdated or missing driver and matches the right update for your exact hardware.Free scan · exact hardware matchMaterial Choice
MDF is flat, cheap, and easy to replace. It is a good sacrificial face, but it hates moisture. Keep it dry and do not leave it in a truck bed overnight. Melamine is slick and stable, which helps stock slide smoothly, but the edges chip and screws need good pilot holes. Cabinet-grade plywood is tougher and better for jobsite handling. For exterior-project shops where pressure-treated or damp boards pass through the saw, plywood usually survives longer than MDF.
If you add T-track, install it above the blade danger zone and use short bolts that cannot reach the blade. Mark a no-screw/no-hardware zone across the portion of the fence where the blade, dado stack, or rabbet cut could ever enter. We mark the working side with “blade side” and draw a bold hardware-free band near the blade path. That simple mark prevents expensive and dangerous mistakes later.
Tools and Supplies
You do not need a cabinet shop to build this. A table saw, drill/driver, countersink bit, square, straightedge, clamps, and measuring tape are enough. A combination square or machinist square helps verify the face is 90 degrees to the table. A feeler gauge is useful, but backlighting behind a straightedge also shows a bowed face quickly.
Rank #2

- SPECS - ARF-48 | 48 Inch Table Saw Fence | 3-1/2" Tall | Built In T-Track Slots | 12" Material Support | 3 Sliding Clamping Blocks | Fence & Clamping Block Thickness Measure Exactly 2" | Made in USA
- STRAIGHTER, SMOOTHER CUTS - Clamp the Auxiliary Rip Fence to any table saw fence for a longer, straighter, and more precise reference surface - no twisting or warping like plywood fence faces.
- MORE CONTROL FOR BIG PROJECTS - The 48" length and 12" material support keep panels balanced and stable on the infeed or outfeed side of the blade for safer, cleaner cuts.
- VERSATILE SETUP OPTIONS - Configure high, low, or L-fence positions to match the task - from thin rips to box lids to edge jointing straight stock.
- MADE IN THE USA - Built and inspected to our strict standards in Strongsville, Ohio, ensuring top-tier accuracy and durability.
For a basic fence, gather:
- One 3/4 in. MDF, melamine, or cabinet-grade plywood panel
- Wood glue if making a fixed saddle
- #8 or #10 flat-head screws, usually 1-1/4 in. to 1-1/2 in. long depending on layout
- Two fence clamps, F-style clamps, or through-bolts with knobs
- Paste wax or slick tape for smoother feeding
- Push stick, push block, featherboard, and outfeed support
Keep all metal hardware out of any area the blade may touch. If you plan to bury the blade in the fence for rabbets, build a dedicated sacrificial face with no hidden screws near that cut line.
Step-by-Step Build
1. Confirm the Factory Fence First
Do not attach a straight auxiliary face to a misaligned fence and expect better cuts. Lock the factory fence and check it against the miter slot or blade according to your saw manual. The fence should guide stock parallel to the blade. If it toes toward the back of the blade, it can pinch the board and increase kickback risk.
Also check that the fence locks solidly. If it shifts under hand pressure, fix that before building accessories. An auxiliary fence adds leverage, especially when it is 8 to 12 in. tall.
2. Cut the Face and Cap
Cut the main face to length first. For most saws, 30 to 36 in. works well. On a cabinet saw, you may want 42 to 50 in. depending on the fence. For general work, rip the face 5 in. tall. For a tall-stock version, rip it 10 in. tall.
Cut the top cap to span the factory fence width plus the two side pieces. If your factory fence is 2-1/2 in. wide and you are using two 3/4 in. side pieces, the cap should be about 4-1/16 to 4-1/8 in. wide. That gives slight clearance without a sloppy fit.
3. Add the Rear Cleat or Second Face
A full U-shaped saddle uses a working face on the blade side and a shorter rear face on the opposite side. A lighter version uses the working face plus a top cap and rear cleat. The rear piece does not need to be full height unless you want maximum rigidity.
Dry-fit the parts over the factory fence. The saddle should slide on easily and sit flat on the saw table. Ease the lower inside edge of the working face with sandpaper or a small chamfer. That keeps dust from holding the fence off the table and throwing the face out of square.
4. Fasten Without Creating a Blade Hazard
Glue and screw the cap to the face, or use countersunk screws alone if you want easier repairs. Pre-drill MDF and melamine. Countersink screw heads so they sit below the surface. Keep the working face slightly proud of any hardware.
If you use through-bolts, knobs, threaded inserts, or T-track, lay out the blade path first. A dado stack or buried blade can reach farther into the face than a normal rip blade. Leave a generous no-metal zone. On our shop fences, the lower 2 in. of the blade-side face is treated as sacrificial wood only.
Rank #3

- PRECISION TABLE SAW RIP FENCE UPGRADE : Built from high-strength extruded aluminum, this table saw rip fence extension provides a stable, straight reference surface for cleaner and more consistent cuts. The rigid profile helps reduce flex and supports accurate alignment during repeated table saw operations
- 46" EXTENDED SUPPORT WITH SPACE-SAVING DESIGN : This 46" table saw fence extension kit with featherboards measures 47-1/4" overall and adds support when working with long boards or sheet goods. It functions as a table saw extension and outfeed support without requiring a bulky outfeed table
- VERSATILE 3-IN-1 MULTI-FUNCTION FENCE SYSTEM : Configure the fence for different cutting tasks: High Fence Mode supports tall panels and box work, Low Fence Mode 3/4" helps with controlled thin ripping, and L-Fence Mode supports edge jointing or template-guided cuts. It also works as a thin rip jig and table saw jig for added workshop flexibility
- 8 BUILT-IN T-SLOTS FOR CUSTOM JIG SETUPS: The fence body features eight integrated T-slots for mounting featherboards, stop blocks, hold-downs, and custom woodworking jigs. The included drop-in T-bolts can be inserted directly through the slot opening, allowing faster setup and adjustment without sliding hardware in from the ends of the track
- FITS MOST TABLE SAW FENCES WITH 1-1/4" OFFSET ALIGNMENT :Designed to clamp securely to most table saw rip fences without drilling or permanent modification. The 1-1/4" total thickness provides a clear offset reference
5. Clamp and Check for Square
Install the auxiliary fence, lock the factory fence, and clamp the add-on securely. Place a square on the table against the auxiliary face. Check at the front, middle, and back. If the face leans, shim it or rebuild it. A tall fence that is not square will push edge-standing boards out of plumb.
Next, place a straightedge along the face. Look for daylight. A small hollow can sometimes be shimmed, but a visible bow near the blade is a reject. It is cheaper to cut a new face than to fight bad rips for the next year.
6. Make a Test Rip
Run a test board before production work. Use a straight, dry piece of scrap, not a twisted deck board. The feed should feel smooth and predictable. The board should not drift away from the fence or pinch against the back of the blade. If it does, stop and correct the alignment.
Using It Safely
A homemade auxiliary fence does not replace table saw safety equipment. Use the riving knife, splitter, blade guard, push stick, featherboard, and outfeed support whenever they are compatible with the cut. For workplace use, OSHA machine-guarding rules require guarding that encloses the saw blade above the table with a self-adjusting guard that adjusts to stock thickness and remains in contact with the material under 29 CFR 1910.213(c)(1) and (d)(1). Jobsite and employee use must follow applicable OSHA requirements, employer procedures, and the saw manufacturer’s instructions.
OSHA table-saw guidance also emphasizes guiding stock parallel to the rip fence to reduce kickback, standing to the side of the blade, maintaining clearance, and using push sticks for small pieces. Those are not paperwork rules. They are habits that prevent real injuries.
CPSC rulemaking materials estimated 49,176 medically treated blade-contact injuries annually that a proposed table-saw blade-contact standard would address, with societal costs around $3.97 billion in 2021 dollars. In 2025, CPSC withdrew proposed regulatory actions including that table-saw blade-contact rule. As of 2026, the practical takeaway is straightforward: do not rely on a future mandate or a homemade jig to protect you. Use safe setup, compatible guards, and good judgment.
When Not to Use a Homemade Auxiliary Fence
Do not use it if it is loose, warped, cracked, or rocking on the table. Do not use it if it blocks the guard or riving knife on a cut where those devices should be installed. Do not use it if it forces your hands close to the blade or prevents a push stick from working. Do not trap offcuts between the blade and fence. Do not rip wet, twisted, or badly cupped boards just because the taller fence makes them stand up.
For long deck boards, bowed fence pickets, wet pressure-treated lumber, and full sheet goods, a circular saw with a straightedge guide or a track saw may be safer and more accurate than wrestling material through a table saw. Sort your boards first. Cup, twist, treatment incising, knots, and high moisture all increase binding risk.
What’s actually slowing this PC down?
Pick the symptom - the matching free tool is one click away.
Special Setups Worth Building
Sacrificial Rabbet Fence
For rabbets or dadoes, install a plain sacrificial face with no metal in the blade path. Lock the fence, verify clearance, start the saw, and raise the blade slowly into the wood face only after confirming the blade will not hit screws, clamps, or T-track. This creates a zero-clearance pocket around the blade and supports the workpiece tight to the cut.
Rank #4
- Accurate Cutting: Upgrade your rip guide precision with the Wixey digital rip saw fence system that offers ±0.002" accuracy per ft and a digital readout for reliable, repeatable cuts across all woodworking projects
- Heavy-Duty Build: Crafted from durable steel and aluminum, this professional-grade table fence delivers long-lasting stability and is perfect for woodworking benches, rip cuts, and shop work tables
- Digital Readout: Features a backlit digital display showing readings in inches, fractions, or millimeters; constant memory preserves calibration even when powered off or removed from the bench rail
- Smooth Adjustment: Micro-adjust wheels and roller glide ensure fine-tuned, smooth fence movement - ideal for setting precise bevels, rip cuts, and repeat measurements on contractor or cabinet saws
- What’s Included: You get (1) Wixey Table Saw Fence System (WR750) - (1) Digital Readout Display – (1) 72” Fence Rail (ships in two parts) - (1) Drilling Jig & Bit - Mounting Hardware Included - Batteries (2×AAA, not included) with this digital fence tool
This is a non-through or specialty setup, so guard compatibility depends on the operation and saw. Use the riving knife or guard when compatible. When it is not compatible, use a documented alternate setup: featherboards, push blocks, outfeed support, and a clear plan for where both the workpiece and offcut will go.
Tall Fence for Narrow Stock
A 10 in. tall plywood face helps when ripping boards on edge, such as trim blanks, fascia strips, lattice components, or rail parts. Add featherboards or a vertical hold-down so you are not relying on hand pressure alone. Keep your hands above and away from the blade path, and use a push block that controls the stock through the end of the cut.
Removable L-Fence
An L-fence is a short horizontal ledge mounted to the auxiliary face so the workpiece has clearance after passing the blade. It is useful for certain flush-trimming and pattern-guided cuts. Make it removable, clearly label it, and treat it as a specialty jig. If you do not understand where the waste piece goes after the cut, do not make the cut.
Quick wins for a faster PC:
Scan for outdated or missing drivers - takes under a minuteDriver Scan →Clear out junk files and repair common Windows errorsFree Scan →Fix the driver behind crashes, sound loss and screen glitchesFind Drivers →DIY vs. Hiring a Pro
Most homeowners with a functioning table saw can build a basic auxiliary rip fence in 1 to 2 hours. A more refined version with replaceable faces, T-track, knobs, threaded inserts, and slick tape can take half a day. The material cost is small compared with the value of cleaner cuts and better control.
DIY makes sense if your saw fence locks firmly, you understand basic table saw operation, and you are making ordinary rips, rabbets, or trim components. It also makes sense if you can verify flatness and squareness instead of guessing.
Hire a carpenter, cabinetmaker, or experienced saw technician if the factory fence is out of alignment, the saw does not hold settings, you need repeatable production cuts, or the work is part of a paid jobsite where employee safety rules apply. Professional help is usually priced as a minimum service call, not just an hourly wage. Even though the May 2024 US median carpenter wage was about $28.51 per hour, a contractor’s billable rate commonly runs higher because it includes overhead, travel, insurance, tooling, and scheduling.
Common Mistakes to Avoid
The first mistake is using a bowed 2×4 as the fence face. It may look straight until you put a real straightedge on it. Any bow near the blade can pinch stock or create tapered cuts.
Recommended Free Tools
The second mistake is hiding screws in the blade path. Mark the sacrificial zone before you assemble the fence. If you later convert the fence for dadoes or rabbets, you need to know exactly where metal is located.
The third mistake is making the fence too tall without enough stiffness. A 12 in. MDF face that flexes under light hand pressure is not a precision fence. Use plywood, add a stiffener, or reduce the height.
Best Value

- FEED CONTROL AND SAFETY: The XT XTENDER T Track Fence adds a 5” tall face to improve workpiece guidance on table saws and bandsaws. The increased surface helps stabilize material, supporting straighter cuts and controlled feeding.
- MULTI-SAW FIT: This 46” XTENDER clamps to existing fences using Bow T-Track clamps (sold separately). Fits portable saws, cabinet saws, UniSaw, Harvey, and bandsaws—a choice among woodworking gifts for dad to upgrade his existing fence.
- MULTIPLE T-SLOTS FOR ACCESSORIES: Features three T-slots on the face, top, and back for 1/4” and 5/16” T-bolts. Our table saw fence system supports featherboards, stops, and feed accessories for customizable setups and improved control.
- HEAVY-DUTY ALUMINUM CONSTRUCTION: Built from aluminum extrusion with sandblasted anodized finish. The 4” flat face supports smooth material glide, while rigid 1” width maintains stability and alignment during woodworking operations.
- ADJUSTABLE POSITIONING AND EXTENSION SUPPORT: With milled rear slots, our table saw fence allows quick repositioning for infeed, center, or outfeed use. Standoffs help smooth movement, while accessory compatibility extends support for longer boards.
The fourth mistake is removing safety devices for convenience. If the riving knife and guard fit the cut, use them. If they do not, build a controlled specialty setup with featherboards, push blocks, and outfeed support.
The fifth mistake is feeding bad lumber through a good jig. Outdoor-structure lumber can be wet, cupped, twisted, or heavily incised from pressure treatment. That material moves as it is cut. When a board is trying to close on the blade, the problem is the stock, not the fence.
Final Setup Checklist
- Factory fence is parallel to the blade or miter slot.
- Auxiliary face is flat with no visible bow.
- Face is square to the table at the front, middle, and back.
- Fence locks securely and does not shift under pressure.
- No screws, bolts, T-track, or clamps are in the blade path.
- Lower edge is eased so dust does not lift the face.
- Blade side and hardware-free zone are clearly marked.
- Riving knife, guard, push stick, featherboard, and outfeed support are used whenever compatible.
- A test rip confirms smooth feed before production cuts.
A good auxiliary rip fence is not complicated. It is a straight, stable, replaceable reference surface that makes the table saw easier to control. Build it from flat material, attach it without slop, keep metal away from the blade, and verify the setup before every serious cut. For deck details, fence parts, exterior trim, and small outdoor-structure components, that careful 1- to 2-hour shop project can pay for itself the first time it saves a bad rip or keeps your hands farther from the blade.
Frequently Asked Questions
What is an auxiliary rip fence used for on a table saw?
It adds a custom face to the factory rip fence for cleaner ripping, taller stock support, sacrificial rabbets or dadoes, zero-clearance cuts, and easier clamping of featherboards or stops.
What is the best material for a DIY table saw auxiliary fence?
For accuracy, use 3/4 in. MDF, melamine, Baltic-birch plywood, or cabinet-grade plywood. Avoid ordinary 2x lumber when precision matters because it is more likely to cup, twist, or move with humidity.
How tall should an auxiliary table saw fence be?
A 4 to 6 in. tall face works for general ripping. Use an 8 to 12 in. face for tall narrow stock or panels, provided the fence remains rigid and square to the table.
Quick wins for a faster PC:
Repair Windows errors before they cause bigger problemsFix Now →Scan for outdated or missing drivers - takes under a minuteDriver Scan →Clear out junk files and repair common Windows errorsFree Scan →Can I screw an auxiliary fence directly to my table saw’s factory fence?
Yes, if the factory fence has suitable mounting holes and the saw manual allows it. Many users prefer a clamp-on saddle because it avoids drilling the factory fence and makes the auxiliary face easier to replace.
Is it safe to bury a dado blade or saw blade in a sacrificial fence?
It can be done for specific rabbet or dado setups, but only with a dedicated sacrificial face, no metal in the blade path, a locked fence, controlled feed pressure, and proper push blocks or featherboards. Verify guard and riving-knife compatibility for the specific cut.
Do I need a permit or code approval to build a table saw jig at home?
A homeowner usually does not need a building permit to make a shop jig. For employee or jobsite use, OSHA rules, company safety policies, manufacturer instructions, and applicable workplace requirements matter more than permits.
Quick Recap
Product prices and availability are accurate as of the date/time indicated and are subject to change. Any price and availability information displayed on Amazon at the time of purchase will apply.
The Tool Desk
Outbyte PC Repair FREEClear out junk files and repair common Windows errorsFree Scan →Outbyte Driver Updater FREEFix the driver behind crashes, sound loss and screen glitchesFind Drivers →
