Quick wins for a faster PC:
Scan for outdated or missing drivers - takes under a minuteDriver Scan →Repair Windows errors before they cause bigger problemsFix Now →Fix the driver behind crashes, sound loss and screen glitchesFind Drivers →Yes, a Raspberry Pi can form the camera and control layer of a remote doorbell and smart-lock system. A practical design uses a Camera Module 3, Home Assistant and MQTT for doorbell images and lock commands, and a separately powered access-control relay for an electric strike or magnetic lock. Keep the Pi’s GPIO on the control side only: it should not power the lock. For a door people rely on for security or emergency egress, retain an approved mechanical override and do not treat an untested hobby build as a dependable access-control system.
How the system fits together
Think of the build as three separate jobs: capturing a visitor image, carrying events and commands over the network, and physically operating the lock. Home Assistant can join those jobs, but the camera and lock need not share a power circuit or a direct connection to the Pi’s GPIO.
- At the door: Mount a Raspberry Pi Camera Module 3, a weather-protected doorbell button, and optionally a PIR motion sensor and magnetic door-contact sensor. The button or motion event can prompt an image capture.
- For images: Send a snapshot or event image as image data on an MQTT topic. Home Assistant’s MQTT Camera integration subscribes to that topic and updates the camera entity when a new image arrives. This is an event-image approach; the cited integration description does not establish continuous live video.
- For the lock: Use Home Assistant’s MQTT Lock integration to publish lock and unlock commands. Configure a state topic that reports the physical lock state, rather than relying on optimistic mode, which reflects a command without independently confirming the result.
- At the actuator: Use a correctly rated access-control relay or interface to switch a separately powered electric strike or magnetic lock. The Pi GPIO provides only a control signal to the interface; the lock’s operating current comes from its own correctly rated supply.
This division helps keep a software command from being mistaken for proof that the door actually locked. A magnetic door-contact sensor can report whether the door is open or closed; it does not, by itself, prove that the lock actuator engaged.
Choose the camera for the doorway
Raspberry Pi Camera Module 3 is an official 12-megapixel option, available in standard and wide variants. Choose based on what the camera must see at the mounting distance and angle: a wider view may cover more of a porch, while framing a visitor clearly depends on placement as well as the lens.
Recommended Free Tools
#1 Best Overall

- 【RP2040 Development Platform】It uses the Raspberry Pi Pico development board and is equipped with the RP2040 microcontroller, making it suitable for e-learning, programming instruction, and embedded project development.
- 【Multiple programming methods】Supports MicroPython, C/C++, and Piper Make graphical programming to meet the needs of users at different learning stages.
- 【Rich experimental modules】Includes common electronic components such as LCD1602 display module, SG90 servo motor, human body sensing module, WS2812 RGB LED strip, buzzer, and buttons, covering basic applications such as display, input, sensing, and execution control.
- 【Comprehensive learning tutorial】The kit provides detailed project tutorials and sample code to help users quickly complete circuit connections, program downloads, and experimental verification.
- 【Suitable for STEM education】Ideal for electronics beginners and school lab teaching. Through hands-on project practice, it effectively improves practical skills, logical thinking and innovation ability, making it a great choice for programming enlightenment and hobby cultivation.
| Choice | Useful comparison | What is established |
|---|---|---|
| Camera Module 3, standard | Field of view and mounting position | Official 12-megapixel variant; the cited specification does not state a field-of-view figure. |
| Camera Module 3, wide | Broader doorway coverage versus how large a visitor appears in the frame | Official 12-megapixel variant; the cited specification does not state a field-of-view figure. |
| NoIR or other low-light choice | Whether the scene needs visible-light color or a different night-vision arrangement | The cited component facts do not establish a specific NoIR model, low-light performance, or illumination setup. |
Before fixing the camera in place, check the actual image from the intended height and angle. Also plan the cable route and mechanical mounting, and protect the camera, button, and connections from weather as appropriate to the site. The listed official guide includes a Camera Module or HQ Camera, but it does not establish a particular cable length, enclosure rating, or outdoor mounting specification.
Select a lock actuator that suits the door
An electric strike and a magnetic lock are access-control actuators, not interchangeable assumptions about a door. Verify that the chosen device matches the door and frame, the existing latch or hardware, its voltage and current requirements, and the required behavior when power is lost. The official Raspberry Pi smart-door parts list includes a magnetic access-control system; the system design can also use an electric strike where it is suitable for the door.
Rank #2

- IoT Starter Kit for Beginners: The SunFounder Raspberry Pi Pico W Ultimate Starter Kit offers a rich IoT learning experience for beginners aged 8+. With 450+ components, 117 projects, and expert-led video lessons, this kit makes learning microcontroller programming and IoT engaging and accessible, RoHS Compliant
- Expert-Guided Video Lessons: This kit includes 27 video tutorials by the renowned educator, Paul McWhorter. His engaging style simplifies complex concepts, ensuring an effective learning experience in microcontroller programming
- Wide Range of Hardware: The kit includes a diverse array of components like sensors, actuators, LEDs, LCDs, and more, enabling you to experiment and create a variety of projects with the Raspberry Pi Pico W
- Supports Multiple Languages: The kit offers versatility with support for three programming languages - MicroPython, C/C++, and Piper Make, providing a diverse programming learning experience
- Dedicated Support: Benefit from our ongoing assistance, including a community forum and timely technical help for a seamless learning experience
- Check the physical fit: Confirm the frame, latch, door swing, and available space are compatible with the actuator and its mounting instructions.
- Choose the failure behavior deliberately: Establish whether the selected device is fail-safe or fail-secure, and assess how that behavior affects emergency egress and the building’s requirements.
- Keep an override: Provide a mechanical key or another approved means of access if electronics, power, or network service fail.
- Confirm the outcome: Use a state report and, where appropriate, a door-position contact. A successful MQTT publish is not confirmation that the door is physically secure.
The cited project materials do not give actuator force, voltage, current, wiring diagrams, or a universal fail-safe/fail-secure recommendation. Use the specifications for the actual lock and relay interface, and have installation reviewed by an appropriately qualified access-control or electrical professional when required.
Use MQTT as the integration path
Home Assistant documents MQTT Camera support for image payloads published to a topic, and MQTT Lock support for lock/unlock commands with either a state topic or optimistic mode. For a door lock, prefer the state topic: the entity can then reflect reported state rather than merely the last requested action. Configure the camera and lock topics consistently between the devices and Home Assistant, and test what happens when a message is delayed, missing, or stale.
Rank #3

- 【Starter Kit for Raspberry Pi Pico】SunFounder Basic Starter Kit for Raspberry Pi Pico is One-Stop-Shop for Raspberry Pi Arduino Beginners & Experts. Online tutorials provide you with step-by-step guidance, with 283 items and 40 projects
- 【Pre-soldered Raspberry Pi Pico Included】The Raspberry Pi Pico is a high-performance microcontroller board with flexible digital that features the RP2040 with a dual-core ARM Cortex-M0+ processor
- 【280+ Items】In addition to Raspberry Pi Pico, it comes with various components, such as: I2C LCD, WS2812 RGB LED Strip, Servo Motor, and PIR Motion Sensor etc. Detailed explanations and learning information are provided for each component
- 【Provided 40 Projects】The starter kit for raspberry pi pico kit includes 40 professional projects in a variety of degrees of complexity. Each lesson includes a circuit diagram, explanation of the operating principle, and an example code
- 【3 Programming Languages】MicroPython (18 projects), an officially recommended programming language. C/C++ (13 projects), compatible with the Arduino IDE. Piper Make (9 projects), a simplified version of Scratch, which is ideal for beginners
Home Assistant also documents a remote Raspberry Pi GPIO integration, but its current documentation says remote Raspberry Pi 5 hosts are not supported because pigpio lacks support there. For a Pi 5 at the door, MQTT is therefore the safer general integration route described by the available documentation, rather than depending on remote GPIO compatibility.
Remote viewing and remote control require a secured path to Home Assistant; MQTT topic support alone does not make a system safe to expose publicly. Do not expose an MQTT broker directly to the internet. Authenticate and encrypt remote access, restrict who can issue lock commands, and test the local behavior when the WAN, Wi-Fi, or broker is unavailable.
Rank #4
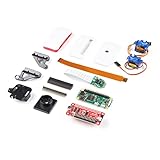
- Provides you with a pan/tilt camera controlled via a Raspberry Pi Zero W.
- This kit consists of parts that are easy to assemble and program, expanding the Raspberry Pi Zero W's IoT capabilities and highly tailored accessibility to the Pi Camera Module.
- Includes: 1x Raspberry Pi Zero W w/ Headers, 1x SparkFun Pi Servo pHAT, 1x Raspberry Pi Camera Module V2
- Also includes: 1x Raspberry Pi Zero Case w/ Short Camera Cable, 1x Pan/Tilt Bracket Kit, 1x Raspberry Pi Zero Camera Cable, 1x Raspberry Pi GPIO Male Header - 2x20, 1x Raspberry Pi GPIO Tall Header - 2x20, 1x Double-Sided Foam Tape Square - 1in.
- Note: The Pan/Tilt Bracket in this kit does not come pre-built, so some assembly is required.
Plan wiring and failure behavior before installation
Treat the door lock as an access-control load, not as a Pi accessory. Switch it through an access-control relay or interface rated for the actuator, and power it from a separate supply rated for its requirements. Inductive loads can produce electrical transients, so use appropriate isolation, fusing, and suppression for the specific actuator and interface; do not guess at component ratings.
- Keep GPIO at the control-signal level; do not route lock operating current through the Pi.
- Provide the specified protection for the actuator circuit, including a correctly selected fuse and suppression appropriate to the load.
- Keep a mechanical key or approved override available even when remote operation works normally.
- Do not let a missing state message or stale lock state appear as a verified locked door.
- Test behavior after loss and restoration of power, a broker restart, camera failure, and a network interruption.
The Raspberry Pi Official Magazine’s smart-door project guidance explicitly frames the build as inspirational and warns against relying on it without hardening the code and adding failsafes. That caution matters most where the lock controls access to an occupied building: a prototype can demonstrate the idea without being suitable as the building’s sole security or egress system.
The Tool Desk
Outbyte PC Repair FREEClear out junk files and repair common Windows errorsFree Scan →Outbyte Driver Updater FREEScan for outdated or missing drivers - takes under a minuteDriver Scan →Best Value

- 5 sets of code: Python (compatible with 2&3), C, Java, Scratch and Processing (Scratch and Processing code provide graphical interfaces)
- Detailed tutorial: Can be downloaded (in English, 962-page in total) or viewed online (original in English, can be translated into other languages by browsers) (The tutorial link can be found on the product box, no paper tutorial)
- 128 projects from simple to complex: Provides step-by-step guide with electronics and components knowledge, each project has schematics, wiring diagrams, complete code and detailed explanations
- 223 items in total: This ultimate kit includes the most commonly used electronic components, modules, sensors, wires and other compatible items
- Compatible models: Raspberry Pi 5 / 500 / 400 / 4B / 3B+ / 3B / 3A+ / 2B / 1B+ / 1A+ / Zero 2 W / Zero W / Zero (NOT included in this kit)
What the official smart-door project adds
Raspberry Pi’s official smart-door guide lists a wired doorbell, Raspberry Pi Touch Display, PAM8302 amplifier, Camera Module or HQ Camera, speaker, PIR sensor, magnetic access-control system, and two security door-contact reed switches. It describes possibilities including remote peephole viewing, controllable locking, lighting, and facial recognition. These are project components and possibilities, not proof that every configuration is secure or suitable for a particular entrance. For a construction or retrofit project, select only the functions that match the door, site, and safety requirements.
Quick Recap
Product prices and availability are accurate as of the date/time indicated and are subject to change. Any price and availability information displayed on Amazon at the time of purchase will apply.