Windows Errors? Fix Them Before They Spread
Repair common Windows errors and clear accumulated junk for a smoother, more stable PC - no reinstall needed.Free scan · no reinstallCrashes, No Sound, or Screen Glitches?
Random freezes, missing sound and display glitches usually trace back to one bad driver. Find and replace yours safely.Free scan · under a minuteTo build a backyard swing set, start with a level, obstacle-free site and a plan that matches your chosen design and hardware. Then assemble the frame, anchor it as instructed, and prepare protective surfacing before children use it. The nine stages below adapt one published DIY walkthrough and CPSC safety guidance; they are not engineered plans, so use the instructions supplied with your swing kit and any design you follow.
1. Choose a level location with clear space
Pick a spot on level ground, away from fences, trees, buildings, driveways, and other obstacles. Allow room for the frame, moving swings, access, and the protective surfacing required for the equipment. If the yard slopes or the location cannot provide clear space, resolve that before building rather than compensating with an improvised frame or foundation.
CPSC’s Outdoor Home Playground Safety Handbook advises installing play equipment on level ground with adequate surfacing and anchoring. Check your chosen design’s site requirements as well.
2. Plan the swing bay and gather materials
Choose a design and swing kit before cutting lumber. The beam, support frame, hangers, fasteners, and seats must be compatible with one another; dimensions and connection details vary by design. Do not treat one project’s lumber sizes or hardware as universal load specifications.
#1 Best Overall
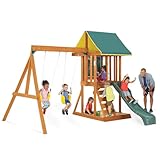
- BUILT FOR OUTDOORS: Made to withstand the weather, this wooden backyard set is pre-treated with a water-based stain that includes UV and mold protection to hold up against the elements.
- ASSEMBLY WITH A FRIEND: Make assembly easier with more help! Two people can set up this item in approximately 4-8 hours.
- CHALK WALL: Sketch a treasure map, practice writing letters or numbers or write out the menu for the day. The chalk wall helps bring imaginative play to life.
- SHADED AREA: The upper deck is a landing spot for deciding where to visit next is also a cool break from active play, thanks to the tarp canopy.
- ACTIVE & IMAGINATIVE PLAY: Exercise muscles with the rock wall, slide and swings. Or, enjoy role playing in the below area that would make an ideal sandbox (sand not included).
Materials in the cited example
This Old House’s backyard swing set walkthrough, updated May 26, 2026, lists Western Red Cedar lumber in 4×4, 2×6, and 2×4 dimensions; 4-inch screws; carriage bolts, nuts, and washers; a swing set kit with hardware and brackets; and T-nuts. Climbing holds or a slide are optional features in that example. Use these as a reference to the example, not a universal shopping list or structural specification.
Tools in the cited example
The walkthrough lists combination wrenches, a cordless drill/driver, flathead screwdriver, hammer, saw, speed square, and tape measure. Check your design and kit for any additional tools or installation requirements before starting.
Rank #2

- Designed for Little Explorers: Ideal starter swing set, perfect for young children just starting to discover active outdoor play
- Elevated Adventure: Raised play deck features a brightly colored canopy roof and mesh panels, providing both shade and visibility while inspiring imaginative exploration
- Industry-Leading Warranty: 5-year warranty for added peace of mind
- Swinging Fun: 2 classic belt swings with rope chains are gentle on little hands and don't pinch fingers
- Speedy Wave Slide: 6-foot wave slide offers swift, safe descents for endless fun every time
3. Mark and drill the beam for the hangers
Lay out the attachment points on the top beam using the spacing and edge clearances specified by the swing design and hanger manufacturer. Measure and mark carefully so the swings will hang straight and remain clear of the supports. Drill only the specified hole size and locations; do not guess at spacing, hole diameter, or remaining wood around a hole.
4. Install the specified swing hangers
Fit the hangers or brackets supplied for the chosen swing kit, following their instructions for orientation, fasteners, and tightening. Use the hardware intended for the connection. CPSC’s home playground handbook calls for proper hardware and tightened connections; substitute fasteners only if the design or manufacturer explicitly allows them.
The Tool Desk
Outbyte PC Repair FREERepair Windows errors before they cause bigger problemsFix Now →Outbyte Driver Updater FREEScan for outdated or missing drivers - takes under a minuteDriver Scan →Rank #3
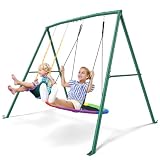
- [440lbs Heavy-Duty Capacity & Rock-Solid A-Frame] - Built to last through years of energetic play, our outdoor swing set confidently supports up to 440lbs. The heavy-duty A-frame features a powder-coated steel stand, reinforced with multiple support bars and included ground anchors, working together to deliver wobble-free stability and rust resistance for non-stop backyard fun
- [2 Fun Swings for Shared Adventures & Family Bonding] - Includes a classic belt swing for gentle glides and an exciting 32" saucer swing for lying, leaning, and gentle soaring! It's the perfect setup for siblings and friends to play together, encouraging outdoor exercise and creating cherished childhood memories in your own backyard
- [All-Weather Safety & Easy-Clean Materials] - Engineered as the ideal kids swing set for durability and easy care. The belt swing features rust-resistant zinc-plated chains to prevent pinched fingers, while the round swing offers an adjustable rope for a custom fit. Saucer swing's Oxford fabric wipes clean; belt swing's EVA seat is soft and non-slip. Both withstand sun and rain for long-lasting, worry-free play
- [Super Simple Setup & Adjustments] - Get swinging FAST! Super easy assembly with pre-drilled holes & clear instructions. Adjust the seat height on both swings for a custom fit as kids grow—no tools needed! Or swap in your own swing attachments to tailor the fun. Customize your play zone effortlessly
- [Create Your Backyard Fun Hub & Cherished Memories] - Transform your garden, patio, or backyard into an active playground for every occasion! It's the perfect spot for after-school energy burns, weekend family gatherings, imaginative play dates, and sunny afternoon adventures. More than a swing set, it's an investment in active play, family bonding, and creating those priceless childhood memories
5. Assemble the A-frames
Assemble the two support frames on a flat work surface, keeping the members aligned and using the connectors and fasteners specified by the design. Confirm that each frame sits evenly and that its joints are secure before attaching the beam. A-frame angles, member lengths, and connection details are design-specific; the example material list does not establish dimensions for another build.
6. Connect the beam to the supports
Set the beam into the support-frame connections and secure it with the specified connectors and fasteners. Check that the beam is level and centered, and that all connections are fully seated and tightened. Do not rely on screws alone where the design specifies bolts, brackets, or other structural connectors.
Rank #4

- STURDY SWING STAND - Crafted from heavy duty steel, this swing frame can support up to 600lb without wobbling,ensuring safe and fun swinging for older kids. The package also includes 4 anchor stakes to ensure extra stability
- BUILT TO LAST - This swingset is weather resistant with powder coated finished steel tubes, making them strong and low maintenance for years of outside use. Featuring an A frame design, this set guarantees longevity and safety for your children
- PLAYGROUND SET FOR BACKYARD - This metal playset is perfect for your backyard and comes with a 45” platform swing and 2 belt swings, each capable of holding up to 200 lb. Let your children enjoy hours of outdoor fun with this exciting 6.5ft tall play set
- SAFETY ASSURANCE - Safety is our top priority. This swingset meets or exceeds ASTM safety standards to make sure your kids are safe while getting benefit from physical activity
- EASY TO ASSEMBLE - Setting up this swing set is a breeze with our detailed, easy-to-follow instructions. Additionally, the package includes all essential hardware and tools for your convenience. Your children can start swinging and playing in no time
7. Raise and anchor the structure
Raise the assembled frame with enough help to control it safely, then install the anchors required by the design and site. Follow the assembly and anchoring instructions for the equipment; do not assume a particular footing depth or anchor type applies to every yard. Before hanging seats, check that the frame stands level, the anchors are secure, and the connections have not loosened during raising.
8. Add only features included in the design
If the plan includes a platform, climbing holds, or a slide, install them according to their own instructions and confirm they do not interfere with the swing path or required clear area. Treat optional play components as part of the structure: their attachments and placement must be suitable for the design, not improvised after assembly.
9. Prepare surfacing and inspect before use
Provide protective surfacing
CPSC’s Public Playground Safety Checklist specifies at least 12 inches of listed loose-fill surfacing or safety-tested rubber-like mats, with protective surfacing extending at least six feet around playground equipment. For swings, the checklist says surfacing should extend in front of and behind the swing by twice the height of the suspending bar. These are published CPSC checklist recommendations; follow the equipment instructions and assess the actual site rather than treating the figures as a substitute for either.
Check the seats and complete a safety inspection
Use lightweight swing seats. CPSC’s home playground handbook advises avoiding heavy metal or wood seats because a child can be injured if struck by one. Before use, inspect the frame, anchors, hangers, bolts, and other hardware for looseness, exposed or hazardous edges, and damage. Check for trip hazards and surfacing in poor condition, and supervise children using the equipment. Recheck and maintain the structure and surfacing over time.
Quick Recap
Product prices and availability are accurate as of the date/time indicated and are subject to change. Any price and availability information displayed on Amazon at the time of purchase will apply.