The Tool Desk
Outbyte PC Repair FREEClear out junk files and repair common Windows errorsFree Scan →Outbyte Driver Updater FREEScan for outdated or missing drivers - takes under a minuteDriver Scan →A good backyard pottery studio is a small specialty workshop, not a decorated storage shed with a wheel in the corner. The best designs start with the messy realities: clay dust, wet cleanup, kiln heat, 240V power, ventilation, shelving, weather protection, and local permit rules.
For most homeowners, the sweet spot is a finished detached studio between 120 and 200 square feet. That is enough room for a wheel, wedging table, hand-building surface, drying shelves, glaze area, and a small electric kiln bay if the structure is planned correctly. Smaller studios can work, but only if storage is tight and firing happens elsewhere. Larger studios are more comfortable, but they cost more and may trigger additional permit review in many jurisdictions.
On our job sites, we plan pottery studios from the kiln outward. The kiln dictates electrical service, clearances, ventilation, wall protection, floor material, and fire-safety details. Once that is right, the rest of the studio can be made efficient, comfortable, and good-looking without compromising the parts that keep the building safe.
Start With the Right Size
A backyard pottery studio can be compact, but it cannot be random. Clay work needs separate zones for storage, wedging, forming, drying, glazing, firing, and cleanup. When those functions overlap too much, the studio becomes hard to clean and easy to damage.
Recommended Free Tools
#1 Best Overall

- Professional Desktop Furnace: This tabletop kiln melter provides the perfect combination of portability, functionality, and performance required by professional artists. It features precise temperature control, intelligent operation, and various heat treatment capabilities, making it an ideal solution for jewelry making, metal clay, and ceramic firing.
- Large Space & High Power: The electric kiln features an enlarged internal chamber with evenly distributed heat, paired with a 1500W high-power heating element embedded around the structure. This enhances heating efficiency, allowing metals with melting points below 1200°C to melt within 34-38 minutes.
- Precise Temperature Control: Designed with a PID digital control system, this electric melting furnace accurately monitors and adjusts the actual temperature. It allows for customizable temperatures and can handle multiple projects simultaneously. The control panel has clearly labeled function buttons and an easy-to-read digital LED display.
- Excellent Cooling System: This electric furnace is equipped with an outstanding cooling system, featuring small cooling holes on the top for wax discharge during lost wax casting. The body’s cooling vents also ensure rapid heat dissipation, extending the product's lifespan.
- Wide Application: This melting furnace is perfect for lost wax casting, DIY metal clay projects, pottery firing, metal tempering, and more. It is suitable for professional industries and workshops, as well as being an excellent melting assistant for home use.
Here are realistic size targets:
- 80 to 120 square feet: workable for one hobby potter with a wheel, small hand-building table, shelving, and no kiln. A 10×10 or 8×12 studio can feel efficient if every wall is used.
- 120 to 200 square feet: better for a single potter with a small kiln area. A 10×14, 10×16, or 12×16 footprint gives enough space to separate wet work from firing.
- 200 square feet and up: more comfortable for glazing, larger shelving, multiple wheels, teaching, or small-batch production. This size may also bring more building-code and zoning scrutiny, depending on the city or county.
Do not choose the size only by what fits in the yard. Check setbacks, easements, maximum accessory-structure size, lot coverage, height limits, HOA rules, and utility trench paths before ordering a shed kit or signing a studio contract.
Use a Clay-to-Kiln Workflow
The best pottery studio layout follows the path of the material. Clay comes in heavy and damp. It gets wedged, formed, dried, bisque fired, glazed, fired again, then packed or stored. If the layout fights that sequence, the studio becomes crowded fast.
A Practical L-Shaped Studio Plan
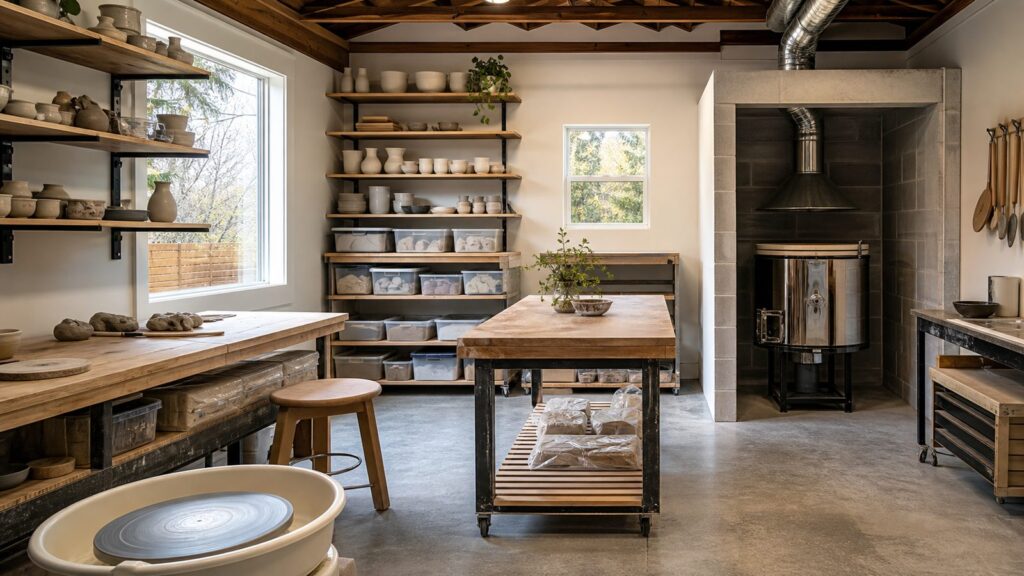
For a 10×14 or 12×16 backyard studio, an L-shaped workflow usually works well. Put clay storage and wedging near the entry so 25-pound clay bags and boxes do not need to be carried across finished work. Place the wheel and hand-building bench along one wall with splash-resistant surfaces. Keep drying shelves out of direct sun and away from heater vents or mini-split airflow. Put glazing on a washable counter near storage for chemicals and tools. Reserve one corner or short wall for the kiln bay.
This layout keeps wet, messy work on one side and firing/loading work on the other. It also reduces traffic past fragile greenware. A 30-inch walking aisle is the bare minimum; 36 inches is better if you will carry ware boards or kiln shelves.
Door and Window Placement
A 36-inch exterior door is worth the upgrade. Kilns, wheels, worktables, clay boxes, and shelving are awkward to move through narrow doors. If the studio is raised on skids or piers, include a stable landing and a low-threshold entry.
Windows should bring in light without baking the drying shelves. North or east light is easier to manage than harsh west sun. If you want cross-ventilation, place operable windows on opposite or adjacent walls, but do not rely on windows alone for kiln ventilation.
Design the Kiln Bay First
An electric kiln can work in a detached backyard studio, but only when the building is designed for it. A kiln is not just another appliance. It produces high heat, needs a dedicated circuit, requires clearances, and should be vented outdoors.
Many hobby and functional electric kilns need a dedicated 220-240V circuit, often in the 30- to 60-amp range. The exact requirement depends on the kiln model, plug or hardwire configuration, breaker size, wire run, and manufacturer specs. Have an electrician verify panel capacity before the kiln is purchased, especially if the studio is detached and needs underground conduit or a subpanel.
What’s actually slowing this PC down?
Pick the symptom - the matching free tool is one click away.
Plan for these kiln-bay basics:
- Dedicated power: do not share the kiln circuit with lights, outlets, HVAC, or tools.
- Clearances: manufacturer guidance commonly requires at least 12 to 18 inches from noncombustible surfaces and about 36 inches from combustible walls, storage, shelves, paper, wood, fabric, or chemicals.
- Noncombustible floor zone: sealed concrete is ideal. If the studio has other flooring, create a defined kiln area with noncombustible material under and around the kiln.
- Working room: allow space for lid swing, loading, controls, kiln furniture, emergency access, and a clear path to the door.
- Vent route: direct kiln venting should discharge outdoors through an approved route with proper termination.
We also avoid putting the kiln where someone must brush past it to reach shelves or the sink. A hot kiln corner should be boring, clear, and easy to inspect.
Plan Electrical Like a Workshop, Not a Shed
A basic storage shed might need one light and one outlet. A pottery studio needs much more thoughtful electrical planning. The wheel, task lighting, scale, mixer, small tools, dehumidifier, fan, mini-split, and kiln all have different needs.
For a finished backyard pottery studio, we typically discuss a detached subpanel when the building has a kiln, HVAC, and multiple work zones. A simple kiln circuit can sometimes cost around $400 to $900 when the panel is close and the run is straightforward. Costs rise quickly when the electrician has to trench across the yard, install conduit, upgrade the main panel, add a subpanel, meet GFCI or AFCI requirements, or work around landscaping and hardscape.
Put general outlets above bench height where potters actually work. Outlets behind shelves and under tables are frustrating and more likely to collect dust. Keep outlets away from splash zones near sinks or cleanup buckets, and use proper covers where required. Good task lighting also matters: aim for bright, even, color-neutral light so clay and glaze color can be judged accurately.
Ventilation and Air Quality Are Non-Negotiable
Ventilation has two jobs in a pottery studio: remove kiln fumes and control room heat. A window fan may help on a mild day, but it is not a complete plan for year-round firing in a tight, insulated backyard building.
A proper setup usually includes direct kiln venting to the outdoors and separate room ventilation or make-up air. Kiln firing can release fumes and corrosive gases depending on clay bodies, glazes, temperature, and firing schedule. The studio also needs a way to replace exhausted air so the vent system can work correctly.
Clay dust deserves the same level of attention. Dry clay and glaze materials can contain respirable silica. The practical control is not just buying an air purifier. The studio should be built and operated for wet cleanup: smooth washable floors, sealed shelves where possible, closed storage bins, wet sanding or grinding methods, damp mopping, and no dry sweeping. A HEPA vacuum rated for fine dust can help, but it should not replace wet cleaning routines.
Choose Durable Floors, Walls, and Work Surfaces
Pottery studios are hard on finishes. Clay film gets everywhere, water spills happen, and shelves carry real weight. Choose materials that are washable, moisture-aware, and durable.
Do these 3 things before closing this tab:
1Scan for outdated or missing drivers - takes under a minute2Repair Windows errors before they cause bigger problems3Fix the driver behind crashes, sound loss and screen glitchesA sealed concrete slab is one of the best floor choices. It is noncombustible, stable, easy to mop, and compatible with a kiln bay. If the structure is on a wood-framed floor, plan for stiffness, moisture protection, and a noncombustible kiln zone. Avoid carpet, rough unfinished plywood, and heavily textured flooring that traps clay dust.
For walls, painted drywall can work if it is well finished and washable, but consider more durable panels behind splash zones and cleanup areas. Light-colored surfaces make the room brighter and make clay film easier to see. Around the kiln, use manufacturer-approved clearances and noncombustible protection rather than decorative wall finishes.
Worktables should be heavy, stable, and easy to clean. A wedging table can be around 30 to 36 inches high depending on the potter’s height. Many potters prefer a plaster, hardibacker, canvas-covered, or heavy wood surface for wedging, but the right surface depends on clay type and cleanup habits. For general counters, washable laminate, sealed plywood, stainless steel, or solid surface can all work if the edges are protected from water.
Budget Realistically in 2026
The cost of a backyard pottery studio depends on whether you are building a simple shell or a finished, utility-ready workshop. Pottery studios trend above basic shed pricing because they need better electrical, ventilation, heat control, washable finishes, and sometimes plumbing.
Quick wins for a faster PC:
Clear out junk files and repair common Windows errorsFree Scan →Scan for outdated or missing drivers - takes under a minuteDriver Scan →Repair Windows errors before they cause bigger problemsFix Now →| Studio Item | Typical 2026 US Cost Range | What Changes the Price |
|---|---|---|
| Basic backyard shed shell | $1,875 to $8,250; averages often near $3,350 to $3,900 | Size, prefab vs custom, siding, roof, doors, windows, foundation |
| DIY 10×10 shed materials | About $1,500 and up | Lumber package, roofing, siding, fasteners, foundation, local pricing |
| Professionally built custom 10×10 | About $5,600 and up | Labor, access, finish level, site prep, local rates |
| Finished studio shell | $10,000 to $20,000 | Insulation, walls, electrical, windows, basic HVAC, better foundation |
| Fully conditioned studio with utilities | $30,000 to $50,000+ | HVAC, plumbing, trenching, custom doors/windows, slab, higher-end finishes |
| Kiln circuit | $400 to $900 for simple installs | Distance, trenching, panel capacity, subpanel, inspections, conduit |
| Electric kiln | Under $1,000 to $2,000 for small tabletop/test kilns; $4,000 to $6,000+ for larger programmable kilns | Size, controller, voltage, furniture kit, vent kit, delivery |
| Pottery wheel | $800 to $2,000+ | Brand, motor strength, capacity, splash pan, warranty |
| Shelving and storage | $150 to $800+ | Weight rating, wall mounting, drying rack style, custom work |
Broad shed and studio pricing runs about $25 to $150 per square foot. A pottery studio usually lands toward the higher end once kiln power, ventilation, insulation, and finish durability are included. Site work can also change the number: grading, drainage, tree roots, slab thickness, frost depth, termite risk, and trenching all matter.
Decide Whether Plumbing Is Worth It
A sink is convenient, but it is not automatically simple. Once you add plumbing to a detached studio, you may need permits, trenching, frost-depth protection, water supply, drain routing, venting, and inspection. In cold climates, the studio also needs freeze protection.
The bigger issue is clay in the drain. Clay should not go straight into household plumbing. Use a clay trap, settling bucket, or approved sediment interceptor. A basic DIY settling system may cost $50 to $300 in materials. Installed plumbing hardware costs more, especially if it must meet local code for a workshop sink.
Rank #2

- Professional Desktop Kiln: This tabletop kiln melter combines portability, functionality, and performance. It provides precise temperature control, smart functions, and versatile heat treatment, ideal for jewelry, metal clay, and ceramic firing
- Programmable Controller: Set up to 9 temperature ramp stages for complex processes. This electric kiln avoids overheating/underheating, ensuring uniform grain refinement and better yield. The PID control monitors and corrects the temp accurately
- Large Space & High Power: Enlarged cavity for even heat distribution. With 1500W power and embedded heating elements, this electric melting furnace melts metals below 2192℉ in 34-38 minutes for high efficiency
- Excellent Heat Dissipation System: The gold melting furnace features small ventilation holes for wax escape during lost-wax casting and a heat exhaust structure for quick cooling, extending the product's lifespan
- Wide Application: This electric furnace is ideal for lost-wax casting, metal clay DIY, pottery firing, metal tempering, and more. It is suitable for both professionals and home use, melting materials like car wax, 3D resin, PLA, and teeth
If the budget is tight, design a maintenance station without permanent plumbing at first: covered water containers, labeled settling buckets, a reclaim area, and a dedicated place to wash tools. If plumbing is added later, leave a practical wall location and utility path in the original plan.
Outdated Drivers Are Slowing You Down
One free scan finds every outdated or missing driver and matches the right update for your exact hardware.Free scan · exact hardware matchPC Slower Than It Used to Be?
A free scan shows the junk files, broken settings and background clutter dragging Windows down - then fixes them in one click.Free scan · Windows 10 & 11Build Storage Before You Think You Need It
Pottery supplies expand quickly. A studio that looks spacious on move-in day can feel crowded after the first clay order, glaze test batch, and holiday firing cycle.
Use full-height storage wherever possible. Put heavy clay boxes low, ideally under benches or on low shelves near the entry. Store glaze chemicals in labeled closed bins. Keep kiln furniture near the kiln, but outside clearance zones. Narrow drying racks are more useful than deep shelves because they let air move around pieces and reduce the chance of bumping greenware.
Plan for ware boards before choosing shelf depth. Common boards need enough room to slide in and out without tilting. In a small studio, one wall of 12- to 18-inch-deep shelving can be more valuable than a larger table in the middle of the room.
Control Weather, Moisture, and Comfort
A backyard studio has to survive weather before it can support good pottery work. Gutters, roof overhangs, positive drainage, and a covered entry are not decorative extras. Carrying greenware, kiln shelves, or clay boxes through rain is a real failure point.
Insulation and climate control depend on your region. In hot climates, a small mini-split may be the best way to control temperature and humidity. In cold climates, protect clay, glazes, plumbing, and electronics from freezing. In humid regions, include dehumidification or air conditioning so shelves, boxes, and tools do not stay damp.
Site drainage matters just as much as indoor comfort. Keep the finished floor elevation above surrounding grade, slope soil away from the structure, and avoid placing the studio where roof runoff or irrigation water collects. If the studio is on a slab, specify a proper vapor barrier and edge detailing. If it is on skids or piers, make sure the floor system is protected from ground moisture and pests.
Permits, Insurance, and Home-Business Questions
Many homeowners hear that small sheds under a certain size may be permit-exempt and assume a pottery studio is automatically the same. That can be a costly mistake. A storage shed and an occupied workshop with electrical service, HVAC, plumbing, or a kiln may be treated differently.
Before construction, ask your local building department about accessory-structure rules, electrical permits, mechanical permits for ventilation or HVAC, plumbing permits, setbacks, easements, lot coverage, height limits, and fire separation. Some jurisdictions have specific thresholds around 120 or 200 square feet, but the details vary. Electrical work almost always deserves permit review and inspection.
Free tools Windows power users keep installed
One-click scans. No signup required.
Also check HOA rules and insurance. If you sell pottery, teach classes, invite customers, or operate a home business from the studio, zoning, parking, liability, and insurance coverage may change. A detached studio with a kiln is exactly the kind of project where written answers are better than assumptions.
When to DIY and When to Hire a Pro
A capable homeowner can handle parts of a pottery studio build, especially interior layout, shelving, workbenches, painting, and some non-structural finish work. A prefab shell can also be a reasonable starting point if it is upgraded thoughtfully.
DIY is reasonable for assembling freestanding shelves, building ware racks, painting washable walls, setting up non-plumbed settling buckets, organizing clay storage, and installing simple worktables. It may also make sense for a basic shed shell if the homeowner has framing experience and the local code allows it.
Hire licensed pros for kiln electrical circuits, subpanels, panel upgrades, underground conduit, permanent HVAC, roof or wall penetrations for mechanical venting, structural slab work, and plumbing. The risk is not just poor workmanship. It is fire safety, insurance coverage, inspection failure, and expensive rework after the studio is finished.
A practical phased approach is to build the studio shell, install the right electrical pathway and subpanel capacity, finish the interior, and fire at a community studio until the kiln budget is ready. That way, the building is future-ready without forcing every equipment purchase on day one.
A Buildable Backyard Pottery Studio Checklist
Use this checklist before ordering materials or buying a kiln:
- Confirm setbacks, easements, accessory-structure size limits, and HOA restrictions.
- Choose a realistic footprint, usually 120 to 200 square feet for a kiln-equipped hobby studio.
- Select the kiln model early enough to verify voltage, amperage, receptacle, clearances, and venting.
- Have an electrician check panel capacity and the route to the detached studio.
- Reserve a noncombustible kiln bay with clear access and no nearby storage.
- Plan direct kiln venting outdoors plus make-up air or room ventilation.
- Use sealed, washable flooring and wall finishes that support wet cleanup.
- Keep clay dust under control with wet cleaning, closed storage, and no dry sweeping.
- Decide whether plumbing is worth the cost and permit complexity.
- Add gutters, overhangs, lighting, exterior access, and storage before the studio fills up.
The best backyard pottery studios are not the biggest or most expensive. They are the ones where the boring details were solved early: power, air, water, clearance, storage, and cleanup. Get those right, and the studio can be both beautiful and buildable.
Frequently Asked Questions
How much does it cost to build a backyard pottery studio in 2026?
A basic shed shell may cost about $1,875 to $8,250, while a finished backyard studio commonly runs $10,000 to $20,000. A fully conditioned pottery studio with electrical, ventilation, HVAC, plumbing, and higher-end finishes can reach $30,000 to $50,000 or more.
Can I put an electric kiln in a shed?
Yes, but only if the shed is designed for the kiln. You need the correct dedicated 220-240V circuit, manufacturer-required clearances, noncombustible surroundings, direct venting outdoors, room ventilation or make-up air, and local permit approval.
What size backyard pottery studio is best?
For one hobby potter without a kiln, 80 to 120 square feet can work. With a small kiln area, 120 to 200 square feet is more realistic. Studios over 200 square feet are more comfortable but may trigger additional permit requirements.
Do I need plumbing in a backyard pottery studio?
Plumbing is convenient but optional. If you add a sink, clay should not drain directly into household plumbing. Use a clay trap, settling bucket, or approved sediment interceptor, and expect plumbing permits and trenching costs in many locations.
What is the best flooring for a pottery studio?
Sealed concrete is one of the best choices because it is durable, washable, noncombustible, and kiln-friendly. Avoid carpet, rough unfinished plywood, and textured flooring that traps clay dust.
Quick wins for a faster PC:
Scan for outdated or missing drivers - takes under a minuteDriver Scan →Repair Windows errors before they cause bigger problemsFix Now →Fix the driver behind crashes, sound loss and screen glitchesFind Drivers →Do I need a permit for a backyard pottery studio?
Often, yes. Even if a small storage shed is exempt in your area, electrical service, plumbing, HVAC, mechanical venting, kiln use, setbacks, or home-business use can trigger permit requirements. Check with the local building department before construction.
Quick Recap
Product prices and availability are accurate as of the date/time indicated and are subject to change. Any price and availability information displayed on Amazon at the time of purchase will apply.