Recommended Free Tools
A tiny Brazilian tree frog recently caught attention because researchers observed it feeding inside flowers and leaving with pollen on its back. That is unusual enough to make homeowners ask a fair question: if a frog can help pollinate flowers in Brazil, what else are we missing in our own yards?
The practical answer is not to look for exotic frogs. Izecksohn’s Brazilian tree frog, Xenohyla truncata, is native to Brazil’s coastal Atlantic Forest and restinga habitats, not the United States. US homeowners should not buy it, release it, or try to attract it. The real lesson is bigger and more useful: pollination is a whole habitat system, not just a few honeybees visiting a flower bed.



As an Amazon Associate I earn from qualifying purchases.
On residential projects, we see the best results when pollinator planting is treated like site work: planned beds, clean edges, drainage, access, maintenance, water, soil preparation, and code compliance. A small 100- to 300-square-foot pollinator bed can support bees, butterflies, moths, beetles, flies, hummingbirds, and beneficial insects while still looking intentional from the street.
Free tools Windows power users keep installed
One-click scans. No signup required.
This guide explains what the frog discovery means, what it does not mean, and how to build a practical pollinator-supportive yard in the United States with real costs, dimensions, timelines, and contractor-level planning.
#1 Best Overall
What the Tree Frog Discovery Actually Means
The frog in the headlines is Xenohyla truncata, a small Brazilian tree frog known for an unusual diet that can include fruit, flower parts, and nectar. In a 2023 study, researchers described frogs entering flowers, feeding, and emerging with pollen grains attached to their backs. That makes the species a potential amphibian pollinator and an excellent reminder that pollination can involve more than bees, butterflies, and birds.
There is a careful distinction here. The frog is not a proven managed pollinator like honeybees in agriculture. The observation suggests that the frog may transfer pollen between flowers as it feeds, but homeowners should understand it as a fascinating wildlife discovery, not a landscaping prescription.
Not a US Garden Frog
Do not treat Xenohyla truncata as a North American garden species. It is from Brazil, and introducing non-native animals is unsafe, often illegal, and damaging to local ecosystems. In US landscapes, the correct move is to support native pollinator networks already adapted to your region.
Quick wins for a faster PC:
Scan for outdated or missing drivers - takes under a minuteDriver Scan →Repair Windows errors before they cause bigger problemsFix Now →Fix the driver behind crashes, sound loss and screen glitchesFind Drivers →That means native flowering perennials, grasses, sedges, shrubs, trees, clean water, nesting habitat, less pesticide exposure, and thoughtful maintenance. A healthy Midwestern, Southeastern, Western, or Northeastern pollinator garden will look different because local soils, rainfall, native plants, and insect life are different.
The Bigger Lesson: Habitat Diversity Beats Novelty
The frog story matters because it widens the homeowner’s view. Pollination is not a single-species service. Bees get most of the attention, but residential yards can also support moths at night, beetles on open flowers, flies on small clustered blooms, hummingbirds on tubular flowers, and caterpillars on host plants.
A sterile lawn with a few annual flowers in dyed mulch does not offer much. A layered planting with flowers from spring through fall, some stems left standing through winter, and a clean water source offers a lot more. The goal is not a wild-looking mess. The goal is a designed landscape that gives pollinators food, cover, and continuity while still meeting homeowner expectations for curb appeal.
On our job sites, the pollinator beds that hold up best usually have four things in common: a crisp border, plants installed in repeatable groups, enough mulch or groundcover to suppress weeds during establishment, and a maintenance plan that the homeowner can actually follow.
Start With a Code-Friendly Pilot Bed
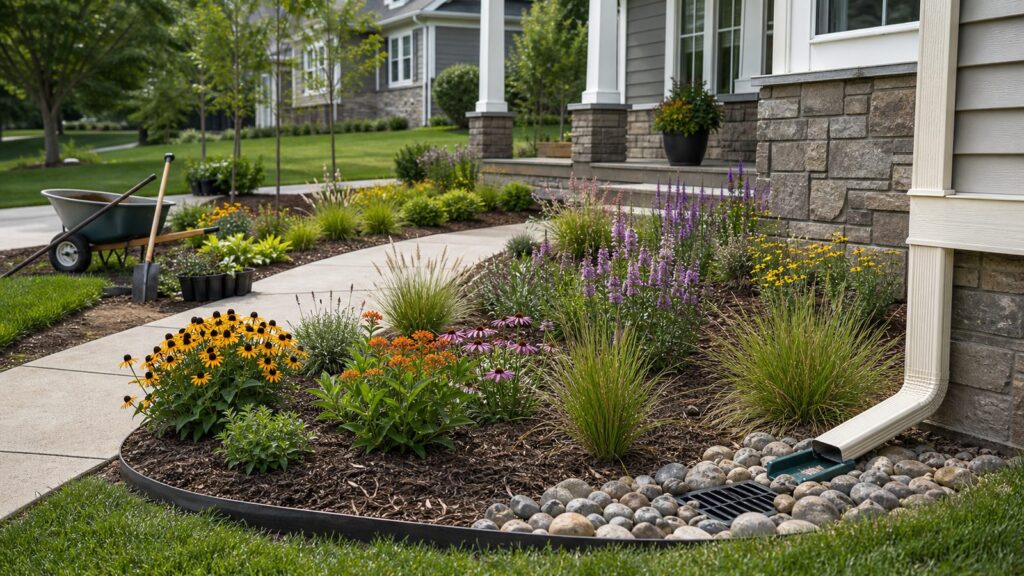
If you are converting lawn for the first time, start smaller than your ambition. A 100- to 300-square-foot bed is large enough to matter and small enough to manage. Good starter dimensions are 8 by 12 feet, 10 by 20 feet, or a 3- to 5-foot-deep strip along a fence, patio, driveway, or walkway.
Place the bed where it already has a visual boundary. Existing hardscape, a fence line, a retaining edge, a patio, or a foundation planting helps the new garden look intentional from day one. Avoid blocking sightlines at driveways and intersections. Keep mature plant heights in mind near sidewalks, utilities, HVAC equipment, meters, and windows.
Many cities still regulate tall vegetation. Some communities now distinguish maintained pollinator habitat from nuisance weeds, but the rules vary by city, county, and HOA. A good plan usually includes a mown strip along sidewalks or property lines, a defined edge, a plant list, and a maintenance schedule. Charlotte, North Carolina, for example, updated its ordinance on February 9, 2026, to exempt registered pollinator habitats and naturalistic landscapes. That is a positive trend, but it is not universal.
Basic Layout Dimensions
For a front-yard pollinator bed, we like a border that is easy to maintain: steel edging, stone, brick, concrete curb, or a 12- to 18-inch mown strip. For beds next to sidewalks, keep tall plants set back 18 to 36 inches so they do not flop into the walking path. If using shrubs, plan from mature width, not nursery size.
Do these 3 things before closing this tab:
1Fix the driver behind crashes, sound loss and screen glitches2Repair Windows errors before they cause bigger problems3Scan for outdated or missing drivers - takes under a minuteFor access, any bed deeper than 6 feet should have stepping stones, a narrow gravel path, or maintenance gaps. A 24-inch path is enough for hand work. A 36-inch path is more comfortable for wheelbarrow access. These small construction decisions save hours of maintenance later.
What to Plant: Build Layers, Not a Random Flower Mix
The best pollinator gardens are not one of everything. Pollinators find flowers more easily when plants are grouped in drifts. A practical minimum is three plants of each species, and five to seven is better where space allows. Repetition also looks cleaner from the curb.
Think in layers. A ground layer covers soil and reduces weed pressure. A flower layer provides nectar and pollen. Grasses and sedges add structure, seed, shelter, and winter form. Shrubs create height, early or late bloom, and bird habitat. Host plants support caterpillars, which become butterflies and moths and also feed birds.
Use local Extension recommendations, regional native plant society lists, and reputable native plant nurseries instead of a generic national plant list. A plant that thrives in a damp Ohio clay yard may fail in a dry Colorado front yard or a sandy Florida site. Match species to sun, soil, moisture, and your ecoregion.
A Practical Bloom Succession Target
Before buying plants, sketch bloom time on paper. Aim for at least three blooming species in spring, three in summer, and three in fall. That gives pollinators continuity and keeps the bed from looking empty after one short bloom window.
For a 150-square-foot sunny bed, a reasonable first layout might include 9 to 12 flowering perennial groups, 2 to 3 grass or sedge groups, and one compact native shrub if space allows. Use taller plants toward the back or center, depending on whether the bed is viewed from one side or all sides.
Costs in 2026: Seed, Plugs, Potted Plants, and Installed Beds
Pollinator garden pricing varies because the plants are only part of the work. Site prep, turf removal, grading, edging, mulch, irrigation changes, drainage correction, and first-season maintenance can cost more than the plants themselves.
National 2026 landscaping benchmarks commonly fall around $4.50 to $12 per square foot for typical landscaping work, with complex tear-outs and remodels reaching about $40 per square foot. Basic softscaping is often listed around $4 to $6 per square foot, with general landscaping labor around $51 per hour nationally. Licensed local contractors may price higher depending on region, access, insurance, crew size, soil disposal, and scope.
The Tool Desk
Outbyte Driver Updater FREEScan for outdated or missing drivers - takes under a minuteDriver Scan →Outbyte PC Repair FREERepair Windows errors before they cause bigger problemsFix Now →| Approach | Typical 2026 Cost | Best For | Tradeoff |
|---|---|---|---|
| Native seed mix | About $0.01-$0.11 per sq. ft. for seed only | Large meadow-style areas, patient homeowners | Slow establishment; more weed management; less layout control |
| Plug-heavy native planting | About $3-$4 per sq. ft. for larger plant budgets over roughly 350 sq. ft. | Medium beds where faster coverage matters | More upfront cost than seed; still needs careful watering |
| Potted native plants | About $2-$10 per sq. ft. for plants and mulch, depending on density | Front yards, HOA-sensitive areas, controlled design | Higher material cost; better immediate structure |
| Professionally installed pollinator bed | Roughly $5-$20 per sq. ft. for many residential design-build beds | Homeowners who want grading, edging, layout, and establishment done correctly | Complex drainage, soil disposal, irrigation, or hardscape can exceed this range |
| Rain garden and pollinator hybrid | About $4-$35 per sq. ft. | Downspout discharge, soggy lawn areas, runoff control | Requires correct sizing, soil testing, overflow planning, and sometimes permits |
For a 10-by-20-foot bed, a seed-only material purchase may look cheap, but it does not include turf removal, soil prep, irrigation, erosion control, mulch, labor, or two seasons of weed control. A planted front-yard bed with edging and plugs or quarts is more expensive, but it usually looks more intentional and establishes faster.
As a working budget, many homeowners should expect a professionally installed 200-square-foot pollinator bed to land around $1,000 to $4,000 for straightforward work. If the same area needs drainage correction, a retaining edge, imported soil, downspout routing, irrigation modifications, or a decorative path, the project can move above that range quickly.
Site Prep Matters More Than Most Plant Lists
Most failed pollinator beds do not fail because the homeowner chose one wrong flower. They fail because the site was not prepared, the watering was irregular, or weeds won during the first season.
Rank #3

- Insects, Pollinators, Landscape Design
For lawn conversion, turf removal needs a plan. Sod cutting gives quick results but creates soil disposal. Sheet mulching can work, but it needs enough time and proper layering. Herbicide use is a personal and site-specific decision; if used, it must follow the label exactly and should never be treated casually around pollinator areas, drainage paths, or edible gardens.
Windows Errors? Fix Them Before They Spread
Repair common Windows errors and clear accumulated junk for a smoother, more stable PC - no reinstall needed.Free scan · no reinstallCrashes, No Sound, or Screen Glitches?
Random freezes, missing sound and display glitches usually trace back to one bad driver. Find and replace yours safely.Free scan · under a minuteFor a clean installation, we typically want soil loosened where compaction is severe, but not over-amended into a rich, floppy bed unless the plant palette requires it. Many native perennials prefer leaner soil once established. Drainage should be observed before planting. If water stands for more than 24 to 48 hours after a normal rain, the bed may need grading, soil correction, underdrain work, or rain garden design instead of a standard perennial layout.
Watering During Establishment
New native plants still need water. Drought-tolerant after establishment does not mean drought-proof the week after planting. For plugs and quart-size plants, expect regular watering through the first growing season. In hot weather, that may mean checking soil moisture two to three times per week and watering deeply when the root zone is dry.
Deep watering is better than daily misting. The target is to wet the root zone, then allow the soil to breathe. By the second season, watering should taper unless there is drought or the planting includes moisture-loving species.
Pesticides Can Undermine the Whole Project
Pesticide exposure is one of the biggest homeowner blind spots in pollinator landscaping. A garden can have the right plants and still become harmful if flowers are sprayed while pollinators are active or if nursery plants were treated with systemic insecticides.
Ask nurseries directly whether plants were treated with neonicotinoids or other systemic insecticides. If staff cannot answer, keep looking or buy from a native plant nursery with transparent growing practices. Systemic products can move into plant tissues, including nectar and pollen, which defeats the purpose of building pollinator habitat.
At home, avoid spraying flowers directly. Do not spray when bees and other pollinators are active. Read environmental hazard language on every label. Use integrated pest management: identify the pest, decide whether damage is actually serious, use cultural controls first, and reserve chemical treatment for specific, justified cases.
On construction and remodeling projects, also watch for overspray from adjacent lawn treatments. If a pollinator bed sits next to a conventional turf program, coordinate application timing and buffers. A 2- to 3-foot untreated strip can help, but drift and runoff still need attention.
Drainage, Rain Gardens, and Where a Contractor Adds Value
Pollinator gardens are often placed where the lawn already struggles. That can be smart, but wet spots and runoff paths need proper design. A rain garden is not just a low area filled with flowers. It is a shallow, planted basin designed to capture and infiltrate stormwater without sending water toward the foundation, sidewalk, driveway, or neighboring property.
What’s actually slowing this PC down?
Pick the symptom - the matching free tool is one click away.
As a rule of thumb, keep rain gardens at least 10 feet from the house foundation unless a qualified designer confirms conditions are appropriate. Do not place one over a septic field, near underground utilities without marking, or where infiltration could affect a retaining wall. Call 811 before digging.
For downspout routing, the outlet needs stable conveyance: solid pipe where appropriate, a splash block, stone apron, or swale that prevents erosion. The garden needs an overflow path for large storms. Without overflow planning, a well-intended rain garden can become a pond against a walkway or a washout across the lawn.
This is where a construction-minded landscape plan pays for itself. Grading, hardscape edges, permeable paths, retaining borders, drain lines, and soil disposal are not decorative details. They determine whether the garden survives and whether the property still drains correctly after the work is done.
HOA, Municipal, and Permit Notes
Before removing a visible front-yard lawn, check your city code and HOA documents. Some HOAs require plant height limits, setbacks, a maintained border, approved plant lists, or a landscape plan. Some municipalities require naturalization permits or registration for taller native plantings. Others allow pollinator habitats but still enforce sightline, nuisance, drainage, and sidewalk clearance rules.
A strong HOA submittal usually includes the bed location, dimensions, mature plant heights, plant list, edging material, maintenance schedule, and photos or renderings showing the finished look. If rebates are available for turf replacement, native planting, or stormwater work, check the rules before starting. Many rebate programs require pre-approval before turf removal or installation.
Keep documentation practical. A one-page plan for a 200-square-foot bed is often enough: a simple sketch, species list, spacing, edge detail, and maintenance notes. For a drainage project or rain garden, include downspout routing, basin depth, overflow direction, and soil assumptions.
Independent reader supportYour contribution helps us test, update, and keep practical guides available for everyone.When to DIY vs. When to Hire a Pro
A homeowner with basic tools can build a small pollinator bed. DIY makes sense when the site is flat, drainage is already good, the bed is under 200 square feet, access is easy, and the work is limited to turf removal, planting, mulch, and watering.
Plan on a full weekend for a 100-square-foot DIY bed if you are removing sod, setting edging, planting plugs or quarts, and mulching. A 200- to 300-square-foot bed can take several weekends, especially if you are working around weather and disposal. Budget for a shovel, wheelbarrow, hose, nozzle, edging, compost only if needed, mulch, and plants. The cheapest seed mix is not always the cheapest finished project if it requires two seasons of weed rescue.
Hire a pro when the project affects drainage, grading, hardscape, irrigation, slopes, retaining walls, downspouts, utility areas, or public-facing curb appeal. Also hire help if the HOA requires drawings, if the bed is over 300 square feet, if soil disposal is substantial, or if you want a rain garden sized and built correctly.
A professional crew can usually complete a straightforward 200-square-foot planted bed in one to three working days after design and material procurement. More complex projects with grading, drainage, hardscape edges, or irrigation changes may take one to two weeks depending on scope and inspections.
Maintenance: What Happens After Planting
A pollinator garden is lower input than a high-maintenance annual bed, but it is not no-maintenance. The first year is about watering and weed control. The second year is about filling gaps and shaping the plant community. The third year is when many native beds begin to look settled.
During year one, inspect weekly during the growing season. Pull weeds before they seed. Water deeply during dry spells. Replace failures quickly if they leave bare soil. Keep mulch at 2 to 3 inches around new plants, but do not bury crowns or pile mulch against stems.
In fall, avoid stripping the bed bare. Many beneficial insects overwinter in stems, leaf litter, and soil. Leave some stems and leaves through winter, then cut back selectively in spring. If the front yard needs a tidier winter face, cut only the most visible flopped material and leave interior stems standing until spring temperatures are consistently mild.
Best Value
Every spring, refresh edges, remove aggressive weeds, divide overcrowded perennials where needed, and check that plants are not blocking sidewalks, vents, signs, meters, or sightlines. A tidy edge is often the difference between a pollinator garden that neighbors accept and one that triggers complaints.
The Bottom Line for Homeowners
The Brazilian tree frog story is worth paying attention to because it reminds us that pollination is broader and more surprising than most people realize. But the homeowner takeaway is local and practical: support the pollinators that belong where you live.
Start with a manageable bed. Use native plants selected for your region. Group plants in drifts. Plan bloom from spring through fall. Avoid pesticide-treated nursery stock. Provide water and overwintering habitat. Keep the edges clean and the plan code-compliant.
What’s actually slowing this PC down?
Pick the symptom - the matching free tool is one click away.
For many homes, the sweet spot is a 100- to 300-square-foot pilot bed tied into an existing walkway, patio, fence, foundation planting, or drainage improvement. Done well, it is not just a wildlife gesture. It is a durable landscape upgrade that can improve curb appeal, reduce weak lawn areas, manage runoff, and make the yard more alive without looking neglected.
Frequently Asked Questions
Is the Brazilian tree frog a pollinator in US gardens?
No. Izecksohn’s Brazilian tree frog, Xenohyla truncata, is native to Brazil, not the United States. US homeowners should not buy, release, or try to attract it. The useful lesson is to support local pollinators with native plants and habitat.
How small can a pollinator garden be?
A pollinator garden can be as small as balcony containers, but for a yard, a 100- to 300-square-foot pilot bed is a practical starting size. Common layouts include 8 by 12 feet, 10 by 20 feet, or a 3- to 5-foot-deep strip along a fence or walkway.
How much does a pollinator garden cost in 2026?
Seed-only materials can be under $0.11 per square foot, while potted native plants often run about $2-$10 per square foot before full installation costs. A professionally installed residential pollinator bed commonly falls around $5-$20 per square foot, with drainage or hardscape work costing more.
The Tool Desk
Outbyte Driver Updater FREEFix the driver behind crashes, sound loss and screen glitchesFind Drivers →Outbyte PC Repair FREERepair Windows errors before they cause bigger problemsFix Now →Are pollinator gardens allowed in HOAs?
Sometimes, but rules vary. Many HOAs require a landscape plan, defined edging, setbacks, height limits, or maintenance standards. Submit a plant list, bed dimensions, mature heights, edging detail, and maintenance schedule before removing visible front-yard turf.
Should I use pesticides in a pollinator garden?
Avoid spraying flowers directly and do not spray while pollinators are active. Ask nurseries whether plants were treated with neonicotinoids or other systemic insecticides. Use pest identification and cultural controls before considering any chemical treatment.
When should I hire a contractor for a pollinator garden?
Hire a pro when the work involves grading, drainage, downspout routing, irrigation changes, slopes, retaining edges, public-facing curb appeal, or beds larger than about 300 square feet. DIY is more reasonable for small, flat beds with good drainage.
Quick Recap
Product prices and availability are accurate as of the date/time indicated and are subject to change. Any price and availability information displayed on Amazon at the time of purchase will apply.
Quick wins for a faster PC:
Scan for outdated or missing drivers - takes under a minuteDriver Scan →Clear out junk files and repair common Windows errorsFree Scan →
