To add or replace a table saw wing, follow the instructions for your exact saw model: support the wing, start its specified fasteners loosely, align its front edge with the main table, and adjust the adjoining tops until they are flush. Tighten the fasteners in stages as alignment is achieved. Mounting hardware and leveling methods vary, so do not assume that instructions for one saw apply to another.
Before you install a wing
Find the owner’s manual for the exact saw model and identify where the wing attaches. For example, the Powermatic Model 2000 manual describes cast-iron wings bolted to the sides of the table. The Delta 36-5000 T2 / 36-5100 T2 manual covers named configurations that can attach wings to the table or to rails. Those are different assemblies, not interchangeable instructions.
- Check that the wing is specified for your saw and that its mounting holes and attachment points match.
- Confirm whether it attaches to the tabletop or fence rails, and whether its manual specifies a leveling adjustment.
- Gather the hardware and tools called for in the relevant instructions. A straightedge, rubber mallet or hammer with a wood block, and clamps are used in the cited alignment guidance.
Install and level the wing
Support it and start the fasteners loosely
Hold the wing in position while starting the specified fasteners; do not tighten them fully before alignment. For the Powermatic Model 2000, the manual recommends having an assistant hold the wing while the fasteners are finger-tightened. It also describes an alternative: hang the wing from the center fastener, then pivot it level. Use that approach only if your saw’s manual allows it.
Align the front edge and adjoining tops
Match the wing’s front edge to the front edge of the main table, then check the seam and tabletop with a straightedge. The target is an aligned front edge and adjoining surfaces that are flush—not merely a securely attached wing. WOOD Magazine’s guidance also describes clamping straight boards to the wing and tabletop, tapping the wing laterally with a rubber mallet until the mounting holes align, and clamping across the seam while tightening. Treat this as alignment guidance; the saw manual governs the actual mounting procedure. WOOD Magazine’s wing-installation guide
#1 Best Overall

- Space-saving table saw router extension: Replaces a table saw extension wing to add a dedicated routing surface beside the saw, helping integrate routing into the existing table-saw footprint instead of requiring a separate router table. Check your saw’s mounting-hole pattern before ordering, as fit varies by model
- 1-1/2 in thick, 50+ lb cast-iron work surface: The substantial cast-iron top provides a solid routing surface, while its machined, smooth-finished face gives stock a consistent working area as it moves across the table. Its weight also means two-person handling is recommended during installation
- Insert plate fit and mounting: The recess measures 11-3/4 x 9-1/4 in with 3/4 in radius corners and accepts plates up to 3/8 in thick. Compatible with the O’SKOOL router series, including the 3.5/4.2 Router Lift Systems. Recess size alone does not confirm mounting fit for other lifts or plates, so check securing-hole placement before ordering
- Fence, miter and fixture compatibility: Fence mounting slots are 21 in apart; the O’SKOOL 32 in Router Table Fence fits, while the 24 in Fence does not. For other fences, check mounting spacing and bolt-head fit. A 3/4 x 3/8 in miter slot and separate fixture slot support compatible routing accessories
- Installation, hardware & support: Mounting and plate-leveling hardware is included, while some table saw setups may require original fasteners, drilling, or shimming. After installation, check balance and stability and add support legs if the extension-wing setup is not adequately supported
Adjust and tighten a little at a time
Use the leveling method specified for your model. On the Powermatic Model 2000, the manual describes checking across the width with a straightedge and tapping with a hammer and wood block or a rubber hammer. Once an area is flush, tighten the screw beneath that area, then continue across the wing. The Delta 36-5100 T2 manual identifies set screws for leveling its cast-iron wings. Do not assume that adjustment hardware is present on other saws.
Keep extension tables separate from wing installation
An extension table may be a separate assembly with different support and leveling requirements. Some attach only to fence rails; WOOD Magazine advises installing the rails first in those cases. Its guide also describes leveling a table with adjustable feet. Check the instructions for both the saw and the extension table to determine attachment points and the correct leveling procedure. WOOD Magazine’s extension-table guidance
Rank #2
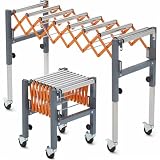
- Expandable Roller Conveyor: This expandable roller conveyor features portable conveyor rollers that extend from 14 to 50 inches long with an adjustable height from 23 to 36 inches, making it a perfect table saw stand and outfeed roller for any workshop setup.
- Heavy Duty Table Saw Outfeed Table: This heavy duty table saw outfeed table supports up to 300 pounds and features fourteen wide conveyor rollers that ensure smooth material flow, making it an ideal roller stand for woodworking projects and material handling.
- Adjustable Roller Stand with Individual Legs: Each leg adjusts independently to level the stand on uneven surfaces, while the roller stand adjustable length feature accommodates various applications
- Connectable Outfeed Roller Stand System: Built‑in hooks connect multiple roller stands together to create custom length conveyor systems, while locking swivel casters provide both mobility and stability.
- Versatile Outfeed Table Solution: The frame flexes to accommodate slight angles, while smooth rolling action on all conveyor rollers and Bora roller stand quality ensure reliable performance for demanding workshop tasks.
Hardware examples are specific to their models
The manuals illustrate why hardware should be verified rather than generalized. The undated Powermatic Model 2000 manual specifies three 3/8-16 x 1-inch hex-head screws per wing. The Delta Machinery manual, revision 19 (2022), identifies four 5/16-18 set screws for 36-5100 T2 cast-iron wings, two per wing. These quantities and sizes apply to those named configurations only; consult your own manual before buying hardware or drilling.
Independent reader supportYour contribution helps us test, update, and keep practical guides available for everyone.Safety and what alignment does—and does not—establish
The cited installation instructions focus on assembly and alignment, not a complete safety procedure. Follow the saw manufacturer’s full instructions and safety guidance before working around the machine. A flush wing provides an aligned support surface, but the cited material does not establish that adding a wing improves cut accuracy or makes an otherwise unsupported workpiece safe.
Do these 3 things before closing this tab:
1Scan for outdated or missing drivers - takes under a minute2Repair Windows errors before they cause bigger problems3Fix the driver behind crashes, sound loss and screen glitchesQuick Recap
Best Value

- UNPARALLELED PRECISION - Achieve unparalleled routing precision with this table saw extension wing, crafted from 1½” thick premium cast iron to eliminate vibration and provide a stable, professional-grade work surface for flawless results.
- MAXIMIZE YOUR WORKSPACE - This space-saving table saw extension mounts easily to most standard table saws, expanding your capabilities in compact workshops without increasing your footprint. Maximize your workspace without sacrificing functionality!
- CONVENIENT LIFT-OUT INSERT - Enjoy effortless router changes and maintenance with the convenient lift-out insert included with our table top router extension. Designed for quick adjustments and enhanced setup flexibility, you spend less time tinkering and more time creating.
- PRE-DRILLED MOUNTING HOLES - Get routing right away with easy, hassle-free installation thanks to pre-drilled mounting holes. The integrated ¾” x ⅜” miter T-slot and a universal slot accommodates jigs and fixtures for ultimate versatility on this cast iron table saw router extension wing.
- PRECISION-MACHINED QUALITY - Built to last, this heavy-duty cast iron router table top is precision-machined to exacting standards, ensuring long-term durability and professional-level performance that stands up to even the most demanding routing tasks.
Rank #4

- WOOD PLATFORM AND SAW ARE NOT INCLUDED: The kit includes the following parts;
- 2ea. 24" Sections of T-Track $25.95 value
- 2ea. 11" Table Brackets $12.99 value
- 1ea. 32" Miter Track $12.99 value & 4 ea. Star Knobs and Bolts $6.00 value
- 1ea. Extension Table Plan $8.99 value
Rank #3

- Precision ground to .0118”
- Aligns perfectly with table, rails and extension table
- 40 more pounds means added stability and reduced vibration
Product prices and availability are accurate as of the date/time indicated and are subject to change. Any price and availability information displayed on Amazon at the time of purchase will apply.