Quick wins for a faster PC:
Scan for outdated or missing drivers - takes under a minuteDriver Scan →Clear out junk files and repair common Windows errorsFree Scan →Fix the driver behind crashes, sound loss and screen glitchesFind Drivers →Some links on this page are affiliate links: if you buy through them we may earn a commission, at no extra cost to you.
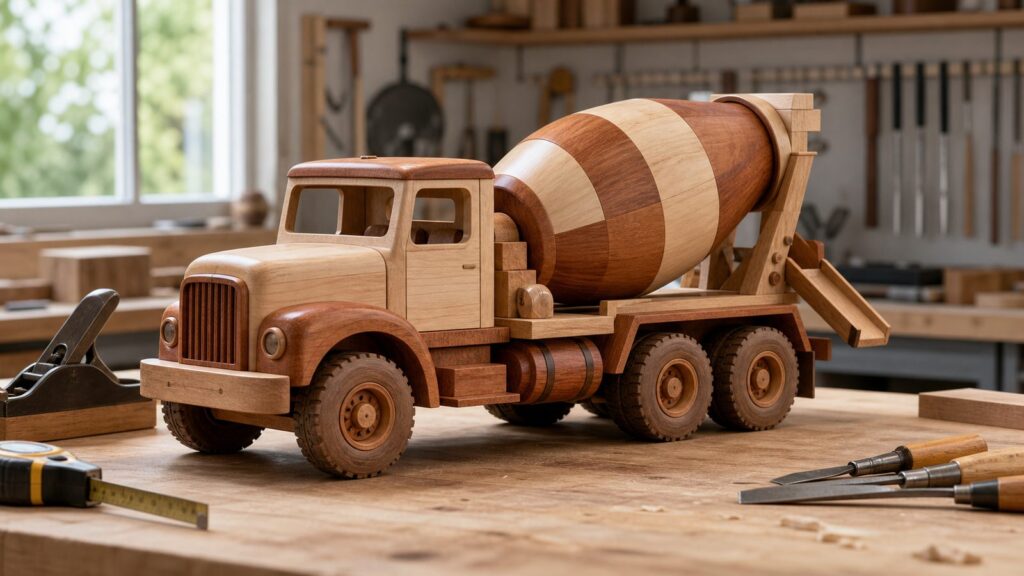
A construction-grade concrete truck woodworking plan should be treated as a wooden toy or model project, not as a shortcut to building a real concrete truck or a backyard structure without planning. For most builders, the practical project is an 18-inch to 20-inch wooden cement mixer truck with a cab, frame rails, wheels, rotating drum, rear chute, fenders, bumper, and chunky job-site details that can survive handling.
The best version depends on who will use it. A shelf model can prioritize detail. A child’s toy needs rounded edges, captured parts, non-toxic finish, and oversized components. A ride-on or outdoor truck becomes a construction project with drainage, anchorage, fall zones, exterior materials, and possible permit review.
As an Amazon Associate I earn from qualifying purchases.
What’s actually slowing this PC down?
Pick the symptom - the matching free tool is one click away.
On our job sites, the same rule applies whether we are framing a wall or building a toy for a client’s child: decide the use case before you choose the material. A beautiful plan built from the wrong stock, with undersized parts or loose axle pegs, will fail quickly. A simple plan built square, sanded properly, and assembled with mechanical common sense can last for years.
Start With the Right Build Level
Before buying hardwood or downloading a plan, choose the build level. Most mistakes happen because people mix the expectations of a display model, a playable toy, and an outdoor play structure.
Popular on Amazon

- Officially licensed by Caterpillar
- Diecast metal construction with detailed plastic components
- Authentic CAT CT660 concrete mixer design with rotating mixer drum
- Micro-scale size: approx. 5" (L) × 4" (H) × 3" (W)
- Display-ready with clear protective cover and interlocking base; suitable for collectors and ages 6+
| Build Level | Typical Size | Primary Goal | 2026 Material Cost | Key Risk |
|---|---|---|---|---|
| Display model | 12 to 20 inches long | Looks accurate on a shelf | $25 to $60 if using scrap hardwood | Fragile details breaking off |
| Playable hardwood toy | 16 to 22 inches long | Safe handling and rolling durability | $60 to $150 | Small parts, wobbling axles, tipping |
| Premium heirloom toy | 18 to 24 inches long | Long-term durability and finish quality | $150 to $350+ | Overbuilding the drum or adding delicate hardware |
| Oversized ride-on or outdoor version | 3 to 8 feet long | Play feature or yard display | $300 to $2,500+ before labor | Code, anchorage, weather, fall safety |
A downloadable woodworking plan for a cement or straight truck commonly sells in the $10.95 to $22.95 range. Some retailers sell wheel and axle kits separately. That can be worthwhile if you want predictable wheel diameter and axle fit, but purchased parts still need to be evaluated for age appropriateness and strength.
For a child-use toy, keep the design stout. A wider wheelbase than the cab, low drum height, and rounded fenders make the truck harder to tip. The chute, ladder, mirrors, caps, and handles should either be large enough that they are not small-part hazards or permanently captured so they cannot pull loose.
What a Real Concrete Mixer Truck Should Teach Your Toy Design
A good wooden concrete truck does not need dozens of fragile details. It needs the right major forms in the right places. A real ready-mix truck has a cab at the front, frame rails below, a rear-mounted mixing drum, rear support structure, discharge chute, service platform, fenders, bumper, and heavy-duty wheels. Those are the visual cues that make the toy read correctly.
For a tabletop model, an overall length around 18 1/2 inches works well. That size is large enough for a rotating drum and sturdy axle layout, but small enough to build from common shop stock. A typical proportion would be a cab about 5 to 6 inches long, a drum section about 8 to 10 inches long, and a rear chute assembly about 2 to 4 inches past the drum support.
Do not copy every real truck part at miniature scale. Thin mirrors, narrow ladders, tiny knobs, and little chute chains look good for one photo and then snap off. For play, reduce those details into thicker shapes. Use a broad rear chute, blocky fenders, a strong front bumper, and a service platform that is glued with long-grain contact or reinforced with dowels.
2026 Cost Guide for Materials and Tools
In 2026, material cost is not just about board feet. Hardwood species, regional supply, shipping, tariffs and duties on Canadian softwood, seasonal demand, and specialty toy hardware all change the final price. National lumber context also matters: the U.S. lumber producer price index was reported at 280.114 in June 2026, lumber was around $615 per 1,000 board feet on July 31, 2026, and framing lumber prices were reported up 1.4% week over week as of July 24, 2026, while roughly flat year over year.
For this project, hardwood costs matter more than framing lumber prices, but those numbers explain why plywood, dowels, and specialty stock can vary from one month to the next. A builder using scraps from a cabinet shop may spend under $60. A first-time builder buying tools can easily spend $300 to $1,500 before the first wheel rolls.
Small Display Model Budget
Expect $25 to $60 if you already own basic tools. The main costs are the plan, hardwood dowels, glue, sandpaper, finish, and any purchased wheels or axle pegs. Scrap maple, poplar, birch, cherry, or beech is usually enough.
Playable Hardwood Toy Budget
Expect $60 to $150 for a durable child-safe build. Use better stock, avoid splinter-prone offcuts, buy quality axle pegs or make accurate dowel axles, and choose a finish labeled appropriate for toys or food-contact use after full cure. If the mixer drum is turned from a glued blank, add cost for adhesive, clamps, waste, and possibly lathe access.
Premium Heirloom Budget
Expect $150 to $350 or more. This includes maple, cherry, walnut accents, brass or stainless hardware where appropriate, custom wheels, high-end finish, templates, jigs, and replacement abrasives. The money should go into structure and finish quality, not tiny decorative parts that create weak points.
Outdoor or Ride-On Budget
Expect $300 to $2,500 or more before labor. The cost comes from exterior-rated plywood, pressure-treated or naturally decay-resistant lumber, stainless or hot-dipped galvanized fasteners, coatings, surfacing, anchoring, drainage, and possible design or inspection help. At that scale, you are no longer just woodworking. You are building a site element.
Also popular on Amazon

- FULLY-FUNCTIONAL CEMENT TRUCK: Incredibly detailed, cab doors that open and close. Realistic mixer that spins in 2 directions and rear funnel to pour contents. Simulation plastic stone and shovel are included.
- STURDY CONSTRUCTION: Built with sturdy metal and plastic, as well as realistic details. METAL CAB, superior plastic body and chassis, real rubber tires. Perfect Size: 11 (L) 3.0 (W) 5.2 (H) inches approximately.
- REALISTIC LIGHTS & SOUNDS: Friction powered construction truck toy featuring lights & sounds and rumbles when you press the body. BIBI sound effects when press the steering wheel. 3 LR44 batteries (Included).
- SIMULATED WORKING: Construction vehicles with a realistic mixer that spins in 2 directions and rear funnel to pour contents. Cement mixer spins one way to mix and the other to pour. Operate the button to spin mixer and pour contents out.
- PERFECT GIFTS FOR KIDS: Encourage creativity and learning through imaginative play while building cognitive recognition and hand eye coordination. Great cement mixer toy for 3+ Year Old Boys. Perfect for both indoor and outdoor and play and helps reduce screen time.
Best Wood and Hardware Choices
For a child’s wooden concrete truck, use hardwood where parts take abuse. Maple, birch, beech, poplar, and cherry are good choices. Maple and beech are excellent for wheels and axles because they resist denting. Poplar is affordable and easy to machine for cab blocks and non-wear parts. Cherry machines beautifully and makes a premium gift, but it costs more and darkens over time.
Baltic birch plywood or cabinet-grade plywood can work for frame rails, templates, layered drum discs, and hidden structural parts. Avoid cheap plywood with voids, because exposed edges can chip and the layers may fail under play. Avoid wet, twisted, pressure-treated, or splintery construction lumber for indoor toys. Treated lumber does not belong in a child’s mouth or hands as a toy material.
Use hardwood dowels or proper axle pegs. For a truck around 18 inches long, 1/4-inch axles may work for a display model, but 5/16-inch or 3/8-inch hardwood dowels are stronger for play. Wheels should be thick enough to resist splitting, usually 3/4 inch to 1 inch thick for a medium toy. If you make wheels in the shop, drill the axle hole before cutting the final wheel profile whenever possible so the hole stays centered.
The Tool Desk
Outbyte PC Repair FREEClear out junk files and repair common Windows errorsFree Scan →Outbyte Driver Updater FREEFix the driver behind crashes, sound loss and screen glitchesFind Drivers →For glue, a high-quality wood glue is fine for indoor toys when used on clean, bare wood. Do not pre-finish glue surfaces. For outdoor builds, use exterior-rated adhesives and fasteners, but remember that glue alone is not a substitute for mechanical fastening in a ride-on or fixed play structure.
Tools, Jigs, and the No-Lathe Drum Option
A basic build can be done with a bandsaw or scroll saw, drill press, clamps, router or roundover bit, sander, and common layout tools. A lathe helps with the mixer drum, but it is not mandatory. The lathe is often the biggest optional cost in a first build, especially once turning tools, sharpening, and dust control are included.
The most important tool setup is the axle drilling jig. Use a drill press fence and stop block for all axle holes. On our work, repeated holes get a stop, a reference face, and a test piece before the finished part goes under the bit. That one habit prevents most toy trucks from wobbling, binding, or sitting with one wheel off the bench.
Turned Drum Method
For a traditional solid-wood mixer drum, glue up a blank, mount it safely, turn the basic barrel profile, and sand through progressive grits. Keep the drum lighter than it looks. A drum that is too heavy or mounted too high can make the truck tip during play.
No-Lathe Drum Method
If you do not own a lathe, stack plywood or hardwood discs on a dowel mandrel. Cut the discs slightly oversized, glue them in sequence, clamp square, and sand the assembly to shape while rotating it carefully by hand or with a controlled jig. Another option is a straight-truck variation using a rectangular rear body instead of a rotating mixer drum. That is less iconic, but it is easier and safer for a first build.
Recommended Dimensions for a Durable Toy Truck
For a practical playable truck, start around 18 to 20 inches long, 6 to 7 inches wide, and 7 to 9 inches tall. Keep the wheelbase wider than the cab. A cab around 5 inches wide on a 6 1/2-inch overall wheel width gives better stability. Wheels around 2 1/2 to 3 1/2 inches in diameter look right and roll over carpet better than small wheels.
The frame rails should run as continuous pieces where possible. A pair of 3/4-inch-thick hardwood rails, spaced consistently and tied together with crossmembers, gives the truck a real chassis instead of a stack of decorative blocks. The cab can be a shaped block or built-up assembly, but all exposed edges should be rounded over.
The mixer drum should sit between rear supports with enough clearance to rotate without scraping. Leave at least 1/16 inch to 1/8 inch of clearance at each side after finish. Wood moves, finish adds thickness, and children will push sideways on the drum. A tight showroom fit often becomes a stuck drum after the first humid week.
Do these 3 things before closing this tab:
1Scan for outdated or missing drivers - takes under a minute2Clear out junk files and repair common Windows errors3Fix the driver behind crashes, sound loss and screen glitchesAlso popular on Amazon

- Construction Truck Play: DRIVEN by Battat Cement Mixer Truck is a 7-inch toy cement truck with realistic details, working headlights, engine and horn sounds, and movable parts for hands-on construction play and building-site stories.
- Working Mixer Action: Turn the crank to spin the cement mixer in 2 directions, one way to mix and the other way to pour. The movable rear funnel helps kids empty the contents and act out concrete delivery, road work, and building scenes.
- Interactive Opening Parts: This micro construction vehicle gives kids more to explore with doors that open and close and a hood that lifts to reveal the engine, adding extra hands-on action beyond simple push-and-roll truck play.
- Lights And Sounds Fun: Working headlights, engine sounds, and horn sounds make this toy truck feel more lifelike during pretend play. 3 x AG13 batteries are required and included for the light and sound features.
- Gift For Kids: A fun birthday gift or holiday gift for girls and boys who enjoy toy trucks and construction vehicles. Recommended for kids 3 years +.
The rear chute should be angled and secured. For a display model, a separate chute can look sharp. For a toy, make it thick, wide, and strongly attached. A 3/8-inch-thick chute is more realistic for play than a thin strip that snaps off. If it protrudes beyond the truck, round both ends and test it under twisting force.
Step-by-Step Build Sequence
Start by reading the plan all the way through and marking parts by material thickness. Group the work by setup, not by page order. Cut all matching wheel blanks together, drill all axle holes in one setup, and sand small parts before they become hard to hold.
1. Prepare the Stock
Mill boards flat, square, and dry. For toy parts, use stable stock around 6% to 10% moisture content if possible. Reject pieces with checks, loose knots, severe grain runout, or splintery edges. Construction offcuts are fine only when they are dry, clean, untreated, and dimensionally stable.
2. Make Templates and Rough Cuts
Use paper or hardboard templates for the cab, fenders, drum supports, and frame parts. Rough cut outside the line, then sand or route to final shape. Keep left and right parts paired so the truck stays symmetrical.
Crashes, No Sound, or Screen Glitches?
Random freezes, missing sound and display glitches usually trace back to one bad driver. Find and replace yours safely.Free scan · under a minutePC Slower Than It Used to Be?
A free scan shows the junk files, broken settings and background clutter dragging Windows down - then fixes them in one click.Free scan · Windows 10 & 113. Drill Axle and Drum Holes
Set up the drill press with a fence and stop block. Drill test holes in scrap from the same stock. Axle holes must be parallel and square to the truck centerline. If they are off by even 1/16 inch across the width, the truck may crab sideways or bind.
4. Shape Wheels and Round Edges
Round wheel edges, cab edges, fenders, bumper corners, and chute ends. For a child’s toy, there should be no sharp arrises. Sand progressively from 120 to 180 to 220 grit. For handled parts, going to 320 grit can improve the feel, but do not polish glue surfaces.
5. Build the Drum
Turn the drum or build it from stacked discs. Keep the center hole accurate. If the drum rotates on a dowel, wax the bearing surface lightly after finish cure, or use a clean hardwood-on-hardwood fit with enough clearance. Do not rely on a loose press-fit cap that can be pulled off by a child.
6. Dry Fit the Chassis
Assemble the frame rails, crossmembers, cab, drum supports, axles, and wheels without glue. Check that all wheels touch the bench, the drum clears its supports, and the chute does not make the truck rear-heavy. Fix alignment now, not after glue-up.
7. Pre-Finish Tight Areas
Pre-finish parts that will be difficult to reach later, such as inside drum supports, behind fenders, and under the cab. Keep glue surfaces bare. Masking tape works, but accurate brushing and restraint are usually cleaner.
8. Final Assembly
Glue the structural parts first: frame, crossmembers, cab, supports, fenders, and bumper. Let that cure before installing moving parts. Captured axles, peened axle ends, glued axle pegs, or dowel retainers are better than press-fit-only parts. After assembly, pull and twist every protruding piece. If it moves, redesign the joint.
Toy Safety: What Matters for Children
If the truck will be used by children, safety is part of the design, not a final inspection item. Commercially sold toys in the United States must be evaluated against applicable toy-safety rules, including ASTM F963-23, which became the mandatory toy safety standard under CPSC rules effective April 20, 2024. A one-off DIY gift is different from a commercial product, but the hazards are the same.
Also popular on Amazon

- car toys for kids
- Classic Concrete Mixer Truck Toys - No batteries, no lights, no noise. Rounded edges and chunky size designed for little hands to grab, push, and roll. Perfect first vehicle toy that builds fine motor skills and hand-eye coordination
- Safe Materials Montessori Toys - Non-toxic, BPA-free, phthalate-free, PVC-free — zero harmful chemicals. Made from sugarcane bioplastic with no weird plastic smell. Safe for kids who still mouth everything. Third-party tested
- The Go-To Gift for Every Occasion - A crowd-pleasing kids gift — birthday party favor, stocking stuffer, Easter basket filler, Christmas present, classroom prize, or "first day of school" surprise. Timeless concrete mixer truck toys design that never goes out of style
- Perfectly Sized for 18 Months+ - Measures just right for little hands — lightweight, easy to maneuver indoors or outdoors. Encourages independent play, imaginative storytelling, and familiarizes little ones with the school bus experience before preschool starts
Small-parts rules are especially relevant for toys intended for children under 3. The practical takeaway is simple: do not use small detachable parts. Wheels, pins, caps, mirrors, ladders, chute pieces, knobs, and decorative hardware must be oversized, permanently captured, or omitted. If a child can pull it loose, it should not be there.
Recommended Free Tools
For toddlers, be conservative. Avoid brittle species, exposed sharp corners, splinter-prone softwood, loose dowels, metal hardware that can back out, and finishes that are not labeled appropriate for children’s items after cure. Also consider weight. A hardwood truck can hurt if dropped. A 20-inch toy with a solid drum may be too heavy for a young child even if every edge is rounded.
Good tests are physical. Pull the chute. Twist the drum supports. Tug on the wheels. Drop the truck a few inches onto a padded surface and check joints. Rub the surface with a clean cloth after cure to confirm the finish is not tacky. Check again after a week of play because early failures often show up after repeated side loading.
Finish Selection and Sanding Standards
For indoor toys, choose a finish labeled non-toxic when fully cured, toy-safe, or food-contact-safe after cure. Common options include shellac, certain water-based finishes, mineral oil and beeswax blends, and hardwax oils with appropriate labeling. Read the actual product label for cure time. Dry to the touch is not the same as cured.
For a playable truck, finish durability matters because wheels and drum edges get handled constantly. A film finish can protect better than oil, but it must cure fully and should not chip into sharp flakes. Oil and wax feel good and are easy to renew, but they offer less stain resistance. For an heirloom toy, we usually favor a repairable finish over a glossy finish that looks perfect for a week and then shows every dent.
Free tools Windows power users keep installed
One-click scans. No signup required.
Sand end grain carefully. End grain on bumpers, fenders, and wheel edges can stay rough after the faces feel smooth. Start at 120 grit to remove tool marks, move to 180, then 220. Use 320 only where touch matters. Break all edges with a roundover bit or sanding block. A 1/8-inch roundover is a good minimum for handled hardwood toy parts; larger radii are better on bumpers and fenders.
Common Failure Points After Months of Play
The first failures usually appear at the wheels, chute, drum supports, and small decorative parts. Wobbling wheels usually come from hand-drilled axle holes or undersized dowels. Binding wheels often come from finish buildup, crooked holes, or too little side clearance. A good fix is to drill accurately, use consistent spacers during assembly, and leave a small washer-like shoulder or built-in clearance at the wheel hub.
Chutes fail because they stick out and invite twisting. Use thicker stock, more glue area, and a dowel or captured slot where possible. If the toy is for a younger child, make the chute part of a larger rear block instead of a separate delicate piece.
Drum supports fail when the drum is too heavy or mounted on weak side posts. Keep supports wide, use long-grain glue surfaces, and reinforce with dowels if the plan allows. The drum should rotate, but it should not have enough side play to pry its supports apart.
Recommended Free Tools
Cab details fail when they are scaled too literally. Thin mirrors, exhaust stacks, ladders, and grab handles belong on display models, not toddler toys. For play, carve or paint those details into the main body instead of attaching separate pieces.
Independent reader supportYour contribution helps us test, update, and keep practical guides available for everyone.When to DIY vs When to Hire a Pro
DIY makes sense for a tabletop display model or playable wooden toy if you have basic woodworking tools, patience for sanding, and a way to drill straight holes. Expect 8 to 20 hours for a careful first build, depending on the drum method and finish schedule. Add another 2 to 7 days for finish curing, depending on the product.
Also popular on Amazon

- 【3-in-1 Toy Construction Vehicle Set】This premium construction toy set includes a cement mixer, bulldozer, and steam roller—each crafted to resemble real construction vehicles. Designed for imaginative play, these wooden trucks introduce kids to the exciting world of road building while encouraging creative play, fine motor development, and cooperative play with friends.
- 【Realistic Moving Parts for Hands-On Fun】Each construction car toy features movable elements for an interactive experience. The cement mixer drum rotates, the bulldozer’s blade lifts and lowers, and the steam roller drum spins smoothly. These functional details look like real machines and help children develop hand-eye coordination, problem-solving, and cause-and-effect understanding during play.
- 【Durable, Smooth-Rolling Wooden Design】Made with two kinds of premium wood, these toddler construction toys are hand-polished for a smooth finish and a natural look. All wheels spin freely, allowing for easy and stable movement across various surfaces. Built to last through countless play sessions, these montessori wooden toys offer a safe and sturdy alternative to plastic vehicles.
- 【Safe and Handcrafted】Every toy vehicle is handmade and carefully sanded for a safe, splinter-free touch—perfect for small hands. The combination of craftsmanship and durable design makes this wooden montessori toy car set a thoughtful gift for toddlers and preschoolers.
- 【Perfect Gift for Toddlers and Young Builders】This construction vehicle set is a great gift for birthdays, holidays, or any special occasion. Ideal for kids, it promotes early learning, independent play, and creativity. Whether at home, preschool, or daycare, it will quickly become a favorite in any toy collection.
Hire a woodworker or cabinet shop if you want an heirloom-grade toy but do not own a drill press, bandsaw, router, or safe dust collection. Tool-driven first builds can cost $300 to $1,500 or more because the lathe, drill press, clamps, router bits, and dust collection add up quickly. Paying a pro can be cheaper than buying tools for one project.
Hire a contractor or playground specialist if the project becomes ride-on size, fixed outdoors, elevated, climbable, or part of a school, church, daycare, HOA, or public-facing site. That version may need setback checks, anchoring, drainage, inspection access, fall surfacing, and code review. A forum answer saying no permit was needed in one town does not apply across the United States.
Outdoor and Ride-On Versions: Contractor Notes
An oversized concrete truck play feature should be designed like a small exterior structure. Use exterior-rated fasteners, decay-resistant lumber, exterior plywood where appropriate, drainage gaps, ground clearance, and coatings that can be maintained. Avoid trapped horizontal pockets where water sits. Seal end grain. Keep inspection access to anchors, fasteners, and underside framing.
For a ride-on version, stability is not optional. The base must resist tipping, racking, and sliding. If children can climb on it, you must think about fall height, surfacing, entrapment gaps, protrusions, and impact zones. Anchoring may be needed even when the structure feels heavy.
Local rules may treat a large wooden truck as playground equipment, an accessory structure, or both. Before building, check zoning setbacks, HOA rules, building department requirements, and any school or childcare regulations that apply. If the structure is for commercial or community use, assume the review will be more formal than a private backyard toy.
Final Build Checklist
Before calling the truck done, check it like a builder. All wheels should touch the surface. The truck should roll straight without binding. The drum should rotate without scraping. The chute should resist pulling and twisting. Every edge should be rounded. No small part should detach. The finish should be fully cured. The truck should sit stable when pushed from the side.
For a display model, the reward is accuracy. For a child’s toy, the reward is durability. For an outdoor version, the reward is a structure that handles weather, use, and inspection. The best construction-grade concrete truck woodworking plan is the one that matches the real use from the start and respects the difference between craft, toy, and construction.
Frequently Asked Questions
How much does it cost to build a wooden concrete truck toy in 2026?
A small display model typically costs $25 to $60 if you already own tools. A playable hardwood toy usually costs $60 to $150. A premium heirloom version can reach $150 to $350 or more, while a ride-on or outdoor version can run $300 to $2,500+ before labor.
What wood is best for a DIY cement mixer truck toy?
Maple, birch, beech, poplar, and cherry are good choices. Use harder woods for wheels, axles, and moving parts. Baltic birch plywood can work for layered or hidden parts, but avoid wet, treated, splintery, or twisted construction lumber for child-use toys.
Do I need a lathe to build a wooden concrete mixer drum?
No. A lathe makes a rounded drum easier, but you can build the drum from stacked plywood or hardwood discs on a dowel mandrel and sand it to shape. You can also simplify the project into a straight-truck variation.
Is a wooden concrete truck safe for toddlers?
Only if it is designed for toddlers from the start. Avoid small detachable parts, sharp edges, loose dowels, brittle details, and uncured or inappropriate finishes. For children under 3, be especially cautious with wheels, caps, chute parts, knobs, mirrors, and decorative hardware.
What finish is safe for a child’s wooden toy truck?
Use a finish labeled non-toxic when fully cured, toy-safe, or food-contact-safe after cure. Shellac, some water-based finishes, mineral oil and beeswax blends, and certain hardwax oils may be suitable, but always follow the product label and full cure time.
Do I need a permit for a large outdoor wooden truck play structure?
Possibly. A tabletop toy is not a permitted construction project, but a ride-on, fixed, climbable, or outdoor play structure may trigger local rules for playground equipment, accessory structures, setbacks, anchoring, or inspections. Check with the local building department before building.
Quick Recap
Product prices and availability are accurate as of the date/time indicated and are subject to change. Any price and availability information displayed on Amazon at the time of purchase will apply.
Quick wins for a faster PC:
Repair Windows errors before they cause bigger problemsFix Now →Fix the driver behind crashes, sound loss and screen glitchesFind Drivers →
