The Tool Desk
Outbyte Driver Updater FREEFix the driver behind crashes, sound loss and screen glitchesFind Drivers →Outbyte PC Repair FREEClear out junk files and repair common Windows errorsFree Scan →Some links on this page are affiliate links: if you buy through them we may earn a commission, at no extra cost to you.
Hardwood flooring planks have grooves for two main reasons. The groove on the edge is part of a tongue-and-groove joint that locks one board to the next, keeps the walking surface aligned, and allows fasteners to be hidden. The grooves on the bottom of many planks are relief grooves, sometimes called back relief or kerfs, that help the board bear more consistently on the subfloor and give small installation debris somewhere to go.
Those two groove types get confused all the time. They are not doing the same job. Edge grooves are about board-to-board fit. Bottom grooves are about board-to-subfloor contact. Neither one makes hardwood immune to moisture movement, cupping, buckling, gaps, squeaks, or poor subfloor prep.
As an Amazon Associate I earn from qualifying purchases.
PC Slower Than It Used to Be?
A free scan shows the junk files, broken settings and background clutter dragging Windows down - then fixes them in one click.Free scan · Windows 10 & 11Crashes, No Sound, or Screen Glitches?
Random freezes, missing sound and display glitches usually trace back to one bad driver. Find and replace yours safely.Free scan · under a minuteOn our job sites, we treat grooves as part of the flooring system, not as a cure-all. A well-milled tongue-and-groove plank still needs the right indoor conditions, moisture readings, expansion gaps, fastener schedule, and subfloor flatness. If those basics are skipped, the floor can fail even if the planks have perfectly machined grooves.
What grooves are we talking about?
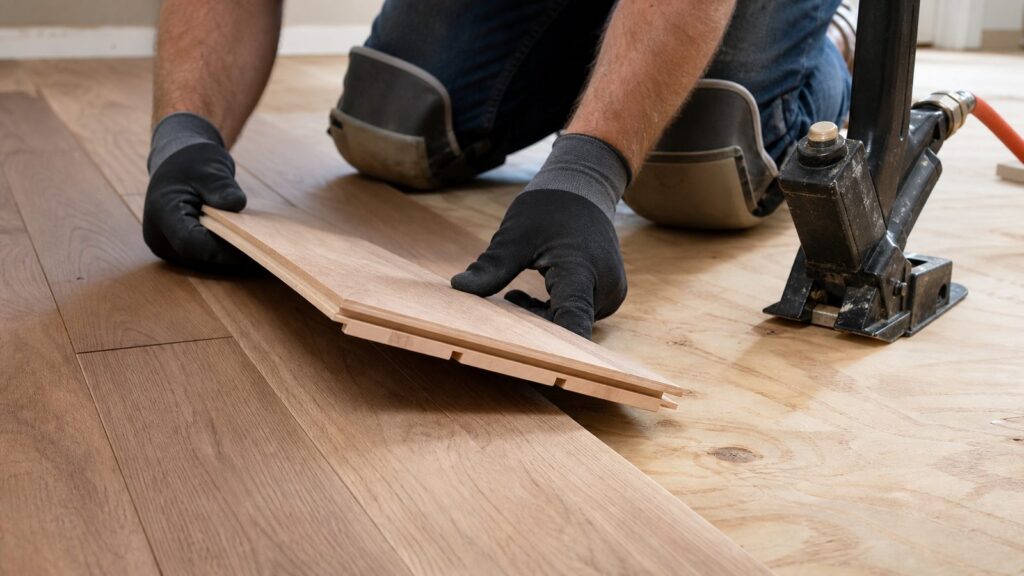
Most solid hardwood and many engineered hardwood planks are milled with a tongue on one long edge and one end, and a groove on the opposite long edge and end. When installed, the tongue of one plank fits into the groove of the next plank. That is the classic tongue-and-groove flooring profile.
#1 Best Overall

- Accelerating Installation: This floor bracing tool speeds up the installation process, saving valuable time and delivering a smoother experience for solid wood floor projects
- Protecting Floor: The CreekT Floor Jack gently adjusts bent or warped floorboards into their correct position without causing scratches or wear
- Achieving Precise Alignment: Specifically designed for solid wood flooring, the CreekT hardwood Floor Jack features an advanced, user-friendly ratchet mechanism. It easily positions boards, ensuring each plank is perfectly aligned and firmly secured for nailing or stapling
- Enhancing Control and Efficiency: Engineered for ease of use, the CreekT flooring jack increases control and boosts productivity. Even first-time flooring installers can operate it with confidence
- Sturdy and Reliable Construction: Built with a robust steel frame, the CreekT flooring jacks for hardwood floors incorporates reinforced heavy-duty gears and a dependable spring-loaded ratchet mechanism that securely locks into position
On the underside of many hardwood boards, you may also see shallow channels running lengthwise. These are relief grooves or kerfs. They are usually invisible once the floor is installed, and they are not decorative. Depending on the manufacturer and product, they may be wide and shallow, narrow and closely spaced, or absent altogether.
A typical 3/4-inch solid hardwood plank may have a tongue-and-groove edge profile, a wear surface above the tongue, and underside relief grooves cut into the bottom face. Engineered hardwood may have similar edge milling, but the core construction, thickness, and installation method can differ substantially. Common engineered products range from about 3/8 inch to 3/4 inch thick, while many traditional solid products are 3/4 inch thick.
What’s actually slowing this PC down?
Pick the symptom - the matching free tool is one click away.
The practical distinction matters because a homeowner may ask, “Why are there grooves in my hardwood?” The answer depends on where the grooves are. Side grooves are for joining planks. Bottom grooves are for contact relief and installation tolerance.
Side grooves create the tongue-and-groove joint
The edge groove is half of the mechanical joint that makes strip and plank hardwood flooring work. One board’s tongue slides into the next board’s groove, linking the boards together along their edges and ends. This joint helps the installed floor behave like one continuous surface while still allowing each board to expand and contract with normal seasonal humidity changes.
Without that profile, every plank would depend much more heavily on face nails, adhesive, or another exposed fastening system. Older floors, utility floors, and some specialty plank floors have been installed that way, but it is not how most modern residential hardwood is designed.
It keeps plank faces aligned
The tongue-and-groove joint helps keep adjacent plank faces in the same plane. That reduces lippage, which is the small height difference you feel when one board edge sits proud of the next. Minor height variation can still happen from subfloor irregularities, milling tolerance, job-site damage, sanding, finish buildup, or moisture imbalance, but the joint gives the floor a built-in alignment system.
Do these 3 things before closing this tab:
1Clear out junk files and repair common Windows errors2Scan for outdated or missing drivers - takes under a minute3Repair Windows errors before they cause bigger problemsThis is especially useful under foot traffic. As people walk across the room, the boards are not acting as completely independent strips. The tongue seated in the groove helps resist one edge lifting while the neighboring board stays down.
It hides fasteners
Traditional nail-down hardwood is usually blind-nailed or blind-stapled through the tongue side of the board at an angle. The next board’s groove covers that fastener line. When the floor is complete, you do not see rows of nails across the field of the room.
Face-nailing is still used in some locations, especially near walls where a flooring nailer will not fit, at certain transitions, or in repair work. But in the main field, tongue-and-groove milling allows a cleaner finished appearance and a stronger fastening pattern.
Fastening into the wrong side of the board is a common installation mistake. The system is designed so the fastener goes through the tongue, not through the groove. If the groove edge is damaged or split, the next board may not seat tightly, and the joint may telegraph problems across the floor.
It helps manage seasonal movement
Wood flooring moves as indoor humidity changes. It usually moves far more across the width of the plank than along the length. The tongue-and-groove joint helps keep boards aligned during that movement, but it does not stop the movement.
In a typical U.S. home, indoor hardwood performance targets often fall around 60 to 80 degrees Fahrenheit and 35% to 55% relative humidity, depending on the flooring manufacturer. When winter heating drives indoor humidity down, boards can shrink and show small gaps. When summer humidity rises, boards can expand. If the expansion pressure has nowhere to go, the floor can cup, crown, tent, or buckle.
That is why installers leave expansion space at walls, columns, pipes, fixed cabinets, hearths, and transitions. The exact gap depends on product instructions, room size, species, and installation method, but 1/2 inch to 3/4 inch at the perimeter is common for many hardwood installations. Baseboard and shoe molding typically cover that space after installation.
Bottom grooves are relief grooves, not locking grooves
The grooves on the bottom of hardwood flooring are not there to connect boards together. They are relief channels. Their job is mainly to reduce full-face contact between the plank and subfloor and to give tiny high points, splinters, or fastener-related debris a place to settle.
Quick wins for a faster PC:
Fix the driver behind crashes, sound loss and screen glitchesFind Drivers →Repair Windows errors before they cause bigger problemsFix Now →Scan for outdated or missing drivers - takes under a minuteDriver Scan →Rank #2

- Made in United States
When a nail or staple goes through a wood plank, it can raise a small sliver or bulge on the underside. If the underside of the plank were perfectly flat and that raised spot pressed directly against the subfloor, it could create a pivot point. Under traffic, that pivot point can contribute to movement or squeaks. A bottom groove gives those small irregularities somewhere to go.
Relief grooves also reduce the amount of wood touching the subfloor. That can help a board sit more consistently across minor subfloor variation. It does not mean the floor can be installed over a bad subfloor. If the subfloor has a ridge, dip, hump, loose panel, proud screw, or deflection problem, relief grooves will not fix it.
On our projects, we still check subfloor flatness before flooring comes out of the boxes. A common flatness target for hardwood is within about 3/16 inch over 10 feet or 1/8 inch over 6 feet, though the flooring manufacturer’s instructions control. High spots need to be sanded or planed. Low spots may need approved patching compound, panel repair, or structural correction. Loose subfloor panels need to be re-fastened before hardwood installation begins.
What grooves do not do
Grooves do not prevent hardwood from cupping, warping, shrinking, swelling, squeaking, or buckling by themselves. They help the floor fit and install correctly, but most hardwood problems are caused by moisture, site conditions, subfloor issues, wrong fasteners, wrong adhesive, or missing expansion space.
Recommended Free Tools
Grooves do not stop moisture movement
Wood is hygroscopic, which means it gains and loses moisture based on the surrounding environment. A groove profile does not change that basic behavior. If the flooring is installed too wet, installed over a wet subfloor, exposed to crawlspace moisture, or trapped in a home with uncontrolled humidity, the boards can move.
Before installation, we want actual measurements, not guesses. A good moisture log should record the flooring moisture content, wood subfloor moisture content, indoor temperature, and indoor relative humidity. Photos of meter readings are useful for warranty support and for resolving disputes later.
Many manufacturer instructions require the flooring and wood subfloor to be within about 2% to 4% moisture-content difference, depending on plank width and product type. Wider solid planks are less forgiving. For 3-inch-and-wider solid planks, many instructions use a tighter tolerance around 2% maximum difference between the hardwood and wood subfloor. Narrower strip flooring may allow a wider difference, often around 4%, but the product instructions should be followed.
Grooves do not replace acclimation
Acclimation is not simply leaving flooring boxes in the house for three days. The goal is for the flooring to reach a moisture condition appropriate for the building’s normal living environment. That means the building should be enclosed, wet trades should be complete, HVAC should be running, and the space should be held near expected occupancy conditions.
For many homes, hardwood should be stored in the installation area only after drywall, painting, masonry, and major wet work have had time to dry. The exact timeframe varies. A newly poured slab or recently finished basement can hold significant moisture long after the surface looks dry. A crawlspace without proper vapor control can keep feeding moisture into the subfloor.
We do not install based only on the calendar. We install when the readings are in range.
Grooves do not make wide planks low-risk
Wide plank hardwood can look excellent, but it demands tighter control. A 7-inch board and a 2-1/4-inch strip may experience the same percentage of movement, but the wider board shows a larger visible change. That can mean wider seasonal gaps in dry months and more compression stress in humid months.
For wide planks, we pay close attention to moisture readings, species stability, board width, installation method, and whether glue assist is required. Some manufacturers require or strongly recommend a glue-assist installation for wider nail-down products. That means the board is mechanically fastened and also supported with approved adhesive. The goal is to reduce movement and hollow spots, not to eliminate seasonal wood behavior.
Free tools Windows power users keep installed
One-click scans. No signup required.
How tongue-and-groove affects installation methods
Tongue-and-groove flooring can be installed several ways, but not every product is approved for every method. Solid hardwood is commonly nailed or stapled over a wood subfloor. Engineered hardwood may be nailed, stapled, glued down, floated, or installed with a glue-assist method, depending on the product.
The groove profile supports the installation method, but the manufacturer’s instructions decide what is allowed. If general trade guidance and the product instructions differ, we follow the stricter requirement because the manufacturer controls the product warranty.
Rank #3

- New type floor jack with the felt, to prevent damage your floor
- The flooring rack is made of cast steel, #45, Q235 material, strong and durable
- Come with manual instruction, easy to use ratchet mechanism, speed up installation and save time
- Designed to push or pull flooring strips into place, can be used with any floor thickness. Works for hardwood, laminate, or vinyl plank flooring
- Always have straight floorboards by bringing crooked planks into place for nailing. Makes installing hardwood floors easier and helps in straighten hardwood tile floors
| Installation method | Common use | How grooves matter | Key job-site concern |
|---|---|---|---|
| Nail-down or staple-down | Solid hardwood and some engineered flooring over wood subfloor | Fasteners go through the tongue and are hidden by the next board’s groove | Correct fastener length, spacing, air pressure, subfloor thickness, and moisture readings |
| Glue-down | Many engineered floors and some approved solid products, often over concrete | Tongue-and-groove edges keep boards aligned while adhesive bonds the floor | Slab moisture testing, adhesive compatibility, trowel size, open time, and cleanup |
| Floating | Some engineered flooring systems | Edges lock or glue together while the floor floats over underlayment | Expansion space, flatness, underlayment rating, transitions, and room-size limits |
| Glue-assist nail-down | Wide plank or higher-value floors where specified | Tongue-and-groove still receives fasteners while adhesive supports the board | Adhesive pattern, moisture control, plank width, and manufacturer approval |
One practical detail: when an installer has to reverse direction, such as working out of a hallway into two rooms, a spline or slip tongue is often used. A spline fits into the groove and creates a new tongue so the next row can be fastened correctly. This keeps the nailing pattern on the tongue side and helps the floor stay tight.
How much do hardwood floor grooves affect cost?
For most projects, grooves themselves are not a line-item cost. Tongue-and-groove milling is standard on most hardwood flooring sold for residential installation. You are usually paying for the wood species, grade, construction, width, finish, labor, subfloor prep, installation method, and site conditions, not for the existence of the groove.
In 2026, national installed hardwood flooring costs commonly run about $6 to $25 per square foot. Budget projects often land around $6 to $12 per square foot. Higher-end, wide plank, complex, occupied-home, or specialty projects commonly run $13 to $25 per square foot or more.
Materials alone vary widely. Commodity unfinished utility oak can sometimes be found under $1 per square foot, but that is not the installed cost and may involve more waste, sorting, sanding, finishing, and appearance limitations. Common prefinished oak often costs several dollars per square foot. Premium maple, acacia, Brazilian koa, wide plank, long-length flooring, or specialty finishes can run $7 to $10 or more per square foot before labor.
| Cost item | Typical 2026 U.S. range | What changes the price |
|---|---|---|
| Installed hardwood flooring | $6 to $25+ per sq. ft. | Product, labor market, prep, layout, stairs, transitions, and moisture work |
| Budget installed projects | $6 to $12 per sq. ft. | Simpler rooms, standard products, minimal repair, straightforward nail-down or floating work |
| Higher-end installed projects | $13 to $25+ per sq. ft. | Wide plank, premium species, glue assist, pattern work, stairs, demolition, leveling, occupied-home protection |
| Engineered wood installation estimate | About $7.89 to $12.79 per sq. ft. starting range | Local adjustments, product type, subfloor condition, adhesive, underlayment, and trim |
| Common national project range | Roughly $1,024 to $4,221 | Total square footage drives the number more than anything else |
Groove-related costs show up when the profile affects labor. Damaged tongues or grooves may force board replacement during installation or repair. Direction changes may require splines. Wide plank floors may require adhesive in addition to fasteners. Some engineered profiles are more delicate and require slower handling. None of that means grooves are expensive by themselves; it means the flooring system has to be installed correctly.
Common mistakes we see with grooved hardwood planks
The first mistake is assuming every groove has the same purpose. Edge grooves are for joining boards. Bottom grooves are relief cuts. Treating them as the same thing leads to bad assumptions about what the plank can tolerate.
The second mistake is expecting the grooves to overcome moisture problems. If a wood subfloor reads too high, a slab has not been tested, the HVAC is not running, or the crawlspace is damp, the groove profile will not save the floor. Moisture imbalance is one of the main reasons hardwood cups, gaps, crowns, or buckles.
The third mistake is skipping subfloor preparation. Bottom relief grooves may help with very small irregularities, but they do not flatten the floor framing. If there is a 1/4-inch hump across a doorway, a soft panel seam, or a low area near a wall, the floor can move underfoot and make noise. Fasteners can loosen. Adhesive can lose contact. Floating floors can bounce or click.
The fourth mistake is poor racking. Hardwood should be racked from multiple cartons before fastening so color, grain, and length variation are blended across the room. This is also when we inspect tongues and grooves for damage. A cracked tongue, crushed groove, or poorly milled end joint should not be buried in the middle of the floor just because it came out of the box.
The fifth mistake is forgetting transitions. Hardwood meeting tile, carpet, exterior doors, stairs, or existing flooring needs a plan before installation starts. Finished floor height can change by 1/4 inch, 1/2 inch, or more depending on underlayment, adhesive, plywood buildup, or floor thickness. Leaving transitions until the end often creates awkward reducers or tight spots where the floor cannot move properly.
The sixth mistake is cutting tightly around door casing. We prefer undercutting door jambs and casing so the plank slides underneath. It looks cleaner and leaves room for normal movement. Tight scribed cuts around trim tend to look amateur and can pinch the floor.
DIY vs hiring a professional
A capable homeowner can install some tongue-and-groove hardwood floors, especially a floating engineered floor in a small, square room with a flat subfloor and simple transitions. The right DIY project is usually low-risk: one bedroom, no stairs, no slab moisture concern, no major leveling, no expensive wide plank material, and clear manufacturer instructions.
DIY becomes much less forgiving with 3/4-inch solid hardwood, wide plank flooring, nail-down installation, glue-down installation, stairs, occupied-home dust protection, uneven subfloors, concrete slabs, basements, crawlspaces, radiant heat, or rooms that connect into existing hardwood. Tool setup matters too. Flooring nailers need the correct fastener, shoe, and air pressure. Too much pressure can split tongues. Too little can leave fasteners proud and prevent the next groove from seating.
For DIY planning, budget for more than the flooring. You may need a moisture meter, underlayment or vapor retarder, saw blades, jamb saw or oscillating tool, tapping block, pull bar, spacers, flooring nailer rental, compressor, adhesive, trowels, knee protection, transition moldings, base shoe, and waste. Waste is commonly 5% to 10% for straightforward layouts and can run higher for diagonal layouts, narrow rooms, closets, repairs, or heavy color sorting.
Recommended Free Tools
Hire a pro when the floor is expensive enough that one installation error would erase the labor savings. That includes wide plank, premium species, site-finished hardwood, glue-assist systems, stair work, patterned layouts, and installations over concrete or moisture-sensitive areas. A certified wood flooring installer or an experienced local contractor will know how local humidity, basements, crawlspaces, and seasonal HVAC use affect the floor.
Independent reader supportYour contribution helps us test, update, and keep practical guides available for everyone.Safety, building rules, and permits
Replacing flooring inside a single-family home often does not require a building permit when the work is purely finish replacement, but rules vary by city, county, condominium association, and scope. If the project includes structural subfloor repair, stair changes, fire-rated assemblies, sound-control requirements, radiant heat, asbestos-containing flooring removal, or work in a multifamily building, the rules can change quickly.
Rank #4

- Wide Use for Floor Installation: These two flooring jacks pull boards tight and keep seams aligned. Works for hardwood, laminate, deck boards, and engineered wood. Not for LVP or thin materials
- Strong Steel & Reliable Ratchet: Made of heavy-duty steel with a sturdy ratcheting mechanism that delivers steady tightening force and helps close flooring gaps
- Simple to Operate: Easy for beginners and pros. The lever design increases force, reduces effort, and avoids hammering or noisy prying during installation
- Stable, Low-Noise Performance: Helps reduce noise and surface impact. The ergonomic grip allows controlled tightening in tight areas without stressing nearby walls
- Two-Piece Set for Efficient Installation: Includes 2 flooring jacks so you can work on multiple areas at once, ensuring tighter seams and faster, more efficient floor installation
In condominiums, co-ops, and apartments, flooring replacement may be controlled by the building even when the city does not require a typical residential permit. Sound transmission is a common issue. A building may require a specific underlayment rating, written approval, work-hour limits, insurance certificates, or inspection before and after installation. Do not assume carpet can be replaced with hardwood without approval in a multifamily building.
There are also safety concerns. Older resilient flooring, mastic, or underlayment can contain asbestos. If a floor assembly is old enough for that to be plausible, do not sand, grind, scrape, or demolish it casually. Have suspect materials tested before disturbance. For sanding or cutting hardwood, use dust control, eye protection, hearing protection, and respiratory protection. Wood dust is not harmless, and some exotic species can be irritating.
The Tool Desk
Outbyte PC Repair FREERepair Windows errors before they cause bigger problemsFix Now →Outbyte Driver Updater FREEFix the driver behind crashes, sound loss and screen glitchesFind Drivers →What we check before installing grooved hardwood
Before installation, we want the house ready for wood flooring. The building should be enclosed. Exterior doors and windows should be installed. Wet trades should be complete. HVAC should be operating. The installation area should be close to normal living conditions, commonly around 60 to 80 degrees Fahrenheit and 35% to 55% relative humidity, unless the flooring manufacturer gives a different range.
Then we check moisture. For wood subfloors, that means readings in multiple locations, including exterior walls, plumbing areas, kitchens, entries, and rooms over crawlspaces or basements. For concrete slabs, the required test depends on the product and adhesive system. Surface appearance is not enough. A slab can look dry and still emit too much moisture for a glue-down wood floor.
We check flatness with a long straightedge or laser. We re-fasten loose panels, address squeaks, remove high fasteners, clean debris, and correct unacceptable humps or dips. Bottom relief grooves can help the plank ride over tiny debris or nail-related splinters, but the subfloor still has to meet the flooring manufacturer’s tolerance.
We plan the layout before fastening. That includes starting wall straightness, board direction, room transitions, hallway alignment, stair nosings, vents, fireplaces, cabinets, islands, and final-row width. A common target is to avoid a sliver rip at the last wall. If the first row and last row would be badly uneven, we adjust the starting rip so the room finishes cleanly.
Quick wins for a faster PC:
Scan for outdated or missing drivers - takes under a minuteDriver Scan →Clear out junk files and repair common Windows errorsFree Scan →Fix the driver behind crashes, sound loss and screen glitchesFind Drivers →Finally, we rack the boards from multiple cartons. Hardwood is a natural product. Color and grain variation are part of the material, not a defect. Racking lets us distribute lighter boards, darker boards, short pieces, long pieces, and stronger grain patterns so the finished floor looks intentional.
Bottom line
Hardwood flooring planks have grooves because the floor needs controlled connections and controlled contact. The edge groove works with the tongue to align planks, hide fasteners, and keep the floor tight. The underside grooves reduce contact points, provide relief for small splinters or bulges, and can help the board sit more consistently over minor subfloor irregularities.
The grooves are useful, but they are not magic. The long-term performance of a hardwood floor still depends on moisture testing, acclimation by measurement, subfloor flatness, correct fastening or adhesive, expansion space, indoor humidity control, and following the flooring manufacturer’s instructions. When those details are handled correctly, the grooves do their quiet job and the floor performs the way it should.
Frequently Asked Questions
Why do hardwood flooring planks have grooves on the sides?
Side grooves are part of the tongue-and-groove joint. One board’s tongue fits into the next board’s groove, which keeps plank faces aligned, reduces lippage, helps the floor stay tight, and allows fasteners to be hidden below the next row.
Free tools Windows power users keep installed
One-click scans. No signup required.
What are the grooves on the bottom of hardwood flooring for?
Bottom grooves are relief grooves or kerfs. They reduce full-face contact with the subfloor and give small nail splinters, raised fibers, or minor debris somewhere to go so the board can sit more consistently.
Do grooves prevent hardwood floors from cupping or warping?
No. Grooves help with fit and installation, but they do not stop wood from expanding and contracting. Moisture content, indoor humidity, subfloor moisture, expansion space, and proper installation control most cupping, buckling, and gapping problems.
Should tongue-and-groove hardwood be nailed, glued, stapled, or floated?
It depends on the product. Solid hardwood is commonly nailed or stapled over wood subfloor. Engineered hardwood may be nailed, glued, floated, or installed with glue assist. Always follow the flooring manufacturer’s approved installation method.
How much does hardwood flooring installation cost in 2026?
In 2026, installed hardwood flooring commonly costs about $6 to $25 per square foot in the U.S. Budget projects often run $6 to $12 per square foot, while wide plank, premium species, stairs, glue assist, demolition, leveling, or moisture mitigation can push projects to $13 to $25+ per square foot.
PC Slower Than It Used to Be?
A free scan shows the junk files, broken settings and background clutter dragging Windows down - then fixes them in one click.Free scan · Windows 10 & 11Outdated Drivers Are Slowing You Down
One free scan finds every outdated or missing driver and matches the right update for your exact hardware.Free scan · exact hardware matchDo I need a permit to replace carpet with hardwood?
Often, simple finish-floor replacement in a single-family home does not require a permit, but local rules vary. Multifamily buildings may require approval for sound control, underlayment, insurance, work hours, and inspections before carpet is replaced with hardwood.
Quick Recap
Product prices and availability are accurate as of the date/time indicated and are subject to change. Any price and availability information displayed on Amazon at the time of purchase will apply.

