Injection molding makes parts by preparing material, forcing it into a closed mold, letting it cool or cure, and ejecting the finished shape. Because the mold is built for a particular part, the process is most useful when a manufacturer needs many consistent copies and can justify the initial tooling investment.
How injection molding works
In a common thermoplastic process, plastic pellets enter a heated barrel from a hopper. A rotating, reciprocating screw moves the pellets forward, melts and mixes them, then accumulates a measured amount—called a shot—for the next part. Meanwhile, the mold is closed and clamped shut.

- Clamp: The clamping unit closes the mold and holds its two halves together against the pressure of injection.
- Inject: The screw pushes the prepared shot through the machine nozzle and the mold’s feed system into the cavity.
- Hold and cool: Pressure is maintained after filling to push in additional material as the part shrinks during cooling. The part solidifies in the mold; some materials are cured rather than simply cooled.
- Open and eject: Once the part is sufficiently solid, the mold opens and ejector components release it.
- Repeat: The cycle begins again. The screw can prepare the next shot while the current part cools.
The stages overlap in practice, and cycle duration varies with the part, material, mold, and machine. Autodesk’s 2023 Moldflow documentation gives a typical range of 2 seconds to 2 minutes; Protolabs Network reports 15 to 60 seconds on its guide, whose publication year is not stated. Neither range is a universal production setting.
What the machine and mold do
Injection unit
The hopper feeds material to the heated barrel. Inside it, the screw prepares and delivers the shot. NISSEI describes 200–300°C as an illustrative melt-heating range, but the appropriate temperature depends on the material and process; that figure is not a general setting for all machines or resins.
Do these 3 things before closing this tab:
1Clear out junk files and repair common Windows errors2Fix the driver behind crashes, sound loss and screen glitches3Repair Windows errors before they cause bigger problems#1 Best Overall
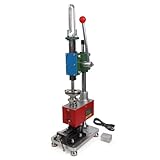
- Maximum Injection Amount (theoretical): 0-10g/time
- Cost Saving:This injection molding machine uses a simple hand-disassembled mold to complete the injection molding, and the mold can be replaced to achieve multiple uses of one machine. Furthermore, compared to pneumatic injection molding machines, it uses lower pressure and allows for the use of 3D printed molds to create products, making it suitable for DIY projects.
- Heating Temperature: 0-350°C(0~662°F). The temperature is adjustable according to material. PEPP temperature 200-240°C, ABS 180-210°C, PS 180-200°C
- The plastic injection machine comes with a test mold and bench vise. It can be used by connecting the power supply. Don't need to connect the air compressor. It is easy to use and simple to operate without take much space.
- Application: Soft plastics such as PP, PE, ABS are the most suitable, and PS, PA, PET, TPU, and PVC can also be used. Only a small amount of sample is needed for easy extrusion. Capable of small batch production and test
Mold
The mold is a part-specific tool, usually made of metal. Its core and cavity define the part’s shape. The sprue, runners, and gates guide molten material from the machine into the cavity; the gate is the entry point and can leave a small mark, or vestige, on the finished part. Cooling channels help manage heat, while the parting line marks where mold halves meet.
Clamping and ejection unit
The clamping unit keeps the mold closed during injection, then opens it at the right point in the cycle. Ejector components push the formed part out. Their placement and the part’s geometry can affect visible ejector marks and whether the part releases cleanly.
Rank #2
Why manufacturers use it—and when tooling matters
Injection molding combines part-specific tooling with a repeatable machine cycle. Once the mold is ready and process conditions are controlled, the same geometry can be produced repeatedly, often at a fast rate and with relatively low labor per part. The trade-off is the upfront work and cost of designing and making the mold.
That makes expected volume central to the decision: tooling cost is spread across the parts produced, so higher volumes can make the per-part economics more favorable. Protolabs Network recommends 500 units as a general guide on its design page, but that is its recommendation, not a universal break-even point. The right volume depends on the part, tool, material, supplier, and alternatives.
Free tools Windows power users keep installed
One-click scans. No signup required.
Rank #3

- Used Book in Good Condition
Autodesk identifies fast production, design flexibility, accuracy, and low labor costs among the process’s advantages, while noting upfront tooling cost and design restrictions as disadvantages. Before comparing manufacturing routes or suppliers, assess:
- Expected quantity and how tooling cost is allocated across it.
- Material properties and compatibility with the required process.
- Part geometry, including features that could complicate filling or release.
- Production capacity and expected cycle time for the actual part and tool.
- Tool durability, tolerances, surface finish, lead time, geography, and quality requirements.
Design choices that affect the finished part
A part must fill, cool, and release reliably. Wall thickness, draft, ribs, bosses, gate location, surface finish, and material selection all affect mold design and production. Uniform wall sections can help manage cooling and shrinkage; draft—slight taper on faces parallel to the opening direction—helps the part release. Ribs and bosses can add structure, but their shape and thickness need to work with the surrounding walls and material flow.
Rank #4
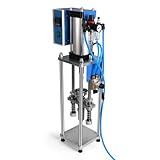
- Maximum Injection Amount (theoretical): 0-20g/time
- Cost Saving:This injection molding machine uses a simple hand-disassembled mold to complete the injection molding, and the mold can be replaced to achieve multiple uses of one machine.
- Heating Temperature: 0-350°C(0~662°F). The temperature can be adjusted. PEPP temperature 200-240°C, ABS 180-210°C, PS 180-200°C
- Pneumatic Plastic Extruder: You need to prepare the air pump, and a 30L 500W or higher power air pump is recommended, and the air pressure requirement is between 0.65-0.85
- Application: Soft plastics such as PP, PE, ABS are the most suitable, and PS, PA, PET, TPU, and PVC can also be used. Only a small amount of sample is needed for easy extrusion. Capable of test piece production and small batch production.
Undercuts are features that prevent a part from coming straight out of a simple, straight-pull mold. They may require additional mold mechanisms or a redesign. Gate placement and runner layout also influence how material reaches the cavity and where marks may remain. Considering these features before the mold is cut can reduce avoidable design constraints and production problems.
Independent reader supportYour contribution helps us test, update, and keep practical guides available for everyone.Materials and process variants
Thermoplastics soften and flow when heated, then solidify as they cool. Depending on the material and application, injection molding can also be used with some thermosets, silicones, and elastomers. Additives and blends can alter material properties, so selection depends on the part’s performance requirements and the process conditions. A resin cannot be recommended responsibly without knowing the application and its requirements.
Recommended Free Tools
- Liquid silicone rubber molding: Used for silicone parts, including flexible components.
- Overmolding: Adds one material over another, such as a softer layer over a rigid part.
- Insert molding: Forms material around an embedded component, such as a metal insert.
- Multi-cavity or family molding: Produces multiple copies or different related parts in a cycle, depending on the mold design.
Where injection-molded parts are used
Familiar examples include bottle caps, packaging, combs, toothbrushes, appliance housings, chairs, and storage containers. The process is also used for components in automotive products, medical devices, consumer electronics, aerospace, robotics, and industrial equipment. The common production logic is the same: a purpose-built mold makes it practical to repeat a part’s geometry across many units.
Quick Recap
Product prices and availability are accurate as of the date/time indicated and are subject to change. Any price and availability information displayed on Amazon at the time of purchase will apply.




