Some links on this page are affiliate links: if you buy through them we may earn a commission, at no extra cost to you.
A good sandpaper cabinet is not just a box with dividers. It is a small workflow station for one of the messiest, most repetitive parts of woodworking: choosing the right abrasive, using it before it gets damaged, and keeping dust away from clean finishing supplies.
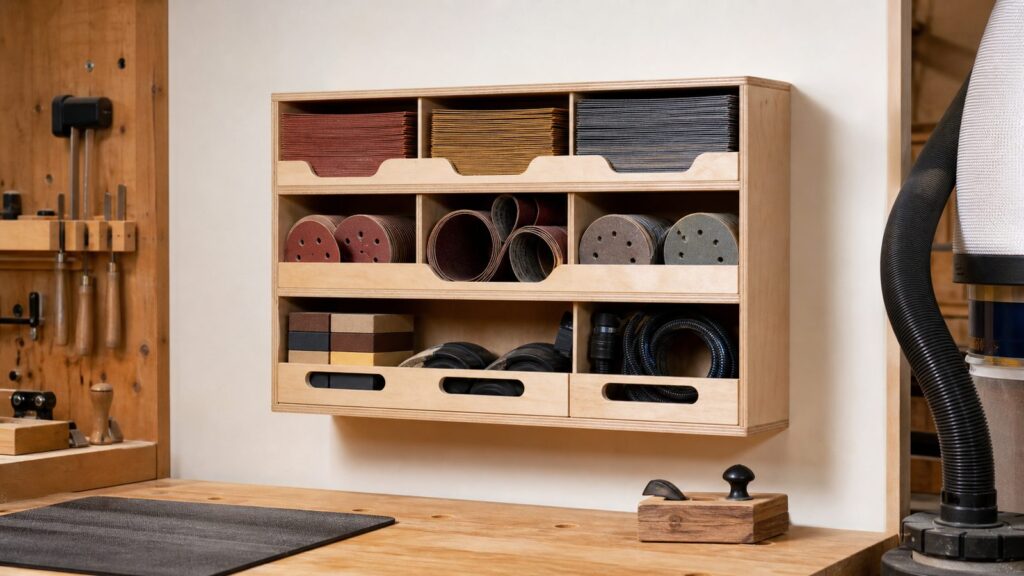
If you came here looking for the basic plan idea, the proven size is compact: about 28 inches wide, 21 inches tall, and 7 inches deep. That is large enough for 9 x 11 sheets, 5-inch or 6-inch random-orbit discs, sanding belts, blocks, pads, and small accessories, while still fitting on a garage or shop wall above a bench.
As an Amazon Associate I earn from qualifying purchases.
For 2026, expect a small DIY sandpaper cabinet to cost about $45 to $140 if you use shop scraps and simple hardware. If you buy a full sheet of cabinet-grade plywood, hardwood edging, drawer slides, labels, hinges, and finish, a realistic materials range is closer to $100 to $250. Hiring a carpenter or handyman to build and install a simple custom sanding station usually lands around $250 to $900, depending on finish level, wall conditions, and local labor rates.
On our job sites, the biggest difference between useful storage and decorative storage is whether the cabinet supports the way people actually work. Sanding starts rough, moves through prep grits, then shifts into finishing and between-coat sanding. Your cabinet should follow that sequence.
Popular on Amazon

- Efficient Organization: Store 5-inch sanding discs, grinding discs, and accessories in a set of 10 individual connectable boxes. Each box can hold up to 60 pcs sanding discs.
- Offset Snap-On Connection: Use the snap-on mechanism to assemble the boxes according to your needs. Ideal for stable placement on a workbench or installation on a wall or pegboard using the included expansion screws.
- Grit Classification: Includes stickers for easy marking and categorization of grit sizes, allowing quick identification of the desired grit for improved organization and workflow efficiency.
- Space-Saving Design: Organize random orbital sander accessories such as Hook & Loop sanding discs and PSA sanding discs, reducing clutter in the workspace and maximizing productivity.
- Versatile Application: Suitable for professional workshops, DIY enthusiasts, and craftsmen using random orbital sander for various projects. Can also be used as a holiday gift for family or friends, such as Father's Day, Valentine's Day, Christmas, etc.
What This Sandpaper Cabinet Needs to Hold
Before cutting plywood, lay out your actual sanding inventory on a bench. Do not design from memory. Most shops have a mix of full sheets, random-orbit discs, belts, sponges, sanding blocks, scraper blades, interface pads, used-but-still-good discs, and small packs of specialty abrasive.
A practical sanding cabinet should make room for these common formats:
- 9 x 11-inch sheet sandpaper
- 5-inch hook-and-loop discs
- 6-inch hook-and-loop discs
- Quarter-sheet and half-sheet sander paper
- Sanding belts, often 3 x 21 inches, 3 x 24 inches, or 4 x 24 inches
- Sanding sleeves for spindle sanders
- Sanding sponges and hand pads
- Hard and soft sanding blocks
- Mesh abrasives and interface pads
- Small accessories such as eraser sticks, tack cloths, scrapers, and replacement pads
The cabinet does not have to hold every abrasive you own, but it should hold the active inventory. Bulk backstock can stay in a drawer or tote. The wall cabinet is for the grits and formats you reach for every week.
Recommended Cabinet Size and Layout
A 28-inch-wide by 21-inch-tall by 7-inch-deep cabinet is a strong starting point for a small woodworking shop. It is shallow enough to keep supplies visible and light enough to hang safely with a proper cleat, but wide enough for full sheet paper and disc trays.
For most homeowners and serious hobbyists, we would build the case from 1/2-inch or 3/4-inch plywood. Use 3/4-inch plywood for the outer case if the cabinet will carry a heavy inventory, drawers, or a door. Use 1/4-inch plywood or hardboard for dividers where the spans are short. Thin material works fine for vertical grit separators, but shelves that span 20 inches or more should be thicker or supported with a front lip.
A Practical Interior Arrangement
Here is a layout that works well in a real shop:
- Left section: shallow vertical slots for 9 x 11 sheets, grouped by grit
- Center section: pull-out trays or cubbies for 5-inch and 6-inch discs
- Right section: dowels, hooks, or tall slots for sanding belts and sleeves
- Bottom shelf: sanding blocks, sponges, used discs, and specialty pads
- Door interior, if used: narrow clips or labels for grit charts and small templates
Keep sheet compartments slightly oversized. A 9 x 11 sheet should not be forced into a 9-inch opening. Give the slot about 9-1/2 to 10 inches of clear width and at least 11-1/2 inches of depth or height, depending on orientation. Tight slots bend paper, make sheets curl, and turn a simple cabinet into a daily annoyance.
Do these 3 things before closing this tab:
1Clear out junk files and repair common Windows errors2Scan for outdated or missing drivers - takes under a minute3Repair Windows errors before they cause bigger problems2026 Cost Breakdown
Material prices still vary by region, and plywood is one of the bigger swing items. In 2026, big-box 23/32-inch cabinet-grade plywood has been listed around $44.98 per 4 x 8 sheet, while 3/4-inch birch plywood has been listed around $74.98 per 4 x 8 sheet. National producer price data also shows plywood pricing moving during 2026, so check local pricing before locking in a project budget.
The cabinet itself may cost less than the sandpaper it stores. A stocked abrasive inventory can easily represent $50 to $300 or more, especially if you use ceramic discs, mesh abrasives, premium belts, or multiple sander sizes.
| Build Level | Typical 2026 Cost | What It Includes |
|---|---|---|
| Scrap-shop DIY | $45-$90 | Plywood scraps, simple dividers, glue, screws, brads, printed labels, unfinished or shop finish |
| New-material DIY | $100-$250 | Cabinet-grade plywood, hardwood edging, better labels, hinges or slides, pulls, finish, French cleat |
| Paid plan only | $6-$10 | Downloadable woodworking plan with drawings, dimensions, and cut list |
| Hired simple build | $250-$900 | 3-8 labor hours plus materials, wall mounting, basic shop-grade finish |
| Custom built-in station | $900+ | Integrated cabinets, matching finish, drawers, dust-control details, electrical or larger garage work |
For labor, consumer-facing carpenter rates commonly run about $40 to $100 per hour, with many skilled residential carpenters billing in the $75 to $125 per hour range in higher-cost markets. A small cabinet is not complicated, but layout, finishing, and installation time add up quickly.
Materials and Hardware That Make Sense
For a shop cabinet, spend money where it changes performance. Flat plywood, a reliable wall cleat, good labels, and adjustable dividers matter more than decorative trim.
The Tool Desk
Outbyte PC Repair FREEClear out junk files and repair common Windows errorsFree Scan →Outbyte Driver Updater FREEFix the driver behind crashes, sound loss and screen glitchesFind Drivers →A solid material list for a 28 x 21 x 7-inch cabinet looks like this:
- One partial sheet of 1/2-inch or 3/4-inch cabinet-grade plywood for the case
- 1/4-inch plywood or hardboard for dividers and tray bottoms
- 1/4-inch plywood, hardboard, or 1/2-inch plywood for the back
- 3/4-inch plywood strip or hardwood strip for a French cleat
- 1-1/4-inch cabinet screws or trim-head screws
- Wood glue
- 18-gauge brads or pin nails, if available
- Labels or label tape with high-contrast printing
- Clear finish, shellac, water-based polyurethane, or shop-grade paint
- Optional: small drawer slides, piano hinge, cabinet pull, magnetic catch, dowels, hooks
Avoid rough construction sheathing for small dividers. It can work for rough shop fixtures, but voids, splinters, and warped faces make thin slots frustrating. Cabinet-grade plywood cuts cleaner dados, stays flatter, and gives sheet paper a smoother surface.
Also popular on Amazon

- Proper Size: Our sandpaper holder measures 9.8 x 5.5 x 4.3 inches. The slots have an inner width of 1.2 inches. Perfectly organizes your 5-inch sandpaper sheets. This holder features removable dividers, allowing for up to 8 compartments. Each compartment holds approximately 20 sandpaper sheets.
- Grit Sorting: Our sandpaper holder easily organizes various combinations of sandpaper grits, including 60, 120, 240, 400, 600, 800, 1000, 1200, 1500, and 2000 grits. Eight slots allow for quick and easy identification of the desired grit, improving storage efficiency and workflow.
- Transparent and Safe: Our sandpaper holder is made of durable, transparent PET plastic. You can easily check all your stock at any time! The stylish and simple transparent plastic box provides a completely transparent visual experience; the integrated side handle allows you to easily and safely carry all your sandpaper sheets from your studio to the work site. All edges are smooth and secure, providing a comfortable grip and protecting both yourself and your sandpaper.
- Space-saving design: Our sandpaper holder offers easy and convenient access. The convenient open design allows for quick and easy retrieval without fumbling; it also stores accessories for your track sander, such as Velcro and pressure-sensitive adhesive sandpaper discs, reducing workspace clutter and maximizing work efficiency.
- Versatile: Our sandpaper holder is not only suitable for storing sandpaper, but also for office supplies, kitchen utensils, and cosmetics. It makes a great gift for family and friends on occasions such as Father's Day, Valentine's Day, and Christmas.
Build Sequence for a Clean, Durable Cabinet
The build is straightforward, but accuracy matters because small compartments multiply small errors. Plan for a half day if you are experienced and have plywood ready. Plan for a full weekend if you are buying materials, setting up tools, finishing the cabinet, and installing it carefully.
1. Measure Your Inventory
Stack your sheet packs, discs, belts, sanding blocks, and pads by type. Measure the widest pack, tallest belt loop, and thickest disc stack. Add at least 1/4 inch of clearance to small compartments and more where fingers need to reach in.
Recommended Free Tools
2. Cut the Case Parts
For a 28 x 21 x 7-inch cabinet, cut the top and bottom to the full width, the sides to the full height, and size the back to square the case. If you use 3/4-inch plywood, account for material thickness so the interior width remains useful. Dry-fit the case before cutting dividers.
3. Add Shelves and Dividers
Use dados if you want the cleanest result, but simple glued-and-pinned dividers are acceptable for a shop cabinet. Keep dividers removable where possible. Abrasive formats change: a shop that uses 5-inch discs today may add a 6-inch sander later.
4. Build Disc Trays or Cubbies
Random-orbit discs are easier to use when they are stored flat and labeled by grit. Shallow trays about 5-1/2 inches wide for 5-inch discs and 6-1/2 inches wide for 6-inch discs work well. If you use mesh abrasives, leave room for original packaging so the discs do not snag.
5. Add Belt Storage
Sanding belts should not be crushed into a short cubby. Use a dowel, hook, or tall vertical bay so belts hang without sharp folds. A 7-inch-deep cabinet will not hold every belt orientation perfectly, so test your actual belts before installing fixed partitions.
Free tools Windows power users keep installed
One-click scans. No signup required.
6. Sand, Label, and Finish
Break all sharp plywood edges with 180-grit paper. Apply a light shop finish so dust wipes off easily. We prefer clear finish or a light-colored paint inside because dark interiors make grit markings harder to read.
Organize by Sanding Workflow, Not Just Numbers
Most people organize sandpaper from coarse to fine, which is a good start. A better system is to organize by the work being done. That way you are not searching through every abrasive format when you are moving from milling marks to finish prep.
A practical grit system looks like this:
- 40-80 grit: stripping, heavy shaping, paint removal, rough leveling
- 100-150 grit: milling marks, saw marks, general smoothing
- 180-220 grit: final sanding before many stains, paints, and clear finishes
- 240-320 grit: between-coat sanding and fine surface prep
- 320 grit and higher: polishing, rubbing out finishes, specialty work
Keep the rough grits physically separate from finishing supplies. Coarse, dust-loaded abrasives do not belong next to tack cloths, fresh stain pads, or clean applicators. On construction sites, we separate dirty prep tools from finish-stage materials for the same reason: contamination causes rework.
Wall Mounting and Load Safety
A sandpaper cabinet looks light when it is empty. Loaded with abrasives, blocks, belts, and small tools, it can weigh 25 to 50 pounds. Add a door, drawer slides, or hardwood trim and the number climbs.
Do not hang this cabinet from drywall alone. Use a French cleat or a full-width back rail fastened into at least two wall studs. A French cleat is forgiving, strong, and easy to relocate if your shop layout changes.
For a typical wood-framed garage wall, use a 3/4-inch plywood cleat ripped at 45 degrees. Fasten the wall half of the cleat into studs with structural screws or cabinet screws long enough to penetrate framing by at least 1-1/2 inches. Use a level, predrill when needed, and avoid relying on small keyhole hangers for a loaded cabinet.
Also popular on Amazon

- Sufficient Quantity: you will receive 8 individual connectable sandpaper disc storage boxes, each box can hold up to 30 sandpaper discs, enough to meet your large number of storage needs
- Individual Connectable: our sandpaper storage boxes can be connected and combined at will to meet your different needs, and you can use the included expansion screws to install the spliced storage boxes wherever you want, such as on the wall; Please note: our product does not include sandpaper; Please confirm that it meets your needs before purchasing
- Grit Classification: sandpaper organizer boxes set includes grit size classification stickers, you can use the stickers to easily mark and classify the grit size, reduce your time looking for different sandpaper discs, and improve work efficiency
- Reliable Material: the sandpaper organizer holder is made of plastic, which can withstand the weight of multiple sandpaper discs, and the sturdy material is enough to use for a long time
- Wide Application: sanding discs storage rack is suitable for workshops, craftsmen, DIY enthusiasts and all those who like to solve problems by themselves; It can also be applied as a heartwarming gift for your family or friends on Christmas, Father's Day and Valentine's Day
If the wall is concrete, block, brick, or an older plaster assembly, anchoring details change. Masonry anchors, Tapcon-style screws, or a ledger fastened into proper anchors may be required. When we install wall-mounted storage in garages, the wall type determines the fastener, not the other way around.
Humidity, Dust, and Fire Housekeeping
Sandpaper storage is not only about neatness. Paper-backed sheets can curl or cup when exposed to humidity. Dust can clog abrasives before they are used. Used sandpaper may carry finish residue, paint dust, or fine wood dust that should not be stored carelessly near heat, sparks, or clean finishing materials.
Quick wins for a faster PC:
Fix the driver behind crashes, sound loss and screen glitchesFind Drivers →Clear out junk files and repair common Windows errorsFree Scan →Keep the cabinet in a dry part of the shop, preferably away from an overhead door that gets wind-driven rain or humid air. If your garage swings from damp mornings to hot afternoons, consider a simple door or dust flap on the cabinet. It does not need to be airtight, but it should keep airborne dust from settling into every compartment.
Good housekeeping rules are simple:
- Store new abrasives flat and dry
- Keep used abrasives in a separate labeled tray
- Throw away discs that are loaded with finish, paint, adhesive, or unknown material
- Do not store dusty abrasives beside solvents, oily rags, or clean finishing supplies
- Vacuum the cabinet during major shop cleanups
Fine dust is also a respiratory issue. A sandpaper cabinet is a good place to keep spare respirator filters or dust masks, but do not store them loose in the same open cubby as used abrasives. Clean respiratory supplies need clean storage.
Permits: Usually No, But Know the Boundary
Installing a small wall-mounted shop cabinet in a private garage or workshop usually does not require a building permit. It is personal storage, not structural work. Still, local rules vary, and the boundary changes when the work becomes part of a larger project.
You may need permits or inspections if the cabinet project expands into electrical changes, new lighting, new receptacles, wall framing, structural modifications, plumbing, HVAC changes, fire-rated wall alterations, or a broader garage conversion. Some jurisdictions publish lists of work that does not require a permit, but those lists are local. A city in Texas, a county in Oregon, and a municipality in New Mexico can treat residential work differently.
Our advice is practical: for a small cabinet screwed into studs, proceed like normal shop storage. For a full garage build-out with cabinets, dust collection, new circuits, insulation, or wall changes, check your local building department before work begins.
When to DIY vs When to Hire a Pro
This is a very reasonable DIY project if you own basic tools and can work safely. You need a saw that cuts plywood accurately, a drill or driver, clamps, a square, measuring tools, and ideally a brad nailer. A router or table saw makes dados cleaner, but neither is mandatory.
DIY makes sense when the cabinet is standalone, shop-grade appearance is acceptable, and you can mount it into exposed or easy-to-locate studs. Expect 4 to 8 hours of hands-on time for a simple version, plus finishing and installation. A careful first-time builder may spend a full weekend.
Hiring a pro makes sense when the cabinet is part of a larger garage storage wall, must match existing built-ins, needs drawers or finished doors, mounts to masonry, or shares space with dust collection and electrical work. It also makes sense if the cabinet will be used by multiple people and needs to withstand commercial or semi-commercial use.
What’s actually slowing this PC down?
Pick the symptom - the matching free tool is one click away.
| Situation | Best Choice | Why |
|---|---|---|
| Small shop cabinet from plywood scraps | DIY | Low cost, low risk, easy to customize |
| Wall-mounted cabinet above a home bench | DIY or handyman | Simple if studs are accessible and layout is clear |
| Cabinet on concrete or block wall | Experienced DIY or pro | Anchoring must match masonry conditions |
| Garage remodel with lighting and outlets | Pro | Electrical, code, and layout coordination matter |
| Finished built-in storage system | Pro | Fit, finish, and long-term durability justify labor cost |
Common Mistakes to Avoid
The most common mistake is copying old dimensions without checking current supplies. Abrasive packaging, disc hole patterns, sander sizes, and belt lengths change. A cabinet that fits one brand perfectly may be awkward for another.
The second mistake is making everything too tight. Tight slots look efficient on paper, but they curl sheets, scrape disc edges, and make it hard to grab one grit without disturbing five others. Leave finger room.
Also popular on Amazon
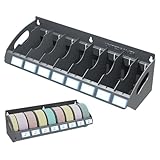
- Well Organizer: This sandpaper storage rack features 8 individual compartments, Store your different sizes of sandpaper in one convenient, compact rest for easy access, great for use in the garage, shop. this will affix to any flat wall
- Space Saving: The sanding discs rack can be mounted on a tool box, cart or wall, for the ultimate in convenience, storage and organization, keeps your workspace organized, decluttered, reducing clutter in the workspac
- Adjustable compartments: The adjustable partitions to meet your actual needs, Pull up the partition and adjust to the distance size you want
- Quick Tool Access: Includes self-adhesive stickers labels for instant identification—no more wasted time searching for the right abrasive, the open-bin design allows quick access
- Durable Material: The sanding discs Storage Organizer Made of heavy metal with powder coated finish for lasting durability
The third mistake is weak labeling. Dust covers small pencil marks quickly. Use high-contrast labels on the front edge of each shelf or tray. In shared shops, duplicate the label inside the cubby so the system survives when the front edge gets dirty.
The fourth mistake is poor anchoring. A cabinet loaded with abrasives is heavier than it appears, and repeated door opening or tray pulling adds movement. Anchor into studs or masonry with appropriate fasteners.
Outdated Drivers Are Slowing You Down
One free scan finds every outdated or missing driver and matches the right update for your exact hardware.Free scan · exact hardware matchPC Slower Than It Used to Be?
A free scan shows the junk files, broken settings and background clutter dragging Windows down - then fixes them in one click.Free scan · Windows 10 & 11The fifth mistake is building a fixed interior around today’s tools. Add removable trays, loose dividers, or adjustable shelves where possible. The cabinet should adapt when you buy a new sander or switch abrasive brands.
Final Recommendation
For most home woodworking shops, build a wall-mounted sandpaper cabinet about 28 inches wide, 21 inches tall, and 7 inches deep, using 1/2-inch or 3/4-inch plywood for the case and thinner stock for dividers. Mount it on a French cleat fastened into at least two studs. Organize it by workflow: rough shaping, surface prep, finish prep, between-coat sanding, and polishing.
Keep the cabinet simple, shallow, labeled, and adaptable. The goal is not to make a showpiece. The goal is to stop wasting time hunting for 180-grit discs, stop damaging full sheets before they are used, and keep your sanding process clean enough that it supports better finishing work.
If this small cabinet is part of a larger garage or workshop plan, treat it as one piece of a bigger system: wall loads, moisture, dust control, lighting, electrical access, and future tool storage. That is where a simple woodworking plan starts to cross into professional shop planning.
Frequently Asked Questions
How much does it cost to build a sandpaper storage cabinet in 2026?
A small DIY sandpaper cabinet usually costs about $45 to $140 if you use scraps and simple hardware. If you buy new cabinet-grade plywood, hardwood edging, hinges, slides, labels, and finish, budget about $100 to $250. A hired custom build commonly runs $250 to $900.
What size should a sandpaper cabinet be?
A practical compact size is about 28 inches wide, 21 inches tall, and 7 inches deep. That gives enough room for 9 x 11 sheets, 5-inch or 6-inch discs, sanding belts, blocks, pads, and small accessories without taking over the wall.
What plywood thickness is best for a shop sandpaper cabinet?
Use 1/2-inch or 3/4-inch cabinet-grade plywood for the case. Use 3/4-inch material if the cabinet will have drawers, doors, or a heavy inventory. Thin 1/4-inch plywood or hardboard works well for short dividers and tray bottoms.
Do I need a permit to install a wall-mounted cabinet in my garage?
A small wall-mounted storage cabinet usually does not require a permit. Permits may become relevant if the project includes electrical work, wall framing, structural changes, plumbing, HVAC, fire-rated wall changes, or a larger garage conversion.
Recommended Free Tools
How should sandpaper be stored so it does not curl?
Store sheets flat, dry, and slightly loose in shallow compartments. Avoid tight slots, damp garage corners, and open storage that collects dust. If humidity is a problem, add a simple cabinet door or dust flap.
Is a French cleat strong enough for a sanding-supply cabinet?
Yes, when properly built and fastened. Use a full-width 3/4-inch plywood or hardwood cleat and drive appropriate screws into at least two studs. Do not rely on drywall anchors alone for a loaded cabinet.
Quick Recap
Product prices and availability are accurate as of the date/time indicated and are subject to change. Any price and availability information displayed on Amazon at the time of purchase will apply.

