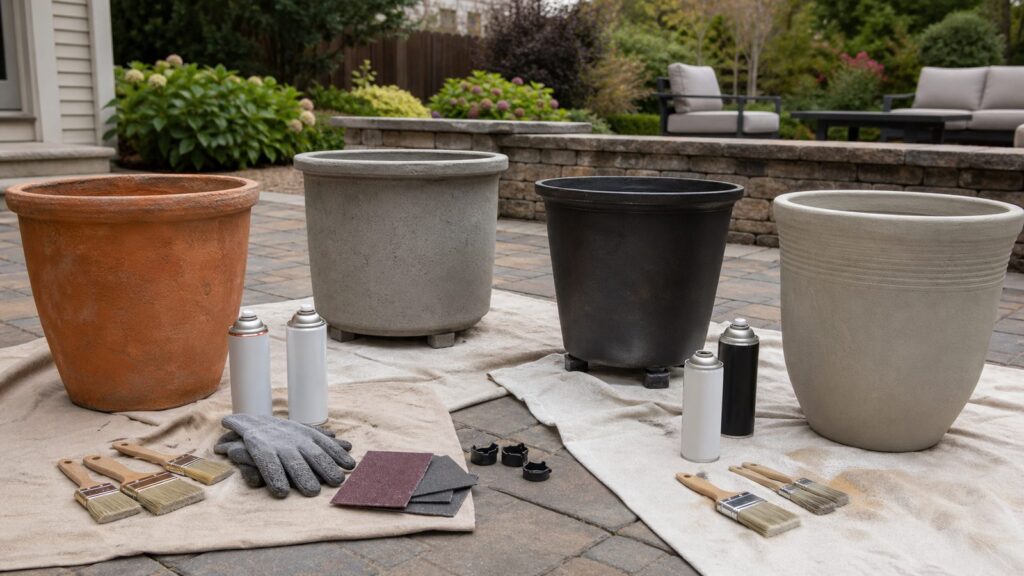
Refinishing patio pots is a practical way to make an outdoor space look newer without replacing every planter. For most homeowners, it is a weekend maintenance project, not a construction project: clean the pots, repair minor defects, choose the right primer and coating for the material, paint in thin coats, let the finish cure, and keep water draining freely.
The catch is that patio pots live in a rough environment. They hold damp soil, sit on concrete or pavers, bake in UV, and sometimes freeze while full of water. On our job sites, when we see painted planters failing early, the cause is usually not the paint brand. It is moisture trapped in terra cotta or concrete, poor adhesion on plastic, rust left under paint on metal, or blocked drainage that keeps the bottom edge wet all season.
As an Amazon Associate I earn from qualifying purchases.
A good refinishing job can refresh 4 to 10 medium pots for about $45 to $120 in DIY materials in 2026. A smaller 2 to 4 pot project can land around $20 to $45 if you already have gloves, drop cloths, sanding pads, and basic brushes. Replacement can still make sense for brittle plastic, badly cracked clay, or spalling concrete, but structurally sound large ceramic, fiberglass, concrete, and decorative planters are often worth saving.
Start by Sorting Pots by Material
Before buying paint, group your patio pots by substrate. Do not use one universal method for everything on the patio. A clay pot, a resin planter, a concrete trough, and a rusted metal container all fail in different ways.
#1 Best Overall

- Valued Carpenter Pencil Set: You will get 2 pcs solid carpenter pencils with 26 piece 2.8 mm refills, 1 replaceable sharpener, 1 plastic storage box.The complete carpenter pencils combination allows you to finish your work faster and more easily
- Deep Hole Marker Pencil: The deep-hole construction pencils adopts 45mm elongated tip design, which is more convenient to mark in the small hole or in other tight areas that other carpenter markers cannot reach
- Carpenter Pencils with Sharpener: The sharpener is screwed into the top of the work pencil, which won't get lost either. Built-in pencil sharpener that keep the lead with pointed and smooth to Improves line of sight in fine work
- Stronger Solid Lead: This work pencil is matched with a 2.8 mm thick lead , which is much thicker and stronger during the drawing process of construction work, it will not break or damage easily
- Marks on Various Surfaces: 3 colors solid construction pencil can marks on various surfaces,such as metal, plastic, wood, paper etc. Ideals for woodworkers, contractors, craftsmen, builders, merchants and masons
Use these working categories:
- Terra cotta and unglazed clay: porous, moisture-sensitive, prone to salts and peeling if sealed incorrectly.
- Concrete and masonry: porous, heavy, often chalky or alkaline, may need masonry coatings or penetrating sealer.
- Plastic, resin, and fiberglass: lower surface energy, needs scuffing and paint rated for plastic or all-surface exterior use.
- Metal: needs rust removal and rust-inhibiting primer before topcoat.
- Glazed ceramic: hard, slick surface; adhesion testing matters more than color choice.
If you have several materials, treat each group as its own small project. That keeps primer, paint, and sealer chemistry compatible. It also prevents one pot from being under-prepped because another material was easier.
What It Costs to Refinish Patio Pots in 2026
Most patio pot refinishing projects are inexpensive because the surface area is small. The biggest cost drivers are the number of pots, whether old coatings need to be stripped, whether you need specialty texture or masonry sealer, and whether the pots have to be emptied, moved, repaired, and replanted.
| Project Type | Typical 2026 Cost | What It Usually Includes |
|---|---|---|
| Light DIY refresh, 2 to 4 small or medium pots | $20 to $45 | 1 to 2 cans of exterior spray paint or small paint bottles, light sanding, basic masking, clear coat if needed |
| Full DIY refresh, 4 to 10 pots | $45 to $120 | Cleaner or degreaser, sanding pads or wire brush, primer, 2 to 4 cans of paint or 1 quart exterior acrylic, sealer, tape, gloves, masking materials |
| Spray paint | $6 to $12 per 12 oz can | Common exterior spray paint; specialty stone-look, textured, metallic, or all-surface products often run $8 to $18 per can |
| Aerosol primer | $7 to $13 per can | General exterior primer, adhesion primer, or rust-inhibiting primer depending on substrate |
| Concrete or masonry sealer | $29 to $50 per gallon | Common retail gallon options; premium 5-gallon silane/siloxane products can run around $200 to $250 |
| Professional labor | $20 to $50 per hour nationally; $75+ in higher-cost metros | Usually only economical when bundled with exterior painting, patio sealing, deck staining, or landscape maintenance |
A realistic DIY time budget is 1 to 3 hours of active work for several pots, plus cure time. Most primer, paint, and sealer systems need 24 to 72 hours before you should reload the pot with damp soil and plants. Humidity, cool weather, heavy coating thickness, and low airflow can stretch that timeline.
What’s actually slowing this PC down?
Pick the symptom - the matching free tool is one click away.
Inspect Before You Refinish
Refinishing is not a fix for a pot that is failing structurally. Before you clean or paint, empty the pot if practical and inspect the rim, sidewalls, bottom, and drainage holes.
Minor surface chips, faded color, stains, and old peeling paint are normal refinishing candidates. Hairline cracks in terra cotta can sometimes be stabilized cosmetically, but long cracks running from rim to base are usually a replacement signal. Concrete planters with deep spalling, exposed aggregate that keeps shedding, or cracks that widen after cleaning may keep deteriorating under a new finish. UV-damaged plastic that feels brittle, chalky, or flexes with cracking is rarely worth much labor.
Drainage deserves the same attention as appearance. A planter with blocked or undersized drainage holes will keep water against the coating, rot roots, stain patios, and speed up freeze-thaw damage. For most medium outdoor pots, at least one clear drainage hole is the bare minimum; two or three holes are better for wide planters. If the pot sits directly on a slab, add pot feet or risers after refinishing so air can move under the bottom edge.
Prep Steps That Make the Finish Last
Paint failures usually start before the first coat goes on. A clean, dry, lightly profiled surface gives the coating a chance. A wet, dusty, glossy, or salty surface almost guarantees peeling.
Clean the Surface
Remove soil, loose roots, mineral crust, algae, and old flaking paint. For terra cotta and concrete, use a stiff nylon brush and clean water first. A mild detergent can help with grime. For plastic and resin, use a degreaser or dish soap solution to remove sunscreen residue, pollen film, and oily dirt. For metal, remove loose rust and flaking paint with a wire brush or sanding pad.
Avoid painting over white powdery efflorescence on clay or masonry. That residue is salt moving through the pot wall with moisture. Brush it off, rinse, and let the pot dry fully. If it returns quickly before painting, the pot may be holding more moisture than it appears.
Dry Longer Than You Think
Terra cotta and concrete can look dry on the outside while the wall still holds water. In warm, dry weather, give porous pots at least 24 hours after washing. Thick concrete planters, shaded patios, and humid climates may need 48 hours or more. If the pot was full of wet soil, emptying it and drying it upside down on blocks can make a noticeable difference.
Scuff Glossy and Plastic Surfaces
Plastic, fiberglass, resin, and glazed ceramic need mechanical tooth. Lightly sand with a fine sanding pad, often around 180 to 220 grit, then wipe the dust away. You are not trying to carve scratches into the planter. You are breaking the gloss so primer or paint can grip.
Mask and Elevate
Set pots on scrap blocks, painter pyramids, or narrow boards so the bottom edge is off the drop cloth. This lets you coat the lower lip without gluing the pot to the surface. Mask inside the rim if you want a clean line. For a more durable job, coat the rim and the bottom edge after the main body dries enough to handle.
Choose the Right Coating System by Pot Material
The best-looking finish is the one that works with the material underneath. Color is the easy part. Adhesion, breathability, moisture control, and UV resistance decide whether the pot still looks good next season.
Terra Cotta and Clay Pots
Terra cotta is porous. Water moves through the wall from damp soil to the exterior surface, carrying salts with it. If you paint only the outside with an impermeable film, moisture can push from the inside and cause bubbling, peeling, or white deposits.
Rank #2

- Ergonomically Designed: Work in tight areas with a compact design that gets into tough spots
- Both tools are designed to fit into difficult to reach spaces
- Complete a wide range of applications with a high-performance motor that delivers up to 300 UWO, and an impact driver delivering up to 1,400 in-lbs of torque
- Both the DEWALT impact driver and drill driver feature integrated LED work lights with a convenient 20-second delay, ensuring enhanced visibility in dimly lit or challenging work areas
- One-Handed Loading - Keep one hand free with a 1/4 in. hex chuck that accepts 1 in. bit tips
For a decorative terra cotta finish, clean thoroughly, dry fully, and use exterior-rated acrylic paint or a spray product compatible with clay. Many homeowners seal the inside and outside before painting to slow moisture migration, then apply a compatible exterior topcoat and clear sealer. Keep the drainage hole open. Do not seal the bottom so completely that trapped water has nowhere to go.
Do these 3 things before closing this tab:
1Clear out junk files and repair common Windows errors2Fix the driver behind crashes, sound loss and screen glitches3Repair Windows errors before they cause bigger problemsFor a natural look, consider cleaning the pot and using a breathable masonry sealer rather than paint. You can also paint bands, rims, or patterns while leaving part of the clay exposed. That approach is more forgiving in wet climates.
Concrete and Masonry Planters
Concrete pots should be cleaned with a stiff brush, stripped of loose or flaking material, and allowed to dry completely. Use masonry-compatible paint, concrete stain, or a breathable/penetrating sealer depending on the look you want.
If the concrete is chalky, dusty, or shedding, paint will not fix it by itself. Brush until the loose surface stops coming off. For a refined finish, patch small chips with an exterior masonry repair product, let it cure per label, sand rough edges, and then coat. A penetrating sealer is often a better choice for planters where you want a mineral, stone-like finish instead of a painted shell.
Plastic, Resin, and Fiberglass Planters
Plastic planters fail mostly from poor adhesion and UV exposure. Clean, degrease, scuff, and use paint specifically rated for plastic or all-surface exterior use. Some spray paints include primer; others still benefit from a bonding primer. Follow the label on recoat windows closely. Missing the recoat window can cause wrinkling or weak adhesion.
Crashes, No Sound, or Screen Glitches?
Random freezes, missing sound and display glitches usually trace back to one bad driver. Find and replace yours safely.Free scan · under a minutePC Slower Than It Used to Be?
A free scan shows the junk files, broken settings and background clutter dragging Windows down - then fixes them in one click.Free scan · Windows 10 & 11For a concrete-look finish on plastic, do not stop at one flat gray coat. Use a compatible textured spray or a sanded first coat, then mist in two or three related tones such as warm gray, taupe, and charcoal. Keep the variation subtle. Real concrete is not one perfectly uniform color.
Metal Planters
Metal needs rust handled first. Scrape or wire-brush loose rust, sand edges smooth, clean the surface, and prime bare or rusty spots with a rust-inhibiting primer. Then apply an exterior-rated enamel or all-surface topcoat. If you paint directly over rust scale, the finish may look good for a few weeks and then blister from below.
Pay attention to seams, feet, handles, and the bottom edge. Those areas hold water and usually rust first. If a planter has pinholes or deep corrosion, replacement may be smarter than refinishing.
Glazed Ceramic Pots
Glazed ceramic can be refinished, but adhesion is less predictable because the surface is hard and slick. Scuff the gloss, wipe clean, and test primer and paint on a hidden area before committing to the whole pot. If the test patch scratches off easily after curing, use a stronger bonding primer or choose a different finish plan.
The Tool Desk
Outbyte Driver Updater FREEScan for outdated or missing drivers - takes under a minuteDriver Scan →Outbyte PC Repair FREEClear out junk files and repair common Windows errorsFree Scan →Step-by-Step: Refinish Patio Pots
This process works for most exterior patio pots when you pair it with the material guidance above.
- Empty and inspect. Remove plants if needed, or protect soil and foliage with plastic and painter’s tape. Check for cracks, loose surfaces, blocked drainage, and unstable bases.
- Clean thoroughly. Brush off dirt, algae, salts, and flaking paint. Wash with mild detergent or degreaser where appropriate. Rinse well.
- Dry completely. Let terra cotta and concrete dry at least 24 hours in warm, dry weather; allow 48 hours or more if the pot is thick, shaded, or was saturated.
- Sand or scuff. Use sanding pads on plastic, resin, fiberglass, glazed ceramic, and any old glossy coating. Wire-brush rusty metal.
- Repair minor damage. Patch small concrete chips, sand rough edges, and stabilize minor imperfections. Replace pots with major cracks or crumbling walls.
- Prime as needed. Use bonding primer for slick surfaces, masonry-compatible primer for concrete if the paint system calls for it, and rust-inhibiting primer on metal.
- Apply thin coats. Spray or brush multiple light coats instead of one heavy coat. Heavy coats drip, stay tacky, and crack more easily.
- Seal when appropriate. Use a compatible exterior clear coat, masonry sealer, or penetrating sealer. Confirm primer, paint, and sealer compatibility before layering products.
- Cure before planting. Wait 24 to 72 hours before reloading with soil and plants, unless the product label requires longer.
- Raise the finished pot. Use pot feet, risers, or drainage mats to reduce staining and keep the bottom edge drier.
For spray work, hold the can at the distance listed on the label, usually about 8 to 12 inches. Start spraying just off the pot, move across at a steady speed, and release after passing the edge. Rotate the pot rather than bending your wrist into awkward angles. Several thin passes from different directions produce a more professional result around ribs, rims, and textured surfaces.
Design Choices That Look Intentional
The best refinished planters look connected to the house, not like leftover paint was used because it was in the garage. Start with fixed exterior elements: window trim, siding, paver undertones, stone veneer, railing color, door hardware, and outdoor furniture frames.
For traditional homes, satin black, deep bronze, warm white, charcoal, olive, and muted clay colors usually age better than bright novelty colors. For modern patios, matte black, graphite, soft concrete gray, deep green, and warm off-white work well when repeated across several pot sizes. For coastal or cottage spaces, restrained blue-gray, sage, terracotta, and cream can work, but keep the palette tied to the architecture.
Quick wins for a faster PC:
Scan for outdated or missing drivers - takes under a minuteDriver Scan →Repair Windows errors before they cause bigger problemsFix Now →A good rule is to use one anchor color for 60 to 70 percent of the planters, one secondary color for 20 to 30 percent, and one accent finish for the rest. If every pot is a different color, the patio can look busy. If every pot is identical, it can look flat. Vary size, height, plant texture, and finish sheen instead of relying only on color.
Rank #3

- 【Great Compatibility】This Katerk 1/4 inch hex shank bit holder is specifically designed for 1/4 inch hex shank drill bits. It's compatible with most 1/4 fast hex handles, hex sockets, various electric screwdrivers, and handheld screwdrivers. The bit holder makes it a valuable addition for any handyman.
- 【Secure and Safe】Built with a secure backup nut design, each drill bit holder securely locks onto your bits, ensuring they stay firmly in place. Additionally, our bit holder incorporates a high-quality steel ball rolling design that holds up to several kilograms of weight, ensuring your various drill bits don't fall off.
- 【Easy One-Handed Operation】The bit holder for impact driver allows you to change bits single-handedly, simplifying your workflow. Its multi-color design further allows for quick identification of the drill bit you need.
- 【Compact and Convenient】Thanks to its compact size, this 1/4 inch bit holder is easy to carry around. The bit holder allows for easy attachment to various tools, making this a convenient addition to your construction accessories. The Katerk bit holder is cast from high-quality alloy material, promising a long product lifespan. Despite its rugged strength, the bit holder remains lightweight, making it portable.
- 【Cool Christmas Gift For Men Stocking Stuffers】 This screwdriver bit holder, driver bit holder, impact bit holder, can be given as a gift to your loved one, especially for anyone involved in construction or electrical work. It's a must-have for stocking stuffers for men and women, tools gifts for dad, tech gadgets for men, gifts for dad, gifts for him, gifts for husband, gifts for boyfriend, cool gadgets for men, and cool gifts for dad.
Safety, VOC, Disposal, and Weather Notes
Work outdoors or in a highly ventilated area. Wear gloves and eye protection when brushing, sanding, spraying, or using cleaners. A disposable dust mask is not the same as a respirator for solvent fumes; follow the coating label, especially with aerosol products.
Choose a painting window with dry weather, low wind, shade or indirect sun, and temperatures within the product label range. Many exterior coatings are commonly applied somewhere around 50 to 90 degrees Fahrenheit, but the label controls. Direct hot sun can skin the coating too fast. Cold, damp air can leave paint tacky and weak.
Control overspray. Move cars, cushions, grills, and outdoor furniture away from the work area. Use a drop cloth or cardboard spray shield, but keep it stable so wind does not blow it into wet paint.
Free tools Windows power users keep installed
One-click scans. No signup required.
Do not pour leftover paint, solvents, or sealer into storm drains, soil, or household drains. Many paints, aerosol cans, solvents, and sealers fall under household hazardous waste rules depending on the product and local program. Let empty aerosol cans and leftover coatings be handled according to your city or county waste guidance. California and some other jurisdictions also regulate consumer product VOC content, so availability and formulas can vary by state.
Permits, Deck Loads, and Rooftop Planters
Refinishing movable patio pots at grade is generally maintenance, not permitted construction. That changes when planters become part of a built-in system or affect safety conditions.
Get professional guidance if the pots are built into masonry, tied into irrigation or low-voltage lighting, placed on a roof, set on an elevated deck, or located where they affect guardrails, stairs, walking clearances, or egress. Large planters can become surprisingly heavy. Saturated soil, gravel, wet concrete, and mature plants can turn a decorative container into a structural load.
As a practical habit, document heavy planter locations on elevated decks or rooftops. Keep rough saturated-weight estimates with your property records, especially for multifamily buildings, commercial patios, roof terraces, and homes likely to be remodeled later. A 30-inch planter full of wet soil is not just decor from a builder’s perspective; it is a load that needs a proper bearing surface.
Recommended Free Tools
When to DIY vs When to Hire a Pro
DIY makes sense when the pots are movable, structurally sound, easy to clean, and you are using ordinary exterior paint, spray paint, or sealer. A homeowner with a free afternoon can usually refinish several small or medium pots for less than the cost of one large replacement planter.
Hire or bundle with a pro when the planters are heavy, built-in, high-value, on an elevated structure, or part of a larger exterior refresh. Professional painters commonly charge about $20 to $50 per hour nationally, with rates of $75 or more per hour in higher-cost metro areas. Because refinishing pots is small work, minimum trip charges can make a standalone service inefficient. It is often smarter to include planters while the crew is already on site for fence staining, deck staining, patio sealing, exterior touch-ups, stucco repairs, or landscape improvements.
A pro is also worthwhile for specialty finishes: stone-look layering, architectural color matching, masonry patching, corrosion correction, or refinishing large fiberglass and concrete planters without damaging the patio surface. On our projects, we also look at the surrounding hardscape. There is no point making planters look new while leaving rust stains, irrigation overspray marks, or failing sealer underneath them.
Independent reader supportYour contribution helps us test, update, and keep practical guides available for everyone.When Replacement Is the Better Call
Refinishing is attractive because the material cost is low, but it is not always the right answer. Replace the pot if it is structurally cracked, brittle, unstable, missing a functional base, or deteriorating faster than you can clean it.
Replacement is usually smarter for sun-baked plastic that cracks when flexed, terra cotta split by freeze-thaw cycles, metal with deep rust perforations, and concrete with active spalling that continues after brushing. It may also be smarter when the planter has no practical way to drain. You can drill some materials, but glazed ceramic and brittle clay can fracture, and drilling concrete or heavy planters requires the right bit, support, and patience.
Refinishing usually wins for large decorative planters that are sound but faded. Large ceramic, fiberglass, concrete, and architectural planters can cost hundreds of dollars each to replace. Spending $45 to $120 in materials to refresh a group of them is a good trade when the structure is solid.
Common Mistakes to Avoid
The most common mistake is painting over dirt, moisture, chalk, algae, or salts. Coatings need a stable surface. If the surface underneath is moving, dusty, or damp, the paint will not make it stable.
Rank #4

- Long Nib and Deep Hole Marker: Our mechanical carpenter pencil with 45mm nib is designed for easy marking of deep holes or narrow areas. These construction pencils are the great choice for woodworking tools, construction tools, carpenter tools, contractor tools, wood carpentry tools and architect tools
- Extra Refills in 2 Colors for Versatile Marking: The construction mechanical pencil comes with 12 extra 2.8mm refills, including 6 red and 6 black refills. The black refill is suitable for light surfaces, while the red wax is perfect for dark surfaces. Our carpenter mechanical pencil makes sure that you'll have an ample supply for extended use
- Built-in Sharpener: Our construction pencil comes with a built-in sharpener to ensure the mechanical pencil tip is always sharp and ready for use. Never buy an extra pencil sharpener again. A great tool for any woodworker pencil, contractor pencils. The refill can easily be extended or retracted with a simple click of the pencils mechanical, allowing you to work more efficiently and accurately
- Portable Clip Design: Our deep hole construction pencil features a portable clip design, easy to carry and attach to your pocket or tool box, so that you can keep the carpenter pencils mechanical close at hand, making it a convenient tool to have on the go. Great gifts choice for carpenters
- Stronger Pencil Lead: The black refills are made of lead, sturdy and smooth. The red refills are made of wax, clear and light. These marking pencils are much thicker and stronger than normal pencils during the marking process of construction work, suitable for various surfaces, such as glasses, metal, boards, floors, walls, furniture, etc. The written marks can be easily wiped with a wet paper towel when needed
Other mistakes include skipping primer on plastic or rusty metal, using interior paint outdoors, applying one heavy coat instead of several thin coats, painting in direct hot sun, sealing only the outside of terra cotta while wet soil drives moisture through the wall, and setting freshly painted pots directly on a patio where the bottom edge stays wet.
Do these 3 things before closing this tab:
1Scan for outdated or missing drivers - takes under a minute2Repair Windows errors before they cause bigger problems3Fix the driver behind crashes, sound loss and screen glitchesAlso avoid mixing random products without checking compatibility. A primer, color coat, texture coat, and clear coat should be from compatible chemistry or confirmed by the manufacturer. If you are unsure, make a test patch on the back of the pot and give it a full cure before judging adhesion.
Maintenance After Refinishing
After the finish cures, protect the work by managing water. Keep drainage holes open. Use pot feet or risers. Avoid letting irrigation spray hit the same side of the planter every day. Lift pots occasionally and clean underneath so mineral stains and algae do not build up on the patio.
Expect minor touch-ups every few seasons depending on climate, sun exposure, planter material, and how often pots are moved. A shaded covered porch may hold a finish for years. A south-facing patio with dark planters, daily irrigation, and freeze-thaw exposure is a harsher test.
Clean refinished pots with mild soap and water. Avoid pressure washing at close range, harsh solvents, stiff metal scraping on painted surfaces, and dragging planters across concrete. Small chips should be sanded, cleaned, spot-primed if needed, and touched up before water gets under the coating.
Bottom Line
Refinishing patio pots is a high-return exterior refresh when the planter is structurally sound and the coating system matches the material. Sort by substrate, clean aggressively, dry porous pots thoroughly, use the correct primer or sealer, apply thin coats, and keep drainage working. For most homeowners, that means a $20 to $120 project that can make a patio look planned again within a weekend, with full cure typically taking 24 to 72 hours.
The professional standard is simple: do not treat paint as a cover-up. Treat refinishing as surface preparation, moisture management, coating compatibility, and finish work. That is what separates a pot that looks good for one afternoon from one that still looks sharp after a full season outside.
Frequently Asked Questions
What kind of paint should I use on outdoor patio pots?
Use exterior-rated paint matched to the pot material. Terra cotta and concrete need masonry-compatible or breathable systems, plastic needs paint rated for plastic or all-surface exterior use, and metal needs rust-inhibiting primer before an exterior topcoat.
Do terra cotta pots need to be sealed before or after painting?
Usually yes, but moisture management matters. Terra cotta is porous, so sealing only the outside can trap moisture movement from damp soil and cause peeling. Many projects benefit from compatible sealing inside and outside, while keeping drainage open.
Can you spray paint plastic planters and make it last outside?
Yes, if the planter is not brittle from UV damage. Clean and degrease it, scuff the glossy surface, and use a spray paint or primer system rated for plastic and exterior exposure. Multiple thin coats last better than one heavy coat.
How much does it cost to refinish patio pots in 2026?
A small DIY refresh for 2 to 4 pots usually costs about $20 to $45 if you own basic supplies. A fuller 4 to 10 pot project typically runs $45 to $120 for cleaner, sanding pads, primer, paint, clear coat or sealer, tape, gloves, and masking materials.
How long should painted pots dry before adding plants?
Plan on 24 to 72 hours before reloading pots with soil and plants, depending on the product, temperature, humidity, coating thickness, and whether primer or sealer was used. Always follow the longest cure time listed in the coating system.
Do large planters on a deck or rooftop need a permit or structural review?
Movable pots at grade usually do not need permits. Large planters on decks or rooftops may need structural review because saturated soil and water add significant weight, especially if planters are built-in or affect guards, egress, irrigation, or lighting.
Outdated Drivers Are Slowing You Down
One free scan finds every outdated or missing driver and matches the right update for your exact hardware.Free scan · exact hardware matchPC Slower Than It Used to Be?
A free scan shows the junk files, broken settings and background clutter dragging Windows down - then fixes them in one click.Free scan · Windows 10 & 11Quick Recap
Product prices and availability are accurate as of the date/time indicated and are subject to change. Any price and availability information displayed on Amazon at the time of purchase will apply.

