Japanese indigo (Persicaria tinctoria) is a practical anchor for a backyard dye garden: it grows from seed, can be cut more than once, and its leaves can be used fresh or processed into stored pigment. Start with a small planting and choose the dyeing route you want before harvest; fresh-leaf dyeing and making indigo pigment require different preparation.
Start with Japanese indigo
Japanese indigo is an annual also known as Polygonum tinctorium. Use the botanical name when buying seed so you can distinguish it from other plants sold as indigo. Utah State University Extension’s October 2024 growing guide offers a useful starting plan, but planting dates and watering needs must be adapted to your local frost dates, soil, heat, and rainfall.
Start seed and transplant
- For indoor starts, sow seed about five to six weeks before your local last spring frost. Soaking seed for 12–24 hours may help germination.
- For direct sowing, wait until frost danger has passed and the soil is above 50°F. Sow seed 1/8 to 1/4 inch deep.
- Harden indoor seedlings outdoors over about two weeks. Transplant when they have roughly three to four leaves and established roots.
For the full planting guidance, see USU Extension’s Japanese indigo growing guide.
Choose the site and spacing
Choose a sunny location that receives at least six to eight hours of direct light daily, with well-drained, neutral-pH soil. Japanese indigo is not drought tolerant. USU estimates one to two inches of water per week for Utah conditions, potentially two inches during intense heat, while noting that precise irrigation research is limited; treat that amount as a regional estimate, not a universal schedule. Mulch can help retain moisture, and a soil test can guide fertilizer decisions.
#1 Best Overall

- Natural & Non-Toxic Dye – Made from 100% natural sources, Honey Oak’s dye is safe, chemical-free, and perfect for all ages to enjoy mess-free fabric fun
- 3 Vibrant Long-Lasting Colors – Includes Olive Green, Sunflower Yellow, and Turkey Red. These bold shades stay bright even after repeated washings.
- All-in-One DIY Kit – Comes with everything you need: 3 colors, apron, tablecloth, gloves, elastic bands, and clear instructions for beginners and pros alike.
- Multi-Purpose Use – Ideal for cotton, linen, silk, canvas, and more. Perfect for decorating t-shirts, bags, scarves, and other clothing or home items.
- Fun for Everyone – Great for kids, adults, DIY enthusiasts, and craft parties. Create your own wearable art in a safe, creative way.
Plant groups of three to six small transplants about 12–18 inches apart, with rows roughly 36 inches apart. Larger transplants can be planted singly. In especially hot conditions, some afternoon shade may help reduce heat stress, though it may also reduce indigo precursor production.
Harvest leaves for repeated use
Let plants establish before the first cut. USU suggests an initial harvest when plants are about one to two feet tall. Cut stems while leaving several nodes so the plant can regrow, and harvest in the morning. If the season is long enough, wait about four to six weeks before cutting again. USU notes that three or more harvests may be possible in longer Utah seasons, while shorter seasons may allow two; your local growing season will determine what is realistic.
Rank #2
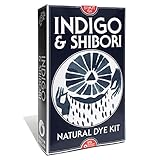
- Natural indigo dye kit packed with everything you need to create a bundle of permanent, dyed patterns on any plant-based fabric.
- We’ve gathered the finest quality ingredients and supplies for you: the beginner to intermediate dyer.
- May this kit inspire and challenge you to create new, beautiful work.
- THIS KIT INCLUDES: (1) Naturally derived indigo pigment. (2) All necessary activation and setting agents. (3) Protective gloves. (4) A blank cotton gauze bandana. (5) Wood clamps and cotton cord. (6) Illustrated instructions.
- YOU WILL NEED: (1) Two five gallon buckets: one for dyeing, one for rinsing. (2) A long mixing stick. (3) Hot water.
Choose between fresh leaves and extracted pigment
Fresh-leaf dyeing uses leaves directly, while pigment extraction turns harvested plants into a dry powder that can be stored. Fresh-leaf dyeing avoids the extraction process; making powder takes more steps and involves high-pH liquid.
| Route | What it involves | Fiber and preparation | Best fit |
|---|---|---|---|
| Fresh leaves | Use harvested leaves directly; USU suggests roughly two to five or more times the dry fiber weight in leaves. | Protein fibers such as silk and wool work best. Cotton and linen need extra preparation, such as soymilk treatment, unless using a more complex process. Scour fabric first to reduce the risk of blotchy uptake. | Trying a leaf-based dye method without first making pigment powder. |
| Extracted pigment | Ferment stems, strain, raise the liquid’s pH, aerate it, settle the pigment, then dry the remaining slurry to powder. | The powder can be used in a vat-dye process. Scour fabric before dyeing; USU describes a fructose vat method. | Keeping pigment for later dyeing and taking on a longer, more involved process. |
USU’s guides explain fresh-leaf dyeing and fabric preparation and indigo pigment extraction in more detail.
Recommended Free Tools
Rank #3

- Set Of 4 Natural Food Dye Powders (Red, Yellow, Orange, Magic Blackberry); Heat Resistant And 3x More Concentrated Than Other Brands.
- Each Packet Vibrantly Colors Up To 2 Cups Of Frosting, 2 Layers Of Cake Or 24 Cupcakes. For Softer Shades Like Pink, Start With A Small Amount Of Color.
- Best For Non-Toxic Baking, Decorating And Crafting Projects: Ideal In Cookies, Cake, Icing, Donuts, Slime, Bath Bombs, Rainbow Pancakes, Unicorn Toast And More.
- Vegan And Certified Kosher, With No Artificial Colors, Artificial Preservatives, Allergens, Gmos Or Gluten.
- Blackberry Is Magic! Mix The Blue Color Packet With Lemon Juice To Make Pink, Milk For Purple, Or Water For Blue.
Extract pigment with attention to safety
USU Extension’s October 2024 extraction guide describes a process that begins by rinsing and submerging harvested stems. In warm weather, fermentation takes about two to three days. After straining, adjust the liquid to pH 10–11 with calcium hydroxide, aerate it for 10–20 minutes, and allow the pigment to settle for several hours or overnight. Dry the remaining slurry to make powder.
USU offers starting recommendations of about 0.75 gallons of water per pound of plant material and 0.75 grams of calcium hydroxide per gallon. These are process starting points, not a substitute for measuring: use pH strips to adjust the liquid, because too much calcium hydroxide can compromise yield. Store dried powder in a dry, dark place; USU says it can keep for multiple years.
Rank #4

- Package Contains NO INSTRUCTIONS and no additional supplies, just the three ingredients you'll need to create an active ferrous indigo vat AKA the copperas vat. Copperas is the antiquated name for ferrous sulfate heptahydrate. Instructions can be found as an image in the listing.
- Ingredients Only Option: These are the exact same ingredients included in the Natural Dye Kits Indigo and Shibori Dye kit, but without all the pomp of a box, instructions and the other supplies. This is an option if you're just looking to get right into dyeing
- Package Contents: Includes 60g of 10% natural plant indigo extract grown and processed in USA, 100g of Ferrous Sulfate Heptahydrate (Iron), and 160g of Calcium Hydroxide (Slaked Lime) in a bag
- Natural Plant-Based Indigo: Features authentic natural plant indigo extract that is domestically grown and processed in the United States.
- Ferrous Vat Method: Provides all necessary chemical components to create a traditional copperas vat using the ferrous sulfate reduction method for indigo dyeing projects. This is most appropriate for dyeing textiles composed of plant material like cotton and linen. The dye will not properly bond to synthetic (polyester etc.) fabrics.
- Wear a mask when handling fine calcium hydroxide powder, which can irritate the respiratory system.
- Wear gloves when handling the high-pH liquid, which can irritate skin.
- Before discarding the high-pH liquid, neutralize it to close to pH 7, as the USU guide directs.
For vat dyeing with the extracted pigment, USU gives an example medium-strength vat using 64 g indigo, 128 g calcium hydroxide, and 192 g fructose in 16 L of liquid. The guide says multiple dips build shade better than one prolonged dip.
Independent reader supportYour contribution helps us test, update, and keep practical guides available for everyone.Add other flowers cautiously
Marigolds can add an easy annual flower to the garden, but the consulted growing guidance does not establish their use for textile dyeing or provide a dye recipe. University of Minnesota Extension’s page, reviewed in 2026, recommends full sun and well-drained soil; direct-sow when soil reaches 65°F, or transplant after frost danger has passed. Treat marigolds as garden diversity unless you have a reliable dye method and color expectations from another source: University of Minnesota Extension’s marigold guidance.
Best Value

- 🌿 18 Vibrant Natural Colorants in One Set Includes indigo, walnut, charcoal, lemongrass, aloe, madder root, lavender, hibiscus, blue clay, annatto, Himalayan pink salt, rose petals, paprika, rosemary, alfalfa, mustard, pumpkin, and ginger powder.
- 🧼 Perfect for Soap Making, Cosmetics, and Skincare Create beautiful natural colors in cold process soap, melt and pour soap, bath bombs, lotions, face masks, and scrubs without synthetic dyes.
- 🎨 Ideal for Textile Dyeing and Craft Projects Use for natural fabric dyeing, handmade paper, candles, resin art, botanical crafts, and eco-friendly creative projects.
- 🌱 Pure, Plant-Based, and Naturally Derived Made from real herbs, roots, clays, and botanicals. No artificial dyes, synthetic pigments, or unnecessary additives.
- 📦 Perfect for Beginners and Professionals Sampler format lets you test and experiment with a wide range of botanical colorants before committing to larger sizes.
Check local rules before planting dye species
Do not assume every plant historically used for dye is suitable for a home garden. Utah State University Extension reports that dyer’s woad (Isatis tinctoria), introduced to Utah as an indigo source in the mid-19th century, escaped cultivation and spread across the Intermountain West. It is a Class 2 noxious weed in Utah and can outcompete perennial plants. Before planting any dye plant with weed potential, check state, county, and local invasive-plant guidance. See USU Extension’s dyer’s woad identification and management guidance.
Quick Recap
Product prices and availability are accurate as of the date/time indicated and are subject to change. Any price and availability information displayed on Amazon at the time of purchase will apply.