Free tools Windows power users keep installed
One-click scans. No signup required.
Growing raspberries in a backyard is not complicated, but it is easy to build the project wrong. The plant is only one piece of it. A productive raspberry row needs full sun, well-drained slightly acidic soil, a narrow managed cane strip, a trellis that will not lean after two seasons, water within reach, and enough working room to prune and harvest without fighting a thorny thicket.
For most homeowners, the right starting point is a 12- to 25-foot row with 6 to 12 raspberry plants, drip or soaker irrigation, compost-amended soil, mulch, and a simple two-wire trellis. Under good conditions, a 25-foot row can produce roughly 15 to 20 pounds of fruit per year. That is a strong return for a small yard project, but only if the bed is designed for maintenance from day one.
As an Amazon Associate I earn from qualifying purchases.
On our job sites, we treat this kind of planting like a small outdoor structure. We lay out the line, check drainage, call 811 before digging post holes, set durable posts, keep the row serviceable, and think about how the space will work three years later when the plants have filled in. That builder’s mindset is what keeps a raspberry patch productive instead of letting it turn into a tangled mess.
The Tool Desk
Outbyte Driver Updater FREEScan for outdated or missing drivers - takes under a minuteDriver Scan →Outbyte PC Repair FREEClear out junk files and repair common Windows errorsFree Scan →Start With the Right Raspberry Plan
Before buying plants, decide what kind of harvest and maintenance schedule you want. Raspberries are not all managed the same way. The two broad choices are summer-bearing and fall-bearing, also called everbearing.
#1 Best Overall

- 4pack Fiberglass Material Raspberry Cross Stake System with Adjustable Cross-bars, Height Adjustable
- Light weight while heavy duty, UV resistant, never rust, weather proof. No worry about base rotting
- Assembled with screw kits, pre-machined slots for wiring
- Size : 7ft height, upper long arm 3ft, lower arm 2.5ft, 4pack (total17.8~18.5lb)
- Reminder : Due to the product being made of fiberglass, direct contact with the skin can cause itching and stinging. Please wear gloves during installation (the package includes gloves)
Summer-bearing raspberries
Summer-bearing raspberries produce one main crop, usually early to midsummer depending on the region and cultivar. They fruit on second-year canes called floricanes. After those canes fruit, they are removed, while the new first-year canes are kept for next year’s crop.
The advantage is a concentrated harvest. If you want jam, freezing, baking, or a larger short-season crop, summer-bearing types make sense. The tradeoff is pruning complexity. You have to know which canes fruited and which canes should stay.
Fall-bearing raspberries
Fall-bearing raspberries can produce on first-year canes called primocanes. For many homeowners, they are the simpler option because you can manage them for one fall crop by cutting all canes down after dormancy. That removes the need to sort old fruiting canes from new growth.
If this is your first raspberry bed, fall-bearing red raspberries are usually the most forgiving. They still need good soil, water, spacing, and weed control, but the annual pruning routine is easier to keep straight.
Red, black, and purple raspberries
Red raspberries are the most common backyard choice and are usually planted about 2 feet apart in a row. Black and purple raspberries need more room, often about 3 feet between plants, and are commonly managed as individual clumps rather than a continuous narrow hedge. They can be excellent fruit, but they take more deliberate pruning and training.
For a simple family planting, plan on 6 to 8 plants for a 12- to 15-foot starter row, or 10 to 12 plants for a 20- to 25-foot row. Raspberries spread by suckers, so starting modestly is smart. Maintenance grows faster than the plant invoice.
Pick a Site Before You Buy Plants
Raspberries need full sun for best yield. A site with 6 to 8 hours of direct sun is the practical minimum, and more is better in cooler climates. In hot regions, light late-afternoon shade can reduce stress, but heavy shade will cost you fruit.
What’s actually slowing this PC down?
Pick the symptom - the matching free tool is one click away.
The best location is a straight, accessible strip with good air movement, no standing water after rain, and a nearby water source. A back fence line can work, but only if you still have room to prune, harvest, and control suckers. Do not trap raspberries between a fence and a shed where you can only reach them from one side unless that is the only available option.
Allow working space. A managed red raspberry row is often kept about 12 to 18 inches wide. Leave at least 2 to 3 feet of walking room along one side, and more if you can access both sides. If you are planting multiple rows, 6 to 8 feet between rows is a common practical spacing because it gives room for airflow, mowing, pruning, and harvesting.
Avoid disease-prone locations
Do not plant raspberries where tomatoes, potatoes, peppers, eggplants, or other solanaceous crops recently grew. A four-year separation is a good rule because of Verticillium wilt risk. Also avoid areas near wild brambles where possible. Wild blackberries and raspberries can harbor viruses and pests. Extension guidance often recommends keeping new plantings hundreds of feet away from wild brambles, with figures commonly ranging from 300 to 600 feet. In a normal residential yard, that may not be fully possible, but clearing nearby wild brambles and buying certified disease-free plants matters.
Build the Soil First
Raspberries are shallow-rooted and dislike wet feet. Poor drainage is one of the fastest ways to lose a planting. The target is fertile, well-drained soil with a slightly acidic pH, commonly about 5.6 to 6.5 or 5.8 to 6.5 depending on your region.
Start with a soil test. A basic lab or kit commonly costs $15 to $50, and it can save you from guessing at lime, sulfur, phosphorus, potassium, and organic matter. Guessing is how homeowners end up with lush leaves, weak fruit, or a bed that never takes off.
Drainage check
After a steady rain, look at the planting area. If water stands there for hours, fix drainage before planting. Options include moving the row, building a raised row, adding compost, loosening compacted soil, or installing a properly designed raised bed. Do not bury raspberry roots in a low, wet strip and expect mulch to solve the problem.
For a ground-level row, loosen a strip about 24 to 30 inches wide. Blend compost into the top 8 to 12 inches of soil. Avoid creating a narrow bathtub of amended soil inside heavy clay. If native soil is tight and slow-draining, feather the improvement wider so water can move out of the root zone.
Raised row versus raised bed
A full framed raised bed is not always necessary for raspberries. A raised row or berm, 8 to 12 inches above surrounding grade, can be enough where drainage is the main issue. A framed bed makes sense when the yard has poor native soil, accessibility needs, a tight layout, or a slope that needs containment.
If you use lumber, choose materials deliberately. Modern pressure-treated lumber sold for ground contact is commonly used in outdoor residential projects, but homeowners should use products labeled for the exposure, follow local guidance, and avoid questionable salvaged lumber. Cedar and other naturally durable woods cost more but are popular for food garden settings. Either way, build the bed so it drains freely and does not trap saturated soil against the crowns.
Spacing and Layout That Still Works in Year Three
A clean layout matters because raspberries multiply. The row you plant in spring will not be the row you have in year three unless you manage it.
For red raspberries, space plants about 2 feet apart in a straight row. For black and purple raspberries, use about 3 feet between plants. Keep the productive cane strip narrow, usually around 12 to 18 inches for red raspberries. Any suckers outside that strip should be mowed, cut, dug, or pulled while they are small.
Set the row where you can reach the full planting without stepping into the root zone constantly. A practical backyard layout for a single row is:
Quick wins for a faster PC:
Scan for outdated or missing drivers - takes under a minuteDriver Scan →Clear out junk files and repair common Windows errorsFree Scan →Fix the driver behind crashes, sound loss and screen glitchesFind Drivers →- Row length: 12 to 25 feet
- Plant count: 6 to 12 plants for red raspberries
- Plant spacing: about 2 feet for red raspberries, about 3 feet for black or purple raspberries
- Managed row width: about 12 to 18 inches
- Working path: at least 2 to 3 feet on one side
- Multiple-row spacing: 6 to 8 feet or more where space allows
Do not plant raspberries tight against a lawn edge unless you are willing to cut suckers regularly. A mowing strip, metal edging, paver border, or gravel path can help define the line. It will not stop every sucker, but it makes maintenance visible and faster.
Build a Trellis Like It Has to Last
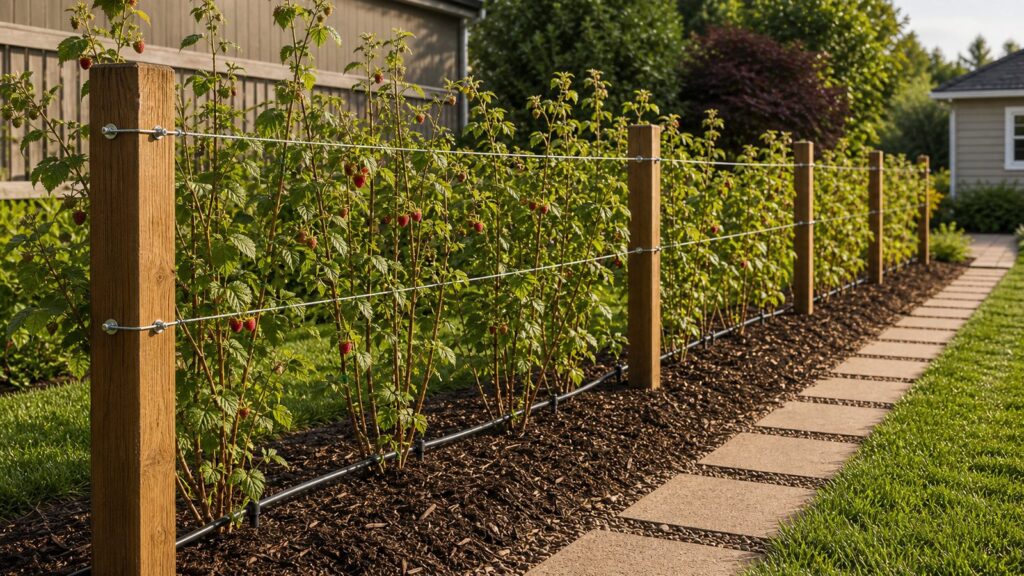
Many raspberry rows eventually lean, collapse, or become hard to harvest because the trellis was treated as an afterthought. Canes, fruit load, wind, wet foliage, and years of wire tension all work on the structure. Build it once with decent posts and corrosion-resistant hardware.
Rank #2
- Fiberglass Material Raspberry Cross Stake System with 2 Adjustable Cross-bars
- Light Weight while Heavy Duty, UV resistant, Never rust, weather proof
- Assembled with screw kits, Pre-machined Slots for wiring, No worry about base rotting
- Size : 5ft high, upper long cross-bar 3ft, lower cross-bar 2.5ft, 2pack
- Reminder : This product is made of fiberglass. Direct contact may cause skin itching or stinging. Please wear gloves during installation and handling
For most red raspberry rows, a simple two-wire trellis is enough. Set end posts, run galvanized wire along the row, and train canes between or along the wires. Common wire heights are roughly 30 to 36 inches for the lower wire and 48 to 60 inches for the upper wire. Taller systems can be useful for vigorous varieties, but do not create an oversized fence-like structure unless you have checked local rules.
Post and wire basics
Use 4×4 wood posts or suitable metal posts for the ends. For a short 12- to 15-foot row, two solid end posts may be enough. For a 25-foot row, use sturdy end posts and consider an intermediate support if the wire span sags. Set wood posts roughly 24 to 36 inches deep depending on soil, frost, height, and local conditions. In loose soil or windy locations, deeper and better-braced posts are worth the extra work.
Use exterior-rated screws, eye bolts, turnbuckles, staples rated for fencing, or other corrosion-resistant fittings. Tensioning hardware is not fancy; it is what lets you tighten the wire later without rebuilding the row. Keep wire ends clean and capped or turned away from walking paths.
T-trellis and V-trellis options
A T-trellis uses crossarms on the posts to spread wires apart. A V-trellis angles canes outward to improve light, airflow, and picking access. These systems cost more and take more careful construction, but they can be useful for longer rows, heavier crops, humid climates, or homeowners who want easier harvest access.
For a first backyard row, start simple unless there is a clear reason to build heavier. A well-built two-wire trellis is better than an elaborate structure with shallow posts and loose hardware.
Safety, Utilities, and Permit Notes
Before digging post holes, call 811. This applies even for shallow garden projects. Utility lines are not always where a homeowner expects them, and private lines such as irrigation, landscape lighting, gas grill lines, or detached-garage electrical may not be marked by public utility locating. Walk the site and identify private systems before digging.
Recommended Free Tools
Permit requirements vary by city, county, HOA, and subdivision. A low garden trellis often does not need a permit, but height, location, and design can change the answer. If the trellis is tall, built near a property line, attached to a fence, combined with deer netting, or visually functions like a fence or screen, check local fence and zoning rules. Some cities regulate fence height by front, side, and rear yard location, and some require permits for certain fence heights or locations.
Also think about neighbor impact. A raspberry trellis along a shared line should not lean, shed water, block sightlines near driveways, or become a maintenance burden on the other side. Keep access on your property so pruning and repairs do not require stepping into a neighbor’s yard.
What It Costs to Grow Raspberries in 2026
The cheapest raspberry project is a few bare-root canes in decent existing soil with a basic wire support. The most expensive version is a professionally installed raised bed with drainage correction, irrigation tie-in, premium posts, deer protection, and difficult site access. Most homeowners land somewhere in the middle.
| Project type | Typical 2026 cost | What is included |
|---|---|---|
| DIY starter row, 12 to 15 feet | $175 to $550 | 6 to 8 plants, compost, mulch, basic wire trellis, posts or stakes, fasteners, soaker hose or simple drip line |
| DIY productive row, about 25 feet | $350 to $1,000 | 10 to 12 plants, heavier trellis materials, more compost and mulch, irrigation parts, possible bird or deer protection |
| Simple trellis materials | $75 to $250 | Short-row two-wire system using basic posts, galvanized wire, eye bolts, staples, and tensioning hardware |
| Heavier trellis system | $250 to $750+ | Cedar or treated posts, T or V structure, bracing, better hardware, longer spans, or metal components |
| Raised bed, DIY wood | $25 to $50 per square foot | Framed bed materials, depending on wood choice, height, hardware, soil volume, and local material prices |
| Professionally installed row or bed | $1,200 to $4,500+ | Layout, soil prep, drainage fixes, trellis construction, irrigation tie-in, mulch, planting, and cleanup |
Plants are a smaller part of the total than many homeowners expect. Bare-root raspberry canes often run about $5 to $15 each. Potted nursery plants commonly cost about $12 to $35 or more each, depending on size, cultivar, certification, and region.
Soil and amendments can add $50 to $300 or more, especially if you buy bagged compost and mulch instead of bulk material. Irrigation can be as simple as a $20 to $60 soaker hose or as complete as a $75 to $250 drip system with pressure regulator, filter, tubing, emitters, fittings, and timer.
The big cost drivers are poor drainage, slope, distance from water, deer pressure, local labor rates, lumber and metal prices, HOA restrictions, and whether the work is bundled into a larger landscape project. If a crew is already on site building beds, grading, or installing irrigation, adding a raspberry row usually costs less than mobilizing for it as a stand-alone job.
Planting Steps for a Backyard Raspberry Row
Plant raspberries in early spring in many regions, or at the locally recommended planting time for your climate. Buy certified disease-free plants from a reputable nursery. Bargain plants are not a bargain if they bring disease into a permanent bed.
Prepare the bed before plants arrive. Set the trellis posts first if possible, or at least mark them clearly so you do not disturb roots later. Install drip or soaker irrigation before mulch goes down. It is much easier to do clean work before canes and wires are in the way.
Do these 3 things before closing this tab:
1Scan for outdated or missing drivers - takes under a minute2Repair Windows errors before they cause bigger problems3Fix the driver behind crashes, sound loss and screen glitches- Mark a straight row with string and stakes.
- Call 811 before digging post holes or doing deeper soil work.
- Test soil and adjust pH or nutrients according to results.
- Loosen and amend a 24- to 30-inch-wide planting strip.
- Set trellis posts and hardware.
- Plant red raspberries about 2 feet apart, or black and purple raspberries about 3 feet apart.
- Water thoroughly after planting.
- Mulch 2 to 3 inches deep, keeping mulch from piling directly against crowns.
- Install and test soaker hose or drip irrigation.
Planting depth depends on plant type and nursery instructions. Bare-root plants should be kept moist before planting, not left exposed in sun or wind. Spread roots naturally, backfill with loosened soil, firm gently, and water deeply. Do not over-fertilize at planting. Young roots need steady moisture and good soil contact more than a heavy feeding.
Watering, Mulch, and Weed Control
Raspberries need consistent moisture, especially during establishment, flowering, and fruit development. They do not tolerate waterlogged soil, so the goal is even moisture, not saturation. Drip irrigation or a soaker hose is usually better than overhead watering because it keeps foliage drier and reduces disease pressure.
A simple soaker hose can work for a short row. For a cleaner installation, use drip tubing with a pressure regulator and filter. Add a timer if the water source allows it. The best irrigation system is the one you will actually use consistently during hot, dry weeks.
Mulch helps hold moisture, moderate soil temperature, and suppress weeds. Apply about 2 to 3 inches of organic mulch such as wood chips, shredded bark, straw, or clean composted material. Keep the crown area from staying buried and wet. Replenish mulch as it breaks down, but avoid building a deep wet mat around the plants.
Windows Errors? Fix Them Before They Spread
Repair common Windows errors and clear accumulated junk for a smoother, more stable PC - no reinstall needed.Free scan · no reinstallCrashes, No Sound, or Screen Glitches?
Random freezes, missing sound and display glitches usually trace back to one bad driver. Find and replace yours safely.Free scan · under a minuteWeed control is not optional. Raspberries have shallow roots and do not compete well with aggressive weeds or grass. Keep a clean strip around the row and mow or remove suckers that spread into the lawn. Once a raspberry patch gets weedy and overgrown, it becomes harder to prune, harder to harvest, and more disease-prone.
Independent reader supportYour contribution helps us test, update, and keep practical guides available for everyone.Pruning and Cane Control
Pruning is where raspberry plantings either stay productive or become a problem. The method depends on the type you planted.
Fall-bearing red raspberries
For the simplest system, manage fall-bearing raspberries for one fall crop. After the plants are dormant, cut all canes down close to the ground. Remove and dispose of old cane material. New canes will grow the next season and fruit in late summer or fall.
Rank #3

- Fiberglass Material Raspberry Cross Stake System with Adjustable Arms
- Heavy Duty, UV resistant, Never rust, weather proof
- Assembled with screw kits, Pre-machined Slots for wiring, No worry about base rotting
- Size : 7ft high, upper long arm 3ft, lower arm 2.5ft, 3pack
- Reminder : Since the products are made of fiberglass, please wear gloves when installing
This system sacrifices the smaller early crop that some everbearing varieties can produce, but it greatly simplifies maintenance. For many homeowners, that tradeoff is worth it.
Summer-bearing red raspberries
Summer-bearing raspberries fruit on second-year canes. After harvest, remove the canes that fruited. Keep healthy new canes for next year. Thin crowded growth so air can move through the row, and tie or guide canes to the trellis as needed.
The key is not waiting until the row is an indistinguishable wall. Prune promptly after fruiting and again during dormancy if needed. A narrow, open row produces better fruit and is easier to pick.
Black and purple raspberries
Black and purple raspberries are usually managed as clumps with more spacing. They often need tipping and lateral pruning to keep plants productive and contained. If you choose these types, follow cultivar-specific pruning guidance and give yourself more room than you think you need.
Pests, Disease, and Sanitation
The best pest and disease strategy starts before planting: full sun, airflow, clean plants, weed control, drip irrigation, and good drainage. Wet foliage, crowded canes, and unmanaged weeds create disease pressure.
Do these 3 things before closing this tab:
1Clear out junk files and repair common Windows errors2Fix the driver behind crashes, sound loss and screen glitches3Repair Windows errors before they cause bigger problemsRemove diseased, damaged, and spent canes promptly. Do not let old cane debris collect in the row. Keep wild brambles cleared as far away as practical. If a plant looks stunted, distorted, virus-infected, or repeatedly weak, do not keep nursing it forever. Sometimes removal is the responsible move to protect the rest of the planting.
Birds, deer, and small wildlife can also take fruit. Bird netting may be worth it as fruit ripens, but install it so it can be lifted for harvest and does not become tangled in canes. Deer protection can turn a simple raspberry row into a fencing project, which is another reason to check local height and fence rules before building.
When to DIY and When to Hire a Pro
A raspberry row is a good DIY project when the site is flat, drainage is decent, water is nearby, and you are comfortable digging post holes, setting posts plumb, running wire, and doing seasonal pruning. A handy homeowner can build a 12- to 15-foot row over a weekend, with soil testing and material shopping done ahead of time.
Hire a pro when the project includes drainage correction, grading, retaining edges, irrigation tie-in, deer fencing, difficult access, hard clay, slope, or a larger landscape redesign. Professional installation also makes sense when the raspberry row is part of a finished outdoor living area and the trellis, paths, beds, and irrigation need to look integrated rather than improvised.
The cost difference is real. DIY may run a few hundred dollars. Professional work can run $1,200 to $4,500 or more. But if poor drainage, bad layout, or a weak trellis causes the planting to fail, the cheaper first attempt can become the expensive version later.
A Practical First-Year Timeline
In late winter or early spring, choose the site, order plants, test soil, and plan the trellis. Before planting, call 811, prepare the soil, and install posts if conditions allow. Plant when the timing is right for your region and water deeply.
During the first growing season, focus on establishment rather than maximum fruit. Keep weeds down, water consistently, and maintain a narrow row. Do not let suckers run wherever they want. Check wire tension and adjust canes as they grow.
After the season, prune according to raspberry type. For fall-bearing raspberries managed as a single crop, cut canes down after dormancy. For summer-bearing raspberries, remove spent floricanes and keep healthy primocanes for next year. Each winter, inspect posts, wires, mulch depth, drainage, and row width.
The Tool Desk
Outbyte PC Repair FREEClear out junk files and repair common Windows errorsFree Scan →Outbyte Driver Updater FREEFix the driver behind crashes, sound loss and screen glitchesFind Drivers →Bottom Line
The best backyard raspberry beds are not the biggest. They are the best planned. A 12- to 25-foot row with certified plants, tested soil, good drainage, drip irrigation, a durable trellis, and a clear pruning path can feed a household for years without taking over the yard.
Build the row as if you will need to service it every season, because you will. Straight layout, solid posts, manageable spacing, clean edges, and water access matter as much as cultivar choice. Get those basics right, and raspberries become one of the most rewarding small fruit projects a homeowner can add to a backyard.
Frequently Asked Questions
Do raspberries need a trellis in a backyard garden?
Most backyard raspberry rows benefit from a trellis. A simple two-wire system with wires around 30 to 36 inches and 48 to 60 inches high keeps canes upright, improves airflow, and makes harvesting and pruning easier.
How much does it cost to grow raspberries at home in 2026?
A DIY 12- to 15-foot starter row commonly costs about $175 to $550. A 25-foot DIY row usually runs about $350 to $1,000. Professionally installed raspberry beds or rows can cost roughly $1,200 to $4,500 or more depending on drainage, irrigation, trellis design, access, and labor rates.
How many raspberry plants should I start with?
Most homeowners should start with 6 to 8 plants in a 12- to 15-foot row, or 10 to 12 plants in a 20- to 25-foot row. Red raspberries are commonly spaced about 2 feet apart, while black and purple raspberries often need about 3 feet between plants.
Can I grow raspberries in a raised bed?
Yes, raspberries can grow well in a raised bed if the bed is wide enough, drains freely, and includes a trellis or support system. A full framed raised bed is most useful where native soil is poor, drainage is bad, accessibility matters, or the planting needs a defined edge.
What is the best soil pH for raspberries?
Raspberries prefer slightly acidic soil, commonly in the range of about 5.6 to 6.5 or 5.8 to 6.5 depending on region. A soil test before planting is the best way to know whether you need amendments.
Do I need a permit to build a raspberry trellis?
A low garden trellis often does not need a permit, but rules vary. Check local requirements if the trellis is tall, near a property line, attached to a fence, combined with deer netting, or could be treated as a fence or screen.
Quick wins for a faster PC:
Fix the driver behind crashes, sound loss and screen glitchesFind Drivers →Clear out junk files and repair common Windows errorsFree Scan →Scan for outdated or missing drivers - takes under a minuteDriver Scan →Quick Recap
Product prices and availability are accurate as of the date/time indicated and are subject to change. Any price and availability information displayed on Amazon at the time of purchase will apply.

