Some links on this page are affiliate links: if you buy through them we may earn a commission, at no extra cost to you.
Yes, you can mount a TV to an exterior wall with siding, but you should not mount it to the siding. Vinyl, fiber cement, engineered wood, aluminum, and most other siding products are cladding. They shed water and finish the wall; they are not structural support for a 40- to 100-pound television and a steel bracket.
The right way is to transfer the load through the siding and into framing, masonry, or properly installed blocking, while preserving the wall’s water-resistive barrier. That means finding studs, creating a flat mounting surface, using corrosion-resistant fasteners, sealing penetrations correctly, and powering the TV from a code-compliant outdoor receptacle.
As an Amazon Associate I earn from qualifying purchases.
Do these 3 things before closing this tab:
1Fix the driver behind crashes, sound loss and screen glitches2Clear out junk files and repair common Windows errors3Scan for outdated or missing drivers - takes under a minuteOn our job sites, we treat an outdoor TV mount more like a small exterior renovation than a home theater chore. The bracket is only one piece. The real questions are: what is behind the siding, how will water drain, how will the siding expand and contract, where will power come from, and can the assembly be serviced five years from now without tearing the wall apart?
Start With the Wall, Not the TV
Before buying a bracket, confirm what the mount will actually fasten into. Most exterior walls have siding over furring, sheathing, housewrap or another water-resistive barrier, and wood or metal studs. Some homes have brick, concrete block, stone veneer, or stucco assemblies. Each one changes the fastening and waterproofing detail.
#1 Best Overall

- Design for Outdoors: With waterproof coating and stainless steel hardware, this TV mounting mount is salt spray tested and resistant to rain, rust or corrosion to support your TV in all weathers. Ideal for patio, gazebo, balcony, deck, seafront, etc.
- 37.9" Extra Long Extension Arm: Long extension TV mount extends 37.9" from wall to cover more viewing positions, and retract 3" to wall to save space for a clean look. The long extend and swivel function allows to watch TV wherever you're seated
- Universal Compatibility: Corner TV wall mount fits most 42"-75" TVs with VESA patterns from 150x100mm to 600x400mm, holding up to 99 lbs. Please CHECK TV weight, size, VESA, and input access before purchase
- Ultimate Viewing Experience: The full motion TV wall mount can swivel left or right 90° to cover different viewing area, tilts +5°/-10° to reduce glare, and screen level+3°/-3° after installation
- Easy Installation: Large TV wall mount comes with clear step-by-step instruction, bubble level, and necessary mounting kit for quick installation. Concrete anchors will be sent per request. NOTE: DO NOT install into drywall alone!
A typical 55-inch outdoor TV may weigh 35 to 60 pounds before the bracket. A 65-inch model may weigh 50 to 80 pounds. A full-motion mount can add another 20 to 40 pounds and, when extended 18 to 30 inches from the wall, can multiply the force on the fasteners. Wind matters too. A large screen on an arm behaves like a sail.
For wood-framed walls, the mount should land in studs or in solid blocking tied to studs. For masonry, it should be anchored into structural brick, concrete, or block with the correct anchors. Do not rely on siding, foam insulation, thin sheathing, or stone veneer alone.
How We Locate Structure
From inside the house, measure from a known reference point such as a window edge, door jamb, outlet box, or corner. Most studs are spaced 16 inches on center, though 24 inches on center is common in some homes. Confirm with an interior stud finder, small pilot checks where appropriate, or access from an unfinished basement, garage, attic, or crawlspace.
Outside, do not assume the siding seams tell you where the studs are. Lap siding, vinyl panels, and trim layout rarely align with framing. If the siding can be temporarily unlocked or removed without damage, that can help confirm the wall build-up before committing to full-size holes.
Pick the Right Outdoor TV and Mount
The TV itself should match the exposure. A covered porch with no direct sun is not the same as a west-facing wall that gets four hours of afternoon heat. Outdoor-rated TVs are built for humidity, insects, dust, rain exposure, heat swings, and brighter viewing conditions. Many dedicated outdoor TVs carry IP55 or IP56-style weather and dust ratings, and their panels are sold for shaded, partial-sun, or full-sun locations.
An indoor TV under a roof may last for a while, but it is not designed for condensation, wind-driven rain, insects, UV exposure, or summer heat trapped behind the screen. It may also be hard to see outdoors because brightness and glare handling are not built for that use.
Fixed, Tilt, or Full-Motion?
Use the simplest mount that gives the viewing angle you need. Fixed and tilt mounts keep the load close to the wall. They are easier to flash, less affected by wind, and put less leverage on the framing. Full-motion mounts are useful where the seating area shifts or the TV must turn toward a pool, grill area, or dining space, but they require stronger backing and more careful fastener selection.
For outdoor siding, we usually prefer a fixed or tilt exterior-rated mount unless the layout clearly calls for an arm. If the screen is 65 inches or larger, or the mount extends more than about 18 inches, plan on beefier blocking and a two-person installation.
2026 Cost Guide for Mounting a TV on Outdoor Siding
Basic indoor TV mounting is often quoted in the low hundreds. Outdoor siding work costs more because the installer is dealing with structure, weatherproofing, exterior-rated hardware, access, and usually electrical work.
| Item | Typical 2026 US Cost | What Changes the Price |
|---|---|---|
| Professional TV mounting labor | $117-$227 national average; commonly $153-$353 | TV size, wall material, height, mount type, cable handling |
| Outdoor or siding-specific installation labor | $250-$800+ | Blocking, siding adaptation, flashing, masonry, difficult ladder access |
| Fixed or tilt outdoor-rated mount | $50-$200 | Load rating, coating, stainless hardware, lock features |
| Heavy-duty full-motion outdoor mount | $150-$500+ | Extension length, TV size, anti-theft features, corrosion resistance |
| Outdoor TV, 43-55 inch shade models | About $859-$2,400 | Brightness, weather rating, brand, smart features |
| Outdoor TV, 55-65 inch midrange/premium | About $1,700-$5,000 | Partial sun rating, panel brightness, enclosure quality |
| Outdoor TV, 65-75 inch full sun | About $7,500-$10,000+ | Full-sun capability, heat handling, panel size |
| Outdoor outlet work | Often a few hundred dollars for simple work; higher for new circuits | Panel capacity, distance, permit, trenching, inspection |
| Vinyl siding replacement benchmark | $7.32-$12.51 per sq. ft. installed | Matching panels, access, trim complexity, local labor |
Representative 2026 retail examples include a 43-inch shaded outdoor TV around $858.95, a 55-inch shaded model around $2,398.95, a 55-inch partial-sun model around $3,499.99, a 65-inch full-sun model around $7,499.99, and a 75-inch full-sun model around $9,999.99. Very large full-sun models can approach $20,000.
Windows Errors? Fix Them Before They Spread
Repair common Windows errors and clear accumulated junk for a smoother, more stable PC - no reinstall needed.Free scan · no reinstallOutdated Drivers Are Slowing You Down
One free scan finds every outdated or missing driver and matches the right update for your exact hardware.Free scan · exact hardware matchFor many homeowners, the full project lands in one of three ranges. A simple covered-patio installation with an existing outdoor outlet and a smaller fixed mount may be $400 to $900 plus the TV. A more typical siding installation with a new mounting block, exterior-rated bracket, sealed penetrations, and some cable management may run $900 to $2,000 plus the TV. A large full-motion mount, new circuit, masonry work, concealed wiring, or lift/scaffold access can push the project well above $2,500 before the television itself.
How Siding Type Changes the Installation
The siding detail is where many outdoor TV installations go wrong. The mount must sit flat, carry load into structure, and still allow the cladding system to manage water and movement.
Vinyl Siding
Vinyl siding expands and contracts with temperature. If you clamp it tightly under a steel TV bracket, it can buckle, crack, or oil-can. A bracket spanning across lap profiles can also twist, leaving uneven bearing points and water gaps.
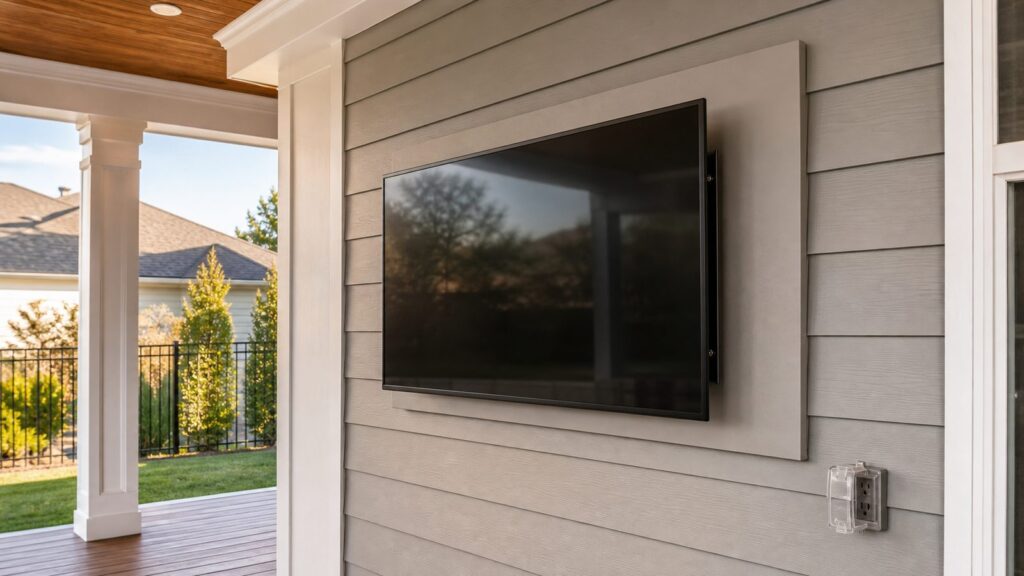
The best approach is usually to create a flat mounting zone. That can mean removing or cutting the siding only where needed, installing a PVC or composite mounting block or trim board fastened into studs or blocking, and integrating the edges with J-channel, flashing, and sealant. The goal is a flat, structural face for the bracket without trapping the surrounding vinyl panels.
For lighter accessories, some installers use siding standoffs, but a TV mount is not the place for guesswork. If the mount compresses the siding, the detail is wrong.
Rank #2

- WEATHERPROOF OUTDOOR TV WALL MOUNT: Designed for patios, decks, gazebos, porches, balconies, and other outdoor entertainment spaces. This outdoor TV mount passed a 96-hour salt spray test. Its outdoor-grade powder-coated finish and stainless-steel screws used throughout the mount help resist rust and corrosion during outdoor use
- FITS MOST 32-65 INCH OUTDOOR & INDOOR TVs: Compatible with most LED, OLED, QLED, and outdoor TVs from 32 to 65 inches, including common 40, 43, 50, 55, 60, and 65 inch models. Supports TVs up to 77 lbs and VESA mounting patterns from 75x75mm to 400x400mm. Check your TV’s size, weight, and VESA pattern before ordering, as screen size alone does not guarantee compatibility
- 19.1-INCH LONG ARM WITH FULL MOTION ADJUSTMENT: This long-arm articulating TV mount extends up to 19.1 inches and retracts to 3.2 inches. It swivels up to 90° left or right depending on TV size, tilts +5°/-15° to help reduce sunlight glare, and levels ±3° after installation. The extra-long extension makes it easier to aim the screen around corners or adjust the view between patio dining, lounge, and other outdoor seating areas
- HEAVY-DUTY ARTICULATING TV MOUNT, 4X LOAD TESTED: Constructed from high-strength steel with a reinforced articulating arm, this full motion outdoor TV bracket helps keep the screen steady while extended, swiveled, or tilted. It passed a safety load test at four times its rated capacity for added installation confidence. The maximum supported TV weight remains 77 lbs
- PREASSEMBLED SINGLE-STUD TV MOUNT: Installs on a single wood stud or on solid concrete or brick walls, making it suitable for locations where a wider two-stud mounting plate may not fit. The preassembled arm reduces setup steps, while the included bubble level, mounting hardware, and illustrated instructions help simplify alignment and installation. Do not mount on drywall alone without a wood stud
Fiber-Cement Siding
Fiber-cement siding is durable, but it can crack under point loads. Pre-drill with appropriate masonry or carbide bits, avoid over-torquing fasteners, and keep the bracket load on blocking or studs rather than the siding face. Penetrations must be sealed carefully because fiber-cement edges and holes should not be left exposed to repeated wetting.
Engineered Wood and Wood Siding
Wood and engineered wood siding still should not carry the TV by themselves. Fasten into framing. Seal all penetrations, prime exposed cuts when required by the siding manufacturer, and maintain clearances from horizontal ledges where water can sit. Wood details also need regular inspection because movement and paint failure can open small cracks around hardware.
Brick, Stone, and Masonry Veneer
Structural brick or concrete can be a good mounting surface with the right anchors. Thin brick, adhered stone veneer, and decorative masonry veneer are different. They are finishes, not structure. If the wall is veneer over framing, the load needs to reach the framing or a designed backing condition. Heavy TVs and articulating mounts on veneer deserve professional evaluation.
The Waterproofing Detail Matters Most
Every screw hole through siding is a possible leak path. Caulk alone is not a waterproofing plan. Sealant is part of the system, but water management should also include flashing, shingled laps, proper trim integration, and drainage.
On our exterior projects, we think in layers. The siding is the first rain screen. Behind it, the water-resistive barrier is the backup drainage plane. When we cut or drill through those layers, we need to restore them in a way that sheds water down and out.
A Practical Mounting Block Detail
For vinyl siding, a common clean detail is a PVC or composite board sized larger than the TV bracket footprint. For many mounts, a board in the range of 16 by 24 inches to 24 by 36 inches works, depending on stud layout and bracket size. The board must be thick and stiff enough to provide a flat bearing surface, often 3/4 inch to 1 inch material, and it must be fastened into studs or added blocking.
The top edge needs flashing so water does not run behind the board. Side and bottom details should allow drainage instead of trapping moisture. J-channel or trim should be integrated neatly with the surrounding siding. Fastener penetrations through the board should be sealed, but the board still needs to be mechanically secured into structure.
The Tool Desk
Outbyte PC Repair FREEClear out junk files and repair common Windows errorsFree Scan →Outbyte Driver Updater FREEFix the driver behind crashes, sound loss and screen glitchesFind Drivers →If blocking must be added inside the wall, that is more invasive. It may require opening the interior drywall or carefully removing exterior cladding. For a 65-inch TV on a full-motion arm, that extra work is often the right call.
Sealant and Fasteners
Use exterior-rated sealant compatible with the siding, trim, and mount materials. Do not smear sealant over everything and call it done. Seal around penetrations and vulnerable joints while preserving drainage paths.
Use stainless steel or hot-dipped galvanized fasteners where appropriate. Confirm compatibility with pressure-treated lumber, aluminum, mount coatings, and any manufacturer requirements. Cheap indoor screws rust quickly outdoors, especially near pools, coastal air, irrigation spray, or shaded damp patios.
Outdoor Power and Cable Routing
Power is not optional background work. Outdoor receptacles used for a TV should be GFCI protected, weather-resistant, and covered by a listed weatherproof in-use cover when cords remain plugged in. The outlet should be behind or adjacent to the TV so the cord is short and protected, not draped across siding or tucked behind trim.
Quick wins for a faster PC:
Scan for outdated or missing drivers - takes under a minuteDriver Scan →Clear out junk files and repair common Windows errorsFree Scan →If there is no proper exterior receptacle at the TV location, bring in a licensed electrician. A simple add or replacement from an existing nearby circuit may only be a few hundred dollars. A new circuit, long exterior run, panel constraints, trenching, conduit, permit, and inspection can raise the cost materially.
Low-Voltage Cables
HDMI, Ethernet, audio, and antenna cables need outdoor-rated handling too. Use exterior-rated covers, conduit, listed low-voltage wall plates for the location, or a properly flashed wall penetration. Loose cables exposed to UV, water, and wind fail faster and look unfinished.
Create drip loops on every cable before it enters a box, enclosure, or wall penetration. A drip loop is a simple downward bend that lets water fall off the cable instead of running straight into the wall or box. It is a small detail, but it prevents a lot of nuisance failures.
Plan serviceability. Leave enough clearance to unplug the TV, remove it from the bracket, inspect sealant, replace cables, and tighten hardware. A beautiful installation that cannot be serviced without damaging siding is not a good installation.
Recommended Free Tools
Rank #3

- Important: Watch the video and learn the”Designed for" details listed below!
- Designed for concrete, brick and wood studs wall (single stud).
- Designed for TVs up to 80 lbs (36.3 KG) and display sized 26" - 55" (66 CM - 140 CM).
- Designed for VESA sized from 3.9'' x 3.9'' through 15.7'' x 15.7''.
- Comfortable View with tilt range from +10° to -5°.
Placement: Shade, Glare, Height, and Viewing Distance
Choose the location before choosing the TV. A shaded north- or east-facing wall is usually easier to watch than a south- or west-facing wall that catches afternoon sun. A covered patio, porch roof, pergola, or deep overhang reduces weather exposure, but it does not eliminate the need for weather-rated power, protected cables, and corrosion-resistant hardware.
For height, start with the center of the screen near seated eye level. Outdoors, that often means the center of the TV is roughly 42 to 54 inches above the finished patio or deck if viewers are seated in lounge chairs. Over a fireplace, outdoor kitchen counter, or bar, the TV may need to go higher, but then a tilt mount becomes more useful.
Viewing distance depends on screen size and resolution, but practical patio layouts usually work like this: 43 to 50 inches for compact seating areas around 6 to 8 feet away, 55 to 65 inches for 8 to 12 feet, and 75 inches or larger when the seating is 12 feet or more from the screen. Bigger is not always better if the wall exposure forces glare or the mount becomes structurally awkward.
Step-by-Step: A Professional Installation Sequence
This is the sequence we use conceptually on siding projects. Specific fasteners, flashing, and electrical methods should follow the TV mount instructions, siding manufacturer guidance, local code, and site conditions.
Free tools Windows power users keep installed
One-click scans. No signup required.
1. Confirm the TV Location
Check sun exposure at the time of day you expect to use the TV. Verify sightlines from the main seating positions. Confirm the wall has enough flat area for the TV, mount, outlet, and service clearance. Make sure sprinklers, grill heat, pool splash, and roof runoff will not hit the equipment.
2. Locate Framing or Structural Masonry
Map stud locations from the interior and confirm outside before drilling final holes. Mark the bracket footprint and fastener locations. If the stud spacing does not match the mount pattern, plan blocking or a properly attached mounting board.
3. Plan Electrical Before Mounting
Place the receptacle behind or just beside the TV in a listed weatherproof assembly. Confirm GFCI protection and a weather-resistant receptacle with an in-use cover. Decide how HDMI, Ethernet, or speaker wiring will be routed. Do not bury standard indoor cords inside the wall.
4. Prepare the Siding Area
For vinyl siding, unlock or cut the siding as needed to create a flat mounting zone. Install PVC or composite blocking tied into studs. Integrate J-channel, trim, and flashing so water sheds correctly. For fiber cement, pre-drill and avoid point-load cracking. For masonry, drill with the correct bit and use anchors rated for the wall and load.
What’s actually slowing this PC down?
Pick the symptom - the matching free tool is one click away.
5. Install the Mount
Use exterior-rated fasteners sized for the mount and wall structure. Keep the bracket level. Do not over-tighten against siding. If using a full-motion arm, test the wall and bracket with the arm extended before hanging the TV. The mount should feel rigid with no flexing, creaking, or movement in the wall surface.
6. Hang and Connect the TV
Use two people for most outdoor TVs, especially 55 inches and larger. Confirm the locking tabs or safety screws are engaged. Route cords with drip loops and strain relief. Keep cables away from sharp metal edges, hot grill areas, and pinch points in articulating arms.
7. Document and Inspect
Photograph the wall before the TV covers the work. Capture stud marks, blocking, flashing, penetrations, outlet location, and sealant details. Keep those photos with the TV manual and mount instructions. They make future service much easier.
Independent reader supportYour contribution helps us test, update, and keep practical guides available for everyone.When to DIY vs When to Hire a Pro
A capable homeowner can handle some outdoor TV installations, but the line between simple and risky is fairly clear.
A Reasonable DIY Project
DIY may make sense when the TV is smaller, the mount is fixed or tilt, the wall framing is easy to confirm, the TV is under a covered patio, a code-compliant outdoor outlet already exists in the right location, and the siding detail does not require cutting into the wall assembly. Even then, use an exterior-rated mount, corrosion-resistant fasteners, and a proper mounting block where needed.
Hire a Pro When the Wall or Power Gets Complicated
Bring in a contractor, siding installer, or qualified handyman when siding has to be cut, trim has to be integrated, blocking must be added, the TV is 65 inches or larger, the mount is full-motion, the wall is masonry or veneer, or the installation is high off the ground. Bring in a licensed electrician for a new outdoor receptacle, new circuit, panel work, conduit, trenching, or any unclear GFCI/weatherproofing situation.
Permits vary by city and county. Mounting a bracket may not require a permit, but new electrical work often does. If the job involves structural alteration, new circuits, exterior penetrations, or work in a condo or HOA-controlled exterior, check requirements before drilling.
Rank #4

- Specifically designed for outdoor use. There’s a rapidly growing trend in TVs being used in outdoor and semi-enclosed environments. Outdoor TV mount Fits for Gazebo Patio Backyard Balcony and so on. Creating an outdoor living space with a weatherproof TV mount.
- An impressive tilt angle for comfortable viewing. +5°/-10° tilt and +/-3° leveling. Ensure the TV features high brightness and anti-glare properties for better visibility in outdoor lighting.
- Perfect Flexibility - 37.9" Long Arm & +/-90° smooth swivel. The long extension TV wall bracket extends 37.9" and retracting back to just 3" from the wall. +/-90° swivel can cover all angles in your room without moving the whole mount.
- Installation Was A Breeze - Fits for most 42-75 inch TVs with VESA patterns from 150x100mm to 600x400mm and up to 99 lbs. With the included hardware and instructions plus additional paper mounting template and level tool for ease of installation. Concrete Anchors available on request. NOTE: DO NOT install into drywall alone.
- Friendly Customer Service. 1. Not sure if it's suitable for your TV? 2. Concerned with the installation? 3. Need other hardware (screws, spacers, washers, etc.)? 4. Need other help? - Welcome to ask any issue.
Common Mistakes That Cause Expensive Problems
The most common failure is lagging the mount into siding or sheathing only. It may feel tight on day one, but it is not a structural connection. Wind, vibration, and the leverage of the bracket can loosen it over time.
Recommended Free Tools
The second common failure is crushing vinyl siding. Vinyl needs room to move. If the mount pins the siding tightly to the wall, the panel can buckle in heat or crack in cold weather.
Another mistake is letting the bracket bridge across lap siding without a flat block. That twists the mount, creates uneven load transfer, and leaves gaps where water can collect. We also see indoor screws, indoor mounts, and non-weatherproof cable covers used outside. Those parts rust, stain the siding, and can fail prematurely.
Finally, do not treat caulk as a magic fix. Sealant ages. UV, heat, cold, and movement will eventually break it down. Good exterior work uses mechanical laps, flashing, drainage, and compatible sealant together.
Maintenance After Installation
Inspect the installation at least once a year, and after major storms. Look for cracked sealant, loose fasteners, rust, siding movement, staining below the mount, insect nests, and any water marks on the interior side of the wall. Move a full-motion arm through its range and check for wobble. Replace damaged cable covers and brittle zip ties before they fail.
If the TV is seasonal, remove it during long periods of non-use or severe winter exposure if the manufacturer recommends it. Use a fitted outdoor cover only if it does not trap moisture against the screen or block ventilation in a way the manufacturer warns against.
Bottom Line
A clean outdoor TV installation on siding comes down to four things: structure, movement, water, and power. Anchor the mount into studs, blocking, or masonry. Do not crush or depend on siding. Restore the weather barrier with proper flashing and sealant. Use outdoor-rated electrical components, mounts, and hardware.
Done right, the installation looks simple from the patio. Behind that simplicity is a wall detail that can handle weight, weather, sun, and service without turning into a leak or repair job later.
Frequently Asked Questions
Can you mount a TV directly to vinyl siding?
No. Vinyl siding is not structural and it expands and contracts with temperature. The mount should fasten through a proper mounting block or standoff detail into studs, blocking, or masonry without clamping the siding so tightly that it buckles.
Do you need studs to mount an outdoor TV on siding?
For a framed wall, yes. The TV mount should transfer load into studs or solid blocking tied to studs. Sheathing and siding alone are not enough, especially for large TVs or full-motion mounts.
What kind of mount should I use for an outdoor TV?
Use an exterior-rated mount with corrosion-resistant hardware and a load rating above the TV’s weight. Fixed or tilt mounts are preferred when possible because they keep the load close to the wall. Full-motion mounts require stronger backing because they create more leverage.
Can I use an indoor TV outside under a covered patio?
You can physically install one, but it is not recommended. Indoor TVs are not designed for humidity, insects, condensation, temperature swings, rain, UV exposure, or outdoor glare. A covered roof reduces exposure but does not make the TV outdoor-rated.
Do I need a permit to add an outdoor outlet for a TV?
Permit rules vary by location, but new exterior electrical work often requires a licensed electrician, GFCI protection, weather-resistant devices, and a weatherproof in-use cover. Check local code requirements before adding or relocating an outlet.
Free tools Windows power users keep installed
One-click scans. No signup required.
How much does it cost to mount a TV outside in 2026?
Plan on roughly $250-$800 or more for outdoor siding-specific labor, not including the TV, when the job includes blocking, siding adaptation, sealing, and exterior-rated mounting hardware. A full project with a new outlet, concealed cables, large TV, or full-motion mount can run much higher.
Quick Recap
Product prices and availability are accurate as of the date/time indicated and are subject to change. Any price and availability information displayed on Amazon at the time of purchase will apply.

