What’s actually slowing this PC down?
Pick the symptom - the matching free tool is one click away.
Some links on this page are affiliate links: if you buy through them we may earn a commission, at no extra cost to you.
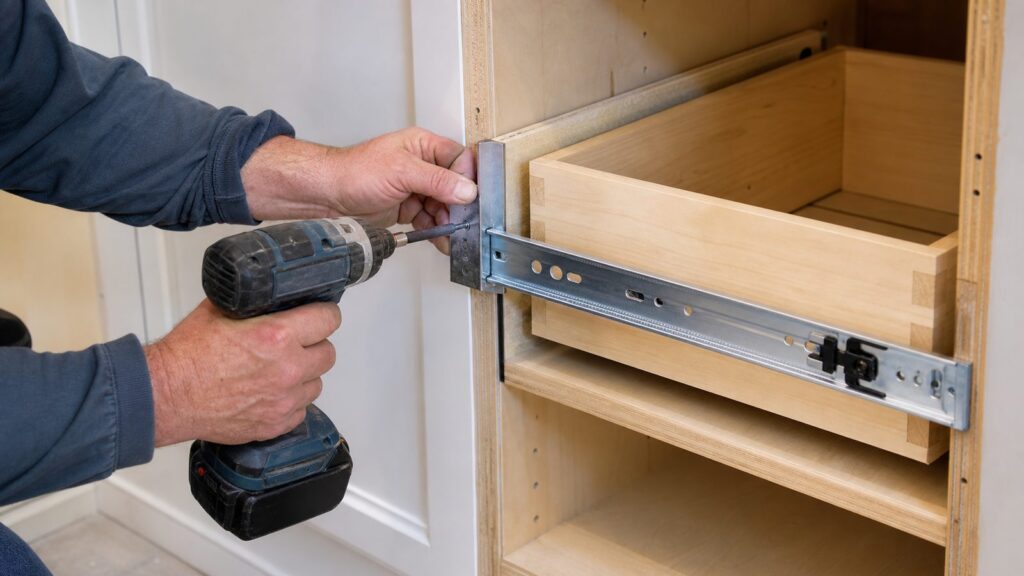
Installing cabinet drawer slides is a manageable DIY project when the drawer box is square, the cabinet is sound, and you choose slides that match the existing construction. The job becomes frustrating when you skip the measuring, buy the wrong slide type, or try to force new hardware into an out-of-square cabinet opening.
On our job sites, we treat drawer-slide installation as precision carpentry, not just hardware replacement. A drawer that glides well depends on small tolerances: the slides need to be level, parallel, coplanar, and fastened into solid material. One side mounted 1/8 inch higher than the other can make a new soft-close slide feel worse than the worn-out hardware it replaced.
As an Amazon Associate I earn from qualifying purchases.
Recommended Free Tools
For a typical kitchen drawer, expect basic side-mount slide pairs to cost about $8 to $25 per drawer, better full-extension or soft-close slides to run about $15 to $60 or more per drawer, and premium undermount systems to run about $35 to $90 or more per drawer, depending on brand, length, load rating, and locking clips. Professional installation for standard soft-close upgrades commonly lands around $40 to $100 per drawer. A full kitchen with 10 to 20 drawers can range from about $400 to $2,000 or more once hardware quality, cabinet repairs, and local labor are included.
This guide explains how to install cabinet drawer slides the right way: how to identify the slide type, measure the drawer and cabinet, set the hardware, test the action, fix common binding problems, and decide when a cabinet carpenter should handle the work.
#1 Best Overall

- Premium Home Improvement Tool: Take the guesswork out of drawers with the Drawer Slide Jig; easily create level drawers that slide smoothly
- Eliminate Measuring: Kreg jig has built-in indexing tabs to precisely align drawer slides and drawers without measuring
- Works with Many Drawer Slides: Drawer jig aligns undermount, ball-bearing, and epoxy-coating slides
- Multipurpose Carpenter Tools: Works for cabinets, cases, drawers, desks, and more
- Premium Kreg Tools: We offer products that help woodworkers close the gap between idea and outcome
Start With the Cabinet, Not the Slide
Before buying anything, identify the cabinet construction. Most installation problems start because the hardware was chosen before the cabinet and drawer were measured.
Frameless cabinets
Frameless cabinets, sometimes called European-style cabinets, usually have flat interior cabinet sides. That makes side-mount slides easier to install because the cabinet member can often screw directly to the cabinet wall. Undermount slides can also work well if the drawer box dimensions match the manufacturer’s requirements.
Do these 3 things before closing this tab:
1Repair Windows errors before they cause bigger problems2Fix the driver behind crashes, sound loss and screen glitches3Clear out junk files and repair common Windows errorsFace-frame cabinets
Face-frame cabinets have a solid frame on the front of the cabinet box. The inside wall is usually set back from the face frame, so a side-mount slide often needs a spacer block at the front, a rear mounting bracket at the back, or both. Without that support, the slide angles inward toward the rear of the cabinet. The drawer may open halfway, rub, then bind.
When we retrofit older face-frame kitchens, we check three things before quoting the job: whether the rear of the cabinet has solid material for brackets, whether the drawer opening is square, and whether old screw holes are stripped or blown out. Those three details decide whether the job is a simple hardware swap or a small cabinet repair.
Inset vs. overlay drawer fronts
Inset drawer fronts sit inside the cabinet opening. Overlay fronts sit on top of the face frame or cabinet box. Inset drawers are less forgiving because the reveal around the front must stay even. A slide installed slightly proud, recessed, tilted, or off-height can make the drawer front rub the frame. Overlay fronts hide more minor variation, but soft-close and push-to-open systems still need correct setback to latch and release properly.
Choose the Right Drawer Slide Type
There is no single best drawer slide for every cabinet. The right choice depends on the drawer box, weight, extension, appearance, and budget.
Free tools Windows power users keep installed
One-click scans. No signup required.
| Slide type | Best use | Typical notes |
|---|---|---|
| Side-mount ball-bearing | Kitchen drawers, utility drawers, retrofits | Visible when open, usually easier to replace, commonly available in 75 lb to 100 lb ratings for residential use |
| Undermount concealed | Higher-end kitchens, clean interiors, soft-close upgrades | Hidden under the drawer, requires compatible drawer-box width, depth, notching, and locking clips |
| Center-mount | Light-duty older furniture or small drawers | Usually lower capacity and less stable than paired side or undermount slides |
| Epoxy or roller | Budget cabinets and light drawers | Simple and inexpensive, but usually less smooth and less durable than ball-bearing slides |
| Heavy-duty | Pantry pullouts, file drawers, tool storage, deep pot drawers | Higher load ratings; needs strong fastening and solid blocking |
| Specialty pullout systems | Trash pullouts, pantry racks, blind-corner accessories | Often much more expensive; some current retail systems run roughly $400 to $540 depending on width and finish |
Side-mount vs. undermount
Side-mount slides are usually the safer retrofit choice. They are visible when the drawer is open, but they tolerate more existing drawer-box designs and are easier to align in many face-frame cabinets. Full-extension side-mount slides are common, affordable, and strong enough for most kitchen drawers when properly rated.
Undermount slides look cleaner and often feel more refined, especially with soft-close action. They hide below the drawer box, leaving the drawer sides clear. The tradeoff is fit. Many undermount systems require very specific side clearance, bottom clearance, rear notches, front locking clips, and drawer-box width. A common Blum-style undermount requirement is that the drawer box be about 42 mm, or 1-21/32 inches, narrower than the cabinet opening, but that number is not universal. Always use the exact manufacturer’s installation sheet.
If your old drawer was built for side-mount slides, do not assume undermount slides will drop in. The drawer may be too wide, the bottom may be built wrong, or there may be no room for the locking devices. In that case, replacing the drawer box may be the better solution.
Extension options
Three-quarter-extension slides leave part of the drawer inside the cabinet. Full-extension slides let the drawer open to its full depth, which is usually the best choice for kitchen storage. Over-travel slides extend slightly beyond the cabinet face and are useful for specialty access, file drawers, or deep storage where you need to reach the very back.
Quick wins for a faster PC:
Fix the driver behind crashes, sound loss and screen glitchesFind Drivers →Repair Windows errors before they cause bigger problemsFix Now →Weight ratings
Do not ignore the load rating. Light residential slides may be around 75 lb. Many full-extension side-mount slides are commonly rated around 100 lb. Heavy-duty pantry, file, and tool slides can go much higher depending on the manufacturer. For pots, cast iron, appliances, trash pullouts, pantry cans, or shop storage, upgrade the rating and fasten into solid cabinet material or added blocking.
Tools and Materials You Will Need
For a clean installation, gather the tools before removing every drawer. Most small mistakes happen when someone is holding a slide with one hand, guessing at height with the other, and trying to drive screws at an angle.
Rank #2
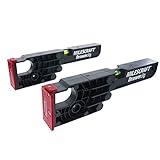
- Alignment fences and tabs make sure your jig is accurately aligned on both framed and frameless cabinets
- Large clamping area allows for tight and secure clamping to cabinet
- CABINET MUST BE AT LEAST 15" DEEP TO SUPPORT SLIDE INSTALLATION
- Reverse the DrawerJig and face outwards to support and align drawer while attaching slides
- Built-in level helps indicate if your cabinets have been installed accurate and true
- Drawer slides matched to the drawer type, length, extension, and load rating
- Manufacturer-provided screws, locking clips, rear brackets, or spacer kits as required
- Tape measure with clear 1/16-inch markings
- Combination square or speed square
- Level, preferably 12 inches or longer
- Drill and driver
- Self-centering bit or small pilot bit
- Drawer-slide jig, matched spacer blocks, or a story stick for repeated heights
- Clamps for holding slides during layout
- Pencil or fine marking knife
- Shims or cabinet-grade spacer stock
- Wood filler, toothpicks and glue, or dowel repair material for stripped holes
- Replacement screws in correct length if the supplied screws do not suit the cabinet
- Safety glasses
Use screws that are long enough to hold but not so long that they puncture the drawer side, cabinet side, or finished exterior panel. For many cabinet-slide installations, short pan-head screws supplied by the slide manufacturer are correct. If you need more holding power, use the manufacturer’s recommended screw size and confirm the cabinet material can accept it.
How to Measure for Cabinet Drawer Slides
Measure the drawer box, not just the cabinet. Slide length generally follows the drawer-box depth. A slide that is too long can hit the cabinet back or prevent the drawer from closing. A slide that is too short may reduce extension, carrying capacity, and stability.
Measure drawer-box depth
Remove the drawer and measure from the back of the drawer front or drawer box front to the outside back of the drawer box. Common slide lengths include 14, 16, 18, 20, 22, and 24 inches. If the box measures about 21-3/4 inches deep, a 22-inch slide may fit if the cabinet has enough rear clearance. If the box is closer to 20 inches, use a 20-inch slide unless the hardware instructions say otherwise.
Measure cabinet depth
Measure from the inside face of the cabinet front to the back panel or any obstruction. Watch for plumbing, electrical boxes, nailers, cabinet backs, or old blocking. In sink bases and older built-ins, the usable depth may be less than it appears.
Measure side clearance
Side-mount slides usually need a specific clearance between the drawer box and cabinet opening, often around 1/2 inch per side for many common ball-bearing slides, but this varies by product. Measure the opening width, then measure the drawer-box width. The difference tells you total side clearance. Divide by two for clearance per side.
For undermount slides, do not use side-mount assumptions. Check the product sheet for required drawer width, bottom recess, rear notch, and clip placement. If the drawer box is too wide, the slide will not work correctly without rebuilding or replacing the drawer.
Check squareness
Measure both diagonals of the drawer box from corner to corner. If the two diagonal measurements differ by more than about 1/8 inch on a typical kitchen drawer, the box may be racked enough to cause binding. Also check the cabinet opening. Older cabinets can sag, twist, or move with the house. New slides cannot fully compensate for a failed drawer box or a cabinet opening that is badly out of square.
Step-by-Step: Installing Side-Mount Drawer Slides
Side-mount ball-bearing slides are the most common retrofit choice, so this is the process most homeowners need. Always keep the left and right slide members paired and oriented correctly. Some slides are handed, and cabinet members and drawer members are not interchangeable.
1. Remove the drawer and old slides
Pull the drawer out and release the existing slide tabs if present. Remove the old cabinet members and drawer members. Keep one old slide nearby until you confirm length and setback. If old screws spin without tightening, mark those areas for repair.
2. Repair bad screw holes and weak mounting areas
Do not install new slides into stripped holes and expect them to hold. For small repairs, glue hardwood toothpicks or a small dowel into the hole, let the glue cure, then trim flush and drill a new pilot hole. For larger failures, add solid blocking or replace damaged drawer-box parts. New hardware mounted into weak particleboard will loosen quickly, especially on heavy drawers.
3. Mark slide height
Choose a consistent reference point. For multiple drawers, we often use a story stick or matched spacer blocks so every slide sits at the same height without repeated measuring. On face-frame cabinets, confirm that the front and rear of the slide will be supported in the same plane.
4. Install the cabinet members first
Separate the slide members if the hardware allows it. Position the cabinet member at the required setback from the cabinet front. Use the manufacturer’s sheet here because soft-close, inset, overlay, and push-to-open slides can have different setback requirements.
Rank #3

- Drawer Slide Jig: Install drawer hardware quickly, accurately and more easily than ever with this innovative jig! Our center-mount drawer slide jigs are the ultimate aid for installing drawer slides of almost any type.
- Compatible With: Our cabinet hardware jig is compatible with almost any drawer slide including center-mount slides, epoxy-coated side mount, and ball bearing slides. Not compatible with Blum Tandem Drawer Slides.
- Locking Wedge: Our drawer jig features a locking wedge that holds the slide securely with no risk of slippage. Place our drawer slide jig against the face of your cabinet and position the cabinet drawer slides at level with the proper outback before use.
- Adjustable Indexing Rod: Our cabinet hardware jig tool can be clamped to the face of the cabinet. This woodworking jig features an indexing rod that references off of the face frame rails or cabinet bottom for fast, repeatable height settings.
- Rotating ABS foot: The rotating foot allows you to rotate the indexing rod from the top or bottom. And the cutouts in the cabinet jig allow easy access for drill and driver bits.
Drive one screw near the front through a slotted hole. Set the rear of the slide level and parallel, then drive one rear screw. Do the same on the opposite side. Do not fully populate every screw hole yet.
5. Install the drawer members
Mark the drawer-box side according to the slide instructions. Keep the slide flush, level, and square to the drawer front unless the manufacturer specifies otherwise. Drive one screw near the front and one near the rear through adjustable holes. Check that screw heads sit flat and do not interfere with the slide travel.
Outdated Drivers Are Slowing You Down
One free scan finds every outdated or missing driver and matches the right update for your exact hardware.Free scan · exact hardware matchWindows Errors? Fix Them Before They Spread
Repair common Windows errors and clear accumulated junk for a smoother, more stable PC - no reinstall needed.Free scan · no reinstall6. Dry-fit and test
Insert the drawer and move it slowly. It should engage both slides evenly, travel without grinding, and close without being pulled sideways. If the drawer binds, remove it and adjust before adding more screws. This is the step that separates a clean installation from a drawer that works poorly for the next five years.
7. Final-fastening
Once the drawer runs smoothly, add the remaining screws in the recommended holes. For heavy drawers, use all required fastening points and verify that the cabinet material is solid. Test the drawer loaded, not just empty. A drawer that works empty may sag under 50 lb of cookware if the slides or fasteners are under-rated.
Installing Undermount Soft-Close Drawer Slides
Undermount slides are more particular than side-mount slides, but they deliver a clean look and a high-end feel when installed correctly. The most common mistake is assuming the drawer box is compatible without checking the manufacturer’s specifications.
Confirm drawer-box requirements
Before installation, confirm the required drawer-box width, drawer depth, bottom recess, back notches, front locking clips, and rear pin holes. Many undermount systems need the drawer box to be narrower than the opening by a precise amount. If the box is too wide by even 1/8 inch, the slides may rub, fail to latch, or prevent the drawer from closing fully.
The Tool Desk
Outbyte Driver Updater FREEFix the driver behind crashes, sound loss and screen glitchesFind Drivers →Outbyte PC Repair FREEClear out junk files and repair common Windows errorsFree Scan →Install locking clips
Most undermount systems use front locking clips mounted below the front left and right corners of the drawer box. These clips connect the drawer to the runners and often provide minor side-to-side, height, or tilt adjustment. Use the exact screws and placement shown in the hardware instructions.
Mount the cabinet runners
Set the runners level, parallel, and at the correct setback. In face-frame cabinets, use the proper rear brackets or blocking so the runners do not angle inward. With undermount soft-close hardware, even small misalignment can cause the closing mechanism to miss, drag, or slam instead of catching smoothly.
Fit and adjust the drawer
Set the drawer onto the runners and push until the locking clips engage. Test the reveal around the drawer front. Most quality undermount systems allow small adjustments at the clips. Use those adjustments to even out the front rather than loosening the whole slide assembly every time.
Common Problems After Installation and How to Fix Them
If a drawer binds after installing new slides, do not immediately blame the hardware. Binding usually comes from alignment, clearance, squareness, or support.
The drawer is tight at the back
The cabinet members may be angled inward. This is common in face-frame cabinets when the rear of the slide is unsupported or mounted directly to a recessed cabinet side without a bracket or spacer. Add proper rear brackets or spacer blocks so the slide stays parallel from front to back.
The drawer closes, then pops open
The slides may be mounted out of level, the soft-close mechanism may not be fully engaged, or the drawer front may be hitting the cabinet before the slide reaches its closed position. Check setback and drawer-front clearance.
Rank #4

- 【DRAWER SLIDE JIG】Works with most of standard drawer slide types (side-mount, undermount) and cabinet materials (wood, MDF, plywood). The magnetic arm securely holds slides during installation without damaging surfaces
- 【DRAWER TRACK MOUNTING JIG】The adjustable clamp (0 - 4cm/1.5inch range) locks slides in place with one press, eliminating measurement errors. Achieve perfect alignment every time for multiple drawers without recalibration, saving times on cabinet projects
- 【TIME-SAVING & EFFICIENT DESIGN】Constructed of durable plastic and stainless steel, lightweight and sturdy. Durable fade-resistant laser markings, simply align, mark the drill points and install the drawer slides in seconds without any measuring tools.
- 【WIDE APPLICATIONS】Suitable for any project - cabinets, drawers, nightstands, DIY furniture or professional woodworking, making it easy to achieve professional results in all your woodworking projects.
- 【NOTE】This drawer jig DO NOT fit for face-frame cabinets, only apply for frameless cabinets
The drawer rubs on one side
Check side clearance and drawer squareness. Measure the drawer diagonals. If the drawer box is racked, adjusting the slides may only hide the problem temporarily. Repair or rebuild the drawer box if needed.
The slide feels gritty or noisy
Look for screw heads rubbing the moving member, debris in the track, bent slide components, or slides installed out of plane. Ball-bearing slides should not need force. If they do, something is misaligned or damaged.
The drawer sags when loaded
The slide may be under-rated, fastened into weak material, or mounted with too few screws. Deep pot drawers, pantry drawers, trash pullouts, file drawers, and tool drawers need higher-capacity slides and better structure than a shallow utensil drawer.
Cost to Install Cabinet Drawer Slides in 2026
For DIY work, the hardware is usually the largest cost unless you need jigs, clamps, repair materials, or replacement drawer boxes. For professional work, labor depends on drawer count, slide type, cabinet condition, and how much adjustment is needed.
| Project type | Typical 2026 cost | What affects the price |
|---|---|---|
| Basic DIY side-mount replacement | About $8 to $25 per drawer for slide pairs | Slide length, load rating, and whether old holes need repair |
| DIY full-extension or soft-close upgrade | About $15 to $60+ per drawer for slide pairs | Soft-close mechanism, brand, finish, and drawer compatibility |
| DIY premium undermount system | About $35 to $90+ per drawer | Locking clips, exact drawer-box fit, notching, and adjustment time |
| Professional soft-close drawer upgrade | About $40 to $100 per drawer installed | Labor rate, cabinet type, slide type, and repair work |
| Full kitchen, 10 to 20 drawers | About $400 to $2,000+ | Hardware quality, number of drawers, face-frame brackets, damaged boxes, and heavy-duty upgrades |
| Specialty pullout system | Often hundreds per unit; some retail examples are about $400 to $540 | Width, finish, mounting kit, load rating, and cabinet modification |
Cabinet hardware labor benchmarks are useful for comparison. Small hardware jobs often run about $5 to $30 per piece for labor, and installed cabinet handle pricing can range from about $6 to $60 per handle. May 2026 cabinet-handle installation benchmarks show about $31.34 to $48.82 per handle. Drawer slides can be comparable or higher because the installer has to remove drawers, align paired moving parts, correct old mounting holes, and tune the drawer action.
Budget another $20 to $100 or more for DIY extras if you need a drawer-slide jig, spacer blocks, clamps, drill bits, shims, better screws, or repair materials. If drawer boxes are cracked, swollen, or out of square, replacement boxes can change the budget quickly.
When to DIY vs. When to Hire a Pro
DIY makes sense when you are replacing like-for-like slides on a few standard drawers, the drawer boxes are square, the cabinet openings are sound, and you have enough patience to measure and test-fit carefully. A homeowner with a drill, square, clamps, and a free afternoon can usually handle two to four straightforward side-mount replacements.
Hire a cabinet carpenter when the project involves expensive cabinetry, inset fronts, undermount conversions, wide pantry drawers, trash pullouts, damaged drawer boxes, face-frame cabinets without good rear support, or drawers that already sit crooked. A pro is also worth it when you are doing 10, 15, or 20 drawers and want consistent reveals across the whole kitchen.
On our projects, the decision is usually simple: if the slide installation requires changing the drawer box or correcting the cabinet structure, it is no longer just a hardware swap. That is cabinet work. Done well, it disappears into the finished kitchen. Done casually, it shows every time the drawer opens.
Safety and Permit Notes
Replacing cabinet drawer slides by itself usually does not require a building permit in most US jurisdictions because it is cabinet hardware work, not structural, plumbing, electrical, or mechanical work. That changes if the drawer work is part of a larger kitchen remodel involving layout changes, electrical circuits, plumbing relocation, wall removal, gas work, or structural framing.
What’s actually slowing this PC down?
Pick the symptom - the matching free tool is one click away.
Local rules vary, and cities can treat kitchen remodels differently. If you are only replacing slides, handles, hinges, or drawer boxes, it is normally a minor finish-carpentry task. If the cabinets are being reconfigured around plumbing, electrical, appliances, or walls, check with the local building department before work starts.
For safety, wear eye protection when drilling overhead or into old cabinets. Confirm screw length before fastening through finished cabinet sides. Keep hands clear of slide pinch points, especially with soft-close and heavy-duty hardware. For tall pantry pullouts or trash systems, follow the manufacturer’s anchoring instructions because a loaded pullout can create a lot of leverage on the cabinet.
Best Value

- Upgraded Drawer Slide Clamp: Features innovative removable clamping system with high-quality clamps and rubber heads. Secure drawer slides quickly by placing them in the desired position for stable fixation
- Creative Positioning Design: Built-in blue positioner for fast operation positioning. Special blue protrusions on the support arm fit tightly with wood to prevent displacement and ensure stability
- Magnetic Support Arm: Equipped with strong built-in magnets to hold long drawer slide tracks securely, freeing hands for precise adjustment. Provides alignment assist to ensure parallelism and verticality between slide tracks, cabinets and drawers
- Expandable Extension: With connector design, extend working length by connecting multiple stainless steel bodies for tall cabinet drawer slide installation
- Multiple Track Compatibility: Compatible with standard side-mounted and bottom-mounted drawer slides. Suitable for wood, MDF, plywood and common cabinet materials, ensuring stable and error-free installation
Pro Tips for a Better Result
Use the manufacturer’s installation sheet. Generic measurements are not reliable across brands, especially for undermount, push-to-open, and soft-close systems. The sheet controls setback, clearance, notch size, screw holes, and clip position.
Drive one screw per member first, test the drawer, then adjust before final fastening. Fully screwing everything down before testing makes small errors harder to correct.
Quick wins for a faster PC:
Scan for outdated or missing drivers - takes under a minuteDriver Scan →Repair Windows errors before they cause bigger problemsFix Now →Fix the driver behind crashes, sound loss and screen glitchesFind Drivers →Use a jig, story stick, or matched spacer blocks when installing multiple drawers. Repeated measuring invites small drift from drawer to drawer. A simple spacer gives you consistent height and cleaner reveals.
Keep slide members paired. Do not mix left and right parts from different drawers on the workbench. With some hardware, the difference is subtle until the drawer refuses to close.
Upgrade slides for wide, deep, or heavily loaded drawers. A 100 lb full-extension slide may be fine for many kitchen drawers, but pantry pullouts, files, tools, and heavy cookware may need more capacity and better fastening.
Do not tune new slides around failed cabinet structure. If the drawer box is loose, the bottom is sagging, or the mounting area is crumbling, repair that first. Good slides cannot make a bad box square.
Recommended Free Tools
The Bottom Line
Installing cabinet drawer slides is not complicated, but it is exacting. Measure the drawer box and cabinet opening, choose hardware that matches the construction, mount both sides level and parallel, and test before final fastening. For basic side-mount replacements, a careful homeowner can get a solid result. For undermount conversions, inset drawer fronts, heavy pullouts, or older cabinets with damage, professional cabinet work is usually the better value.
A smooth drawer is one of those details people notice every day. When the slides are selected correctly and installed square, the drawer feels solid, closes cleanly, and keeps working under real kitchen use.
Frequently Asked Questions
What size drawer slides do I need?
Choose slide length based mainly on the drawer-box depth, then confirm the cabinet has enough usable depth. Common lengths include 14, 16, 18, 20, 22, and 24 inches. The slide should not hit the cabinet back or prevent the drawer from closing.
Can I replace old drawer slides with soft-close slides?
Yes, if the drawer box and cabinet opening have the required clearances. Side-mount soft-close slides are often easier to retrofit. Undermount soft-close slides may require a specific drawer-box width, bottom recess, notches, and locking clips.
Are side-mount or undermount drawer slides better?
Side-mount slides are usually easier to retrofit and good for utility or heavy drawers. Undermount slides are hidden and often feel more refined, but they require more exact drawer construction and installation.
Do I need a permit to install cabinet drawer slides?
Replacing drawer slides alone usually does not require a permit because it is cabinet hardware work. A permit may be needed if the work is part of a larger kitchen remodel involving plumbing, electrical, gas, wall removal, or structural changes.
How much does it cost to install soft-close drawer slides in 2026?
A realistic professional range is about $40 to $100 per drawer for standard soft-close upgrades. DIY hardware commonly runs about $15 to $60 or more per drawer for full-extension or soft-close slide pairs.
Why is my drawer binding after I installed new slides?
Common causes include slides mounted out of level, left and right slides set at different heights, rear brackets missing in face-frame cabinets, stripped screw holes, incorrect side clearance, or an out-of-square drawer box.
Quick Recap
Product prices and availability are accurate as of the date/time indicated and are subject to change. Any price and availability information displayed on Amazon at the time of purchase will apply.

