What’s actually slowing this PC down?
Pick the symptom - the matching free tool is one click away.
Use a nail gun only after identifying its power source, trigger mode, compatible fasteners, and operating limits in the manufacturer’s manual. For each shot, keep control of the tool, place its nose against the work before squeezing the trigger, and repeat that order for every nail. NIOSH recommends full sequential triggering because contact or bump triggers can discharge nails unintentionally.
Before using a nail gun
Identify the tool and learn its controls
Read the manual and tool labels for the exact nailer. Confirm whether it is pneumatic, cordless, or another type; which nails and sizes it accepts; how it loads; which trigger mode is selected; and any pressure or operating limits. Trigger-mode names are not consistent across manufacturers, so do not infer firing behavior from a label alone.
Get instruction and follow established work procedures before using a loaded nailer. NIOSH advises against learning by trial and error. Its Nail Gun Safety guidance says about 37,000 people visit emergency rooms each year for nail-gun injuries, with 60% of those injuries work-related; these are the figures stated on the CDC/NIOSH page published December 19, 2023.
Inspect the equipment and work area
- Check the nailer for damage or defects. For a pneumatic tool, inspect the hose, fittings, and compressor as well.
- Use only equipment in proper working condition. OSHA requires tools found defective or developing a defect during use to be removed from service until properly repaired.
- Set up stable work and keep hands and other people out of the firing path. Plan where the nail will exit or what it could strike if it passes through the material.
- Wear eye and hearing protection appropriate to the task, along with any head or foot protection required by the worksite. OSHA construction PPE requirements depend on the task and setting.
How to load a nail gun
There is no universal loading sequence: nail strips, magazines, fastener orientation, and release mechanisms vary by model. Follow the manual’s loading diagram and use only the specified fastener type, length, and collation. Do not force a strip into the magazine or assume that a nail that fits physically is approved for the tool.
#1 Best Overall

- Long life maintenance-free motor to keep from staining the work surface
- Tool-free depth-of-drive adjustment with detents for proper setting of nail heads
- Tool-free jam release mechanism for easy nail removal
- Rear exhaust to keep contaminates away from work
- Drives 18 gauge nails from 5/8 in. to 2 in. length
- Keep the tool pointed away from yourself and others, with your finger off the trigger.
- Use the manual’s procedure to open or release the magazine and insert the compatible fasteners in the indicated direction.
- Close and latch the magazine as directed, then check that the fasteners are seated correctly.
- For a pneumatic nailer, connect the air supply only as specified by the manual and set pressure within the manufacturer’s range. NIOSH’s worker booklet gives 80–120 psi as a usual range for pneumatic nailers, not a universal setting; the exact tool’s recommended range governs.
How to fire a nail gun safely
Use full sequential triggering when available
With full sequential triggering, the nose must contact the work before the trigger is squeezed. After firing, release the trigger and lift or reposition the tool; the nose must be applied again before the next trigger squeeze. Repeat this complete order for every shot.
NIOSH and OSHA’s Nail Gun Safety: A Guide for Construction Contractors calls the full sequential trigger “always the safest trigger mechanism for the job.” The guide attributes a twofold overall injury risk for contact-trigger tools compared with sequential-trigger tools to studies of residential carpenters. That is a relative-risk finding from those studies, not a prediction of an individual worker’s absolute risk.
Rank #2
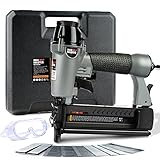
- 2-IN-1 PNEUMATIC BRAD NAILER & STAPLER — Fires both 18GA brad nails (5/8"–2") and 1/4" crown staples (5/8"–1-5/8") with one tool. Quick-swap between nailing and stapling for trim, molding, upholstery, and furniture — no need to own two separate guns.
- 360° EXHAUST & TOOL-FREE JAM CLEAR — Rotatable exhaust directs air and debris away from your workspace and face. When a jam happens, clear it in seconds without tools — no disassembly, no downtime, just fast recovery and back to work.
- USER-FIRST DESIGN — SAFETY & COMFORT — Sequential trigger prevents accidental firing. Transparent magazine window shows remaining fasteners to avoid dry-fire marks on your workpiece. Soft rubber grip and lightweight body keep your hand comfortable through long sessions. Quick-release 100-fastener magazine for fast reloads.
- 1000-PIECE COMPLETE KIT & BMC CASE — Ready to build from day one: includes 400× 2" brad nails, 400× 1-1/4" brad nails, 200× 1-1/4" crown staples, sturdy BMC carrying case, safety glasses, lubricating oil bottle, and 2 Allen wrenches. Everything organized, portable, and job-site ready.
- 60–120 PSI RANGE & 2-YEAR REPLACEMENT WARRANTY — Works with standard air compressors at 60–120 PSI (1/4" NPT inlet) — ideal for woodworking, flooring, picture framing, door/window install, and pet house builds. Backed by NEU MASTER's 2-year warranty: we send new replacements, not repair service. NOTE: Air compressor NOT included.
Keep the firing path controlled
- Keep your trigger finger off the trigger while carrying, repositioning, or setting up the tool.
- Never point the nailer at yourself or another person, even if you believe it is unloaded.
- Keep hands away from the nose and the expected nail path, especially when holding small or awkward workpieces.
- Work only as quickly as you can safely control the tool. Never disable or bypass a safety device.
Which nail gun trigger is safer?
| Trigger mode | How it fires | Safety and tradeoff |
|---|---|---|
| Full sequential | The nose contacts the work first; then the trigger is squeezed. The order must be reset for each shot. | Prevents bump firing through its required sequence. NIOSH recommends it as the safest mechanism for the job. Placement is more deliberate. |
| Contact or bump | The trigger and nose contact can be activated in either order. Holding the trigger while bumping the nose against a surface can fire repeated nails. | Allows faster repetitive nailing, but carries higher overall injury risk in the studies cited by NIOSH. NIOSH warns that bump or automatic triggers can cause unintended discharge. |
Names such as “single sequential,” “single actuation,” and other manufacturer-specific labels can describe different firing logic. Check the tool’s manual and label rather than relying on the name. The NIOSH discussion of the ANSI nail-gun standard also addresses the distinction between trigger modes.
How to clear a jam or service the tool
- Stop work and keep the nailer pointed away from people.
- Isolate the power source before clearing a jam or performing maintenance. On a pneumatic nailer, disconnect the air hose.
- Follow the exact model’s jam-clearing or maintenance procedure. Do not pry or disassemble parts in a way the manual does not authorize.
- Do not return an incorrectly functioning or defective tool to service until it has been properly repaired.
OSHA’s construction rule, 29 CFR 1926.302, includes a specific requirement for pneumatic nailers and staplers with automatic fastener feed operating above 100 psi at the tool: they must have a muzzle safety device that prevents ejection unless the muzzle contacts the work surface. This is one workplace requirement, not a complete compliance assessment.
Do these 3 things before closing this tab:
1Fix the driver behind crashes, sound loss and screen glitches2Clear out junk files and repair common Windows errors3Scan for outdated or missing drivers - takes under a minuteRank #3

- NAILER: 21 degree plastic collated framing nailer
- APPLICATIONS: Great for flooring and framing, truss build-up, window build-up, sub flooring, roof decking, wall sheathing and housing construction
- LIGHTWEIGHT: At only 7. 5 lbs and well-balanced allowing for ease of maneuverability and less user fatigue
- SELECTIVE ACTUATION: Allows for quick changes between sequential and contact nailing with the flip of a switch
- TOOL-LESS DEPTH ADJUSTMENT: Depth adjustment to countersink or flush drive into a variety of materials
What to do after a nail-gun injury
Seek medical attention immediately after any nail-gun injury, even if a hand injury looks minor. NIOSH notes that apparently small puncture wounds can mask serious damage. Its Straight Talk About Nail-Gun Safety provides additional worker guidance.
Quick Recap
Best Value

- METABO HPT BRAD NAILER: The 18-Gauge Brad Nailer from Metabo HPT is ideal for trim work, furniture building and other finishing applications requiring precision and performance for both professionals and DIY enthusiasts alike.
- ACCEPTS: 18-gauge brad nails from 5/8" up to 2" in length.
- SELECTIVE ACTUATION SWITCH: Metabo HPT's power brad nailer has a selective actuation switch, allowing users to easily select bump fire or sequential fire modes, thereby enhancing control and maximizing efficiency.
- LIGHTWEIGHT BRAD NAILER: Our brad nailer is lightweight at only 2.2lbs, for easy use all day long. With its lightweight, ergonomic design, this power tool is engineered for the toughest jobs. The Metabo HPT power brad nailer also includes a No-mar tip which protects the workpiece from accidental marks.
- TOOL-LESS DEPTH ADJUSTMENT: This power tool for brad nails has a depth of drive dial, which allows the user to easily adjust the drive depth for a professional finish. The Metabo HPT brad nailer also has a reload indicator on the magazine, which alerts the user when nail quantities are low, avoiding blank drives.
Rank #4

- AWARD: Rated the Pro Preferred Nailer for 12 years running (2014 - 2025) by Builder and Developer Magazine
- FASTENERS: 16-gauge finish nails in lengths ranging from 1-in up to 2-1/2-in
- TRIGGER: Selective actuation switch lets the user easily select bump fire or sequential fire modes
- LIGHTWEIGHT: Only 3.7 lbs and well-balanced for minimal fatigue and increased maneuverability
- DEPTH ADJUSTMENT: Tool-free depth of drive adjustment helps to provide a professional finish when fastening into varying materials
Product prices and availability are accurate as of the date/time indicated and are subject to change. Any price and availability information displayed on Amazon at the time of purchase will apply.