Free tools Windows power users keep installed
One-click scans. No signup required.
Some links on this page are affiliate links: if you buy through them we may earn a commission, at no extra cost to you.
The most reliable way to fit a straight-edged part around an unknown curve is to make an inexpensive template first, then transfer the curve to the final workpiece. For a one-off fit—such as a wooden pickup-bed toolbox around a wheel well—cut posterboard roughly to shape, use a compass to copy the gap, trim and test the template, and repeat until the fit is tight. Only then mark and cut the wood.
The basic posterboard-and-compass method
This method is intended for copying an existing, irregular curve—not for laying out a mathematically perfect circle or a known-radius arc. It is useful when a workpiece must meet a wall, wheel well, cabinet side, pipe, countertop opening, or another surface whose shape is difficult to measure directly.
As an Amazon Associate I earn from qualifying purchases.
What’s actually slowing this PC down?
Pick the symptom - the matching free tool is one click away.
- Make a rough template. Cut posterboard or thin cardboard approximately to the shape required. Leave enough material that the template overlaps the curved obstruction or remains oversized where the final cut will be made. The first template does not need to be accurate.
- Position the template. Hold or temporarily fasten it exactly where the finished part will sit. Keep its straight edges, reference edges, and intended orientation aligned with the installation.
- Set the compass for the largest gap. Open a woodworking compass slightly wider than the largest space between the template edge and the curved surface. The opening should be large enough for the pointed leg to contact the surface while the pencil leg reaches the template.
- Keep both compass legs perpendicular to the surface. Place the pointed leg against the curve and move the compass along it while the pencil transfers the contour to the posterboard. The compass should remain square to the surface rather than leaning at a changing angle.
- Cut to the transferred line. Remove the waste on the outside of the line, then put the template back in position and check the fit. Leave the line visible until you are certain which side is waste.
- Close the compass as the gap narrows. If the first pass leaves a smaller gap, reduce the compass opening to suit the remaining space and scribe again. Trim the new line and test-fit once more.
- Repeat until the fit is satisfactory. Several light refinement passes are more dependable than trying to achieve the final fit in one cut.
- Transfer the finished template to the workpiece. Once the posterboard fits, clamp or trace it onto the wood, plywood, or other final material. Mark the waste side clearly, rough-cut just outside the line, and refine the edge with an appropriate saw, plane, file, or sander.
The compass setting is therefore not necessarily constant in this quick template-refinement method. Start with an opening that spans the largest gap, then close the legs as the template approaches the curve. That is different from spiling, which uses one unchanged compass setting to transfer a series of reference points.
Why the compass must stay perpendicular
The compass transfers a line parallel to the surface at the distance represented by its opening. If the tool is tilted, the effective distance between the surface and pencil changes as you move. The result can drift inward or outward even when the surface itself has not changed.
Popular on Amazon

- Complete Compass Geometry Set – This all-in-one compass geometry set includes 3 types of compasses (study, graphic, bow), 1 divider, extra lead & needles for compass, 2 protractors (standard and swing arm), a 6” ruler, 2 triangle squares (45°, 30°/60°), 2 mechanical pencils(0.5 & 0.7mm), 2 graphic pencils, erasers, lead refills, and a pencil sharpener, all neatly packed in a durable storage case. Ideal for students for school math or drawing tasks
- Compasses for Smooth Drawing – High-quality metal compasses designed for accuracy and long-term use, create circles up to 6 inches in diameter. One of the compasses includes an adjustable pen holder, offering greater flexibility for precise arcs and curves in drafting, design, and geometry work
- Drafting Tools Kit for Students – Equipped with all the drafting tools needed for school or office use, including protractors, ruler, triangle set squares, and mechanical pencils. All tools are clearly marked with inch and centimeter scales, making them practical and easy to use for math, geometry, or engineering
- Compact & Portable Design – All geometry tools are securely stored in a lightweight, compact case, making it easy to organize and carry anywhere. This makes the compass geometry set perfect for classroom use, homework, on-the-go study, or professional drafting tasks
- Multi-Purpose Set – This geometry and drafting tools set is perfect for multiple applications such as schoolwork, exams, architectural sketching, woodworking or artistic design. A thoughtful gift for students during back-to-school, birthdays, holidays, or Children’s Day
Keep the pointed leg following the curve and the pencil leg touching the template. Move steadily, without forcing the point into the surface. On a vehicle or construction installation, access may make this difficult; in that case, make the template in sections or use a more controlled point-transfer method rather than pretending that a single sweeping line is precise.
A fine, consistent pencil line makes the final trim easier to judge. A mechanical pencil for woodworking can help maintain a narrower line than a wooden pencil that gradually becomes blunt. This is an accuracy aid, not a substitute for test-fitting.
The Tool Desk
Outbyte Driver Updater FREEScan for outdated or missing drivers - takes under a minuteDriver Scan →Outbyte PC Repair FREEClear out junk files and repair common Windows errorsFree Scan →Disclosure: This article may contain product recommendations. If a product link is added, it may help support the site at no additional cost to you.
How to avoid cutting the expensive part too soon
Template work moves the risk to a cheap, replaceable material. Posterboard can be trimmed repeatedly, folded or replaced, and tested in the actual opening before the final board is touched. This matters because many installed curves are not true circular arcs. A single radius measurement may fit one section but fail at the corners or where the curve changes direction.
When transferring the template:
- Mark the template’s orientation and at least two reference points before removing it.
- Indicate the finished face and the waste side so the shape is not accidentally mirrored.
- Do not assume a pencil line itself is the cut edge; decide whether the line represents the finished edge or the waste boundary.
- Rough-cut the final material slightly outside the line, then remove the remaining stock gradually.
- Test the actual workpiece in place before permanently fastening it.
Using a compass for a known-radius curve
If the required shape is genuinely a circular arc and its radius and center are known, you can lay it out with a compass, trammel points, or another radius-setting tool. That is a different operation from copying an unknown existing curve. The posterboard method described here follows the physical contour and is better suited to irregular wheel wells, walls, and openings.
When one curve is too complicated: spiling
For a complex opening, particularly one with corners or changing directions, spiling can preserve more information than trying to sweep one continuous line. Instead of making a full-size template, use a small reference board—approximately 1/4-inch plywood in the described method.
Quick wins for a faster PC:
Scan for outdated or missing drivers - takes under a minuteDriver Scan →Clear out junk files and repair common Windows errorsFree Scan →Also popular on Amazon

- Professional all metal compass/divider for woodwork, carpentry, metal work, leather work, math, etc. - leg length: 8 inches
- Pencil holder to easily draw circles up to 18” in diameter
- Can be used as a scribe or divider to quickly measure and copy measurements
- Draws arcs and circles repetitively with high dimensional accuracy with the lockable wing design
- Made from high quality steel, it will not rust or get corroded
- Place the thin reference board in the opening or against the surface to be copied.
- Set the compass so its point touches the wall or obstruction while the pencil reaches onto the reference board.
- At significant locations—inside corners, outside corners, and points where the front edge meets the wall—swing an arc onto the reference board.
- Label every arc so each mark can be identified later. Record the compass setting on the board.
- Clamp the reference board to the finish stock without changing the compass setting.
- Transfer the corresponding arcs to the finish stock. The intersections of the arcs identify the copied points.
- Connect the transferred points with a controlled line, then cut outside the line and refine the fit.
More transferred points generally produce a closer reproduction of an irregular opening, especially where the shape changes quickly. The compass setting must remain unchanged throughout this operation. If the compass is bumped, restore the recorded setting before continuing; otherwise, the arcs will no longer correspond.
The reference board’s thickness also matters. A board that is too thick changes how far the compass must reach and can introduce a systematic error. A thin, stable piece of plywood is preferable to a thick offcut for this purpose.
Joggle sticks for many irregular reference points
A joggle stick is a narrow strip of plywood or plastic with reference marks, offsets, or deliberately irregular features that allow a complicated opening to be transferred to another piece. It is useful when the shape contains many distinct points that must remain associated with their original locations, or when a one-pass compass line is impractical.
Use clear labels and reference lines. The goal is not to make the stick resemble the entire opening; it is to preserve the locations needed to reconstruct the opening accurately on the finish stock.
Do these 3 things before closing this tab:
1Clear out junk files and repair common Windows errors2Fix the driver behind crashes, sound loss and screen glitches3Repair Windows errors before they cause bigger problemsMaking a durable template for repeated parts
Posterboard is ideal for a one-off fit, but it can deform and is unsuitable as a long-term router guide. For curved furniture parts, cabinet components, or multiple identical pieces, transfer the layout to MDF or Masonite and make a rigid template.
- Transfer the approved layout to the MDF or Masonite, including centerlines and orientation marks.
- Rough-cut the template with a jigsaw, staying outside the layout line.
- Fair the edge with a sanding block, file, or other controlled method until it is smooth and free of bumps.
- Check the template against the original opening or a verified reference before using it.
- Rough-cut the workpiece slightly oversized.
- Align the template’s marked centerlines with the workpiece and clamp it securely.
- Use a bearing-guided pattern or flush-trim router bit appropriate to the setup.
- Make several light router passes rather than one aggressive pass.
A bearing-guided bit reproduces the template edge—including its flaws. A small lump, hollow, or sanding flat in the MDF can therefore appear on every part. Spend time fairing the template before routing. Confirm the bearing is riding on the intended template edge, keep the workpiece supported, and follow the router manufacturer’s safety requirements.
Also popular on Amazon

- 1 High Quality Professional Bow Compass For Math, Geometry, Art, Drafting And Drawing; Creates Circles Up To 8 Inches In Diameter
- Precision Geometry Compass With Spring Bow Head And Center Wheel Prevents Unintentional Leg Movements
- All Metal, Nickel Plating Compass, Lifelong Satisfaction Guaranteed
- Easy To Adjust Legs, Great For Precise Drawings
- Packaged In A Clear, Reusable Pouch. Easy To Carry And Store
Three-wall openings and countertop fits
When a countertop or panel must fit between three walls, a small base-and-guide template can be safer than trimming the finished surface repeatedly.
- Cut a template base slightly smaller than the opening.
- Prepare three guide boards, one for each wall.
- Push each guide board against its wall and mark or scribe the wall contour.
- Rough-trim the boards, then refine them—using a belt sander or another controlled tool—until each one fits snugly.
- Screw the three guide boards to the template base.
- Position the assembled template on the oversized countertop and secure it.
- Use the template as a routing guide, removing the countertop material in controlled passes.
This arrangement keeps the fitting process on the template and reduces the chance of trimming too much from an expensive countertop. Verify that the template is square to the intended front edge and that no guide board has shifted before routing.
Making two complementary curves match
When two parts must mate—such as a veneered plywood center and a solid-wood border—cutting each curve independently can produce a visible mismatch. The saw kerf, small layout errors, and different tool paths can leave gaps even when both parts were marked from the same general shape.
A better approach is to make complementary MDF or Masonite templates and use a bearing-guided router bit to create the matching concave and convex profiles. The templates must be smooth, stable, and accurately related to each other. Thin strips can be bent to establish a desired curve, supported with blocks, and reinforced without allowing the curve to move.
Make a test joint in scrap first. Confirm which template controls the inside curve and which controls the outside curve, and account for the bit’s bearing orientation. As with any template routing, clamp everything firmly and take several light passes.
Also popular on Amazon
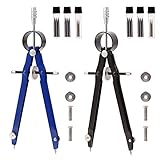
- THOUGHTFUL DESIGN: This Geometry compass has spring bow head, center wheel and automatic locking mechanism, so it can prevent the accidental movement of legs and help you stably draw lines, easy to use and good use feeling.
- QUALITY MATERIAL: The Drawing Compass is made of quality carbon steel, plated and strong structure, which has good toughness and high hardness, so it is strong, durable for long-term use and not easy to rust, bringing convenience to your work or study.
- SIMPLE STRUCTURE: The structure of circle compass is classic, simple and easy to operate, rotate the center wheel to easily control the size of the circle. Even novices can master skills quickly.
- WIDELY USED:The metal bow compass can draw correct circles and arcs; it plays a very important role in the fields of mathematics, engineering, navigation, art and carpentry, making it an ideal drawing tool for students, artists, carpenters and mathematicians.
- WHAT YOU WILL GET: 2 pieces compasses, 4 Pair of Screw Replacements, 2 bottles(4pcs) spare steel needle tips and 4 bottles(12pcs) Pencil Leads, sufficient quantity and replacement device.
Tools and materials
| Item | Use |
|---|---|
| Woodworking or wing compass | Copies the gap or transfers arcs. A lockable wing compass divider is useful for larger arcs and repeated layout. |
| Posterboard or cardboard | Cheap, disposable first-stage template material. |
| Fine pencil or mechanical pencil | Marks a consistent transfer line. |
| Approximately 1/4-inch plywood | Thin reference board for spiling. |
| MDF or Masonite | Rigid template material for repeated parts and routing. |
| Jigsaw | Rough-cuts templates and workpieces outside the layout line. |
| Sanding block, hand sander, or belt sander | Refines template edges and guide boards. |
| Clamps, screws, or temporary fasteners | Hold templates and reference boards in position. |
| Router and bearing-guided pattern or flush-trim bit | Transfers a refined rigid-template edge to one or more workpieces. |
A wing compass divider is an optional upgrade for readers who need a lockable setting, larger arcs, or a tool that can hold a pencil or scribe. It is not required for the basic posterboard method; an ordinary woodworking compass is sufficient when the curve is being refined by repeated passes.
Outdated Drivers Are Slowing You Down
One free scan finds every outdated or missing driver and matches the right update for your exact hardware.Free scan · exact hardware matchWindows Errors? Fix Them Before They Spread
Repair common Windows errors and clear accumulated junk for a smoother, more stable PC - no reinstall needed.Free scan · no reinstallCommon failure modes
The line wanders away from the curve
The compass may be tilted, the point may have lost contact, or the template may have moved. Re-secure the template, keep the legs perpendicular to the surface, and make another pass using a narrower setting.
The template fits at one end but not the other
The opening may not be a single radius, or the template may have shifted during marking. Add reference marks, check orientation, and use several spiling points if the curve changes direction.
The final part is too small
Too much material was removed, or the wrong side of the line was treated as waste. Stop cutting as soon as the part is close, preserve the marked line, and test-fit frequently. A replacement template is cheaper than a replacement finished panel.
Two routed parts do not match
The templates may not be truly complementary, the bearing may have been used on the wrong edge, or the template edge may contain irregularities. Test the setup on scrap and inspect the template edge before routing production parts.
Also popular on Amazon

- Geometry Set For All Levels Designed in USA
- Package Includes 15 Piece: 2 Metal Compasses (1 Study Compass & 1 Graphic Compass), 1 Extra Lead for Graphic Compass, 1 Metal Divider, 2 Pencils for Compass, 1 Mechanical Pencil (0.5 mm) for Compass, 1 Pack of 0.5 mm Lead for Mechanical Pencil, 1 Eraser, 1 Metal Pencil Sharpener, 1 Ruler (6”), 1 Set Square (30°/60°), 1 Set Square (45°), 1 Protractor, 1 Protractor with Swing Arm (6”)
- 15 Piece Geometry Set, Compass Set in a Reusable Pouch, Easy to Carry and Store
- Inch and Centimeter Measurements
- The Math Set/Geometry Set Designed by Experienced Math Experts with All Essential Items for Teachers and Students at Any Level
The routed edge is rough or inconsistent
Check that the workpiece and template are clamped securely, the bit is suitable and sharp, and the cut is being made in light passes. Do not rely on a rough jigsaw edge as a final routing template edge.
Safety checklist
- Secure the template and workpiece before sawing, sanding, or routing.
- Keep hands clear of blades and router bits, and follow the tool manufacturer’s guarding and direction-of-cut instructions.
- Wear eye protection and appropriate hearing and respiratory protection for cutting and sanding.
- Support large panels so they cannot tip or pinch the blade.
- Make shallow router passes and stop if the bit, template, or workpiece begins to shift.
- Mark the waste side and verify the orientation before cutting the final material.
Frequently Asked Questions
What is the easiest way to scribe an irregular curve?
Make a rough posterboard template, hold it in position, and use a compass with its point on the existing curve and its pencil on the template. Trim and test the template repeatedly until it fits.
Should the compass opening stay the same while scribing?
Not for the basic posterboard refinement method. Begin with an opening wider than the largest gap, then close it as the template approaches the curve. In spiling, however, the compass setting must remain unchanged while arcs are transferred.
Can I use a cardboard template for router work?
Use cardboard for initial fitting, not as a durable router guide. For routing or repeated parts, make a smooth, rigid MDF or Masonite template and clamp it securely.
How do I scribe between three walls?
Build a small template base with three guide boards. Scribe and refine each guide board to its wall, fasten the boards to the base, and use the completed template to guide the countertop or panel cut.
The Bottom Line
For one curved obstruction, the dependable sequence is rough template, compass scribe, trim, test-fit, and repeat. Keep the compass perpendicular to the surface and reduce its opening as the gap narrows. Use spiling or a joggle stick when the opening has many changing points, and move to a refined MDF or Masonite template with bearing-guided routing when you need repeatable, matching parts.
Quick Recap
Product prices and availability are accurate as of the date/time indicated and are subject to change. Any price and availability information displayed on Amazon at the time of purchase will apply.

