Remove bathroom mold by physically scrubbing hard surfaces with detergent and water, then drying them completely. Use a small grout-cleaning brush for textured joints, clean glazed tile without abrading its finish, and inspect caulk rather than simply covering it. Do not apply new caulk over visible mold. Clean and dry the joint first; if growth is embedded in damaged caulk or repeatedly returns, replacement or professional advice may be needed.
The lasting fix is moisture control. Repair leaks, improve bathroom exhaust or window ventilation, keep indoor relative humidity below 60 percent (30 to 50 percent is preferable when possible), and clean recurring problem areas more often. The U.S. Environmental Protection Agency (EPA) does not recommend bleach or another biocide as routine mold cleanup; dead mold can still trigger reactions, so it must be removed rather than merely killed.
As an Amazon Associate I earn from qualifying purchases.
Decide what you are cleaning before you start
Mold behaves differently on each bathroom material. Identifying the surface helps you choose a method that removes growth without damaging the finish or hiding a moisture problem.
Do these 3 things before closing this tab:
1Clear out junk files and repair common Windows errors2Scan for outdated or missing drivers - takes under a minute3Repair Windows errors before they cause bigger problemsGlazed tile
Glazed ceramic or porcelain tile is a hard, nonporous surface. Surface growth can usually be scrubbed away with detergent and water, followed by thorough drying. Do not assume that a dark mark is still active mold: mold can stain materials, and cleaning may not restore the original color. Avoid abrasive methods that could scratch or dull a glaze.
#1 Best Overall

- V Shape Design: V grout cleaner brush fits precisely into each groove, and reaches deeply into narrow joints. The three-row design also cleaning the area next to the grout
- Ergonomic Design: Upgraded thicker long handle and small U-shape groove design for easy handling and application of force to quickly wipe away dirt
- Tough and Sturdy: Stiff bristles stay upright even after repeated scrubbing, effectively scrubbing away stubborn dirt, debris, soap scum, grease, and oil
- No Damage Surfaces: Quality PP material are mild on hard surfaces and will not scratch surfaces, like tile, grout, floor, sink, drain, stove, window, pot rim, bathtub toilet base
- About Lumkew: We are always committed to providing good grout brush for tile floors, making cleaning easier
Grout joints
Grout is a cementitious joint with texture and, depending on its condition and formulation, more absorbency than glazed tile. Mold may sit on the surface or discolor material below it. EPA’s general hard-surface direction is still detergent, water, scrubbing, rinsing as appropriate for the surface, and complete drying; it does not promise that every stain will disappear.
Silicone or other flexible caulk
Caulk forms a flexible seal where a tub, shower tray, wall, or fixture meets another surface. Growth that wipes off the surface is different from discoloration embedded in deteriorated caulk. EPA’s general mold guidance does not provide a caulk-specific stripping procedure. If the bead is cracked, separating, persistently moldy, or visibly contaminated through its depth, plan for removal and replacement using the caulk manufacturer’s instructions or a qualified professional.
Is the area small enough for household cleanup?
EPA’s Mold Information Slideshow uses about 10 square feet, roughly a 3-foot-by-3-foot patch, as a rule of thumb: homeowners can in most cases handle a smaller patch by following EPA guidance, while larger growth or substantial water damage may justify a contractor. It is not an absolute safety boundary. Hidden growth, contaminated water, building damage, and an occupant’s health can make professional help appropriate even for a smaller visible patch.
Recommended Free Tools
Prepare safely before touching the mold
Ventilate the room before cleaning. Run the bathroom exhaust fan if it vents outdoors, or open a window when conditions allow. Keep people who may react strongly to mold away from the work area. If you have health concerns, EPA advises consulting a health professional before cleanup.
Rank #2
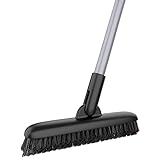
- HEAVY DUTY & LONG LASTING - MR.SIGA grout brush is built with durable plastic and sturdy steel pole, it is tough enough to handle any scrubbing jobs, brings you superior grout cleaning experience.
- V SHAPE STIFF BRISTLES - Durable PP bristles easily scrub away tough grime and dirt from bathroom, pool, tiles, garage, they are firm enough to stand up after sustained use. V shape stiff bristles tackle tough stains on the grout, corners, gaps and hard to reach areas.
- CONVENIENT STEER - This grout cleaning brush also features as a floor scrubber or shower scrub brush with 180 degree maneuverable swivel head allows you to clean corners efficiently and effortlessly.
- ADJUSTABLE 50" LONG HANDLE - Comes with 3-section sturdy steel handle with powder-coated finish, you can adjust the pole length and lock to your desired position. Foam wrapped handle top fits comfortably and perfectly in the hand, making it easy to apply pressure while scrubbing tough tasks.
- MR.SIGA's mission: Make your housework easier, and make the world cleaner.
- Wear suitable gloves, particularly when handling disinfectants or strong cleaning solutions.
- Read the complete label of any cleaner before use, including required ventilation, protective equipment, contact time, rinsing, and compatible surfaces.
- Never mix bleach with another cleaning product, especially a detergent containing ammonia.
- Do not create a stronger mixture or longer contact time than the label allows.
- Gather detergent, water, clean cloths or sponges, and a small grout-cleaning brush. The brush is a practical tool for scrubbing textured joints; EPA does not endorse a particular brush or brand.
Remove bottles, mats, and other items from the immediate area so you can see the full joint and dry it afterward. If a leak is active, stop the leak before cleaning. Otherwise, new moisture can undo the work and spread damage.
Step-by-step: clean mold from tile and grout
- Find and address obvious moisture first. Check the shower valve area, plumbing penetrations, tub edge, ceiling below the bathroom, and corners where water collects. A leak or persistent condensation source must be corrected; surface cleaning alone cannot control recurrence.
- Improve airflow. Start the exhaust fan or open a window to move humid air outside. Keep ventilation running during cleaning and while the surfaces dry, following any product-label precautions.
- Apply detergent and water. Use a detergent solution appropriate for the surface and spread it over the visibly affected tile or grout. EPA’s basic mold cleanup steps call for detergent, water, scrubbing, and complete drying on hard surfaces. The EPA guidance does not specify one universal detergent, dilution, temperature, or dwell time.
- Scrub the tile. Work methodically across the glazed face with a non-abrasive cloth or sponge. Lift the growth rather than simply spreading it to an adjacent joint. Use only the pressure needed to clean; aggressive abrasives can damage a finish.
- Scrub the grout joints. Use a small grout brush to reach the joint’s texture. Move along the full length of the affected line, including corners and the joint where the wall meets the tub or tray. Rinse the brush periodically so removed material is not redeposited.
- Rinse when the surface and cleaner label require it. Remove loosened residue without flooding areas that can absorb water or allow it behind a fixture. Follow the cleaner’s label for rinsing and disposal instructions.
- Dry completely. Wipe remaining water from tile and joints, keep ventilation operating, and allow the area to dry thoroughly. Drying is part of the cleanup, not an optional finishing step.
- Inspect in good light. If the surface is clean but stained, the remaining color may be material staining rather than removable growth. If growth remains in a porous or damaged joint, do not seal over it; reassess the joint and the moisture source.
Repeat cleaning only when the first pass did not physically remove surface material and the product label permits repeated use. Repeatedly applying stronger chemicals without fixing dampness can damage finishes while leaving the cause untouched.
How to deal with mold on shower or bath caulk
When surface cleaning may be enough
If growth is sitting on an intact caulk bead, clean the surrounding tile and the bead with a method and product label that are compatible with the caulk. Use gentle physical action so you do not cut, lift, or separate the seal. Rinse or wipe as directed and dry the joint completely.
Crashes, No Sound, or Screen Glitches?
Random freezes, missing sound and display glitches usually trace back to one bad driver. Find and replace yours safely.Free scan · under a minuteWindows Errors? Fix Them Before They Spread
Repair common Windows errors and clear accumulated junk for a smoother, more stable PC - no reinstall needed.Free scan · no reinstallWhen the caulk should not be kept
Do not cover visible mold with new caulk. EPA’s A Brief Guide to Mold, Moisture and Your Home says to clean moldy surfaces and let them dry before caulking. If the bead is cracked, peeling, detached, soft, or repeatedly discolored after proper cleaning and drying, growth may be embedded or moisture may be trapped behind it. At that point, surface wiping is unlikely to provide a durable result.
Rank #3

- Ultimate Grout Cleaning Set: Easily clean grout lines and grime buildup on tile floors, walls, and baseboards using our telescopic grout cleaner brush. Use the handheld deep cleaning brush to get rid of pesky dirt buildup. This swivel grout scrubber with long handle has a 120° pivoting head to scour hard-to-reach surfaces.
- Handheld Crevice Cleaning Brush: Our grout brush combo set comes with a handheld deep cleaning crevice brush. The small size is perfect for getting into tight spaces where larger brushes can't reach, such as around faucets, toilet bases, and in corners.
- Easy to Clean & Use: Easily scrub grout lines in minutes from floor to ceiling using this efficient grout cleaning tool. Unlike regular commercial grout brushes, our grout brush for tile floors features V-shaped brush bristles for a quick, effective cleanup. The included handheld crevice cleaning brush can also be used as a detailing brush to clean intricate tile patterns or textured surfaces.
- Tough on Dirt, Gentle on Surface: This long handled scrub brush for cleaning has stiff bristles to maintain the smooth, flawless finish of your kitchen or bathroom tiles. Scrub off grime buildup using your grout scrub brush and clean water.
- Adjustable Length: Our long-handled scrub brush for cleaning extends up to 57 inches for those hard-to-reach places and add some extra elbow grease. Shorten the pole of your grout brush for showe down to 30 inches to clean tight spaces or make storage easier.
Replacement decisions
EPA does not set out a caulk-removal sequence on its general household pages. Follow the caulk and fixture manufacturers’ instructions for removing the old bead, preparing the joint, selecting a compatible replacement, and allowing the new sealant to cure. If you cannot determine whether the joint is dry, if the substrate is damaged, or if mold extends behind the fixture, use a qualified contractor rather than sealing an uncertain condition.
Does bleach remove mold from grout?
Bleach is not the default answer. EPA states: "The use of a chemical or biocide that kills organisms such as mold (chlorine bleach, for example) is not recommended as a routine practice during mold cleanup." The reason is practical as well as chemical: dead mold can still cause reactions, and physical removal plus moisture control are still required. See EPA’s guidance on using bleach to clean up mold.
A disinfectant or biocide may have a specific labeled use, but one product’s directions cannot be transferred to another product or treated as a universal recipe. An EPA-registered label for a bleach product (registration 70271-20, dated August 26, 2025) gives directions for specified pre-cleaned hard, nonporous bathroom surfaces. Those directions are product-specific and do not establish permission to use that product on every grout, caulk, or tile finish. Read the exact label and verify surface compatibility before use; ventilate and exhaust air outdoors as directed.
What’s actually slowing this PC down?
Pick the symptom - the matching free tool is one click away.
Never combine bleach with ammonia, detergent, or another cleaner unless the label explicitly permits that combination. In ordinary household cleanup, detergent, water, physical scrubbing, rinsing as appropriate, and complete drying are the EPA-supported starting point.
Rank #4

- Two Types of V-shaped Bristles: The long side of the V-shaped bristles can quickly clean large grout lines and tile joints; the short side of the V-shaped bristles can be accurately stuck into a variety of crevices and corners
- D-Shaped Non-slip Handle: High-density non-slip soft rubber on the top, no slippage even with wet hands. Inside ergonomic curvature with striped texture, comfortable to hold and scrub effortless
- Stiff Bristles: Customized PET bristles are precision implanted to keep their shape and luster even after prolonged and intense scrubbing, making it easy to scrub stubborn dirt, debris, soap stains and grease
- No Surface Damage: Gentle bristles with proper V-angle and bristle spacing apply even pressure to the grout without scratching any hard surfaces
- Multi-Angle Cleaning: From grout to tile, from floor to corner. The shape of this grout cleaner brush is easy to use at a variety of angles, cleaning faster and easier than using old-fashioned brushes
Prevent bathroom mold from coming back
EPA identifies moisture control as the central principle: "The key to mold control is moisture control." After cleaning, work through the conditions that keep the joint wet.
Control leaks and water entry
- Repair leaking supply lines, valves, shower fittings, tub drains, and plumbing penetrations.
- Check whether water is escaping past a failed caulk bead or pooling at the tub or shower-tray edge.
- Investigate soft wall material, swollen trim, peeling paint, or staining on the room below instead of repeatedly cleaning the visible side.
Vent humid air outdoors
Run the bathroom fan during bathing and continue afterward long enough to remove humid air, using the fan’s operating instructions. Open a window when practical and safe. A fan that merely recirculates air does not remove moisture from the building. If mold returns despite routine ventilation, have the exhaust arrangement and moisture source evaluated.
Measure and manage humidity
EPA’s Mold Course Chapter 2 advises keeping indoor relative humidity below 60 percent, ideally between 30 and 50 percent if possible. A hygrometer can show whether the room remains unusually humid, but the number does not replace fixing leaks or improving exhaust.
Keep surfaces dry and clean
Wipe standing water from ledges and horizontal joints, allow the shower area to dry between uses, and clean more frequently if mold repeatedly appears. EPA’s household guidance specifically notes that more ventilation and more frequent cleaning usually limit recurring bathroom mold. Do not apply paint, sealant, or new caulk until the cleaned surface is dry and visibly free of mold.
Best Value

- 【8-Piece Cleaning Brush Set for Every Hard-to-Reach Spot】 Finally clean the places other tools miss. This versatile 8-piece cleaning brush set includes 3 crevice brushes for grout lines, shower door tracks, window tracks, and corners, 2 right-angle scrub brushes for bottles, cups, and narrow interiors, plus 3 wire brushes (brass, steel, nylon) for rust removal, polishing, and detailed scrubbing. A complete cleaning tool set for kitchen, bathroom, and household deep cleaning.
- 【Perfect for Grout, Window Tracks, Bottles & Tight Spaces】 Designed to reach deep into narrow gaps and hard-to-clean corners. Easily scrub bathroom tile grout, shower tracks, sink edges, baseboards, appliance seams, blender bottles, coffee mugs, thermos flasks, baby bottles, and more. Whether you’re tackling everyday messes or deep cleaning stubborn grime, these brushes help clean faster with less effort.
- 【Comfortable Ergonomic Grip & Easy to Store】 Clean longer with less hand fatigue. Each brush features a comfortable ergonomic handle for better grip and control while scrubbing tight spaces and stubborn buildup. Built-in hanging holes make storage simple and allow quick air drying after use—keeping your cleaning tools organized, dry, and always ready.
- 【3 Wire Brush Options for Tough or Delicate Cleaning】 Choose the right brush for every task. Brass bristles help polish metal surfaces, stainless steel tackles rust and corrosion, and nylon gently cleans delicate surfaces without scratching. Great for household maintenance, kitchen appliances, sink fixtures, tools, and detail cleaning around the home.
- 【Built to Last for Daily Cleaning & Deep Cleaning Projects】 Made with durable PP bristles and sturdy materials for reliable long-term use. Strong enough for grime, soap scum, residue, and buildup, yet practical for everyday cleaning. A must-have cleaning brush kit for homeowners, apartment living, spring cleaning, and anyone looking for an easier way to clean hard-to-reach spaces.
What to do when cleaning does not solve the problem
Growth comes off, then returns quickly
Look for an unresolved leak, inadequate exhaust, condensation, or water trapped behind a fixture. Check humidity at different times, including after bathing. Clean and dry the area again only after the moisture source is being corrected; otherwise recurrence is expected.
The mark remains after scrubbing
Mold can stain grout and other materials. A persistent color change does not by itself prove that viable growth remains, but a fuzzy, raised, or spreading surface deposit warrants another careful cleaning and inspection. Do not use increasingly aggressive chemicals simply to restore color, and do not seal over a questionable joint.
Caulk is damaged or growth appears embedded
Cleaning cannot restore a failed seal. Plan replacement according to the manufacturer’s instructions, or obtain professional help when the joint is behind a fixture, the substrate is damaged, or the source of dampness is unclear.
There is a larger or hidden problem
Consider a contractor when visible mold or water damage exceeds roughly 10 square feet, when the water came from sewage or another contaminated source, or when hidden mold is suspected. EPA presents the 10-square-foot figure as a rule of thumb, not a guarantee that a smaller job is safe for every person or building. Extensive water damage and individual health considerations can justify earlier escalation. EPA’s slideshow explains this homeowner-versus-contractor guidance.
Quick Recap
Surface and condition comparison
| Situation | What the EPA-supported approach establishes | What it does not establish | Practical next decision |
|---|---|---|---|
| Glazed tile with surface growth | Scrub with detergent and water, rinse as appropriate, and dry completely. | No universal cleaner, dilution, contact time, or guarantee that staining will disappear. | Inspect for remaining deposits and correct the moisture source. |
| Textured or absorbent grout | Use physical scrubbing with detergent and water; a small grout brush is a reasonable task tool. | No promise that discoloration inside the joint can be removed or that every grout type tolerates every chemical. | If growth remains embedded or the joint is damaged, assess replacement or professional help. |
| Intact caulk with surface residue | Clean the moldy surface and dry it before any future caulking. | EPA provides no caulk-specific stripping procedure. | Use compatible cleaning directions and inspect the bead closely. |
| Cracked, peeling, or persistently moldy caulk | Do not cover visible mold with new caulk. | Surface cleaning alone may not remove embedded growth. | Follow manufacturer replacement instructions or hire a qualified professional. |
| Bleach or another biocide | EPA does not recommend biocides as routine mold-cleanup practice; physical removal remains necessary. | One product label cannot authorize use on all grout, caulk, or tile finishes. | Use only when the exact label permits the application, with required ventilation and precautions. |
| Patch near or above about 10 square feet | EPA uses about 10 square feet as a homeowner-cleanup rule of thumb. | The figure is not an absolute safety boundary. | Consider a contractor, especially with hidden growth, substantial damage, contaminated water, or health concerns. |
A final cleanup checklist
- Identify whether the affected material is glazed tile, grout, or flexible caulk.
- Stop leaks and improve exhaust or window ventilation before cleaning.
- Use detergent and water with physical scrubbing on hard surfaces.
- Use a suitable grout brush carefully on textured joints.
- Rinse as appropriate and dry every cleaned surface completely.
- Never caulk, paint, or seal over visible mold.
- Treat bleach as a product-label-specific option, not a universal mold recipe, and never mix it with other cleaners.
- Keep indoor humidity below 60 percent, ideally 30 to 50 percent when possible.
- Escalate for larger areas, hidden mold, substantial water damage, sewage or contaminated water, damaged building materials, or personal health concerns.
Product prices and availability are accurate as of the date/time indicated and are subject to change. Any price and availability information displayed on Amazon at the time of purchase will apply.

