If part of the nail shank still sticks out of the wood, clamp it with locking (grip) pliers and use a pry bar or crowbar for leverage. Set the bar between the wood and the pliers, then pull with controlled pressure. If the broken nail is completely below the surface, do not use a nail set as an extractor: a nail set is made to drive a nail deeper, and the sources available here do not establish a safe, wood-preserving way to remove a fully buried shank.
First determine which nail problem you have
The correct response depends on whether you can get a solid grip on the remaining steel. A nail with a broken head can still be removed when enough shank is exposed. A nail whose head and shank are flush with, or below, the wood presents a different problem because there is no purchase point for ordinary pulling tools.
As an Amazon Associate I earn from qualifying purchases.
| Condition | What you are trying to do | Action supported by the cited guidance | Important limit |
|---|---|---|---|
| Broken head, usable shank protruding | Extract the nail while limiting levering damage to the board | Clamp locking pliers to the shank and lever against the pliers with a pry bar or crowbar | The method does not guarantee removal or an undamaged board |
| Shank breaks flush or disappears below the surface during work | Continue extraction | Stop and reassess | The practical guide does not document the next extraction step for a fully buried shank |
| Head and shank entirely below the surface | Remove a buried fastener | No specific extraction method is established in the cited practical guide | A nail set is not a removal tool |
| Nail is meant to remain recessed | Hide the nail rather than pull it | Use a nail set to sink it below the wood surface | This achieves recessing, not extraction |
Tools and protective measures
For an accessible, headless nail, gather:
- Locking pliers, also called grip pliers, with jaws large enough to surround the exposed shank.
- A pry bar or crowbar that gives you a stable levering surface.
- Eye protection, particularly if you will strike, pry, or work on a hardened nail.
Ordinary slip-joint pliers may not hold a thick or long nail securely. The practical repair guidance specifically relies on locking pliers because they can be adjusted, clamped, and left gripping while the bar supplies leverage. Choose a bar that can sit between the wood and the pliers without sliding into an uncontrolled position.
Do these 3 things before closing this tab:
1Fix the driver behind crashes, sound loss and screen glitches2Repair Windows errors before they cause bigger problems3Scan for outdated or missing drivers - takes under a minuteClear loose material around the nail so you can see how much shank is available and where the bar will bear. Do not assume that a visible speck of metal is enough to grip; the jaws need a stable section that will not shear or slip as the nail begins to move.
#1 Best Overall

- 【PROFESSIONAL-GRADE CR-V CONSTRUCTION】Drop-forged chrome vanadium steel delivers superior strength and long-lasting durability to withstand tough jobs in the garage, workshop, or jobsite.
- 【MAXIMUM HOLDING POWER】Precision-adjustable locking mechanism creates a strong, reliable grip that won't slip under pressure, making stubborn fasteners and materials easier to handle.
- 【MULTI-PURPOSE JAWS WITH WIRE CUTTER】Curved jaws grip round, square, and flat materials securely, while the integrated wire cutter provides added functionality for electrical and repair tasks.
- 【5 ESSENTIAL LOCKING PLIERS INCLUDED】Complete set features three curved jaw locking pliers (5", 7", 10") and two long nose locking pliers (6-1/2", 9") for reaching tight spaces and handling a wide range of applications.
- 【BUILT FOR WORKSHOP & JOBSITE】Designed for welding, automotive repair, plumbing, fabrication, maintenance, and everyday DIY projects. A dependable tool set for professionals and homeowners alike.
Step-by-step: remove a broken-head nail when the shank is exposed
1. Inspect the remaining shank
Look at the nail from several angles. Confirm that a section projects far enough for the locking-plier jaws to close around it. Check whether the metal is straight enough to grip and whether the surrounding board is already cracked. If the shank is only barely visible, work slowly because the next attempt may break it flush with the surface.
2. Fit and adjust the locking pliers
Open the pliers and adjust their screw so the jaws fit around the exposed nail. The jaws should close firmly on the shank rather than merely touch it. Set the adjustment before applying force; repeatedly squeezing loose pliers encourages slipping and can damage the wood around the nail.
3. Clamp the nail securely
Close the pliers on the shank and lock them. Test the grip with a small, deliberate movement. If the jaws rotate around the nail or pull away, release them and tighten the adjustment. A secure clamp creates the purchase point that a broken head no longer provides.
Free tools Windows power users keep installed
One-click scans. No signup required.
4. Place the pry bar between the wood and the pliers
Slide the pry bar or crowbar into the space between the board and the locked pliers. The cited repair guide places the bar in this position so the tool can lift the pliers and the nail together. Keep the bar aligned with the direction in which the nail should come out. Avoid levering directly against a fragile edge, knot, or visibly split section of the board.
Rank #2
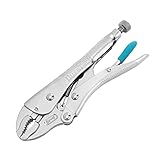
- Ultimate Durability & Toughness: This locking pliers is made from high-grade chrome vanadium steel. The steel is heat-treated to offer the toughness that you need and remain new at service for a prolonged period regardless of the conditions of use
- Adjustable Screw Design: The adjustable screw is perfect for different vise jaw openings, providing the ideal clamping pressure for all different tasks and making your grip work easier
- Perfect Trigger Design: It can provide maximum locking force.Easy to operate, allowing you to freely open the locking pliers with only one hand
- Comfortable Anti-slip Handle: The argyle pattern handle design is not only anti-slip, but also comfortable, and easier to grip and turn
- Package includes: 7-inch curved jaw locking plier, ideal for tightening, clamping, twisting, and turning flat objects such as sheet metal
5. Apply controlled leverage
Press the bar with steady hand and arm pressure instead of jerking it. Watch both the nail and the board as the pliers begin to rise. The goal is a gradual withdrawal that keeps the clamp engaged. If the nail moves, reset the bar closer to the wood as needed and continue with short, controlled movements.
6. Try the alternate crowbar end if needed
The practical guide demonstrates using another end of a crowbar when the first arrangement does not provide a useful angle. Reposition only after releasing pressure and confirming that the pliers are still locked. A different contact point can change the leverage without requiring a sudden increase in force.
7. Stop at the first sign of an unsafe change
Stop if the shank bends sharply, the clamp slips repeatedly, the board begins to split, or the amount of force needed becomes difficult to control. Also stop if the shank breaks flush or drops below the surface. At that point the accessible-shank method no longer applies, and the available guidance does not provide a documented follow-on extraction procedure.
Why a nail set is the wrong answer for removal
A nail set is a small driving tool designed to sink a nail below the wood surface. The U.S. carpentry manual distinguishes it from bars used for prying: a nail set transfers impact to the nail so the nail head finishes below the surface, where it can be covered or left recessed.
Rank #3

- Heat-Treated Carbon Steel: Evertools 6-piece vice grips pliers set is built from high-quality carbon steel with heat-treated jaws, providing wear resistance and maintaining strength over time. Perfect for tough materials without bending or deforming
- Adjustable Clamping Screw for Precise Control: Customize the jaw opening and clamping force to suit different sizes and materials. The adjustable screw ensures locking pliers set holds firmly every time, giving you consistent, reliable results
- Quick Release Lever for Smooth One-Handed Use: The built-in quick release lever allows you to open needle nose vise grips, jaw locking pliers and c clamp easily with just one hand. This feature makes repetitive clamping tasks faster and more efficient, saving time and effort while keeping your workflow smooth and controlled
- Ergonomic TPR Handles for Comfort and Grip: Soft, anti-slip handles provide a firm grip and reduce hand fatigue during extended use. Work confidently with Evertools vise grips & locking pliers set for long periods without discomfort
- Versatile Set for Multiple Tasks: This 6-piece set is designed for a wide range of tasks, including welding, metal bending, woodworking, and general clamping or gripping jobs. This vice grips pliers set provides flexibility to handle different materials and projects, making it a practical addition to any toolbox
That function is useful when a nail is supposed to stay in the board. It is the opposite of extraction. Striking a broken or sunken nail with a nail set may drive the fragment farther into the wood, remove the last visible purchase point, or create a deeper defect. Unless a separate, reliable source supports a particular buried-nail technique and its risks, do not present a nail set or nail punch as a universal removal method.
What to do when the nail is completely buried
If the head and remaining shank are entirely below the surface, the documented pliers-and-bar method cannot start because there is nothing to clamp. The practical guide does not establish a safe, wood-preserving extraction method for this condition. That evidence limit matters: a confident-sounding drilling, punching, or prying recipe would go beyond the method that has been documented.
Do not force a tool into the board simply to create a grip. First determine whether the fastener must actually be removed or whether the immediate goal is only to make the surface safe and usable. If the fragment is not moving, the board is valuable, or further work could split the timber, pause and obtain an on-site assessment from a qualified carpenter or contractor. They can inspect the board, the nail’s position, and the consequence of leaving or replacing the affected section; those decisions cannot be made reliably from the surface description alone.
If an exposed shank becomes buried during the attempted extraction, treat it as the same condition. Do not switch automatically to a nail set: sinking the fragment is a different operation from pulling it out, and the cited sources do not establish that it will preserve the wood or solve the problem.
Rank #4

- Ideal for tightening, clamping, twisting, and turning
- Constructed of high-grade heat-treated alloy steel for durability
- Classic trigger release designed to provide maximum locking force
- Hardened teeth are designed to grip from any angle
- Set includes 7" curved jaw locking pliers with wire cutter and 6" long nose locking pliers with wire cutter
Managing board damage while you pry
Levering always puts a reaction force into the surrounding wood. The supported method reduces the problem by using the locked pliers as the lifting point and placing the bar between the wood and the pliers, but it does not promise a mark-free result. Keep the contact point controlled, use the smallest movement that advances the nail, and inspect the board after each movement.
- Board starts to split: release pressure immediately. Continuing to lever can turn a small crack into a longer split.
- Pliers slip: stop, readjust the jaw tension, and reclamp on a sound section of shank. Do not compensate for a slipping grip with a harder pull.
- Nail bends: stop and reassess the grip and bar position. A bent shank can present a new break point.
- Shank snaps flush: stop. The extraction method documented for an accessible shank has ended.
- Bar keeps sliding: release pressure and reposition it so the contact between the wood and pliers is stable before trying again.
These stopping points are not signs that you need a larger swing or uncontrolled force. They indicate that the physical conditions have changed and that the documented method no longer matches the workpiece.
Independent reader supportYour contribution helps us test, update, and keep practical guides available for everyone.Safety: fragments, protruding nails, and workplace context
Hardened nails can be brittle. The USDA Forest Products Laboratory’s Wood Handbook, Wood as an Engineering Material cautions about injuries from fragments that break during driving and discusses nail brittleness in the context of wood fasteners. A broken head or a damaged shank can create a sharp fragment when it is pried or struck, which is why eye protection is important during this work.
OSHA’s interpretation dated January 25, 2006, addresses lumber-handling work. Russell B. Swanson, director of OSHA’s Directorate of Construction, wrote: “Nails protruding from lumber can cause impalement and cutting hazards.” The interpretation explains that employers may remove protruding nails or bend them down as a protective measure, and that used lumber should have nails withdrawn before stacking. This is workplace safety context, not a statement that a particular household law requires you to use one method.
Best Value

- HIGH LOCKING FORCE PLIERS: Expertly designed for a secure hold with maximum locking force
- ALL-DAY COMFORT: Molded grips on pliers for long-lasting comfort during extended use
- PINCH-FREE DESIGN: Lever-less quick release handles ensure pinch free operation
- EFFORTLESS ADJUSTMENT: Modify sizes with an intuitive thumb knob for quick and easy changes
- RUST PREVENTATIVE COATING: Provides optimal protection against corrosion
Keep your face and hands out of the line of a slipping bar. Do not hold the board in a way that places fingers beneath the pry point. If another person is helping, make sure they are clear of the bar’s travel and of any fragment that could break free. Stop rather than escalating force when the tool no longer feels stable.
Choosing the right objective
When complete removal is required
Use the locking-pliers and pry-bar method only when enough shank remains exposed to clamp securely. Work in small movements and stop if the shank becomes flush, the board splits, or the required pressure becomes uncontrolled. The method is designed to create a purchase point for a headless nail; it is not a general solution for a nail hidden below the surface.
When the nail only needs to be recessed
If the nail is meant to remain in the board and the goal is a smooth surface, a nail set serves that purpose by driving the nail below the wood. That is a finishing operation, not a way to recover a misplaced or unwanted fastener.
When the nail is already buried
Recognize that the sources cited here do not document a particular extraction technique for a completely buried broken nail. Avoid presenting an improvised punch, drill, or chisel sequence as established practice. The appropriate next decision depends on the board’s value, the fastener’s location, and whether leaving the fragment in place creates a hazard.
A practical decision checklist
- Is any nail shank visibly exposed? If yes, continue to the tool setup; if no, the documented extraction method does not apply.
- Can locking pliers close firmly on that shank? If no, do not substitute a loose grip and extra force.
- Can a pry bar or crowbar sit securely between the wood and the pliers? If no, reposition before levering.
- Are you wearing eye protection and working clear of the bar’s travel?
- Does the board remain stable as you apply gradual pressure?
- Has the shank stayed intact and above the surface? If it breaks flush or below, stop.
- Is the real objective extraction or merely recessing? Use a nail set only for the latter.
Common mistakes to avoid
- Using a nail set to pull: its documented purpose is to sink a nail, so it does not replace pliers and leverage.
- Relying on ordinary pliers for a heavy nail: they may not provide the locked purchase required by the practical method.
- Jerking the pry bar: sudden force can slip the tool, split the board, or break a brittle nail.
- Continuing after the shank disappears: once there is no exposed steel, you are no longer performing the documented accessible-shank procedure.
- Assuming success is guaranteed: the cited guide demonstrates a method but does not promise extraction in every wood species, nail size, or condition, nor does it promise an undamaged surface.
What success looks like
For the accessible case, success means the pliers remain locked on the shank while controlled leverage draws the nail out far enough to remove it by hand or with the same gripping setup. Inspect the board afterward for splitting and inspect the extracted metal for a broken tip or fragment. If any piece remains in the wood, the situation has changed to a partially or fully buried fragment, and the documented method should not be extended beyond its stated conditions.
For a fully sunken or broken nail, success cannot be defined by a universal tool sequence from the sources available here. The critical decision is to avoid converting a concealed fragment into a larger defect or a personal injury. Treat the absence of a documented method as a reason to stop and obtain an assessment rather than as an invitation to increase force.
Quick Recap
Product prices and availability are accurate as of the date/time indicated and are subject to change. Any price and availability information displayed on Amazon at the time of purchase will apply.

