Recommended Free Tools
Some links on this page are affiliate links: if you buy through them we may earn a commission, at no extra cost to you.
Overlay cabinet doors are doors that sit in front of the cabinet box or face frame and overlap the opening. That overlap controls almost everything: the finished door size, the hinge type, the reveal between doors, and whether the finished kitchen looks crisp or patched together.
For a typical U.S. face-frame cabinet, partial-overlay doors often overlap the opening by about 1/2 inch on each side. Many full-overlay face-frame doors use about 1 1/4 inches of overlay, though you should never assume that number without measuring the actual cabinets. Older cabinet runs are often out of square, face frames can vary by 1/16 to 1/8 inch, and appliance clearances can make a mathematically perfect door impossible to use.
As an Amazon Associate I earn from qualifying purchases.
Windows Errors? Fix Them Before They Spread
Repair common Windows errors and clear accumulated junk for a smoother, more stable PC - no reinstall needed.Free scan · no reinstallCrashes, No Sound, or Screen Glitches?
Random freezes, missing sound and display glitches usually trace back to one bad driver. Find and replace yours safely.Free scan · under a minuteOn our job sites, we treat overlay door work as a layout job first and a woodworking job second. The cleanest result comes from a cabinet schedule, consistent reveal decisions, accurate hinge boring, and patient adjustment after the finish cures. This guide covers both routes: making your own overlay cabinet doors and installing ordered replacement doors.
What an Overlay Cabinet Door Is
An overlay cabinet door covers part of the cabinet face instead of sitting flush inside the opening. The overlay amount is the distance the door extends past the opening edge. If the opening is 15 inches wide and the door is 16 inches wide, that usually means 1/2 inch of overlay on the hinge side and 1/2 inch on the latch side.
#1 Best Overall
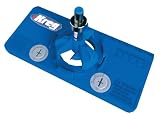
- Concealed Hinge Jig: Dedicated jig for drilling precise 35mm cup holes for European-style concealed cabinet door hinges using any hand drill
- Precision 35mm Boring System: Four-cutter carbide-tipped bit with stop collar drills clean, accurate hinge cup holes with controlled depth
- Adjustable Hinge Positioning: Supports 3mm, 4mm, 5mm, and 6mm hinge offsets with adjustable placement on the door
- Flexible Door Layout: Allows hinge positioning from 2 in (50mm) from the door edge to unlimited spacing for custom cabinet designs
- Premium Kreg Tools: We offer products that help woodworkers close the gap between idea and outcome
There are two common cabinet constructions in U.S. kitchens:
- Face-frame cabinets: A solid wood frame is attached to the front of the cabinet box. Hinges may mount to the frame, and the overlay is measured against the opening or frame edge.
- Frameless cabinets: Also called European-style cabinets. There is no front frame; the doors cover the cabinet box edges. Hinges mount to the cabinet side panel using mounting plates.
Most DIY replacement projects in older American kitchens involve face-frame cabinets. That matters because a hinge made for a frameless full-overlay cabinet may not work correctly on a face-frame cabinet, even if it looks similar online.
Plan the Job Before You Cut or Order Doors
Before removing anything, make a cabinet door schedule. This is one of those small professional habits that prevents expensive mistakes. Give every opening a number, then record the opening width, opening height, hinge side, desired overlay, final door size, material, hinge model, pull location, and notes about walls, appliances, crown molding, light rail, or fillers.
For a mid-size kitchen, expect 12 to 25 doors and 4 to 12 drawer fronts. Measuring them casually with a tape in one pass is how errors happen. We measure, write it down, then recheck before ordering or cutting.
Tools and Supplies
- Tape measure readable to 1/16 inch
- Combination square or speed square
- Story stick or straight scrap board for repeated reveals
- Drill/driver and self-centering bit
- 35 mm Forstner bit or commercial hinge-boring jig
- Clamps and straightedge
- Random-orbit sander, 120- to 220-grit abrasives
- Primer, paint or clear finish, and tack cloths
- Soft-close concealed hinges matched to overlay and cabinet type
- Door bumpers, pulls or knobs, screws, and shims
If you are building the doors yourself, you may also need a table saw or track saw, router table, rail-and-stile bits or a simple Shaker setup, clamps, glue, and a controlled finishing area. Tool costs can erase the savings on a one-time kitchen project, so price both options: building from raw material and ordering unfinished custom doors.
How to Measure Overlay Cabinet Doors
Do not measure only the old doors unless you already know they fit correctly. Measure each cabinet opening and decide the overlay based on the cabinet construction, hinge availability, and adjacent clearances.
What’s actually slowing this PC down?
Pick the symptom - the matching free tool is one click away.
For a single overlay door, use this basic formula:
Door width = opening width + hinge-side overlay + latch-side overlay
Door height = opening height + top overlay + bottom overlay
Example: if the opening is 14 inches wide by 28 inches tall and you want 1/2 inch overlay on all sides, the door size is 15 inches wide by 29 inches tall.
Measuring Double Doors
Double doors need a center gap. If you forget that gap, the two doors can hit each other or leave a crooked reveal after adjustment.
The Tool Desk
Outbyte PC Repair FREERepair Windows errors before they cause bigger problemsFix Now →Outbyte Driver Updater FREEFix the driver behind crashes, sound loss and screen glitchesFind Drivers →For a pair of overlay doors on one opening:
Total door width = opening width + left overlay + right overlay – desired center gap
Rank #2

- 【DURABLE AND ACCURATE】All metal cabinet hinge jig made of high quality aluminum alloy is more durable and accurate than plastic jigs. The all metal concealed hinge jig bulit-in double bearings provides continuous hinge hole drilling and much easier. The 35mm carbide tipped bit is solid and sharp for cabinet door hinges installation. Concealed cabinet hinge jig wood hole puncher locator help you drill accurate and fast as drill press.
- 【WORK WITHOUT DUST】The built in metal dust bracket of GOINGMAKE concealed hinge jig is suitable for 1-3/8 inch vaccum hose and easy to connect with your vaccum. The world's latest dust vacuum adapter makes cabinet hinges drilling without any dust for woodworking. Greatly improves the efficiency and accuracy of installing cabinet hinges. The 1-3/8 inch dust adapter is perfect for most vaccum dust collector.
- 【EASY AND FAST】GOINGMAKE cabinet hardware jig provides quick cabinet hinge hole depth setting without any measuring. The 35mm concealed hinge jig provides drill depth from 0-0.6 inch. Perfect for 1/2 inch overlay hinges or any others. GOINGMAKE cabinet hinges mounting tool is perfect for drill holes for cabinet hinges and hardware installation.
- 【VERSATILE CABINET HINGE JIG】The concealed door hinge jig can work with 2mm, 3mm, 4mm, 5mm and 6mm hinge offsets for most concealed hinges. Have no difficulty on any concealed hinges installation with 35mm hinge hole drilling jig. Our 5/64 inch drill guides provides 4 kinds of hinge screw holes spacing including 42x11mm, 48x6mm, 52x5.5mm, 45x9.5mm for most hidden cabinet door hinges installation. 5/64 inch drill bits is included.
- 【QUICK CLAMP DESIGN】We provide quick clamp on the GOINGMAKE 35mm hinge hole drilling jig pro max type. You can clamp and fix the concealed hinge jig on the workpiece easier and fast. Save a lot of time and make woodworking easier.
Each door width = total door width / 2
Example: for a 30-inch opening with 1/2 inch left overlay, 1/2 inch right overlay, and a 1/8 inch center gap, the total door width is 30 7/8 inches. Each door should be 15 7/16 inches wide.
For height, use the same method as a single door: opening height plus top and bottom overlay, adjusted for nearby drawers, shelves, crown, light rail, or appliance trim.
Use a Story Stick for Consistent Reveals
A story stick is a marked board that captures your reveal and door positions. We use them because cabinets are not always perfectly level, especially in older homes. A story stick helps align a row visually, so the finished doors read as one clean cabinet run instead of a collection of individual corrections.
For settled kitchens, align doors to the cabinet run and eye-level sight lines. A bubble level is useful, but a perfectly level door can look wrong if the entire cabinet run has settled over time.
Choosing Door Material and Style
For DIY work, paint-grade Shaker doors are usually the most forgiving. A hardwood frame with an MDF center panel gives you a durable edge and a stable, smooth paint surface. Stain-grade raised-panel doors require more careful material selection, more precise milling, and a better finishing setup.
| Door Type | Best Use | Typical Pros | Watch For |
|---|---|---|---|
| Paint-grade Shaker, hardwood frame with MDF panel | Most DIY kitchen refreshes | Stable, clean lines, paints well | MDF edges need proper sealing and pre-drilling |
| Hardwood frame and panel | Stained or premium painted cabinets | Durable, traditional, repairable | Seasonal movement and higher cost |
| Plywood slab | Modern flat-panel doors | Simple shape, strong panel | Edges need banding or solid treatment |
| MDF slab | Painted modern doors | Smooth surface, affordable | Heavy, vulnerable to water damage if poorly sealed |
| Thermofoil or laminate | Budget replacement doors | Factory surface, easy cleaning | Difficult to repair if delaminated |
Door thickness commonly falls between 5/8 inch and 1 inch. Many concealed soft-close hinges are built around that range and use a 35 mm hinge cup, but hinge specifications vary. Confirm cup depth, boring distance, overlay amount, opening angle, and mounting plate style before drilling finished doors.
How to Make Simple Overlay Cabinet Doors
If you are building doors, keep the design simple unless you have cabinet-shop tools. A basic Shaker door has two stiles, two rails, and a flat center panel. For paint-grade work, common frame stock is 2 to 2 1/2 inches wide and 3/4 inch thick. Center panels are often 1/4 inch MDF or plywood set into grooves, or 1/2 inch MDF depending on the construction method.
Do these 3 things before closing this tab:
1Fix the driver behind crashes, sound loss and screen glitches2Repair Windows errors before they cause bigger problems3Scan for outdated or missing drivers - takes under a minuteBuild Sequence
- Cut all parts square and label each door.
- Mill rails and stiles consistently so profiles match across the kitchen.
- Dry-fit the frame and panel before glue.
- Glue and clamp on a flat surface, checking diagonals for square.
- Sand progressively, usually 120 grit, then 180 grit, then 220 grit before finishing.
- Ease sharp outside edges slightly so paint holds better.
- Seal MDF edges with primer or a dedicated sealer before final coats.
Wood moves with humidity. Wide solid-wood panels should float inside the frame rather than being glued tight on all edges. MDF panels are more dimensionally stable, which is one reason they are common in painted cabinet doors.
For a whole kitchen, build one sample door first. Confirm the reveal, hinge action, pull location, finish quality, and swing clearance. A sample door can save hundreds of dollars in wasted material.
Hinge Selection and Boring
Hinges are not universal. Choose hinges based on cabinet type, overlay amount, door thickness, opening angle, and whether you want soft-close. A common concealed hinge uses a 35 mm cup and opens about 105 degrees, which works for many standard cabinet doors. Wider-angle hinges are available, but they can create conflicts with walls, appliances, knobs, and adjacent pulls.
If you are replacing exposed hinges with concealed hinges, make a drilling template and test it on scrap that is the same thickness as the finished door. Drill too deep and you can weaken the face or telegraph a mark through the front. Drill off-square and the door may never sit correctly.
Rank #3

- 【High Precision】 All metal cabinet hinge jig made of high quality aluminum alloy,The bottom surface is very flat, Is more durable and accurate than plastic jigs. The all metal concealed hinge jig bulit-in double bearings ,the lateral shaking is reduced, and the drilling is more stable and accurate.provides continuous hinge hole drilling and much easier, making drilling more accurate.
- 【Easy and Fast】cabinet hardware jig provides quick cabinet hinge hole depth setting,Move the hole puncher to the mark and drilling position of the board, lock the quick clip,it easy to use and greatly improves the efficiency and accuracy of installing cabinet hinges. You can easily clamp and fix the concealed hinge jig, quickly drill holes and install hidden cabinet door hinges.
- 【Widely application】The 35MM hinge opener is suitable for 12-25mm wood, 35mm hole to edge distance of 5mm, comes with 35mm hole saw and 2mm drill bit, can be used with any electric drill, 35MM hinge positioning opener is suitable for cabinet/kitchen/closet/cabinet door hinge punching and positioning,which is suitable for most common hinges.
- 【Installation steps】The kitchen hinge jig positioning hole opener installation steps 1. Adjust the drilling depth of the limit ring, normally 12-13MM. 2. Adjust the size to adapt to the thickness of the clamped board. 3. Quickly clamp the locking plate according to the drill mark. 4. Drill 35mm and left and right 2mm screw holes 5. Installation Hinge
- 【Packing list】:1 *Hinge drilling locator body, 1 *35MM drill bit, 1* 2mm Drill bit,2 *small wrenches, 1 *hexagonal tool, 1 screw, 1 limit ring . Concealed cabinet hinge jig wood hole puncher locator help you drill accurate and fast as drill press.And saves you time and effort.
Typical Hinge Layout
For many standard base and wall cabinet doors, two hinges are enough. Larger or heavier doors may need three. A common starting point is placing hinge cups about 3 to 4 inches from the top and bottom of the door to the centerline of the cup. Tall pantry doors often need a third hinge centered or placed according to the hinge manufacturer’s weight chart.
Pre-drill screws, especially in MDF, hardwood edges, and older face frames. Use the correct screw length so fasteners do not poke through the cabinet face or door front. This sounds basic, but it is one of the quickest ways to turn a clean project into a repair.
Dry-Fit Before Finishing
Before paint or clear finish, hang a few raw doors and confirm the system. Check that the hinge overlay matches your math, the mounting plates sit correctly, the doors clear walls and appliances, and double doors have an even center gap.
Finish thickness matters. Primer and two topcoats can slightly tighten gaps. Leave consistent reveals and do final hinge tuning after the finish has cured. On painted doors, give the coating time to harden before installing bumpers and pulls; rushing this step can leave dents around hardware.
Free tools Windows power users keep installed
One-click scans. No signup required.
Installing Overlay Cabinet Doors
Start with the upper cabinets when possible. They are more visible, and a temporary cleat or straightedge can support the door while you fasten the hinge plates. Work across the run in order, not randomly around the kitchen.
- Number each door and opening.
- Mark hinge-side orientation on the back of each door.
- Attach hinges to the doors first.
- Hold the door in place with a cleat, spacer, or helper.
- Fasten the mounting plate or face-frame screws lightly at first.
- Check overlay and swing before tightening fully.
- Install neighboring doors and tune the reveals together.
- Add bumpers, pulls, and knobs after alignment is complete.
Concealed hinges usually provide three-way adjustment: side-to-side, up-and-down, and in-and-out. Make small changes and close the door after each adjustment. If one door is far off, check the cabinet box before blaming the hinge. You may need hinge shims, a slightly shifted mounting plate, planing, or a filler correction.
Pull and Knob Placement
For Shaker doors, knobs are often centered on the stile near the rail intersection. Pulls may be mounted vertically on the stile. Use a hardware jig so every pull lands consistently. A 1/16 inch variation is visible when pulls line up across a cabinet run.
Check door swing with hardware installed. A pull on one door can hit a pull, wall, refrigerator handle, range trim, or dishwasher panel beside it.
2026 Cost to Make or Replace Overlay Cabinet Doors
Costs vary by door count, material, finish, hardware, and local labor. In 2026, national installed replacement benchmarks commonly range from about $180 to $330 per door, with average kitchens landing around $2,200 to $6,600. Other national cost models place installed door replacement higher, around $416 to $602 per door. Project-level estimates often fall between $900 and $4,500, with labor commonly starting around $70 per hour.
Material-only doors and drawer fronts commonly run about $30 to $300 each. Unfinished flat or MDF doors sit near the low end. Hardwood, custom profiles, glass-ready frames, large doors, complex rails, and factory finishing push the cost up.
| Project Route | Typical 2026 Cost | Best Fit |
|---|---|---|
| DIY build from plywood/MDF | A few hundred dollars if tools are already owned | Small refreshes, shops with existing tools |
| Order unfinished doors, DIY install | About $30 to $300 per door plus hinges and finish | Homeowners who want accuracy without building doors |
| Professional door replacement | Often $180 to $602 per installed door | Full kitchens, tight timelines, better finish expectations |
| Full cabinet replacement | Often $100 to $1,200 per linear foot; full projects can reach $8,000 to $70,000+ | Bad cabinet boxes, layout changes, major remodels |
One estimating caution: some contractors count one cabinet opening as one item even when that opening has two doors. Others price per actual door leaf. Ask which method is being used before comparing bids.
Rank #4

- 【Premium Aluminum Alloy Material】The 35mm concealed hinge jig is made of high-quality aluminum alloy material, This is a set of guide tools for installing concealed hinges very accurate.
- 【Adjustable Double Cleat Design】Adjustable double clamping plate for accurate positioning, clamping 15-25mm thickness of wood panels, convenient for fast multi-angle drilling, and installation of cabinet door hinges.
- 【Focus On Practicality】Suitable for most 35mm cabinet hinge jig clamps, with an adjustable opening depth of 10-15mm and adjustable drilling edge distance of 3-7mm.
- 【Upgrade Three Bearing Drill Sleeve】Upper, middle, and lower 3 bearing drill sleeve, the total height of drill sleeve 2cm, the small swinging amplitude of drill bit for accurate hole opening.
- 【Perfect Choice】Easy to use with any drill, you don't have to be a well-equipped woodworker to install these hinges. Perfect for any handyman who needs hinges made.
Permits, Lead Paint, and Safety
Simple cabinet door replacement usually does not require a building permit when you are not moving plumbing, electrical, walls, ventilation, or structural elements. Kitchen remodel rules vary by city and county, and permits often become relevant when the project includes electrical changes, plumbing relocation, new exhaust, wall changes, or full cabinet layout alterations. Check your local building department before expanding the scope.
Lead paint is a bigger concern in homes built before 1978. If old painted cabinets, trim, or surrounding surfaces may contain lead, sanding and scraping can create hazardous dust. Lead-safe work practices, containment, cleanup, and certified renovation requirements may apply. Do not dry-sand old paint casually in an occupied kitchen.
Wood dust is also a real job-site hazard. Cutting MDF, plywood, and hardwood produces fine dust that should not be treated as harmless. Use dust collection, a properly fitted respirator when needed, eye protection, hearing protection, and ventilation. Keep finishing products away from ignition sources and follow the label for cure time and disposal of oily rags.
When to DIY vs When to Hire a Pro
DIY makes sense when the cabinet boxes are solid, the layout is simple, you are using paint-grade doors, and you have the tools or are ordering doors already made. A careful homeowner can install pre-made overlay doors with concealed hinges if they are patient about measurement and adjustment.
Hire a pro when the cabinet boxes are badly out of square, you want stain-grade doors, the kitchen has many double-door openings, the project includes crown or light-rail changes, or the existing finish may contain lead. Professional help is also worth it when the finish quality matters. Cabinet paint is unforgiving under kitchen lighting; brush marks, dust nibs, and uneven sheen are easy to see.
Quick wins for a faster PC:
Repair Windows errors before they cause bigger problemsFix Now →Scan for outdated or missing drivers - takes under a minuteDriver Scan →A strong middle-ground option is ordering unfinished custom doors and handling installation yourself. That avoids the hardest milling work while still saving on labor. Just make sure your measurements are correct, because custom doors usually cannot be returned because the opening was recorded wrong.
Common Mistakes to Avoid
- Measuring only old doors instead of every opening and clearance.
- Forgetting the center gap on double doors.
- Buying hinges by appearance instead of overlay, cabinet type, and door thickness.
- Drilling 35 mm hinge cups too deep or off-square.
- Assuming all cabinet openings are square and identical.
- Finishing doors before a hardware dry-fit.
- Skipping door bumpers and ending up with a cheap sound and feel.
- Using doors so large that they hit walls, appliances, or neighboring pulls.
The best overlay cabinet door projects are not complicated, but they are precise. Decide the overlay, write a schedule, test the hinge setup, dry-fit before finishing, and align the final doors as a cabinet run. That is the difference between replacement doors that simply cover the openings and cabinet work that looks intentional.
Frequently Asked Questions
What is an overlay cabinet door?
An overlay cabinet door sits in front of the cabinet box or face frame and overlaps the opening. The overlay amount is how far the door covers the opening edge, commonly 1/2 inch on partial-overlay face-frame cabinets or about 1 1/4 inches on many full-overlay face-frame cabinets.
How do you measure for overlay cabinet doors?
Measure each cabinet opening, then add the desired overlay to each side. For a single door, door width equals opening width plus hinge-side overlay plus latch-side overlay. Door height equals opening height plus top and bottom overlay. For double doors, subtract the desired center gap before dividing the total width by two.
Free tools Windows power users keep installed
One-click scans. No signup required.
Can I install concealed hinges on old face-frame cabinets?
Yes, in many cases, but the hinge must match the cabinet type, overlay amount, door thickness, and mounting plate style. Test the 35 mm hinge cup and mounting position on scrap before drilling finished doors.
How much does it cost to replace cabinet doors in 2026?
In 2026, installed replacement benchmarks commonly range from about $180 to $602 per door depending on source, market, material, finish, and labor. Material-only doors and drawer fronts often run about $30 to $300 each.
Do I need a permit to replace cabinet doors?
Usually not for simple door replacement only. Permits may be required if the work includes electrical changes, plumbing relocation, ventilation changes, wall modifications, or a larger kitchen remodel. Local rules vary.
What material is best for DIY cabinet doors?
For most DIY painted doors, a Shaker-style door with hardwood rails and stiles and an MDF center panel is the most forgiving. It is stable, paints smoothly, and is easier to build cleanly than stain-grade raised-panel doors.
Quick Recap
Product prices and availability are accurate as of the date/time indicated and are subject to change. Any price and availability information displayed on Amazon at the time of purchase will apply.

