Some links on this page are affiliate links: if you buy through them we may earn a commission, at no extra cost to you.
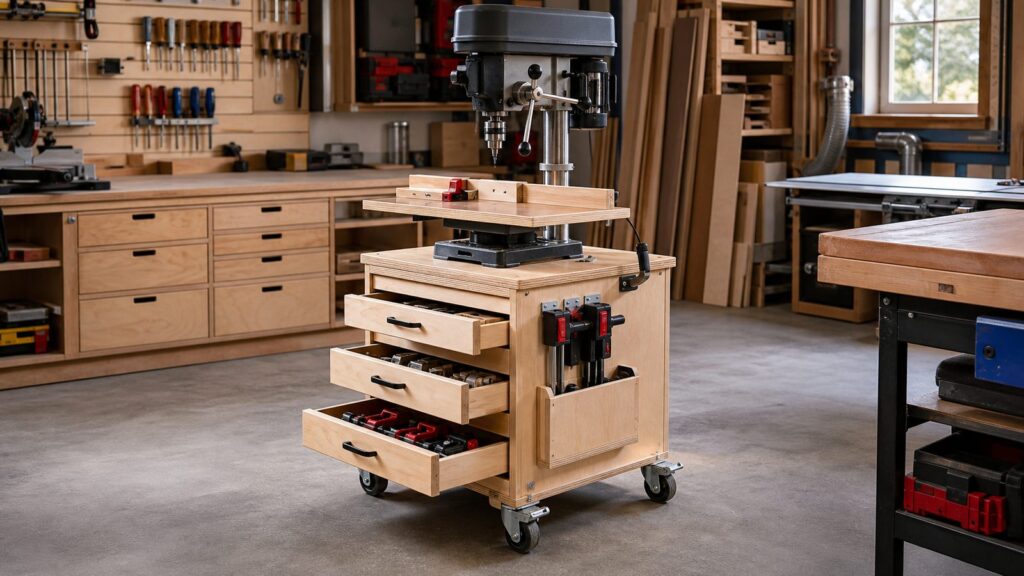
A good drill-press cabinet is not just a plywood box with drawers. It is a small machine base. It has to carry a top-heavy tool, stay still while you feed a workpiece, roll only when you want it to roll, keep sharp bits organized, and give you a repeatable drilling setup without turning the garage into a dust trap.
For most homeowners and serious hobby woodworkers, the best build is a mobile cabinet made from 3/4-inch cabinet-grade plywood, sized around the actual benchtop drill press you own, with a wider base than the machine footprint, locking casters, full-extension drawers, a bolted drill-press base, and a replaceable drill table insert. A compact cabinet can be around 15 inches wide by 24 inches deep by 34-1/2 inches tall, but that is only a starting point. A 12-inch or 14-inch benchtop press often deserves a wider and deeper stand.
As an Amazon Associate I earn from qualifying purchases.
Free tools Windows power users keep installed
One-click scans. No signup required.
On our job sites and in shop setups, we treat every mobile machine stand the same way: measure the tool first, keep the weight low, lock the base, and make maintenance access easy. The plan below gives you a practical cabinet you can resize for 8-inch, 10-inch, 12-inch, and 14-inch benchtop drill presses without copying a plan that may not fit your machine.
Recommended Drill-Press Cabinet Size
Start with the drill press, not the cabinet. Measure the metal base footprint, the column location, the belt-cover swing, the table crank clearance, the full handle sweep, and the height where your hands naturally feed work into the bit. Those measurements matter more than any fixed plan dimension.
#1 Best Overall

- 【Data 】Drill press Vise weight 7 lb, Max jaw opening: 4.25 inch, Jaw width: 4.2 inch.
- 【New style】The accompanying multi-functional vice soft jaws can handle some irregular small items,The table vice are designed with quick buttons to quickly adjust the range of motion of the jaws.
- 【Widely used】Drill press vice is an ideal choice for some industries, such as jewelry enthusiasts, carpenters, craftsmen, model making, electronic products, etc.
- 【Easy to use】The accompanying screws can easily install the vice on the drill floor or desktop, and the quick button will make your work easier.
- 【The best service】If you are not satisfied with the products, you can contact us at any time, we will give you a satisfactory solution.
For a small 8-inch or 10-inch benchtop drill press, a cabinet around 18 inches wide by 24 inches deep works well. For a 12-inch press, 22 inches wide by 26 inches deep is a better target. For a heavier 14-inch benchtop press, consider 24 to 28 inches wide and 28 to 32 inches deep, especially if it will live on casters.
The cabinet top should be at least 3 to 4 inches larger than the drill-press base in both directions. If your drill press base is 10 inches wide by 17 inches deep, do not build a 10-by-17 top and call it done. Give yourself room for bolts, washers, a backing plate, a fence, and your hands. If floor space is tight, keep the cabinet body compact but add a wider lower plinth or outrigger-style caster base to improve stability.
What’s actually slowing this PC down?
Pick the symptom - the matching free tool is one click away.
Working height
Most benchtop drill presses sit on a cabinet between 30 and 36 inches tall. The right number depends on the drill press itself and the user. A common target is to put the drill-press table roughly around elbow height or slightly below when you are standing in a relaxed working position. For many adults, that puts the working table somewhere in the 38- to 44-inch range after the drill press is mounted.
Do a temporary mockup before cutting expensive plywood. Set the drill press on a workbench, blocks, or sawhorses and test a normal drilling motion. If you have to raise your shoulder to pull the feed handle, the stand is too tall. If you hunch over to see layout marks, the stand is too low. The cabinet height should support clean, controlled pressure, not just match a drawing.
Materials and Hardware
Use 3/4-inch plywood for the cabinet sides, top, bottom, back structure, drawer dividers, and lower stretcher components. A 1/4-inch plywood panel is fine for drawer bottoms if the drawers are shallow and lightly loaded, but heavy bit storage should use 1/2-inch bottoms or reinforced 1/4-inch bottoms captured in grooves.
Cabinet-grade plywood is the practical choice for most builds. Current 2026 big-box pricing puts 23/32-inch cabinet-grade 4-by-8 plywood around $45 per sheet, 3/4-inch sande plywood around $70, and 3/4-inch birch plywood around $75, with local store variation. Baltic birch or premium veneer-core plywood can cost more, but the extra plies and stiffness are useful if the cabinet will move often or carry a larger machine.
Crashes, No Sound, or Screen Glitches?
Random freezes, missing sound and display glitches usually trace back to one bad driver. Find and replace yours safely.Free scan · under a minutePC Slower Than It Used to Be?
A free scan shows the junk files, broken settings and background clutter dragging Windows down - then fixes them in one click.Free scan · Windows 10 & 11For a compact stand, one full 3/4-inch sheet can cover the cabinet body if you plan carefully. Add another half sheet or full sheet if you want five drawers, a wider base, an integrated drill table, or thick laminated top panels. We like a doubled 3/4-inch top under heavier presses because it gives bolts more bearing surface and reduces flex.
Hardware list
- One to two sheets of 3/4-inch cabinet-grade plywood or birch plywood
- One half sheet of 1/4-inch or 1/2-inch plywood for drawer bottoms and backs
- Four 3- to 5-inch shop casters, with at least two locking casters
- Five pairs of full-extension ball-bearing drawer slides, typically 12 to 22 inches long
- 1-1/4-inch cabinet screws or confirmat-style screws
- Wood glue rated for interior cabinetry
- 1/4-inch or 5/16-inch bolts, washers, and lock nuts for the drill press base
- Large fender washers, a steel backing plate, or a plywood backing plate below the top
- Drawer pulls, knobs, or shop-made hardwood pulls
- Hardwood edging, iron-on edge banding, or eased plywood edges
- Finish: paint, water-based polyurethane, hard wax oil, or shop-grade enamel
2026 Cost Breakdown
A realistic DIY budget in the United States is about $175 to $425 if you already own the tools. The low end assumes economical cabinet-grade plywood, basic slides, painted edges, and affordable casters. The high end assumes birch or Baltic birch plywood, heavy-duty slides, polyurethane total-lock casters, T-track, hardwood edging, and a better finish.
The biggest mistake in budgeting is pricing only the plywood. Drawer slides, casters, bolts, knobs, finish, and dust-control details add up. A five-drawer cabinet can spend more on slides than on the first sheet of plywood.
| Item | Typical 2026 US Cost | Builder’s Note |
|---|---|---|
| 3/4-inch cabinet-grade plywood | $45-$75 per 4×8 sheet | Use one sheet for a compact cabinet, two for a larger cabinet with drawers and drill table parts. |
| Premium birch or Baltic birch plywood | $75+ per 4×8 sheet | Better stiffness and cleaner edges; pricing varies heavily by region and grade. |
| Full-extension drawer slides | $15-$24 per pair standard; $31-$52+ heavy duty | Five drawers can cost roughly $75-$260 in slides alone. |
| Locking shop casters | $35-$115 for four | Choose by loaded weight, wheel diameter, tread material, and brake type. |
| Fasteners, glue, pulls, edging, finish | $30-$100 | Threaded inserts, quality finish, and purchased pulls raise the total. |
| Shop-built drill-press table and fence | $35-$120 | T-track, knobs, dust port, and replaceable inserts are worth the upgrade. |
| Commercial drill-press table and fence | About $150 | Useful when you want a ready-made fence and stop system. |
If you hire a cabinetmaker or construction professional for a custom build, expect roughly $600 to $1,500 or more installed or delivered. That price reflects design time, labor, finishing, hardware, and fit-up. Dovetailed drawers, sprayed finish, matching shop cabinetry, premium plywood, and a heavy-duty mobile base can push the cost higher.
Quick wins for a faster PC:
Scan for outdated or missing drivers - takes under a minuteDriver Scan →Repair Windows errors before they cause bigger problemsFix Now →Cut-List Logic for Any Benchtop Drill Press
Instead of locking yourself into one fixed plan, use a simple sizing formula. Let the drill press base set the top size, then let the drawer slides and casters set the cabinet body.
Measure the drill press base width and depth. Add at least 6 inches to each dimension for the top. A base that measures 10 inches by 17 inches gets a minimum top around 16 inches by 23 inches. For better stability, especially on casters, round up to 18 by 24 inches or larger.
Next, decide the cabinet height. Subtract the caster height and top thickness from your desired total stand height. If you want a 34-1/2-inch stand, have 4-inch casters, and use a 1-1/2-inch laminated top, the cabinet box should be 29 inches tall.
Rank #2

- Grip woods, metals, plastics and more
- Cast iron construction provides stability to drilling
- 4 in. jaws open up to 4 in. with a 1 in. throat depth
- Includes four onboard mounting slots to securely fasten the vise to a drill press table
- Universal design compatible with the majority of drill presses on the market (see images for base dimensions)
For the cabinet sides, cut two panels to the cabinet-box height by cabinet depth. For the top and bottom, cut panels to the cabinet width by cabinet depth. If the sides run full height and the top and bottom fit between them, subtract 1-1/2 inches from the top and bottom width. If the top and bottom cap the sides, keep them full width. Pick one approach and stay consistent.
Typical starting sizes
| Drill Press Size | Suggested Top | Suggested Cabinet Body | Best Use |
|---|---|---|---|
| 8-inch benchtop | 18 in. W x 22-24 in. D | 16-18 in. W x 22-24 in. D | Small garage shop, light drilling, compact storage. |
| 10-inch benchtop | 18-20 in. W x 24 in. D | 18-20 in. W x 24 in. D | General woodworking and occasional metal drilling. |
| 12-inch benchtop | 22-24 in. W x 26-28 in. D | 22-24 in. W x 26 in. D | Better drawer capacity and more stable stance. |
| 14-inch benchtop | 24-28 in. W x 28-32 in. D | 24-28 in. W x 28-30 in. D | Heavier press, larger bits, more hold-down hardware. |
For drawers, measure the inside cabinet opening after the carcass is assembled. Side-mount ball-bearing slides usually need 1/2 inch of clearance per side, so the drawer box is typically 1 inch narrower than the opening. If your opening is 18 inches wide, the drawer box should be about 17 inches wide. Follow the slide manufacturer’s instructions because small errors here create sticky drawers.
Build the Cabinet Carcass
The cabinet carcass has to resist racking because a rolling drill press stand sees twisting loads every time it crosses a slab joint, threshold, or garage floor crack. Butt joints with screws alone are weak for this job. Use dadoes, rabbets, pocket screws with glue blocks, or hardwood cleats where the top, bottom, and dividers meet the sides.
A practical cabinet sequence is simple. Cut the two sides first, then cut the top, bottom, and fixed shelf or divider panels. Mark all parts clearly. Dry-fit the case on a flat surface and check both diagonals. If the diagonals match, the box is square. If they are off by more than 1/8 inch on a small cabinet, fix it before the glue sets.
Use a full or partial back. A 1/4-inch plywood back captured in grooves is excellent for keeping the cabinet square. If you want open rear access for cord routing, use 3/4-inch upper and lower rear stretchers instead of leaving the back completely open. A drill press vibrates, and an open-backed cabinet without stretchers can loosen over time.
Do these 3 things before closing this tab:
1Clear out junk files and repair common Windows errors2Fix the driver behind crashes, sound loss and screen glitches3Repair Windows errors before they cause bigger problemsFor the top, either use one layer of 3/4-inch plywood with a backing plate under the drill press bolts or laminate two 3/4-inch layers. A doubled top is stiff, gives screws more bite for a fence system, and makes the cabinet feel less hollow under the machine. Glue the layers together on a flat surface and clamp them evenly so they do not crown.
Casters, Stability, and Tip-Over Prevention
A drill press is top-heavy. The motor, head, pulleys, and quill are all high above the cabinet. That means the cabinet can feel stable while parked but become risky when rolled across a rough garage floor. Build the base wider than the drill press footprint and keep the heaviest contents low.
Choose casters by total loaded weight, not empty cabinet weight. Add the drill press weight, plywood weight, drawer contents, vise, clamps, bits, fence, and a margin. If a benchtop press weighs 90 pounds, the cabinet weighs 80 pounds, and the drawers may hold 70 pounds, the loaded stand is already 240 pounds. Add at least a 25 percent safety margin and select casters rated for 300 pounds or more total. Four casters rated at 100 pounds each give 400 pounds total capacity, which is a reasonable minimum for many small stands.
Use at least two locking casters. For a better setup, use four total-lock casters that lock both the wheel and the swivel. Wheel-only brakes can still let the stand pivot under feed pressure. A 3-inch caster is acceptable on a smooth shop floor, but 4- or 5-inch casters roll better over garage slab joints and small debris.
Keep ballast low. Store the drill-press vise, metal hold-downs, large Forstner bits, sanding drums, and heavy clamps in the bottom drawer. Keep the top drawer for light items such as layout pencils, chuck keys, small twist bits, and setup blocks. A heavy upper drawer that slides open while the stand is moving can shift the center of gravity at the worst moment.
Drawers and Tool Storage That Work
A drill-press cabinet does not need oversized drawers. It needs specific storage. Bits, chuck keys, sanding sleeves, stops, clamps, hold-downs, spare inserts, and the drill-press manual all need homes. Five shallow drawers are often more useful than two deep drawers because small tooling disappears in deep boxes.
A good layout is one narrow top drawer for measuring and setup tools, two medium drawers for bit indexes and sanding accessories, one deeper drawer for hold-downs and jigs, and one bottom drawer for the vise and heavier metal parts. Use full-extension slides so you can see the back of each drawer.
Standard side-mount full-extension slides are commonly rated around 75 to 100 pounds, but that does not mean every drawer should be loaded to the limit. If a drawer will carry a drill-press vise, metal clamps, and large bits, upgrade to heavier-duty slides. In 2026, that may mean spending $31 to $52 or more per pair instead of $15 to $24.
The Tool Desk
Outbyte PC Repair FREERepair Windows errors before they cause bigger problemsFix Now →Outbyte Driver Updater FREEFix the driver behind crashes, sound loss and screen glitchesFind Drivers →Add positive drawer retention. Some slides have a hold-in detent. If yours do not, use catches, magnetic latches, or a simple locking bar for transport. A mobile stand with drawers that drift open is annoying at best and unstable at worst.
Pre-finish drawer interiors or apply paste wax after sanding. Drill press chips and fine dust cling to raw plywood. A sealed drawer wipes clean faster and is less likely to grind grit into bit cases and slide bearings.
Rank #3
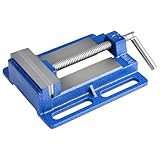
- Non-Slip & Stable: Designed with anti-slip textured jaws, this drill press vise delivers up to 7KN of clamping force to hold workpieces securely. It effectively resists slipping, ensuring steady performance for drilling, engraving, grinding, and more
- Durable Construction: Crafted from quality cast iron with high hardness, this bench vise is impact-resistant and built to last. Its solid structure helps it withstand high-strength use over time
- Easy Installation: Designed with dual long slots on both sides, this machinist vise allows for quick mounting and precise positioning of workpieces. No worry about difficult setup or wrong positioning, making your work more efficient and convenient
- Effort-Saving Handle: This cast iron drill press vise comes with a labor-saving handle to adjust the jaws easily, providing a stable grip on different workpiece sizes and shapes. It allows your work to progress more smoothly and efficiently
- Wide Compatibility: This workbench vise is ideal for milling machines, drilling machines, shaping machines, and surface grinders. With strong versatility, it meets diverse processing needs and serves as a reliable assistant for you
Mounting the Drill Press
Do not rely on friction to hold the drill press in place. Bolt the press through the manufacturer’s base holes using washers and lock nuts. If the base holes are slotted or close to the plywood edge, use a steel plate or a second plywood backing plate below the top to spread the load.
Set the drill press on the top, center it left to right, and then check real-world clearance before drilling holes. Open the belt cover fully. Crank the table up and down. Rotate or swing the table if your model allows it. Pull the feed handles through their full range. Open every drawer. Make sure the power cord has a clean path and is not pinched behind the column or cabinet.
Once everything clears, mark the bolt holes with a transfer punch or brad-point bit. Remove the drill press, drill clean holes through the top, and seal the raw edges of the holes with finish or thin glue. Then reinstall the press with bolts, flat washers, lock washers or lock nuts, and backing support below.
If you plan to remove the drill press occasionally, consider threaded inserts or T-nuts installed from below, but use them carefully. Through-bolts with nuts and washers are usually more dependable for a vibrating machine.
Add a Better Drill-Press Table and Fence
The small metal table on a benchtop drill press is fine for metal parts and quick holes, but it is limited for woodworking. A cabinet-mounted drill press deserves a larger auxiliary table with a fence, stops, and a sacrificial insert.
A practical auxiliary table is 18 to 24 inches wide, 14 to 18 inches deep, and made from 3/4-inch plywood or MDF with a plastic laminate, hardboard, or sealed plywood surface. The replaceable center insert should sit directly under the bit. Make it from 1/4-inch or 1/2-inch material and size it so you can rotate or replace it when it gets chewed up.
Recommended Free Tools
Add a fence that can slide forward and back, then lock down with knobs through slots or T-track. A simple 2-1/2- to 3-inch-tall fence is enough for most work. Stop blocks make repeat drilling faster and more accurate, especially for shelf pins, hinge plates, dowel holes, and batch parts.
Hold-downs are not optional when drilling small parts, round stock, or anything likely to spin. T-track, toggle clamps, or clamp-friendly table edges help keep hands away from the bit. On our crews, the rule is simple: if the bit can grab the work, clamp the work.
Dust, Chips, and Garage Safety
Drill presses make chips more than continuous dust, but sanding drums, hole saws, Forstner bits, and repeated drilling in plywood can put fine wood dust into the air. OSHA identifies airborne wood dust as a respiratory hazard that can cause allergic symptoms, mucosal irritation, non-allergic respiratory symptoms, and cancer. OSHA’s woodworking guidance lists a nuisance-dust permissible exposure limit of 15 mg/m3 total dust and 5 mg/m3 respirable fraction as an 8-hour time-weighted average, while NIOSH recommends 1 mg/m3 total dust.
For a home shop, the practical takeaway is straightforward. Do not blow dust out of drawers with compressed air. Vacuum chips at the source, use a dust mask or respirator when sanding at the drill press, and keep a shop vacuum or dust collector connection close enough that cleanup actually happens. A small dust port behind the fence helps when using sanding drums or drilling repeated holes in MDF and plywood.
Electrical safety matters too. If the cabinet lives in a garage, plan a clean cord path to a GFCI-protected receptacle. Avoid using an extension cord as a permanent wiring method. Do not park the cabinet in front of electrical panels, garage door hardware, required walking paths, or vehicle clearance zones.
Also respect garage fire separation. Penetrations through walls or ceilings between a garage and living space can trigger code concerns, especially if you are adding dust-collection ductwork, new wiring, or built-in shop systems. A rolling cabinet is furniture. Cutting holes through rated assemblies or adding circuits is building work.
Permits: Usually No for the Cabinet, Maybe for the Workshop
In most areas, building a freestanding drill-press cabinet does not require a building permit. It is a movable shop fixture, similar to a workbench or tool cart. That changes when the project expands into electrical work, permanent dust-collection ducting through walls, structural fastening, built-in cabinetry attached to the building, or a broader garage workshop conversion.
Rank #4

- Designed for applications including drilling, tapping and reaming
- Low profile clearance for increased working room on machine table
- Hardened V-grooved jaws hold round-shaped objects both vertically and horizontally
- Durable construction with fine grain cast iron castings and hardened steel vise jaws
- Backed by Wilton's industry-leading limited lifetime warranty
Local rules vary. Some jurisdictions exempt small non-structural work, but electrical changes, fire-rated wall penetrations, and garage conversions are commonly regulated. If you are adding a new 120-volt or 240-volt circuit, moving receptacles, installing hardwired dust collection, or converting part of a garage into a finished workshop, call the local building department or hire a licensed contractor before work starts.
That is not red tape for its own sake. Garages have vehicles, fuel, overhead doors, concrete floors, and fire-separation rules that do not apply to a basement hobby room. Treat the cabinet as a DIY woodworking project. Treat wiring and building modifications as code-governed work.
Independent reader supportYour contribution helps us test, update, and keep practical guides available for everyone.Step-by-Step Build Sequence
1. Measure and draw the cabinet
Write down the drill press base dimensions, machine weight, table height, belt-cover clearance, and desired stand height. Sketch the cabinet front, side, and top. Mark drawer heights before cutting. Leave enough room above the top drawer for the drill press mounting bolts and backing washers.
2. Break down the plywood
Cut the sides, top, bottom, stretchers, and dividers from 3/4-inch plywood. Account for blade kerf and real plywood thickness. Many sheets sold as 3/4 inch are closer to 23/32 inch. That small difference matters when drawer slides need accurate spacing.
3. Assemble the carcass square
Use glue and screws with rabbets, dadoes, or cleats. Clamp the cabinet, measure diagonals, and install the back or rear stretchers while the case is square. Let the glue cure before loading the cabinet.
4. Build and fit drawers
Build drawer boxes from 1/2-inch or 3/4-inch plywood sides with captured bottoms. Install slides level and parallel. Test each drawer before adding fronts. If the cabinet will roll often, add detents, catches, or a locking bar.
5. Install the caster base
Reinforce the bottom with a doubled plywood layer or hardwood blocks where the casters mount. Use through-bolts or heavy screws sized for the caster plate. Keep casters near the corners for the widest stance.
6. Finish before final assembly
Sand sharp edges, ease exposed plywood corners, and apply paint or clear finish. Seal drawer interiors. A smoother finish makes dust cleanup easier and reduces splinters when reaching for bits.
7. Bolt down the drill press
Dry-fit the press, test all clearances, drill the mounting holes, and bolt the machine through the top with backing support. Confirm that the cabinet does not rock with the casters locked.
Quick wins for a faster PC:
Fix the driver behind crashes, sound loss and screen glitchesFind Drivers →Repair Windows errors before they cause bigger problemsFix Now →Scan for outdated or missing drivers - takes under a minuteDriver Scan →8. Add the auxiliary table and fence
Install the larger table, replaceable insert, fence, stop block, and hold-down options. Drill a test hole, check that the bit lands cleanly in the insert, and adjust the fence square to the bit travel.
Common Mistakes to Avoid
The most common mistake is building from a generic plan without measuring the actual drill press. The base, crank, belt cover, column overhang, and feed handles vary by model. A cabinet that fits one 10-inch press may block the table crank on another.
The second mistake is making the stand too narrow or too tall. A benchtop drill press is already top-heavy. A skinny rolling cabinet makes that worse. If you need height, add width or ballast low in the cabinet.
Lightweight casters are another weak point. Small non-locking casters may be fine under a storage cart, but a drill press applies downward pressure, side pressure, and vibration. Use casters sized for the loaded cabinet and lock the stand before drilling.
Free tools Windows power users keep installed
One-click scans. No signup required.
Best Value

- Product Size: The Nagpew drill press vise is portable. 8'' in length, 6.5'' in width and 2'' in height. The widest jaw opening length is 4.3 inch, perfect for wide range of drilling works
- Heavy Duty: Constructed by high-quality and sturdy material, ensuring durability. The body is made of cast iron, the jaw and the pivot is crafted from 45 steel, last for long. Strong jaw secures gripping
- Convenient Pivot Handle: Feature a flexible pivot handle for effortless open and close. The handle of the pivot can rotate flexibly, help you tighten items conveniently
- Oil Paint: The main surface is well painted, smooth and easy to clean. You can simply use cloth to wipe the oil or dust on the surface. The blue color also bright the workshop space
- Slotted Base: The base of the low profile vise is designed to be slotted so that you can place and install the tool with no effort, offering comfortable using experience
Skipping bolts through the drill press base is also asking for trouble. Vibration and feed pressure can walk an unbolted machine across a slick finished top. Bolt it down before calling the project finished.
Finally, do not overload drawers beyond the slide rating. Drill bits, vises, hold-downs, and metal jigs get heavy fast. Put the dense items low and use heavy-duty slides where the load justifies them.
When to DIY vs. When to Hire a Pro
This is a good DIY project if you can safely break down plywood, assemble a square cabinet, install drawer slides, and drill accurate mounting holes. A careful homeowner with a circular saw and guide track, drill/driver, clamps, square, and basic finishing tools can build a solid cabinet over a weekend. Expect 8 to 16 hours for a simple cabinet and 16 to 30 hours for a refined version with five drawers, edge banding, auxiliary table, fence, and finish.
Hire a pro if the cabinet needs to match existing built-ins, carry an unusually heavy machine, fit into a commercial or shared shop, or integrate with electrical and dust-collection changes. Also bring in a licensed electrician for new garage circuits, added receptacles, or hardwired equipment. Call a contractor before cutting dust-collection penetrations through garage walls or ceilings that may be part of a fire-rated separation.
The Tool Desk
Outbyte Driver Updater FREEScan for outdated or missing drivers - takes under a minuteDriver Scan →Outbyte PC Repair FREERepair Windows errors before they cause bigger problemsFix Now →A professional build costs more, but it can be the right call when the drill press is part of a larger garage workshop build-out. A well-planned shop considers workflow, lighting, receptacle placement, dust collection, fire separation, storage, and vehicle clearance together. The cabinet is one piece of that system.
Final Builder’s Checklist
- Cabinet top is at least several inches larger than the drill press base.
- Stand height puts the drill-press table at a comfortable working height.
- Base is wide enough for stability, especially with casters installed.
- Casters are rated for the fully loaded cabinet plus a safety margin.
- At least two casters lock; total-lock casters are preferred.
- Drill press is bolted through the top with washers or backing plates.
- Heavy drawers are low, and drawers have retention for rolling.
- Belt cover, table crank, feed handles, and drawers all clear each other.
- Fence, stop blocks, hold-downs, and sacrificial insert are installed.
- Dust cleanup and GFCI-protected power are planned before the cabinet is parked.
Build the cabinet around the real machine and the way you work. That is the difference between a shop cart that merely holds a drill press and a stable workstation that makes drilling cleaner, safer, and more repeatable for years.
Frequently Asked Questions
What size should a drill-press cabinet be?
For most benchtop drill presses, start around 18 by 24 inches for an 8-inch or 10-inch press, 22 by 26 inches for a 12-inch press, and 24 to 28 by 28 to 32 inches for a 14-inch press. The top should be several inches larger than the drill-press base, and the final height should put the drill-press table near a comfortable working height.
Does a mobile drill-press stand need locking casters?
Yes. Use at least two locking casters, and preferably four total-lock casters that lock both the wheel and swivel. Choose casters by the fully loaded weight of the drill press, cabinet, drawers, and accessories, plus a safety margin.
Should I bolt the drill press to the cabinet?
Yes. Bolt the drill press through the manufacturer’s base holes using washers and lock nuts. For heavier machines, add a steel or plywood backing plate below the cabinet top to spread the load.
What plywood thickness is best for a drill-press cabinet?
Use 3/4-inch plywood for the sides, top, bottom, dividers, and structural parts. Drawer bottoms can be 1/4 inch for light drawers, but heavier drawers should use 1/2-inch bottoms or reinforced captured bottoms.
How much does it cost to build a drill-press cabinet in 2026?
A practical DIY budget is about $175 to $425 if you already own the tools. Plywood may cost $45 to $75 per sheet, drawer slides can run $15 to $52+ per pair, and a set of suitable locking casters often costs $35 to $115.
Do I need a permit to build a drill-press cabinet in my garage?
Usually no, if it is a freestanding movable cabinet. Permits or licensed trades may be required if you add electrical circuits, move receptacles, install hardwired dust collection, penetrate fire-rated garage walls or ceilings, or convert the garage into a finished workshop.
Windows Errors? Fix Them Before They Spread
Repair common Windows errors and clear accumulated junk for a smoother, more stable PC - no reinstall needed.Free scan · no reinstallOutdated Drivers Are Slowing You Down
One free scan finds every outdated or missing driver and matches the right update for your exact hardware.Free scan · exact hardware matchQuick Recap
Product prices and availability are accurate as of the date/time indicated and are subject to change. Any price and availability information displayed on Amazon at the time of purchase will apply.

