Quick wins for a faster PC:
Clear out junk files and repair common Windows errorsFree Scan →Scan for outdated or missing drivers - takes under a minuteDriver Scan →Repair Windows errors before they cause bigger problemsFix Now →The most cost-effective way to improve a small home is to fix the waste you can actually observe, then investigate insulation or paid work only when the building’s condition justifies it. Start with a walk-through for drafts, uncomfortable rooms and heavily used lights; seal clear leaks with the right material; replace the bulbs used most often; use shades and existing thermostat settings intelligently; and check utility assistance before larger projects. Home size alone does not determine the best upgrade. Climate, insulation, heating and cooling equipment, occupancy, construction age and local energy rates all change the priority order.
The figures below are general U.S. consumer guidance, not a prediction for your house. No individual saving percentage or dollar amount can be promised without information about the home, weather, equipment, energy use and utility prices.
As an Amazon Associate I earn from qualifying purchases.
1. Walk through the home before buying anything
Spend one heating or cooling period observing how the house behaves. Write down where you feel a draft, which rooms are consistently too hot or cold, which windows are difficult to close, and which five fixtures or bulbs are switched on most often. Also note visible gaps at baseboards, trim, door frames, attic hatches, plumbing penetrations and basement or crawl-space edges. This inventory keeps a limited budget focused on an actual problem instead of a product category.
Do these 3 things before closing this tab:
1Repair Windows errors before they cause bigger problems2Scan for outdated or missing drivers - takes under a minute3Clear out junk files and repair common Windows errorsSeparate symptoms from causes
- A cold strip near a door or an obvious gap at a fixed joint points toward air sealing.
- A room that is uncomfortable despite no visible draft may have inadequate insulation, solar gain, an equipment or distribution problem, or a control issue.
- A rarely used light is a lower financial priority than a fixture that operates for many hours each day.
- Condensation, combustion-appliance concerns, mold, unsafe wiring or inaccessible areas require qualified advice rather than a quick DIY repair.
ENERGY STAR notes that effort and results vary with a home’s age, construction and condition. Its DIY sealing and insulation guide is useful for identifying likely attic and basement leakage paths and for reviewing safe working practices, but a walk-through is a prioritization step, not a substitute for an assessment when conditions are complex.
#1 Best Overall

- No light penetration: Our door seals are made of high-density foam core material, which effectively blocks light from penetrating around the door.
- Lower Energy Costs: This weather stripping protects your home from air leakage in both winter and summer, while increasing comfort and saving energy.
- Fits Most Doors: Door seal strip are flexible to fit slots from 0.35" to 0.59" and will fit most doors. Please check the slot you need to seal before ordering.
- Easy to Install: The door seal requires no adhesive and will not leave marks. Simply insert the door strips into the grooves or recesses to complete a tight seal that will not fall off easily.
- Enhance Your Living Space: The weather strip offers good resilience and sound insulation, effectively sealing gaps to block dust, water, and reduce noise, creating a comfortable and serene living environment.
Choose projects by more than price
| Decision factor | Questions to ask |
|---|---|
| Upfront cost | Can the household buy materials now, or is assistance needed? |
| Actual need | Is there a measured draft, comfort complaint or heavily used fixture to address? |
| DIY difficulty and safety | Can the work be reached and completed without disturbing wiring, ventilation or combustion equipment? |
| Comfort as well as bills | Will the change reduce a cold floor, hot room or draft, even if bill savings are uncertain? |
| Tenure | Can a renter perform it, or must an owner or landlord approve the work? |
| Compatibility | Will the material, bulb, thermostat or control work with the existing opening, fixture and system? |
| Local help | Could a utility rebate or weatherization program reduce the out-of-pocket cost? |
Do not assume a small floor area makes every upgrade cheap or worthwhile. A compact, well-insulated home may gain more from lighting and controls, while a drafty older home may need air sealing before any new device can deliver useful comfort.
2. Seal small, clear leaks with the correct material
Air sealing is often the first physical repair when you can see or feel a gap. The material must match the way the joint moves. The U.S. Department of Energy says caulk is generally for cracks and openings between stationary components, while weatherstripping is for moving components such as doors and operable windows.
Use caulk on stationary joints
Look for separations where two fixed surfaces meet: interior or exterior trim, window and door frames, baseboards, and penetrations around pipes or cables. Clean and dry the surface, choose a product labeled for the substrate and location, and follow its curing and temperature instructions. A neat, continuous bead is more useful than a thick bead that bridges dirt or leaves openings. If a joint is too wide or moves, do not force caulk to perform as a gasket; use a backer or a different method specified for that gap.
Use weatherstripping on moving parts
Weatherstripping belongs where a door or operable window closes against a stop. Check that the sash or door still latches after installation. If the strip is compressed too aggressively, the unit may become difficult to operate; if it barely contacts the frame, the leak remains. Replace damaged or flattened material rather than adding layers that prevent proper closure.
Check hidden attic and basement paths
Warm air can escape through ceiling penetrations, an attic hatch, recessed-light surrounds, plumbing and wiring holes, and the top plates of partition walls. In a basement or crawl space, look around rim joists, sill plates, ducts and service penetrations. ENERGY STAR’s sealing and insulating information and DIY guide explain where these leaks commonly occur. Access, insulation type, moisture and electrical conditions determine whether a location is suitable for a homeowner.
Do not seal a safety opening
Never block combustion-air openings, appliance flues, chimneys, required vents or other paths intended for safe ventilation. If a gas, oil or solid-fuel appliance is nearby, stop and obtain qualified guidance before sealing. Whole-house weatherization includes health and safety checks for this reason. The DOE’s Weatherization Assistance Program overview describes an approach that considers building systems and occupant safety rather than treating one hole in isolation.
Rank #2

- Press-In Kerf Fit: This weather stripping door seal fits 1/8" kerf slots and 1/4"–1/2" closed door gaps. For pre-cut kerf frames only; not self-adhesive. Measure before ordering
- Block Drafts & Energy Loss: The flexible door frame seal strip helps reduce cold drafts, light leaks, outside noise and heating or cooling loss for year-round comfort
- Replace Worn Exterior Door Seals: Ideal for replacing old, cracked, compressed or pet-damaged door weather stripping on front, back and garage entry doors
- Easy Press-In Installation: Remove the old seal, clean the kerf groove, measure and cut, then press the flange firmly into place. The 40FT roll can be cut to fit multiple doors
- Durable PE-Covered Foam: Resilient PU foam with a tough PE cover compresses and rebounds to help maintain a snug, long-lasting seal
3. Replace the lights you use most
Lighting is a practical early purchase because you can target the fixtures that run for the most hours instead of replacing every bulb at once. ENERGY STAR says certified LED bulbs use up to 90% less energy and last 15 times longer than standard bulbs. Its undated consumer guidance, accessed in 2026, estimates that replacing the five most frequently used fixtures or bulbs can save about $40 per year. That is an ENERGY STAR estimate, not a guarantee for every household; use patterns, bulb wattage and local electricity rates determine the result.
Buy for the existing fixture
- Match the base and physical dimensions so the bulb seats fully and the enclosure can close.
- Choose a brightness comparable to the present lamp, using lumens rather than wattage as the primary comparison.
- Select a color appearance that suits the room; a very different color can make a successful energy change feel like a comfort failure.
- Confirm that the bulb is rated for enclosed fixtures, damp locations or dimming when those conditions apply.
- For a smart or specialty lamp, verify control compatibility before paying extra for features you will not use.
Prioritize by operating hours
Start with kitchen, living-room, exterior-security or work-area fixtures that stay on for long periods. A bulb in a closet may be efficient but will have little effect if it runs only a few minutes a week. Keep a note of the original bulb and the replacement so future maintenance is simple.
4. Use shades, drapes and controls before adding equipment
Existing window coverings can reduce avoidable heating and cooling demand at no material cost. ENERGY STAR’s low-cost tips recommend seasonal use of shades and drapes and practical thermostat scheduling.
| Condition | Useful setting | Reason to check the result |
|---|---|---|
| Sunny, hot weather | Close shades or drapes on sun-exposed windows during the strongest solar gain. | Some rooms may still need ventilation or cooling; avoid trapping heat where that worsens comfort. |
| Cold, sunny weather | Open coverings during useful daylight and close them after sunset. | Window orientation, fabric and nighttime temperatures change the benefit. |
| Heating or cooling is scheduled | Use existing programmable settings when they match actual occupancy. | A schedule that fights the household’s routine can lead to manual overrides and no practical saving. |
| Window air conditioner or similar unit | Check that the installation is sealed at the window. | Gaps around the unit can waste conditioned air even when the machine operates correctly. |
Do not make a thermostat the automatic first purchase
A programmable or smart thermostat can help when the current control supports the system and the household follows a repeatable schedule. First check the heating and cooling equipment, wiring, power requirements, zoning and occupancy pattern. Some systems need a particular control or professional installation. If people are home at unpredictable times, a simple manual adjustment may be more useful than a complex schedule.
5. Investigate insulation before committing to larger work
Insulation is a condition-dependent project. Look in the attic first if it is safely accessible: note the insulation depth and continuity, compressed or wet areas, an unsealed hatch, and penetrations that may bypass the insulation. In a basement or crawl space, inspect for exposed foundation edges, moisture and inaccessible sections. Do not disturb suspected asbestos, vermiculite, mold or damaged wiring.
The Tool Desk
Outbyte Driver Updater FREEFix the driver behind crashes, sound loss and screen glitchesFind Drivers →Outbyte PC Repair FREEClear out junk files and repair common Windows errorsFree Scan →When insulation moves up the list
- Rooms remain uncomfortable after obvious drafts are sealed.
- Attic insulation is visibly thin, uneven, wet or missing around the perimeter.
- Heating or cooling runs for long periods while the envelope feels hot or cold.
- The home’s age or construction suggests that insulation was never upgraded.
These signs do not identify the correct material or thickness by themselves. Air sealing, moisture control and ventilation must be considered together. Sealing a hatch while leaving a moisture problem or blocking required ventilation can create damage instead of efficiency.
Rank #3
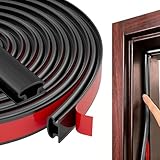
- 【THICKENED SILICONE MATERIAL - COMPLETELY BARRIERING AIR AND NOISE】:The weather stripping is made of thickened TPE material with good sealing and anti-deformation properties, with this weather stripping you can completely seal the gaps, keep the room warm in winter and cool in summer, Helps To Reduce Energy Consumption ,and blocking the entry of noise, light, rain, dust, wind, leaves, snow, and odor, and no reptile will sneak in.
- 【CUSTOMIZABLE IN A VARIETY OF SIZES】This weatherstripping is easy to customize, can be cut to size with scissors, and can be easily bent into any shape. Overall length 50 feet, width: 0.35 inch; thickness: 0.23 inch; fits gaps and spacing from 0.1 to 0.22 inch.NOTE: Please measure the width of the gap before purchase
- 【STRONG ADHESION - WON'T FALL OFF】This door weather stripping is covered with a strong adhesive substance. Simply remove the red film from the surface and install. After 24 hours of bonding, everything is securely bonded and there is no need to worry about peeling or adhesive residue, ensuring that this door seal strip in place long after use (and is no longer affected by extreme temperatures).
- 【EASY INSTALLATION】Measure the length of the groove to be sealed, cut the Universal Weatherstrip to the desired length, clean and dry the surface, and insert the Soundproof Weatherproof Weather strip into the groove.(Note:Low Temperature Will Result In Poor Adhesive Performance,Please Use A Hair Dryer To Heat The Adhesive Backing To Increase The Bonding Effect Before Installation)
- 【WIDELY USED】The Door Insulation Strip is a tough, long-lasting self-adhesive tape with minimal compression that helps prevent rattles, vibrations and squeaks. It is widely used as weather stripping, gaskets or cushioning and stabilizes major appliances such as doors, windows, furniture, electrical cabinets, speakers, toys, crafts, sports equipment, vents, air conditioning, plumbing, HVAC. Also, in cars, trucks and boats.
Check incentives before work starts
ENERGY STAR advises contacting the utility before beginning because some utilities offer rebates for assessments, air sealing or insulation. Programs, eligible measures and documentation rules vary by location and can change. Ask whether an assessment is required first, which contractors qualify, what receipts or photos are needed, and whether the incentive is available to renters or only property owners.
Households that may qualify for Weatherization Assistance should consult their state or local program. The DOE describes WAP as a whole-house approach that includes an energy audit and safety checks; screening, scope and implementation are location-specific. Do not assume eligibility or availability until the local administrator confirms it.
6. Decide when a paid assessment is worthwhile
A professional assessment becomes more valuable when the source of discomfort is unclear, the work involves an attic, crawl space, ducts or combustion appliances, or several upgrades would interact. An assessor can help distinguish air leakage from insulation deficiencies, equipment problems and moisture risks. Ask what the visit includes, whether safety checks are part of the service, and whether the report ranks measures by expected comfort, energy effect and cost.
Crashes, No Sound, or Screen Glitches?
Random freezes, missing sound and display glitches usually trace back to one bad driver. Find and replace yours safely.Free scan · under a minuteWindows Errors? Fix Them Before They Spread
Repair common Windows errors and clear accumulated junk for a smoother, more stable PC - no reinstall needed.Free scan · no reinstallPrepare useful information
- Collect recent utility bills if available, including fuel type and billing period.
- Mark rooms with recurring comfort complaints and note when they occur.
- List heating, cooling and water-heating equipment, approximate age and known maintenance issues.
- Show the assessor attic, basement, crawl-space and mechanical-room access points.
- Ask for written recommendations that distinguish urgent safety work from optional efficiency work.
An assessment is not automatically a license to undertake every recommendation. Compare the proposed measure with the home’s condition, your occupancy horizon and any rebate deadline. A renter should request landlord approval before altering windows, doors, insulation or equipment.
Independent reader supportYour contribution helps us test, update, and keep practical guides available for everyone.7. A staged budget plan
Stage 1: Observe and document
Use a simple floor plan or room list. Record drafts, surface temperatures you can safely observe, window-covering use, frequently operated lights and thermostat settings. Photograph gaps before repair so you can check whether they remain closed.
Stage 2: Make low-cost corrections
Seal stationary cracks with suitable caulk, fit weatherstripping to moving doors and operable windows, and replace the five highest-use bulbs with compatible certified LEDs. Use the existing shades and controls according to season and occupancy.
Rank #4

- Extra Long Size: You'll get a 33FT door weather stripping (1/2in x 1/4in). Easy to install, no tools needed, cut to any length
- High-Density CR Foam & Neoprene Rubber: Eco-friendly, non-toxic foam weather stripping with superior weatherproofing, shock absorption, soundproofing, and heat insulation
- Upgrade the Powerful Adhesive: Upgraded door weather stripping adhesive ensures reliable sealing, and waterproofing, wipe the door frame clean before sticking, there is no need to worry about it peeling off
- Energy Saving & Versatile: Door insulation seals gaps to maintain warm indoor temperatures in winter and cool indoor temperatures in summer, cutting energy costs. It is ideal for doors, windows, vents, AC, vehicles, and handicrafts
- Premium Service: We are confident in offering a 100% Satisfaction Guarantee. If you have any questions about weatherstripping for doors, contact us and we will solve it for you within 24 hours
Stage 3: Recheck comfort and operation
After weather changes, revisit the rooms that motivated the work. Confirm doors and windows latch, lights dim or switch correctly, and no room has developed moisture or ventilation problems. If the original symptom persists, avoid buying another gadget simply because the first measure was inexpensive.
What’s actually slowing this PC down?
Pick the symptom - the matching free tool is one click away.
Stage 4: Escalate based on evidence
Move to insulation investigation, a paid assessment or a qualified contractor when the home shows envelope deficiencies, complex access, safety concerns or unresolved comfort problems. Contact the utility and any local assistance program before signing a contract so eligibility and required sequencing are clear.
8. Common mistakes that waste a small budget
- Sealing the wrong joint: Caulk on a moving door will crack or restrict movement; weatherstripping cannot fill a fixed masonry crack.
- Buying every efficiency product at once: A thermostat, smart bulb or sensor cannot compensate for an unaddressed draft or missing insulation.
- Ignoring compatibility: Bulb bases, dimmers, enclosed fixtures, thermostat wiring and window hardware all impose limits.
- Blocking ventilation: Do not cover combustion-air openings, flues or required vents.
- Assuming a rebate exists: Confirm current local rules before work begins; a national program description is not proof of local eligibility.
- Expecting a fixed payback: ENERGY STAR’s lighting figures are program estimates, and project results vary with climate, construction, behavior and rates.
- Working in unsafe areas: Stop when access is unstable or when you encounter suspected hazardous materials, damaged wiring, mold or combustion equipment.
9. Track whether the changes helped
Keep a dated log of the measure, room, operating schedule and weather. Compare utility use only across comparable billing periods, because a mild month can look like a successful project even when the change had little effect. Also track comfort: fewer drafts, a more usable room, less thermostat adjustment and shorter equipment run times may matter even when a bill signal is too noisy to interpret.
For lighting, note the old bulb’s wattage, the replacement’s lumens and hours of use. For sealing, record which opening was repaired and whether the symptom returned. If several changes were made simultaneously, you may not be able to assign a dollar value to each one; use the record to decide what deserves professional investigation next.
10. A decision guide for renters and owners
| Situation | Reasonable next move |
|---|---|
| Renter with a drafty interior door | Ask the landlord about a removable door sweep or approved weatherstripping; do not alter the building envelope without permission. |
| Owner with visible trim cracks | Use compatible caulk on stationary joints, following the product directions. |
| Any occupant with five heavily used bulbs | Check fixture and dimmer compatibility, then replace those bulbs with certified LEDs first. |
| Owner with inaccessible attic or combustion equipment | Arrange qualified guidance or an assessment rather than sealing blindly. |
| Household facing a larger insulation bill | Contact the utility and local weatherization administrator before work starts; verify rules and eligibility. |
11. What “energy efficient on a budget” realistically means
Budget efficiency is a sequence, not a single product. The best first action is the one that matches an observed loss, can be completed safely, and remains compatible with the home. In one small house that may be weatherstripping and five high-use LEDs; in another it may be an assessment that prevents money being spent on the wrong insulation project. Use the DOE and ENERGY STAR guidance linked above as general U.S. information, then adapt the order to your building, climate, equipment, occupancy and local programs.
Quick Recap
Product prices and availability are accurate as of the date/time indicated and are subject to change. Any price and availability information displayed on Amazon at the time of purchase will apply.

