Outdated Drivers Are Slowing You Down
One free scan finds every outdated or missing driver and matches the right update for your exact hardware.Free scan · exact hardware matchPC Slower Than It Used to Be?
A free scan shows the junk files, broken settings and background clutter dragging Windows down - then fixes them in one click.Free scan · Windows 10 & 11To install a smart thermostat, first confirm that the exact model works with your heating and cooling system. Then use its app or manufacturer instructions to identify the correct wiring, shut off HVAC power, label and photograph the existing connections, and install the thermostat to its model-specific diagram. After mounting it, connect it to Wi-Fi in the supported app and check that heating and cooling respond as expected. This walkthrough uses Google Nest guidance as a concrete example; its wiring and app steps are not universal across brands.
Check compatibility before buying or removing the old thermostat
Look up the exact thermostat model and your HVAC equipment in the manufacturer’s compatibility tool before starting. Google says Nest thermostats are designed for most 24-volt systems, but compatibility depends on the system and wiring. Heat pumps, dual-fuel systems, multiple transformers, accessory equipment and proprietary controls may need closer review or professional help. Do not assume that a thermostat supports every boiler, heat pump, line-voltage system or control setup. Google’s Nest compatibility guide explains its model-specific checks.
For Nest, Google says many systems can operate without a C wire, while some require one or a Nest Power Connector. A C wire provides continuous power; it does not control heating or cooling. Google’s Nest Power Connector guidance describes that Nest-specific option. Other thermostat brands may have different power requirements and accessories.
Prepare the app and document the existing wiring
Have the thermostat’s current manufacturer instructions and app ready before disconnecting anything. For Nest, the installation process asks about the existing wires and provides a diagram for the specific system. Follow that diagram rather than a generic illustration or wire color assumptions: colors do not reliably establish a conductor’s function, and labels can be wrong. If a wire’s purpose is unclear, stop and consult the system control-board documentation or an HVAC technician. Google’s Nest installation instructions cover the app-generated diagram and wiring checks.
Quick wins for a faster PC:
Scan for outdated or missing drivers - takes under a minuteDriver Scan →Clear out junk files and repair common Windows errorsFree Scan →Fix the driver behind crashes, sound loss and screen glitchesFind Drivers →#1 Best Overall
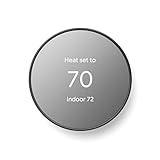
- ENERGY STAR certified smart thermostat for home that helps you save energy and stay comfortable.Connectivity : Wi-Fi - 802.11b/g/n 2.4 GHz, 802.11a/n 5 GHz Wi-Fi., Wireless interconnect : Bluetooth Low Energy Please refer to the product description section below for all applicable legal disclaimers.Product note: You can also check your system’s compatibility before purchasing a Nest thermostat with our online Nest Compatibility Checker on the Google Nest support page
- The Nest Thermostat is designed to work without a C wire in most homes, but for some systems, including heating only, cooling only, zone controlled, and heat pump systems, you’ll need a C wire or other compatible power accessory
- Nest Thermostat turns itself down when you leave, so you don’t waste energy heating or cooling an empty home. Lock feature: No
- Programmable thermostat that lets you create an energy efficient schedule in the Google Home app on your Android or iPhone
- Remote control lets family members change the thermostat temperature from anywhere on a phone, laptop, or tablet[1]
- In the supported app, select the thermostat model or scan its QR code if prompted. Answer the wiring questions accurately and obtain the system-specific diagram before moving wires.
- Switch off power to the HVAC equipment at the breaker or breakers. Some systems have more than one relevant circuit. Verify the system remains off before opening the thermostat or handling conductors.
- Remove the old thermostat cover. Take a clear photograph showing each wire and its terminal label, then label the wires before disconnecting them. Keep the old thermostat and any loose jumper pieces until the new unit works.
Google estimates that most homeowners can install a Nest thermostat in 20–30 minutes when following its app instructions. That is the manufacturer’s estimate, not an independent timing study, and it should not be applied to complex wiring, other brands or systems requiring electrical changes.
Stop if the wiring is unsafe or outside the thermostat’s guidance
Do not connect a low-voltage smart thermostat to wiring that its manufacturer says is incompatible. Google identifies 120-volt or 240-volt markings, thick wires joined with wire nuts, and stranded thermostat wiring as reasons not to proceed with a Nest installation. High-voltage systems can be dangerous and require a thermostat made for that equipment. Proprietary or unidentified wiring also needs to be resolved before installation. Google’s safety and installation guidance gives Nest-specific examples; check the exact device manual for other brands.
Rank #2

- An Alexa thermostat - Amazon Smart Thermostat is an easy way to switch from a traditional thermostats for homes and help reduce energy usage.
- Create comfort zones throughout your home by connecting to select Alexa devices to automatically adjust heating and cooling based on temperature readings or presence detection.
- Save money and energy - After purchase, Amazon will send you an email with details about home thermostat rebates that may be available from energy providers in your area.
- Save energy - According to EPA estimates, ENERGY STAR certified thermostats save an average of $90 on yearly energy bills.
- Programmable thermostat and automatic control - Create your own home, away and sleep schedules, or have Alexa automatically control the temperature with Alexa+ advanced features.
Do not guess, combine conductors or rely on wire color to resolve uncertainty. If the system has multiple transformers, an unusual heat-pump or dual-fuel arrangement, or needs new C-wire wiring, ask a qualified HVAC professional to assess it. Google recommends professional help for complex systems and C-wire installation. Its professional installation information notes that installers are independent and availability varies.
Mount and wire the thermostat to its own diagram
Once compatibility and the wiring diagram are clear, install the base and connect each conductor exactly as the model-specific instructions show. Do not add a conductor just because a terminal exists, or place multiple wires in one terminal unless that thermostat’s instructions explicitly permit it. For Nest specifically, Google says not to reuse the old thermostat’s jumper wires and not to put more than one wire in a Nest connector.
Recommended Free Tools
Rank #3

- Save up to 23% every year on heating and cooling costs, adjusts to your set schedule to save energy when you’re gone and optimize comfort when you’re home. Compared to a hold of 72
- Compatible with 85% of systems, check your system’s compatibility with our online ecobee Compatibility Checker on the ecobee support page
- Change your temperature by easily tapping the color touchscreen or using the ecobee app. Plus, free software upgrades ensure you get the best out of your Smart Thermostat Essential, for years to come
- Automatically adjusts to your set schedule to save energy when you’re gone and optimize comfort when you’re home. Keep track of your energy consumption when you're on the go on the ecobee app
- Easy DIY install. No C Wire, no problem. Get the ecobee Power Extender Kit (PEK) for homes without a C-Wire and keep your walls looking nice with our trim kit – both sold separately
- Remove the old thermostat and base as instructed, keeping the photo and labels visible as references.
- Mount the new base using the supplied hardware and the manufacturer’s placement guidance. Google says basic installation items are included with Nest; extra mounting supplies are only needed if the surface or installation requires them.
- Insert each labeled conductor into the terminal shown in the app-generated diagram. Check that the conductor is secure and no bare wire is exposed beyond what the instructions allow.
- Attach the thermostat display, restore HVAC power, and follow the on-screen or app prompts. If the unit reports a wiring or power problem, switch power back off before inspecting anything and follow that model’s troubleshooting instructions.
Connect the thermostat to its app and Wi-Fi
App enrollment varies by thermostat generation and brand. For Nest models covered by Google’s post-install setup guide, you need a phone connected to Wi-Fi, Google Home and a Google Account. Some older Nest generations may use the Nest app, so verify the current instructions for your particular model rather than assuming every Nest device uses the same flow.
- Open Google Home and select Add > Device.
- Scan the thermostat’s QR code or enter its setup code when prompted.
- Wait for the app to show “Connected.” If the thermostat has already been installed and configured, choose Already installed so the setup retains the equipment settings.
- Select the home Wi-Fi network and complete the remaining prompts.
- Assign the thermostat a room or location. Set optional temperature presets, a schedule and presence automations during setup or later.
Google notes that most Nest thermostat features require connecting the thermostat to the app. See Google’s post-install setup guide for the covered models and enrollment flow. Other brands use their own apps, account requirements and labels.
Rank #4

- EASY DIY INSTALLATION: Do it yourself fast with a built-in level and simple step-by-step instructions. Works with the HVAC equipment found in most homes
- COMMON WIRE REQUIREMENTS: Common wire(C-Wire) required for heat pump and heat/cool only systems. C-wire not required on most systems
- SAVE ABOUT 23% ON HVAC ENERGY: ENERGY STAR-certified and packed with features that help you save money, including flexible scheduling, geofencing, remote access and usage reports
- PRIVACY PROTECTION: Sensi won’t sell your personal information to third parties or leverage your thermostat activity data for targeting or advertising purposes
- CONTROL FROM ANYWHERE: The top-rated mobile app for Android and iOS devices makes it easy to control your comfort from a smartphone or tablet
Verify operation and resolve problems safely
After setup, use the thermostat controls or app to request heating and cooling modes supported by your equipment, then confirm the system responds. Check the app’s wiring or power status if it reports an issue. Follow the manufacturer’s troubleshooting flow rather than moving wires experimentally; turn off HVAC power before touching wiring again.
Quick Recap
- The thermostat will not power on: Check that the relevant HVAC breakers are on and consult the device’s power troubleshooting instructions. If the model needs a C wire and one is absent, use only a manufacturer-supported solution; for Nest, see the Power Connector guidance.
- A wire label or function is uncertain: Do not infer function from color. Refer to the equipment’s control-board documentation or have a qualified technician identify it.
- The system does not respond or the app flags wiring: Compare the connections with the thermostat’s custom diagram and use its diagnostic steps. Stop and arrange professional service if the diagram does not match the actual equipment or the issue remains unresolved.
Product prices and availability are accurate as of the date/time indicated and are subject to change. Any price and availability information displayed on Amazon at the time of purchase will apply.
The Tool Desk
Outbyte Driver Updater FREEFix the driver behind crashes, sound loss and screen glitchesFind Drivers →Outbyte PC Repair FREERepair Windows errors before they cause bigger problemsFix Now →



