Quick wins for a faster PC:
Fix the driver behind crashes, sound loss and screen glitchesFind Drivers →Repair Windows errors before they cause bigger problemsFix Now →Repair torn drywall paper by removing every loose flap, feathering a thin coat of joint compound over the intact panel, allowing it to dry, then sanding and priming. For severely scraped or gouged paper, a drywall conditioner can seal the surface before compound; it is an optional product-specific step, not a requirement in the basic USG method.
First identify what is damaged
Torn face paper is a surface injury: the gypsum panel remains firm, dry and continuous, but its brown or gray paper facing has been pulled, scraped or lifted. This commonly appears after removing wallcovering, adhesive or other finishes. The repair method below is designed for that condition.
As an Amazon Associate I earn from qualifying purchases.
Press around the area and inspect the edges before opening a container of compound. If the board feels soft, stays damp, has a deep break, or is missing a substantial section, you are dealing with more than a paper tear. Water-damaged gypsum and larger holes require a patch or panel replacement approach rather than a simple skim coat. USG discusses larger holes and water-damaged areas separately from ordinary torn-face-paper repairs.
- Surface-paper tear: firm, dry panel with loose, ragged or scraped facing. Use the skim-coat sequence.
- Small hole: gypsum is missing, not merely exposed. A patch may be needed.
- Larger hole or water damage: repair or replace the affected panel after the cause of the damage is resolved.
Materials and preparation
Gather a finishing knife, joint compound, sanding material, primer and a clean surface for mixing or loading the knife. A drywall conditioner is an additional option when the paper is severely scraped, scratched, punctured or gouged. Sherwin-Williams describes its Drywall Conditioner as a damaged-drywall repair primer that seals a vulnerable base and helps reduce bubbling under later patching.
#1 Best Overall

- Complete Repair Kit: Contains 1 pieces repair putty(8.5oz), 2 inch wall repair patches(2pcs), 4 inch wall repair patches(1pcs), 2 pieces of sandpaper, and 4 plastic scrapers.
- Waterproof Formula: The drywall repair kit contains a waterproof wall mending agent that dries quickly and leaves no residue.
- Strong Adhesion: Drywall repair patches are made from quality aluminum, making them lightweight yet strong and durable for long-lasting performance.
- Multipurpose: Wall repair patch is suitable for repairing most damaged surfaces around the home, kitchen, or office building, as well as factories and other industrial facilities.
- Ideal for DIY home renovations: Whether you're an experienced pro or a beginner, our wall patch repair kit makes wall repair a breeze, enhancing the beauty of your home.
Remove wallcovering adhesive, dust and any loose fragments that would prevent compound from bonding to a stable surface. Keep the repair boundary as small as practical: sound paper around the injury gives the skim coat a firm edge to feather into.
Basic method for an ordinary torn-paper area
1. Peel away loose paper
Start by removing every flap, blistered edge and piece that moves freely. USG’s Sheetrock Installation and Finishing Guide and its Patch and Repair Pack application tips both put this step first. Do not bury loose paper under compound; it can lift later and telegraph a ridge through paint.
Continue until the remaining paper is firmly attached. Ragged but stable edges can stay in place, because the compound will be feathered over them. If an edge is high enough to show through the finish, lightly sand it to reduce the transition. Sherwin-Williams’ preparation guidance specifies 80–120 grit for lightly feathering damaged-paper edges.
Recommended Free Tools
2. Decide whether a conditioner is warranted
For a small, stable tear, proceed directly to joint compound. USG’s general procedure does not call for a sealer. Consider a conditioner when the facing is extensively scraped or gouged, has many exposed fibers, or appears likely to absorb moisture unevenly and bubble during patching.
Rank #2

- Drywall repair kit can be used for repairing interior or exterior surfaces like drywall, plaster, wood, brick and stone
- Color indicator spackle goes on pink and dries white providing confirmation the product is dry within 1 to 5 hours
- Wall patch dries within 1 hour for repairs 1/8" in depth; for repairs deeper than 1/8" apply two or more layers and allow spackle to dry between applications
- Durable spackling will not crack, crumble, flake or shrink and creates professional looking wall repairs that last
- No priming required when used indoors, kit contains: spackle, 5x5 fiber tough patch, 4x3 100 grit sandpaper and putty knife
If you use Sherwin-Williams Drywall Conditioner, follow that product’s current label. Its documented preparation path calls for light 80–120-grit sanding, one coat of conditioner and a three-hour wait before applying skim coat, patching, wallcovering or primer. The three-hour interval belongs to that product method; it is not a universal waiting period for every drywall sealer.
3. Skim on a thin coat of joint compound
Load the finishing knife with a modest amount of compound and spread a thin layer across the exposed paper and slightly onto the surrounding wall. Hold the knife so the center of the repair receives coverage while the edges become progressively thinner. This feathered edge prevents a hard ridge that would remain visible after painting.
Do not try to fill a deep depression with one heavy pass. Thick compound takes longer to dry and is more likely to shrink or crack. The USG sequence is a skim coat, feathering, drying, and a second coat only if needed.
4. Let the compound dry completely
Leave the repair undisturbed until the compound is dry before adding another coat. Drying time varies with coat thickness, temperature, humidity and ventilation, so judge the surface rather than relying on a fixed clock. A damp, darker center or cool, soft feel indicates that sanding or recoating is premature.
Rank #3
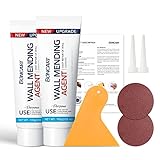
- The drywall repair kit includes 2x Wall mending agent (100g), 2x Nozzle Extender, 1x Scrapers, and 2x Sandpaper.
- This drywall patch repair kit Easily and quickly repair the damaged wall.Just gently squeeze out and use a spatula to smooth. spackle wall repair kit can be reused, Meet your various repair needs.
- The new upgrade wall patch repair kit is very safe, it does not contain formaldehyde. It is highly resistant to breakage, streak-free and waterproof.And the mending will be virtually invisible, then giving you professional-looking results.
- BONCART wall repair kit can solve all kinds of wall damage.Drywall cracks,wall stains,nail holes,wall peeling,wall stains,wall graffiti.Let your walls a new look.
- Best Service:Fast pre-sale and after-sale response, any questions about the product are welcome to contact us at any time.
5. Add a second coat when the first coat settles
After drying, inspect the repair under the lighting that will be used in the room. If the paper texture or depression remains visible, apply another thin coat and feather farther into the wall. A second light pass is preferable to one thick application because it preserves a gradual transition.
6. Sand and remove dust
Sand only after the final coat is dry. Smooth the center and blend the perimeter until you cannot feel a step with your fingertips. Avoid aggressive sanding that cuts back through the paper you just stabilized. Remove sanding dust before priming so the primer bonds to the repair rather than to loose powder.
7. Prime before decorating
Prime the dry, sanded repair before paint or wallcovering. USG’s cited application tips identify First Coat or a high-solids flat latex paint as possible prime coats. USG’s First Coat information explains the purpose: primer helps equalize the different porosity and texture of drywall face paper and joint compound, reducing the chance that the repaired area will absorb finish differently from the surrounding wall.
When a drywall conditioner makes sense
A conditioner is a targeted solution for unstable or heavily damaged paper, not an automatic extra coat on every repair. Use the documented comparison below to choose a sequence without mixing incompatible directions.
Rank #4
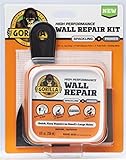
- ALL IN ONE WALL REPAIR KIT: Contains all of the tools you need to complete strong, durable repairs on walls, ceilings and both small and large holes for a fast, professional-looking finish
- KIT INCLUDES EVERYTHING NEEDED: 8 ounce tub of Spackling plus Primer, 4 in self-adhesive patch, 3 in putty knife and sanding block for complete drywall, plaster and ceiling repair projects
- SPACKLING AND PRIMER IN ONE: Paints like drywall with a heavy duty, lightweight, no sag formula that is shrink and crack proof for clean, professional looking finished wall and ceiling repairs
- FAST DRYING EASY TO SPREAD: Paintable in 15 minutes, with dry time assuming a hole 1/2 in diameter by 1/8 in deep, varying with temperature and humidity, and a smooth finish that does not require sanding
- INDOOR OUTDOOR DIY READY: Designed for interior and exterior wall fixes including nail holes, doorknob dents, hairline cracks and large holes, with exterior paint required outdoors and not for continuous water submersion
| Condition | Basic USG face-paper method | Sherwin-Williams damaged-paper method |
|---|---|---|
| Typical damage | Ordinary torn face paper with an intact, stable panel | Severely scraped, scratched, punctured or gouged paper |
| Edge preparation | Remove loose paper; skim and feather | Remove loose paper and lightly sand with 80–120 grit |
| Sealer required? | No conditioner specified | One coat of the product’s Drywall Conditioner is specified |
| Wait before skim coat | Allow joint compound to dry between coats; no fixed pre-coat wait stated | Wait three hours after conditioner before skim coat, patching, wallcovering or primer |
| Best use | Small or moderate tears where the remaining paper is sound | Paper that is porous, badly abraded or prone to bubbling |
These are two manufacturer procedures for different conditions, not one mandatory seven-step recipe. If the conditioner label has been updated, its current directions control, including coverage, ventilation and recoat information.
How to handle holes and larger damage
A skim coat cannot replace missing gypsum. If your inspection finds an actual hole, select a patch method sized to the opening. USG describes a California patch for holes approximately six by six inches and under. That size is a guideline from its article, not a universal limit for every wall or panel.
For openings larger than a small patch, or for sections weakened by water, follow a repair method that restores the gypsum and support before finishing the joints. Replace water-damaged material only after the leak or moisture source has been corrected; otherwise a sound-looking finish can fail again. Once the board is structurally sound, finish the patch seams with compound, sand the dry surface and prime the completed area.
Free tools Windows power users keep installed
One-click scans. No signup required.
Troubleshooting a repair that does not look right
The paper bubbles under compound
Stop and allow the area to dry rather than pressing a bubble flat and covering it immediately. Remove any paper that has released from the panel, return to a stable edge and use a conditioner on severely damaged paper if that matches the product directions. Sherwin-Williams positions its conditioner as a way to create a sealed base and help eliminate bubbling; the three-hour wait applies to that product’s method.
Best Value

- Package includes 12 pieces of drywall repair patch in three different sizes (8 pieces of 4-inch, 2 pieces of 6-inch and 2 pieces of 8-inch), 2 pieces of sandpaper (240 grit), and 2 plastic scrapers.
- Bates drywall repair patches are made from quality aluminum, making them lightweight yet strong and durable for long-lasting performance.
- The self-adhesive backing makes it easy to apply the patch to the wall, ensuring good adhesion to nearly any kind of surface.
- Bates wall repair patch is suitable for repairing most damaged surfaces around the home, kitchen, or office building, as well as factories and other industrial facilities.
- To use this product effectively, first clean and dry out the hole you want to patch before peeling back the backing and applying the drywall patch. Evenly spread out plaster with a scraper afterwards for a more seamless look.
A ridge remains around the patch
The edge was not feathered far enough or the coat was too heavy. Sand the dry high spot carefully, wipe away dust and apply a wider, thinner coat. Keep the center filled while thinning the compound toward the intact wall.
The repair shows through fresh paint
Joint compound and original face paper do not absorb paint identically. Prime the entire repair, not just the most obvious scratch, and allow the primer to dry before finish coating. USG’s First Coat guidance specifically addresses equalizing porosity and texture differences between these surfaces.
The surface feels soft after the expected drying period
Do not sand or paint a soft area. A persistently soft, damp or crumbling panel suggests moisture or deeper board damage rather than a simple paper tear. Investigate the source and move to a patch or replacement repair as appropriate.
Crashes, No Sound, or Screen Glitches?
Random freezes, missing sound and display glitches usually trace back to one bad driver. Find and replace yours safely.Free scan · under a minuteWindows Errors? Fix Them Before They Spread
Repair common Windows errors and clear accumulated junk for a smoother, more stable PC - no reinstall needed.Free scan · no reinstallCommon mistakes to avoid
- Skimming over loose paper: the flap can lift and recreate the defect beneath the finish.
- Using one thick coat: heavy compound is harder to dry and feather cleanly than multiple thin coats.
- Sanding while damp: this tears the surface and clogs sanding material instead of producing a smooth edge.
- Skipping primer: unprimed compound can absorb paint differently, leaving a visible dull or uneven patch.
- Applying a conditioner automatically: the basic USG procedure does not require one; reserve it for badly damaged or vulnerable paper and follow the selected product’s label.
- Treating a hole as a paper tear: missing gypsum needs a patch or panel repair, not just surface compound.
Final inspection checklist
- Confirm that the panel is dry, firm and intact around the injury.
- Peel away all loose face paper and reduce any sharp, stable edges.
- For severe scraping or gouging, decide whether a conditioner is appropriate and observe its label wait time.
- Spread a thin coat of joint compound and feather it into the wall.
- Let the coat dry fully; add a second thin coat only where the surface still needs leveling.
- Sand the dry repair smooth without cutting through the surrounding paper.
- Prime before paint or wallcovering so the repaired area and original wall absorb finish more evenly.
- If the panel is soft, wet or missing material, stop using the paper-tear method and repair the underlying board.
What a successful repair should deliver
When the gypsum remains intact, the finished area should be flat to the touch, free of loose fibers and sealed with primer before decoration. The essential sequence is simple: stabilize the paper, feather compound in thin coats, dry between applications, sand, and prime. The conditioner option belongs only where the paper’s severity justifies it; it does not replace sound inspection or the need to repair holes and water damage properly.
Quick Recap
Product prices and availability are accurate as of the date/time indicated and are subject to change. Any price and availability information displayed on Amazon at the time of purchase will apply.

