Some links on this page are affiliate links: if you buy through them we may earn a commission, at no extra cost to you.
A low retaining wall can be a good homeowner project. A structural retaining wall can become a soil-engineering problem very quickly. The difference is not just the block you buy. It is wall height, soil pressure, water, slope, nearby loads, frost, and whether the wall would damage a driveway, patio, foundation, fence, pool, utility, or neighbor’s property if it moved.
For most homeowners, the practical DIY range is a short decorative or landscape wall under about 3 feet of exposed height, built with a manufacturer-approved segmental retaining wall block system, on a compacted crushed-stone base, with drainage stone and a positive outlet for water. Once the wall approaches 4 feet from the bottom of footing to the top of wall, supports a surcharge load, sits on a steep or wet site, or interacts with another wall, it should be reviewed by your local building department and often by an engineer.
As an Amazon Associate I earn from qualifying purchases.
What’s actually slowing this PC down?
Pick the symptom - the matching free tool is one click away.
On our job sites, the walls that last are not the ones with the prettiest face. They are the ones with a level compacted base, proper embedment, controlled water, correct setback, good backfill, and reinforcement where required. This guide walks through the same decision process we use before committing labor and materials.
Start With the Right Question: Is This Wall Actually DIY?
Before buying block, decide whether you are building a landscape edge or a structural retaining system. A 24-inch garden wall holding back a flower bed is one thing. A 48-inch wall beside a driveway is another. Soil weighs roughly 100 to 120 pounds per cubic foot, and wet soil can push hard enough to bow, slide, or overturn a wall that looked solid on day one.
Popular on Amazon

- A Monster-level Engine: With our high-performance plate compactor, you'll have the power you need to get the job done. Its 196 cc / 6.5 HP gasoline engine delivers a whopping 5,600 vibrations per minute, while the 12-inch compaction depth ensures optimal results.
- Work Like Never Before: Upgrade your road projects with our plate tamper! With an enlarged 351 in² stamped plate, you'll save time with an impressive working efficiency of up to 7300 ft²/h. Plus, the plate is built to last with its durable 8 mm thickness that won't deform even during tough tamping jobs.
- Move with Ease: Hit the road with our VEVOR vibratory compactor! Its wide, wear-proof wheels ensure smooth travels on any surface, while its heavy-duty 146.6 lbs design offers flexibility for road construction. Get the job done right with this powerful and reliable machine.
- Operation Made Simple: Our soil compactor is a game-changer! With an adjustable choke and linear throttle, you can easily customize the speed range to suit any road condition, boosting its endurance. Experience the power and precision of this versatile tool today.
- Your Road Specialist: The compactor machine that can do it all! Our versatile tool has been well-received in construction, municipal, highway, and railroad projects, delivering professional results in compacting dirt, gravel, lawn, and more. Get the job done flawlessly!
A retaining wall gets more complicated when the retained soil is tall, wet, sloped, poorly compacted, or loaded from above. That extra load is called surcharge. Surcharge includes a driveway, parked vehicles, patio, building foundation, pool, steep backslope, fence posts, guardrail posts, or another retaining wall close behind the first wall.
Good DIY candidates
- Short garden or landscape walls under about 3 feet exposed height.
- Walls with level ground behind them, not a steep backslope.
- Walls far from foundations, driveways, pools, property lines, utilities, and easements.
- Dry sites where drainage can daylight safely without dumping water onto a neighbor or public sidewalk.
- Projects using a complete segmental retaining wall block system with published installation guidance.
Stop and hire a pro or engineer when
- The wall is around 4 feet or taller measured from the bottom of footing to the top of wall.
- The wall supports a driveway, patio, parking area, pool, structure, steep slope, fence, or railing.
- The site has clay soil, fill soil, springs, poor drainage, erosion, or water flowing toward the wall.
- The wall is near a property line, easement, utility, septic area, waterway, bulkhead, or public right-of-way.
- You are replacing a failed wall and do not know why it failed.
- You need tiered walls, curves, corners, stairs, columns, lighting, or guardrails integrated into the wall.
A short wall can still require a permit if it is in a regulated location or carries a surcharge. Do not use height alone as your only decision point.
Permits, Property Lines, and Utility Locates Come First
Many U.S. jurisdictions use a common residential code threshold: retaining walls over 4 feet usually require a permit, measured from the bottom of the footing to the top of the wall. That is not the same as visible height. If you bury one full course and place the wall on a 6-inch compacted base, a wall with 42 inches exposed may be close to or over a permitting threshold depending on the local measurement rule.
Many building departments also require permits or engineered drawings for shorter walls when they support a surcharge. A 3-foot wall holding back a driveway can be more critical than a 4-foot garden wall with level soil behind it.
Before-you-dig checklist
- Call 811 before excavation and wait for utility markings. Private utilities such as irrigation, low-voltage lighting, propane lines, and pool equipment may need separate locating.
- Check local building permit rules, zoning setbacks, easements, drainage ordinances, and HOA requirements.
- Confirm the property line. Do not assume the fence is the boundary.
- Identify where the drain pipe will discharge. Daylighting onto a neighbor’s property or public walkway can create liability.
- Download the installation manual for the exact block system you plan to use.
- Ask whether the building department wants photos or inspections of the base, drain pipe, geogrid, and backfill before they are covered.
On permitted work, we photograph the base prep, first course, drainage aggregate, pipe outlet, fabric placement, and each geogrid layer before backfilling over it. Those photos are useful for inspections, troubleshooting, and future resale documentation.
How Much Does a Retaining Wall Cost in 2026?
Retaining wall cost is normally estimated by exposed wall-face area: wall length multiplied by visible wall height. A 40-foot wall with 3 feet exposed has 120 square feet of wall face. That is the number most installed-cost ranges are based on, not the footprint of the trench.
Do these 3 things before closing this tab:
1Repair Windows errors before they cause bigger problems2Scan for outdated or missing drivers - takes under a minute3Clear out junk files and repair common Windows errorsFor 2026 planning, national consumer cost sources cluster around $20 to $53 per square foot installed for many residential retaining walls, with typical national project averages landing roughly between $3,591 and $6,300. Typical total ranges often run from about $1,697 to $12,250 depending on height, material, access, drainage, demolition, and engineering.
Structural and higher-end landscape walls can cost more. Current contractor and manufacturer planning ranges commonly show about $55 to $110 per square foot installed for more involved residential landscape retaining walls, and installed block wall projects can span roughly $25 to $110 or more per square foot depending on whether the wall is light-duty or engineered.
| Planning item | 2026 cost range | What it usually includes |
|---|---|---|
| Simple installed residential wall | $20-$53 per sq. ft. of exposed face | Basic labor and common wall materials, usually with limited site complications |
| Higher structural or difficult landscape wall | $55-$110+ per sq. ft. | More excavation, drainage, reinforcement, access issues, engineering, or premium finishes |
| Retaining wall block materials | $10-$28 per sq. ft. for many block systems | Block only; caps, base stone, drainage stone, pipe, fabric, equipment, and waste are separate |
| 4-ft contractor-installed timber wall example | About $48-$80 per linear foot | Budget material range; shorter service life than masonry or concrete options |
| 4-ft contractor-installed concrete block wall example | About $56-$92 per linear foot | Common residential segmental or concrete block range before major complications |
| 4-ft contractor-installed natural stone wall example | About $88-$152 per linear foot | Material selection, skilled labor, and fitting time drive cost up |
For DIY budgeting, do not price only the face block. Build a line-item estimate for wall block, buried base course, caps, cap adhesive, base stone, drainage stone, perforated pipe, filter fabric, geogrid if required, stakes, stringline, compactor rental, saw rental or blade costs, soil hauling, delivery, permits, and engineering if needed.
Example DIY quantity takeoff
Assume a 30-foot-long wall with 30 inches of exposed height using 6-inch-high blocks. The exposed face is 75 square feet. You need five visible courses, plus usually at least one buried course depending on the manufacturer and site conditions. That makes six total block courses before caps. If each block covers 1 square foot of face, you would start at about 180 blocks, then add 5 to 10 percent waste for cuts, curves, breakage, and layout changes. Add 30 linear feet of cap, plus extra for end cuts.
The Tool Desk
Outbyte Driver Updater FREEFix the driver behind crashes, sound loss and screen glitchesFind Drivers →Outbyte PC Repair FREEClear out junk files and repair common Windows errorsFree Scan →Also popular on Amazon

- Professional Machine - The self-propelled plate compactor has a 196cc/6.5HP engine, delivering 10 inch compaction depth of 2,500 lbs of compaction force and 5,500 vibrations per minute; Raising the density of loose dirt, soil, gravel, sand, asphalt and other media to form a strong & level foundation.
- Efficient & Easy Operation - Speed up the throttle, the 21''x14.5'' one-piece stamped plate can travel 82 ft/min, working efficiency up to 5600 ft²/h. The reasonable weight of 126 pounds and compact form factor make it easy for any adult to use.
- Comfortable & Easy to Move - The compactor machine has a specially designed shock absorption system, improves operator comfort and reduces fatigue. Also, the folding transport wheels kit makes it easy to move around your workplace and store it.
- Precautions - Read the user's manual before using. Check if the nut is loose before each, or tighten it in time. Always wear a hand & eye protective tool when operating. Use unleaded 86+ octane gasoline for engines (0.95 gal max capacity) and SAE 10W-30 engine oil (0.16 gal max capacity). ENGINE OIL IS NOT INCLUDED.
- Warranty - The compactor is free from defects in materials and workmanship 90 days since purchase. The support team is on standby for you.
Curves and corners increase block count, cap cuts, waste, and labor quickly. A straight 30-foot wall might be a weekend excavation and base project plus another day or two of stacking and backfill for a capable homeowner. A curved wall with steps can easily double the layout and cutting time.
Choose the Right Wall System and Materials
For most DIY homeowners, segmental retaining wall block is the most practical choice. These blocks are designed to interlock, step back into the slope, and work with compacted aggregate and reinforcement. They are more forgiving than poured concrete and more durable than most landscape timbers when installed correctly.
Use a true retaining wall block, not a thin garden edger. Retaining wall units usually have a lip, pin, groove, or connector system that creates setback and shear resistance. The manufacturer should publish maximum gravity wall heights, base requirements, drainage details, cap adhesive instructions, and geogrid requirements.
Common material options
- Landscape timber: Often lower initial cost, but shorter life and more movement risk as wood decays. Avoid for critical walls.
- Segmental concrete block: Common DIY and professional choice for low to mid-height residential walls. Works well when drainage, base, embedment, and reinforcement are correct.
- Natural stone or boulder: Attractive and durable, but layout, fitting, equipment access, and drainage details require skill.
- Poured concrete or reinforced CMU: Strong when engineered and built correctly, but usually not a casual DIY wall because footing, steel, drainage, and inspection requirements matter.
Do not mix wall systems or improvise reinforcement. If a block manufacturer specifies a certain geogrid type, connection method, minimum embedment, or maximum unreinforced height, follow that system. Generic internet dimensions are not a substitute for the installation manual.
Drainage Is Part of the Structure
Drainage is where many DIY retaining walls fail. Water behind the wall creates hydrostatic pressure. That pressure can push a wall outward even if the blocks are level and the face looks clean. A retaining wall should relieve water, separate soil from clean stone where needed, and keep surface runoff from pouring over the back of the wall.
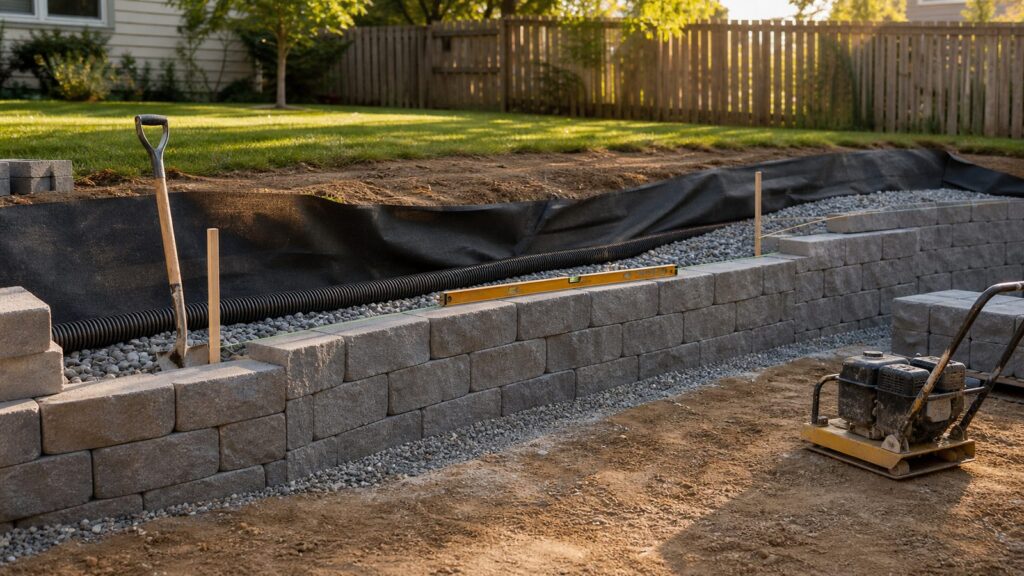
A typical segmental wall drainage setup includes clean crushed stone directly behind the block, filter fabric where needed to prevent soil from migrating into the stone, and a perforated drain pipe at the base that slopes to daylight or an approved stormwater system. The exact thickness of the drainage zone and pipe location should follow the wall-system guide and local requirements, but many residential details use roughly 12 inches of clean drainage aggregate behind the wall face.
Drainage cross-section concept
From front to back, picture the wall as a layered system: compacted soil in front of the toe, buried base course, compacted crushed-stone leveling pad, interlocking block face leaning slightly back into the hill, clean drainage aggregate behind the block, perforated pipe near the bottom wrapped or protected from fines as specified, filter fabric separating native soil from drainage stone where needed, and compacted backfill placed in lifts behind the drainage zone.
The outlet matters as much as the pipe. A pipe that fills with silt, runs flat, or dead-ends behind the wall is not drainage. It is a buried problem. Maintain positive slope and protect the outlet from erosion, freezing, crushing, and clogging.
Tools, Materials, and Site Prep
Most homeowner walls are won or lost during layout and base preparation. The visible blocks go fast once the base is right. Rushing the trench, stone, and first course usually shows up later as waves, gaps, leaning, or cap lines that wander.
Typical tools
- Shovel, mattock, digging bar, and wheelbarrow.
- Stakes, mason’s line, marking paint, tape measure, and string level or laser level.
- 4-foot level and torpedo level.
- Hand tamper for tight areas and a rented plate compactor for the base and backfill.
- Dead-blow mallet or rubber mallet.
- Concrete saw, masonry saw, or splitter for cuts, with eye, ear, and respiratory protection.
- Work gloves, boots, safety glasses, hearing protection, and dust mask or respirator when cutting.
Typical materials
- Segmental retaining wall blocks and caps.
- Angular crushed stone for the compacted base, often 3/4-inch minus or as specified by the manufacturer.
- Clean drainage stone behind the wall, commonly 3/4-inch clean angular aggregate.
- Perforated drain pipe, fittings, outlet protection, and solid pipe where needed to carry water away.
- Filter fabric or geotextile where specified.
- Geogrid reinforcement if required by wall height, soil, slope, surcharge, or manufacturer guidance.
- Cap adhesive rated for masonry and exterior freeze-thaw exposure.
Keep different aggregates separate. Base material needs to compact. Drainage stone needs void space to move water. Soil, sand, and round pea gravel are not substitutes for a compacted angular base.
Also popular on Amazon

- Electric Plate Compactor: This electric plate compactor delivers 5000N force, penetrating 3.9 in into loose soil for solid base preparation. No gas, no fumes, and its lightweight design ensures easy maneuverability for all your compaction needs
- High Efficiency Compaction: Our plate compactor covers up to 500 sq ft in 10 minutes with 3450 VPM vibration and 52.5 ft/min travel speed. Optimized for landscaping, paver installation, and driveway repair, it ensures fast, reliable results
- Heavy-Duty Base Plate: Built with a 4.2 mm thick steel plate, this compactor generates strong centrifugal force for even performance on rough surfaces. Sturdy construction supports long-term use in gardens, patios, and walkway projects
- Backyard & DIY Ready: Designed as a versatile compactor machine, it handles sand, gravel, soil, and small aggregates with ease. Ideal for patios, garden paths, and asphalt patching, helping homeowners save on costly equipment rentals
- 33 ft Power Cord: The long reach makes this a professional compactor for residential projects. Its 1.6A motor delivers consistent operation for soil compaction, walkway prep, or paver installation without frequent outlet changes
Build the Wall: Step-by-Step
The steps below describe a typical low segmental retaining wall. Treat the block manufacturer’s instructions as the controlling document for base width, embedment, setback, drainage zone, compaction, and geogrid placement.
1. Lay out the wall
Mark the front face of the wall with stakes and string or marking paint. Check the planned top elevation, curves, corners, and end conditions before digging. A wall that dies into a slope cleanly looks better and performs better than one that ends abruptly with exposed soil washing around it.
Quick wins for a faster PC:
Clear out junk files and repair common Windows errorsFree Scan →Fix the driver behind crashes, sound loss and screen glitchesFind Drivers →Measure the exposed wall height at the highest retained point, then estimate total height from the bottom of footing or base to the top of wall. That total height is the number many permit offices care about.
2. Excavate the trench
Excavate wide enough for the block, base material, working room, and drainage zone. Many low walls need a trench wide enough to hold the block depth plus several inches in front and behind, but use the manufacturer detail. Dig deep enough for the compacted base and buried block course. In cold climates, wet sites, or erosion-prone slopes, embedment and base depth may need to increase.
Keep excavation safety in mind. OSHA trenching guidance generally requires protective systems for trenches or excavations 5 feet or deeper unless the excavation is entirely in stable rock, and a competent person should assess cave-in hazards even below 5 feet. Homeowners should not enter unstable excavations, undercut banks, or work below unsupported soil.
3. Compact the subgrade
Remove organic material, soft pockets, roots, and loose fill. Compact the native subgrade before placing base stone. If the soil pumps, holds water, or will not compact, stop and get professional advice. A perfect block wall on bad subgrade is still a bad wall.
PC Slower Than It Used to Be?
A free scan shows the junk files, broken settings and background clutter dragging Windows down - then fixes them in one click.Free scan · Windows 10 & 11Outdated Drivers Are Slowing You Down
One free scan finds every outdated or missing driver and matches the right update for your exact hardware.Free scan · exact hardware match4. Place and compact the base
Install the specified crushed-stone base in lifts and compact it thoroughly. Many small wall systems use a base around 6 inches thick after compaction, but some walls need more. The base should be level front-to-back and along the wall, or stepped in controlled increments when the grade changes.
Spend the time here. On our projects, the first course is the slowest course because it controls every course above it.
5. Set the first course
Place the first course on the compacted base and level each block side-to-side, front-to-back, and block-to-block. Use stringline or laser control for straight runs. Sweep the top of each block clean before placing the next course. Small gravel trapped between courses can create visible gaps and alignment issues.
6. Install drain pipe and drainage stone
Set the perforated drain pipe near the bottom behind the wall as specified, sloped to a proper outlet. Surround it with clean drainage aggregate. Do not bury the pipe in clay or compacted soil. Protect the outlet with a grate or rodent guard where appropriate and place stone at the discharge point to reduce erosion.
Recommended Free Tools
Also popular on Amazon

- 196cc engine creates up to 3350 pounds of force at 5700 blows per minute
- Single-direction plate travels up to 125 feet per minute
- Included wheel kit and lifting handles make transportation and storage a breeze
- Low-oil shutdown, vibration dampers, and powder-coated finish for durability
- Backed by a two-year residential (90-day commercial) warranty
7. Stack block and backfill in lifts
Place each course according to the block’s setback system. Pull blocks forward against their lip or connector if the manufacturer requires it. Backfill behind the wall with drainage stone directly behind the blocks and suitable compacted backfill farther behind that zone.
Compact backfill in lifts, commonly 6 to 8 inches at a time for small equipment, keeping heavy compactors away from the wall face unless the system allows it. Over-compacting right against the face can shove blocks out of alignment. Under-compacting behind the wall can lead to settlement and surface drainage problems.
8. Install geogrid where required
Geogrid is not optional decoration. It ties the wall face into a reinforced soil mass behind the wall. Whether you need it depends on wall height, block system, soil type, backslope, surcharge, seismic conditions, and local code.
When geogrid is required, place it at the course elevations, lengths, and orientation specified by the design or manufacturer. It usually must run back into the soil, be pulled tight, and be covered with compacted fill before the next reinforced layer. Do not substitute landscape fabric for geogrid.
9. Finish grade and cap the wall
Finish the surface so water drains away from the wall, not into it. Keep mulch and soil from blocking drain outlets. Cut caps neatly at curves and corners, dry-fit them first, then use exterior masonry adhesive according to the manufacturer instructions. Avoid adhesive smears on the face; they are difficult to clean later.
Independent reader supportYour contribution helps us test, update, and keep practical guides available for everyone.Common Mistakes That Cause Retaining Walls to Fail
Most retaining wall failures are predictable. They usually come from water, weak base preparation, wrong wall type, or ignoring loads behind the wall.
- Skipping the permit check because the wall looks short, while ignoring footing-to-top height, surcharge, tiered walls, easements, and local rules.
- Digging before calling 811.
- Setting the first course on soil, sand, pea gravel, or uncompacted fill instead of compacted crushed stone.
- Making the base too narrow, too shallow, or out of level.
- Skipping the buried course, especially at the toe of a slope.
- Using decorative garden block for a retaining application.
- Leaving out drainage stone, filter fabric, or a functional pipe outlet.
- Backfilling with clay directly behind the wall.
- Failing to use geogrid when the height or load requires it.
- Placing heavy loads near the top of the wall after construction.
- Building tiered walls too close together without engineering review.
If an existing wall is bulging, leaning, separating, cracking, or shedding soil through joints, do not just rebuild the face in the same location with the same approach. Find the cause first.
How Long Does It Take?
A small DIY wall, such as 20 to 30 feet long and 2 to 3 feet high, often takes two to four full working days for a capable homeowner with help. Day one is layout, excavation, and haul-off. Day two is base prep and first course. Day three is stacking, drainage, and backfill. Curves, corners, steps, hard soil, poor access, and hand-hauling stone can add days.
Free tools Windows power users keep installed
One-click scans. No signup required.
Professional crews move faster because they have compactors, saws, lasers, skid steers, dump trailers, and repeatable installation habits. A pro crew may complete a simple low wall in one to three days, while an engineered wall with excavation, geogrid, drainage routing, inspections, and finish work can take a week or more.
Maintenance After the Wall Is Built
A retaining wall should be inspected, especially after major storms and freeze-thaw cycles. Small drainage or erosion issues are much cheaper to fix early than after the wall has moved.
Also popular on Amazon

- Effortless Operation: Equipped with a non-slip handle, this plate compactor stops sweaty palms from slipping even in hot weather
- Mighty Power: This compactor machine's 6.5 HP horsepower can compact 6,534 ft² of ground in 1 hour, and 18 kN compaction force combined with 75 ft/min travel speed can efficiently complete work tasks
- Durable Construction: This professional compactor's engine can reach a speed of 5700 RPM, helping you compact the ground quickly. The thick compaction plate can last for a long time. EPA-certified, ensuring low gas emissions for a cleaner atmosphere
- Large Capacity Fuel Tank: This gas powered compactor features a 0.5 L oil capacity and a 2.5 L fuel tank, use 95 octane gasoline. Simply refuel and start working. For engine protection, continuous operation is recommended for up to about 40 minutes
- Suitable for Various Roads: This vibrating plate compactor can be widely applied in construction, municipal administration, highways, railways, and other fields to fulfill the road surface tamping of dirt, gravel, lawn, and so on
- Inspect after heavy rain for bulging, tilting, settlement, gaps, cracks, or separated caps.
- Keep drain outlets open and clear of mulch, leaves, sediment, ice, and crushed pipe ends.
- Repair erosion at the toe of the wall and at the drain outlet.
- Maintain surface grading so water runs away from the wall.
- Keep parked vehicles, stored materials, sheds, and other heavy loads away from the crest unless the wall was designed for them.
- Avoid planting large-root trees close behind the wall.
- Watch tiered or neighboring walls for signs that one wall is affecting another.
Good maintenance does not rescue a badly designed wall, but it does protect a properly built one.
Bottom Line: Build the Small Wall Right, Engineer the Serious Wall
You can build your own retaining wall when the wall is low, the site is straightforward, and you are willing to treat the base and drainage as structural work. The job is not just stacking blocks. It is excavation, compaction, water management, layout, reinforcement decisions, and code awareness.
Do these 3 things before closing this tab:
1Scan for outdated or missing drivers - takes under a minute2Repair Windows errors before they cause bigger problems3Fix the driver behind crashes, sound loss and screen glitchesUse the exposed face formula for a first budget: length times visible height. Then add the hidden items that actually make the wall last: base stone, drainage aggregate, pipe, fabric, geogrid, equipment rental, permits, engineering, demolition, and soil hauling. In 2026, many simple installed walls price around $20 to $53 per square foot, while structural or difficult walls commonly move into the $55 to $110-plus range.
If the wall is near 4 feet from footing bottom to top, carries any surcharge, sits on a wet or sloped site, or protects something expensive, bring in a qualified contractor or engineer before you dig. That is not overkill. It is the difference between a landscape project and a retaining structure.
Frequently Asked Questions
Can I build a retaining wall myself?
Yes, if it is a low landscape wall, usually under about 3 feet exposed height, with level soil behind it, no surcharge loads, good drainage, and a manufacturer-approved block system. Taller, load-bearing, wet, sloped, or property-line-sensitive walls should be handled by a contractor or engineer.
How tall can a retaining wall be without a permit?
Many U.S. jurisdictions use a 4-foot threshold measured from the bottom of the footing to the top of the wall, not just the visible height. Shorter walls may still need permits or engineering if they support a driveway, patio, building, slope, fence, pool, or another surcharge.
How much does a retaining wall cost in 2026?
Many residential retaining walls fall around $20 to $53 per square foot installed, with national project averages roughly $3,591 to $6,300. Structural or difficult walls often run $55 to $110 or more per square foot depending on height, drainage, access, reinforcement, permits, and engineering.
Do retaining walls need drainage pipe?
Most retaining walls need a drainage strategy, and many segmental block walls use perforated drain pipe behind the base of the wall, surrounded by clean drainage stone and sloped to daylight or an approved stormwater system. Water pressure is one of the most common causes of wall failure.
When does a retaining wall need geogrid?
Geogrid may be required when the wall exceeds the block system’s gravity-wall height, when soil is poor, when there is a slope or surcharge behind the wall, or when local code or engineering requires reinforcement. Follow the block manufacturer’s design tables or an engineer’s plan.
What is the cheapest way to build a retaining wall?
Timber is often the lowest upfront material option, but it usually has a shorter service life. For many homeowners, segmental concrete block is the better value because it is durable, widely available, and compatible with drainage stone and geogrid systems when installed correctly.
The Tool Desk
Outbyte Driver Updater FREEFix the driver behind crashes, sound loss and screen glitchesFind Drivers →Outbyte PC Repair FREERepair Windows errors before they cause bigger problemsFix Now →Quick Recap
Product prices and availability are accurate as of the date/time indicated and are subject to change. Any price and availability information displayed on Amazon at the time of purchase will apply.

