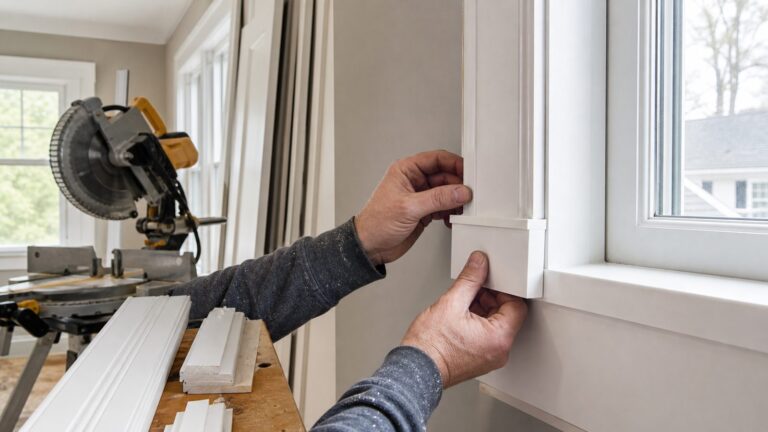
Beautiful door and window trim comes from careful layout and fitting, not just decorative molding. Choose a profile that suits the house, mark a consistent reveal, check how the jamb and wall meet, then fit each piece before fastening. Interior casing is primarily a finish detail; exterior trim also needs a deliberate plan for flashing and water control.
Choose a trim style that fits the house
Use nearby doors, windows, baseboards, and other finish details as references. Matching the profile and width of existing casing helps new work look intentional; in a renovation, replacing only one opening with a markedly different style can make it stand out.
Decide how the corners should look before buying or cutting stock. Mitered corners create a continuous angled joint, while corner blocks provide a different, more defined transition. Either can work when it suits the surrounding trim and the opening. The Home Depot’s guides discuss options for trimming a doorway and trimming a window.
Gather tools and materials
- Casing stock for the chosen profile
- Tape measure, pencil, level, and combination square or reveal gauge
- Miter saw and, if needed, a block plane or rasp for small fitting adjustments
- Finish nails and a hammer or trim nailer
- Shims and carpenter’s glue for fitted joints where appropriate
- Wood filler, sandpaper, and painter’s caulk for paint-grade finishing
- Paint or stain, depending on the casing and intended finish
Inspect the opening and mark the reveal
Check the jamb and wall
Before cutting casing, look for out-of-square corners, uneven walls, and jambs that sit proud of or recessed from the wall. Casing needs to lie flat, and the actual geometry determines how well its joints will fit. Test cuts and test-fitting help expose errors before you fasten the trim. Fine Homebuilding explains the fit considerations for mitered door casing and mitered window casing.
#1 Best Overall

- Prefinished finger jointed pine casing set, ready to be installed
- Smooth surface, free of any defects
- Colonial style, great to cover gaps between drywall and windows or doors
- Pre-mitered for ease of installation
- Finger-jointed radiata pine has a smooth, defect-free surface
Mark a consistent reveal
The reveal is the intentional strip of jamb left visible between its edge and the casing. Mark it around the opening with a pencil, using existing trim as a guide when it provides a sound reference. Keep the spacing consistent at the head and sides; do not treat any example measurement from a guide as universal, because the appropriate detail depends on the existing trim and opening.
Fit and install door casing
- Lay out the pieces. Transfer the reveal marks to the jamb and check them with a square or reveal gauge. Measure the legs and head against those marks.
- Cut and test-fit. Cut the casing to the chosen corner detail. For miters, test the legs and head together at the opening; adjust the cut or make small fitting corrections until the joint closes and the visible faces align.
- Fasten the casing. Apply glue to fitted joints if appropriate, then nail the casing securely. If a piece does not sit tight to the wall near a joint, place a shim behind it before nailing. The shim supports the casing so the fastener does not pull the miter open.
- Check the assembly. Confirm the reveal remains even and the casing lies flat. Correct a proud or uneven joint before moving on to filling and paint.
For a step-by-step visual reference, see This Old House’s door-trim installation guide.
Rank #2

- Door Molding Kit: you will receive 1 sets of pre cut peel and stick door molding, a total of 10 pieces, which can be easily matched and connected to give a sophisticated look to a door or wall, meeting your various decoration needs
- Interior Decor: this door trim molding kit will add depth and style to any room; You can try different spacing and amounts, even mix and match our different sizes to add variety to your space and breathe a new life
- Self Adhesive Applications: the door molding kits come with built in adhesive backing that makes them easy to use without the need for additional adhesives or tools; They can also be effortlessly affixed with silicone quick drying glue or wall studs, giving you the flexibility to match your DIY style
- Save Your Time: our door trim DIY is pre cut to decorate your doors or walls without cutting or aligning; These wall and door molding kits can be painted with any interior paint to beautify your space and ensure a quick and effective makeover of your decor
- Lightweight and Reliable: these door panels for interior door are made of polystyrene material, lightweight but reliable; Besides, they retain a wood like texture, beautiful and practical, not easy to deform, keeping your space looking elegant for long
Fit and install window casing
Window casing can be assembled as a package before installation, but that approach is best when the jambs are flush with the wall. If the jamb and wall are not flush, a preassembled unit may not sit flat and its joints can open as it is fitted. In uneven conditions, fit the casing piece by piece at the opening and make small adjustments to close each joint.
- Mark the reveal on all sides. Use the same reference around the window so the casing frames the opening consistently.
- Fit each piece to the opening. Measure from the marks, cut, and test-fit the pieces. Check both the joint and whether each board sits flat against the wall.
- Correct small gaps before fastening. Use careful recutting or a block plane or rasp for minor adjustments. Where the wall is uneven, support the casing with a shim near the joint before nailing.
- Fasten and inspect. Secure the pieces without forcing a joint out of alignment. Recheck the reveal and the meeting faces before finishing.
Further interior guidance is available in This Old House’s guide to installing interior window trim.
Recommended Free Tools
Rank #3

- Precision Cut Door Trim Kit: this door trim kit features precise measurements of 80 x 36 x 2-9/25 in; The side jambs have a length of 80 inches, a width of 2-9/25 inches, and a thickness of 0.98 inches; The 80-inch length is achieved by joining two side frame pieces to form one continuous side jamb, and the header measures 36 inches in length; The precut door trim kit are designed for straightforward application, simplifying your home improvement projects
- Durable and Not Easily Deformed: crafted from polystyrene material, these door moldings offer superior moisture resistance, crack resistance, and resistance to deformation and rot compared to traditional wooden door moldings; They are structurally stable, durable, and suitable for long-term use; This decorative polyester molding instantly enhances your home's aesthetic
- Maintenance Free Protective Seal: enjoy a maintenance free solution that effectively seals out dirt, bugs, wind, snow, and water; This door casing creates a sturdy barrier against the elements, making it suitable for outdoor and indoor use alike; By closing gaps around the frame, it helps maintain a cleaner, more comfortable environment while reducing unwanted drafts and pests
- Simple Installation Options: this door frame trim kit offers flexible installation to suit your project needs; It can be installed with nails for a permanent hold or with structural adhesive for a clean, seamless application; The lightweight polyester material is easy to handle and cut if adjustments are needed, This door molding serves as an ideal accent for various decor styles, creating a sophisticated look without the upkeep of traditional wood
- Versatile Application Across Spaces: ideal for entryways, living rooms, bedrooms, and bathrooms, this door trim Moulding kit adapts to any room; It uses irregular wavy curves; Its decorative appeal elevates the entrance area and beyond, providing a cohesive look throughout your property; The versatile design allows it to complement both classic and contemporary interiors, enhancing the overall visual depth
Finish paint-grade or stain-grade trim
Fill nail holes with wood filler and sand the filled areas smooth. For paint-grade casing, caulk small gaps at the wall where needed, then paint. Stain-grade work depends on the appearance of the casing stock and should be finished to suit the wood rather than relying on paint to hide defects. A thin, minor joint gap may be filled, but a joint with uneven faces should be leveled first; filler does not correct misaligned trim. Fine Homebuilding outlines general finish-trim practices in its basic trim carpentry rules.
Independent reader supportYour contribution helps us test, update, and keep practical guides available for everyone.Keep exterior trim details weather-ready
Exterior casing is not simply interior trim exposed to the weather. Water management depends on the opening, flashing, sealants, and installation method. Follow the door or window manufacturer’s instructions and use sealants compatible with the unit and flashing materials. Exterior window guidance for the wood-window replacement context described by Fine Homebuilding calls for priming all sides and back-caulking during installation, and discusses cap flashing and a 1/4- to 3/8-inch jamb reveal for that context. Those details should not be assumed to apply to every window or installation.
Rank #4

- Natural Matte TPE Material: Made of durable TPE with a natural matte white finish that highlights the raw texture — not a defect. Resists stains, water, and fading while staying flexible and easy to clean. For best adhesion, install above 68°F (20°C) or warm the adhesive before applying. Not paintable due to material properties.
- High-Quality Materials - These 3d wall panels peel and stick are made of high-quality TPE material, which is soft, elastic, strong and durable
- DIY Application - The built-in adhesive backing of the wainscotting door panel kit is easy to use, requiring no additional adhesives or tools
- Widely Used - This wall panel kit will add depth and style to any room, being both beautiful and practical, and not prone to deformation
- Door Mold Kit - You will receive a 20ft roll of trim, 0.9 inches wide. The product is shipped rolled up. We recommend unrolling and letting it straighten out for a while before use. If you have any questions, please feel free to contact us
Exterior door casing also needs caulk and head flashing arranged to direct water away from the assembly. The exterior door installation discussion from Fine Homebuilding covers these details in its exterior door guide; its wood-window replacement guide describes the window-specific context.
Quick Recap
Best Value

- 2 Rosettes fit most 2-1/4" interior door and window frames - Rosette size 2-3/4" x 2-3/4"
- Easy to install - 4 Step Installation - No Nails!
- Ready to paint plastic
- Classic Rosette design compliments any room
Product prices and availability are accurate as of the date/time indicated and are subject to change. Any price and availability information displayed on Amazon at the time of purchase will apply.