Yes, you can build a functioning mini-hydro generator—but useful power comes from the whole system, not simply a wheel placed in a stream. You need dependable water flow, measurable elevation drop (head), a correctly sized penstock and nozzle, a turbine matched to the site, a generator, and a controller with a diversion or dump load.
For most DIY builders, the safest practical starting point is a contained, low-voltage, off-grid Pelton or Turgo prototype that charges a battery through a rectifier and hydro-specific charge controller. Do not connect a homemade generator directly to household wiring or the utility grid.
As an Amazon Associate I earn from qualifying purchases.
Safety warning: Water, pressurized pipework, high-speed rotating parts, batteries, and electricity can all cause serious injury. Use guards, fuses, disconnects, weatherproof enclosures, grounding, and qualified electrical assistance for permanent installations.
What a mini-hydro generator actually includes
A hydro turbine converts moving water into shaft rotation; a generator or alternator converts that rotation into electricity. A complete microhydro system also includes the intake, screens, penstock, turbine, generator, wiring, controls, batteries or loads, discharge, and protective equipment.
#1 Best Overall

- High Efficiency Micro Hydro Generator: Professional Pelton impulse water turbine generator with open bucket impeller design, ironless permanent magnet alternator delivers up to 100W max output; this mini hydroelectric power unit produces 1V-60V AC under 0.1~1MPa water pressure, perfect water powered generator for continuous clean energy collection.
- Standard 1/2" NPT Easy Installation: Universal 4-point (1/2 inch) brass threaded interface fits all standard household water pipes, garden hoses and small stream diversion systems; this water turbine generator requires no complex adapters, quickly connects to existing plumbing for instant micro hydro power generation.
- Durable Off-Grid Power Construction: High-strength PAL engineering plastic shell withstands extreme temperatures from -4°F to 149°F (-20℃~+65℃); this rugged small hydro turbine features pre-drilled mounting holes for fixed installation, ideal reliable off grid power solution for remote outdoor locations.
- 3-Phase AC Output for Versatile Use: Three-wire configuration delivers stable 3-phase AC power, easily compatible with standard full-wave rectifier boards; convert to DC output for 12V battery charging, LED lighting systems and various low-power devices, making this hydro generator extremely versatile.
- Multi-Purpose DIY Hydro Power Kit: Complete micro hydro power system suitable for outdoor creek energy harvesting, residential tap water pressure recovery, garden fountain power supply, school physics science experiment projects and renewable energy teaching demonstrations for all skill levels.
In a typical hydropower system, water is diverted through a penstock, accelerated through a nozzle or directed through a reaction turbine, and returned downstream after turning the runner.
“Mini-hydro” is used informally here. The U.S. Department of Energy classifies microhydropower systems as up to 100 kW, but a realistic scratch-built project is usually far smaller—often tens or hundreds of watts, depending on the site.
A free-flow water wheel or hydrokinetic rotor can generate electricity without a significant elevation drop, but its power density is generally much lower than a properly designed head-and-penstock installation.
Recommended Free Tools
Check the site before building anything
The first design task is not choosing a generator. It is measuring the site. Your key figures are:
- Gross head: the vertical elevation difference between the intake water level and turbine outlet.
- Net head: gross head minus losses in the pipe, bends, valves, screens, fittings, and nozzle.
- Flow: the available volume of water per unit time.
- Minimum seasonal flow: the dry-season flow your system can depend on.
- Penstock route: length, slope, obstacles, pressure, access, and freezing or flood exposure.
- Tailwater: whether the turbine can discharge freely without becoming submerged.
Designing from a rainy-day measurement can produce an impressive number that disappears in winter. Record minimum, typical, and maximum flow, and provide a bypass for water the turbine cannot use.
Measuring head
Topographic maps, GPS elevation data, and phone apps are useful for a preliminary estimate, but they are not reliable enough for final pipe or nozzle sizing.
For a practical DIY survey, use a transparent hose-and-level method:
- Fill a clear hose with water and remove air bubbles.
- Place one end at the proposed intake elevation.
- Hold the other end farther downhill and let the water settle.
- Measure the elevation difference between the water surface and the second point.
- Repeat in stages down to the turbine location and add the differences.
Kinks, air bubbles, wind, and poor leveling can create substantial errors.
Rank #2

- 1000W Micro-Water Turbine Generator – This micro hydro turbine delivers 110-220V AC output, enough to continuously power lights, TVs, routers, phone chargers, small refrigerators, and power tools in your off-grid cabin, farm shed, or remote work site. Running entirely on flowing water – no fuel, no noise, no solar panels needed.
- Designed for Mountain Water Conditions – This generator is engineered to perform best with a 15m (49ft) vertical water drop and a 75mm (3-inch) inlet pipe. Here's a quick way to check your site: if you have a stream or creek flowing down a hillside, and you can run a pipe from the higher point down to where you want the generator – you're likely good to go. The required water flow is about 10 liters per second, which is roughly a steady garden hose at full blast. Not sure? Measure the time it takes to fill a 10L bucket – if it's under 2 seconds, your flow is sufficient.
- Built to Run Smoothly Without Constant Attention – The impeller is fitted with a stabilizing bearing that keeps rotation balanced, reducing vibration and preventing the unit from shaking or tipping over during operation. This means less wear on moving parts, quieter running, and fewer trips up the hill to check on it. Just set it up and let the water do the work.
- Weather-Ready Design – Made from corrosion-resistant aluminum alloy, this turbine handles rain, humidity, and outdoor exposure without rusting or degrading. The generator head should be sheltered from direct rain (a simple cover or overhang works fine), while the sealed bearing ring keeps water out of the internal components – no oiling required. The seal ring lasts 1-3 years and is easy to replace when needed, keeping your generator running for seasons to come.
- Perfect for Remote Cabins, Farms, and Off-Grid Setups – If you have a reliable water source with elevation drop, this generator is one of the most cost-effective ways to get continuous electricity. It's compact (only 4.5 x 9.45 inches) and weighs just 6.6 lbs, so it's easy to transport to your site.
A pressure test gives another preliminary estimate. Approximately 1 psi equals 2.31 feet of water, and 1 bar equals 10.2 metres of water. Flowing pressure will be lower than static pressure because of friction and restrictions, so use the result cautiously.
Measuring flow
For water already flowing through a pipe, measure how long it takes to fill a container of known volume:
Q = V / t
For a small stream, a bucket method may work at a temporary diversion. A calibrated weir can provide more repeatable results in a small channel. A float method is useful for screening a site: measure channel length and approximate cross-sectional area, time a floating object, and multiply surface velocity by area. Apply a correction because surface water moves faster than the average flow.
Free tools Windows power users keep installed
One-click scans. No signup required.
Repeat measurements and test during the lowest-flow period you expect to rely on.
Estimate output before buying parts
The basic hydraulic power equation is:
Phydraulic = ρgQH
For convenient metric units:
Pelectrical ≈ 9.81 × QL/s × Hm × η
Here, flow is in litres per second, net head is in metres, and η is the combined efficiency of the pipe, turbine, generator, rectifier, and controller. For an early estimate, use a conservative combined efficiency range such as 30–60%; actual output depends heavily on matching and pipe losses.
Example: With 10 L/s of minimum flow, 8 m of net head, and 45% total efficiency:
9.81 × 10 × 8 × 0.45 ≈ 353 W
That is about 353 watts continuously, or approximately 8.47 kWh per day before downtime, seasonal reductions, battery losses, and controller consumption.
Crashes, No Sound, or Screen Glitches?
Random freezes, missing sound and display glitches usually trace back to one bad driver. Find and replace yours safely.Free scan · under a minutePC Slower Than It Used to Be?
A free scan shows the junk files, broken settings and background clutter dragging Windows down - then fixes them in one click.Free scan · Windows 10 & 11Do not confuse:
- Watts: instantaneous power.
- Watt-hours or kilowatt-hours: energy delivered over time.
- Peak output: a short-term maximum.
- Dependable output: what the system can produce at minimum seasonal flow.
Choose the turbine from head and flow
The turbine type should follow the site, not the appearance of an online listing.
Rank #3
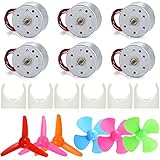
- Designed Beginner Kit: 6 PCS mini dc motor, 6 PCS Motor Mounting Bracket Holder and 3 PCS different colors 4 Vanes shaft propellers and 3 PCS 3 Vanes shaft propellers
- Parameter: Different voltages correspond to different speeds. Voltage: DC 3V, rated speed: 1500 RPM, voltage: DC 4.5V, rated speed: 2500 RPM, voltage: DC 12V, rated speed: 6500 RPM. Color: silver. Motor Body Diameter: 24mm/0.94"
- Two-way Conversion: When the bearing rotates, it generates electricity, when receiving power, the bearing will rotate. This mini wind generator set enables the conversion of kinetic and electrical energy
- Good Present: This learning toy is good for curious kids, let the children know the driving principle of the motor, how the propeller rotates to produce wind. Cultivate children's practical ability, so that knowledge is no longer theoretical
- Warning: Suitable for 8+ years, please see the picture carefully, use the correct circuit diagram to avoid short circuit, short circuit will produce high temperature and cause the battery holder case to melt and burned, the kids must use under the supervision of adults
| Type | Most suitable for | DIY considerations |
|---|---|---|
| Pelton | Relatively high head and lower flow | Best beginner candidate for a nozzle-fed prototype; uses one or more high-speed jets. |
| Turgo | Some high-head, higher-flow applications | Compact, but accurate runner geometry is difficult to improvise efficiently. |
| Cross-flow | Moderate head and broader flow ranges | More fabrication work; water passes through a drum-shaped runner twice. |
| Propeller or reaction | Low head and high flow | Requires submerged components, housing, sealing, and often a draft tube. |
| Water wheel or hydrokinetic rotor | Educational demonstrations or sites without useful head | Simple concept, but usually much lower power density. |
A Pelton is a sensible first choice only when the site has useful head and limited flow. DOE describes Pelton and cross-flow machines as impulse turbines; its turbine guidance explains why head, flow, efficiency, depth, and cost all affect selection.
Use a low-voltage electrical architecture
A practical first system is:
Intake → screen → valve → penstock → nozzle → turbine → permanent-magnet alternator → rectifier → fuse/disconnect → hydro diversion controller → battery and dump load → DC loads or inverterThis arrangement follows the basic water-to-nozzle-to-turbine-to-rectifier-to-battery sequence described by Energy Systems & Design.
A permanent-magnet alternator is generally easier to integrate than an automotive alternator, which commonly requires high speed, excitation, regulation, and suitable cooling. If the alternator produces three-phase AC, use a suitably rated three-phase bridge rectifier.
Do these 3 things before closing this tab:
1Repair Windows errors before they cause bigger problems2Scan for outdated or missing drivers - takes under a minute3Clear out junk files and repair common Windows errorsHydro systems normally need a continuous electrical load. When the battery is full, a diversion controller sends excess energy to a dump load, such as a correctly rated resistor or water-heating element. Simply disconnecting a hydro generator can allow voltage and speed to rise. A typical solar controller that stops accepting input when the battery is full is not automatically suitable.
Voltage and current
Use:
I = P / V
- 300 W at 12 V = 25 A
- 300 W at 24 V = 12.5 A
- 300 W at 48 V = 6.25 A
Lower voltage means higher current, larger conductors, greater voltage drop, and more demanding fuses and connectors. For a long turbine-to-battery run, a higher transmission voltage may reduce losses, but it also increases insulation and protection requirements. Calculate cable voltage drop rather than choosing wire by guesswork.
Parts and tools
Hydraulic and mechanical parts
- Screened intake box or diversion.
- Coarse debris screen and nozzle-appropriate filtration.
- Pressure-rated penstock pipe, supports, anchors, and fittings.
- Shutoff valve and pressure gauge or test port.
- Replaceable or adjustable nozzle inserts.
- Pelton or Turgo runner, shaft, bearings, frame, and coupling.
- Weather-resistant housing, guards, drain paths, and tailwater discharge.
Electrical parts
- Permanent-magnet alternator.
- Correctly rated bridge rectifier.
- DC fuse or breaker and disconnect.
- Hydro diversion controller.
- Dump-load resistor or heating element.
- Battery bank and inverter, if required.
- Voltmeter, ammeter, watt meter, weatherproof junction boxes, conduit, grounding, and bonding equipment.
You will also need accurate measuring equipment, a tachometer if possible, hand tools, alignment tools, and a method of checking vibration and temperature.
Do not improvise pressure-containing fittings, high-speed shafts, unbalanced runners, or unguarded electrical connections.
The Tool Desk
Outbyte PC Repair FREERepair Windows errors before they cause bigger problemsFix Now →Outbyte Driver Updater FREEScan for outdated or missing drivers - takes under a minuteDriver Scan →Build the turbine and water system
1. Define the electrical target
Begin with the load: perhaps 5–20 W of lighting, battery charging, communications equipment, or a 100–300 W continuous off-grid supply. A small generator should not be expected to run heaters, pumps, refrigerators, or power tools unless the measured continuous output supports those loads.
Rank #4

- All-copper coil: high-density all-copper coil, strong conductivity, more stable original bearing performance
- The power of the generator depends on the drop height. The drop should be at least 10 meters or more. The higher the drop, the higher the water pressure and the higher the power. This is based on vertical gradients. Their lengths are not used as a reference. The key is to look at your vertical height.
- Directly supply power to electrical appliances that can use 220V AC and consume less than 300W.
- The high power and high water flow rate of this micro hydro generator ensures high power generation efficiency
- Pay attention to the leakage of the water pipe and prevent water from being sprayed on the generator head. Please Wrap the leaking part of the water pipe well, do not let the water spray on the generator head
2. Design the penstock
Penstock diameter must be chosen from flow, length, material, pressure, and acceptable head loss. A narrow pipe may cost less but waste much of the available head through friction. A larger pipe costs more but can deliver more water to the turbine.
Account for elbows, tees, valves, screens, nozzle restrictions, water hammer, UV exposure, impact, freezing, and maintenance access. Never assume gross head is available at the nozzle.
3. Fabricate the runner and frame
A prototype Pelton may use a machined or printed hub, a metal disc with individually mounted buckets, or a CNC-cut, cast, or machined runner. The runner must be symmetrical, smooth, accurately spaced, statically and dynamically balanced, and contained inside a rigid housing.
Quick wins for a faster PC:
Repair Windows errors before they cause bigger problemsFix Now →Fix the driver behind crashes, sound loss and screen glitchesFind Drivers →Clear out junk files and repair common Windows errorsFree Scan →A plastic or 3D-printed runner is suitable only for low-pressure, contained testing unless its material, design, balance, and overspeed behaviour have been properly validated. Never stand in the plane of an exposed rotating runner.
Use rigid bearing mounts, control shaft thrust where necessary, align the coupling carefully, and guard shafts, belts, pulleys, and couplings. If direct drive cannot reach generator speed, gearing or pulleys may help but add losses, wear, noise, alignment problems, and guarding requirements.
4. Build the nozzle
Use a replaceable or adjustable nozzle so the jet can be tuned. It should produce a coherent jet, be easy to remove and clean, be fed through a screen or filter, and be rated for the actual pressure. Fit an upstream shutoff valve and avoid improvised fittings that can rupture.
For a Pelton, the jet should strike the buckets cleanly rather than spray across the housing.
What’s actually slowing this PC down?
Pick the symptom - the matching free tool is one click away.
5. Install the intake and discharge
Screen the intake against debris, sediment, and wildlife, while preserving a bypass for excess water. Anchor the penstock, protect it from movement and impact, and ensure the turbine outlet cannot back up or become submerged. Do not undermine a stream bank or obstruct fish passage.
Best Value

- 300W high power output for efficient and reliable performance
- Wide compatibility with most common devices and scenarios
- High-quality construction for durability and long-term service
- User-friendly design for easy installation and hassle-free operation
- Strict quality control ensures safe and stable performance in daily use
Wire the generator
- Connect the alternator output to the correctly rated bridge rectifier.
- Install a fuse or breaker and a disconnect immediately downstream of the rectifier.
- Connect the protected DC output to a hydro diversion controller.
- Connect the controller to the battery bank and correctly rated dump load.
- Connect DC loads or an inverter only after voltage, current, grounding, and protection have been verified.
Select the rectifier for maximum expected voltage and current, and provide heat dissipation. Select the controller and dump load for the actual battery voltage and maximum generator output. Keep terminals and junction boxes dry, use weatherproof enclosures and conduit, and install appropriate ground-fault protection, grounding, and bonding.
Commission and test it safely
- Inspect every fastener, guard, bearing mount, pipe support, fitting, and electrical termination.
- Confirm that the runner turns freely by hand.
- Test wiring with the water shut off.
- Open the water gradually.
- Measure open-circuit voltage only briefly and with instruments rated above the expected maximum.
- Add a known electrical load and measure voltage, current, and watts.
- Check runner speed, vibration, bearing temperature, generator temperature, noise, leaks, and pipe movement.
- Confirm that the controller diverts power when the battery reaches its control voltage.
- Test the emergency water shutoff and controlled shutdown procedure.
- Reinspect after the first hour and after several operating cycles.
Measured power under load—not spinning, voltage without a load, or a marketplace “peak watt” claim—is what defines a functioning generator. DOE’s microhydropower electrical guidance recommends qualified electrical assistance and notes that local inspection may be required.
Troubleshoot common failures
| Symptom | Likely cause | Test and corrective action |
|---|---|---|
| Runner spins but produces little power | Low speed, incorrect winding, pipe loss, poor nozzle alignment, or excessive load | Measure generator and rectifier voltage, current into a known load, nozzle pressure, and runner speed. Check alignment, pipe losses, nozzle size, and pulley ratio. |
| High voltage with no load | Normal permanent-magnet behaviour or overspeed | Do not connect sensitive equipment. Install the correctly rated controller and dump load; verify overspeed protection. |
| Output falls after several minutes | Blocked intake, changing flow, air lock, overheating, bearing problems, or dump-load failure | Inspect screens, check pressure, measure temperatures, and confirm diversion operation. |
| Pipe bursts or fittings leak | Insufficient pressure rating, water hammer, poor support, freezing, or mismatched fittings | Shut and depressurize the system before repair. Replace components with correctly rated parts and avoid sudden valve closure. |
| Battery overcharges | Wrong controller, disconnected dump load, incorrect settings, or failed control hardware | Stop or isolate the water source safely. Test the controller and load, then use a hydro diversion controller correctly sized for the system. |
| Severe vibration | Unbalanced runner, bent shaft, misalignment, loose frame, failed bearing, or off-centre jet | Shut down immediately. Inspect and rebalance or replace rotating components before retesting. |
| Summer output disappears in winter | Design based on typical rather than minimum flow | Redesign around minimum dependable flow and provide bypass and debris protection. |
Permits, water rights, and environmental protection
Requirements vary by country, state, county, waterway, project type, diversion, impoundment, and electrical configuration. Potential requirements include water rights, stream-diversion authorization, environmental review, fish and wildlife conditions, floodplain or wetlands approvals, building and electrical permits, and utility interconnection approval.
U.S. readers can use the DOE Hydropower RAPID Toolkit to locate federal, state, and local permitting information, including FERC-related processes. Do not assume a small project is automatically exempt.
Design for floods, ice, sediment, fish passage, minimum downstream flow, wildlife, safe discharge, and maintenance access. A renewable source is not impact-free simply because it is small.
When buying the critical components makes more sense
Building every component from raw materials offers maximum educational value and complete control, but runner efficiency, balance, generator matching, containment, and controls are the most failure-prone parts.
A hybrid build is usually the strongest compromise: buy a matched turbine-generator core, rectifier, and hydro controller, then fabricate the intake, penstock supports, frame, enclosure, and site-specific discharge. Energy Systems & Design lists examples including the 1K Micro Hydro Power System, Stream Engine, low-head LH1000, and compact Watter Buddy. These are product examples, not guarantees of output at your site.
Before buying, require published head and flow ranges, voltage and current ratings, test conditions or an output curve, controller compatibility, maximum pressure, replacement parts, manuals, warranty, and a clear list of what the price includes. Be wary of listings that quote only peak wattage or provide no overspeed and dump-load information.
Buy a complete commercial system when the installation will power a home, operate unattended, involve expensive civil works, or require reliability beyond an experiment. The total cost includes pipework, intake construction, controls, batteries, inverter, labour, maintenance, and permitting—not just the turbine.
Quick Recap
Final design checklist
- Head has been measured, and calculations use net rather than gross head.
- Minimum dry-season flow has been measured or defensibly estimated.
- Penstock diameter, pressure rating, friction loss, supports, and water-hammer risk are addressed.
- Turbine type matches the head and flow.
- Runner, shaft, bearings, and coupling are balanced, aligned, and enclosed.
- Nozzle is pressure-rated, cleanable, and adjustable or replaceable.
- Alternator, rectifier, controller, dump load, battery, and inverter are voltage- and current-matched.
- Fuses, disconnects, grounding, bonding, weatherproof enclosures, and cable voltage drop are addressed.
- Intake screens, bypass flow, sediment, floods, ice, tailwater, and maintenance access are designed.
- Emergency water shutoff and controlled shutdown procedures have been tested.
- Permits, water rights, environmental rules, inspections, and utility requirements have been checked locally.
- Output has been measured in watts under a known load.
Product prices and availability are accurate as of the date/time indicated and are subject to change. Any price and availability information displayed on Amazon at the time of purchase will apply.

