Yes, you can build a high-quality speaker at home—but not by placing a random driver in a wooden box. The driver, enclosure volume, port or passive radiator, crossover, amplifier, damping, wiring and physical layout must be designed as one system.
For most first-time builders, the safest route is a matched kit or a published design with specified drivers, cabinet dimensions and crossover. Designing a speaker entirely from raw components is rewarding, but a successful custom two-way normally requires enclosure modeling, acoustic measurements and crossover tuning.
As an Amazon Associate I earn from qualifying purchases.
Choose the right kind of speaker project
Decide what you want to build before buying parts. A desktop speaker, room-filling bookshelf pair, portable Bluetooth speaker and subwoofer have very different requirements.
The Tool Desk
Outbyte PC Repair FREEClear out junk files and repair common Windows errorsFree Scan →Outbyte Driver Updater FREEScan for outdated or missing drivers - takes under a minuteDriver Scan →| Project | What it requires | Best for |
|---|---|---|
| Passive bookshelf speaker | Drivers, cabinet, passive crossover, terminals and an external amplifier | A traditional home stereo or AV system |
| Active speaker | Separate amplifier channels, DSP or an active crossover, power supplies and additional wiring | Builders who want precise tuning and equalization |
| Portable Bluetooth speaker | Bluetooth amplifier, battery, charging and protection circuitry, switch and suitable enclosure | Wireless listening, preferably using a proven kit or module |
| Single-driver speaker | One full-range driver, cabinet, terminals and amplifier | The lowest-complexity first build |
| Subwoofer | Large woofer, sealed or ported cabinet, bracing and dedicated amplification | Builders specifically seeking deep bass |
A full-range speaker avoids a tweeter crossover, but it may compromise bass extension, treble dispersion, maximum output or tonal balance. A two-way design can cover more of the audible range, but its crossover and driver integration are more demanding. A three-way speaker is substantially more complex and is rarely the best first project.
#1 Best Overall

- DISCOVER HOW SPEAKER WORKS: This amazing science kit is your chance to discover how speaker works while building your own! It's super easy to assemble and the perfect way for kids to explore how speakers work, learn the science of electronics and circuit through hands-on activities. It's fun, entertaining, useful and will never go out of style
- SAFE STEM PROJECTS FOR KIDS: Safety is our top priority, and we're proud to say we use the high quality circuit boards to make sure there are no problems no matter what! We also carry out 100% quality checks on all components, including battery boxes, wooden boards and other parts.We've crafted every detail with love and care to create the perfect environment for children to play, learn and have fun
- UNIQUE GIFT CHOICE: Suitable for both kids and adults, this speaker kit has a stylish design and practical functions, making it the best gift choice for birthdays, Christmas, New Year's Day or any other holiday. Makes a creative and unique gift for boys, girls, teens and children
- EASY TO ASSEMBLE: No soldering is required. Each science kit comes with clear and detailed assembly instructions. Whether you're a beginner or an experienced hobbyist, you can easily get started and enjoy the process of creating your own masterpiece
- FAMILY STEM ACTIVITIES: This set of science experiments is a good way for parents and children to complete together, can also be used as a classroom STEM project
Pick a difficulty level
| Your priority | Best route |
|---|---|
| Highest chance of success | Matched speaker kit |
| Lowest electrical complexity | Full-range driver in a documented enclosure |
| Maximum customization | Raw drivers, modeled enclosure and measured crossover |
| Wireless convenience | Proven Bluetooth kit or protected integrated amplifier module |
| Deep bass | Published subwoofer design or kit |
| Learning speaker design | Build a two-way kit first, then develop a custom design |
The kit route
A kit reduces the most expensive design risks. Many kits provide matched drivers, pre-cut or flat-pack cabinets, crossover components and wiring diagrams. That leaves you to concentrate on accurate assembly, soldering and finishing. See Parts Express speaker-building kits and the Dayton Audio kit and component categories.
The documented-design route
A published driver-and-enclosure design is a useful middle ground. You gain woodworking flexibility while retaining proven cabinet volume, port dimensions and crossover instructions. Do not substitute a different woofer or tweeter simply because it has the same diameter or nominal impedance.
The original-design route
Start here only if you are prepared to model the enclosure and measure the drivers in the finished baffle. A crossover calculator based only on nominal impedance is a starting point, not a finished design. Real drivers have frequency-dependent impedance, uneven response, directivity changes and phase offsets.
Outdated Drivers Are Slowing You Down
One free scan finds every outdated or missing driver and matches the right update for your exact hardware.Free scan · exact hardware matchWindows Errors? Fix Them Before They Spread
Repair common Windows errors and clear accumulated junk for a smoother, more stable PC - no reinstall needed.Free scan · no reinstallSet the design goals first
Write down the answers before selecting components:
- Will the speaker be used on a desk, in a small room or across a large living room?
- What is the listening distance and expected maximum volume?
- Is the priority music, movies, background listening or portability?
- How much bass extension is required?
- What cabinet size and shape can the room accommodate?
- Do you already own an amplifier or need electronics inside the speaker?
- Will the system be wired, Bluetooth-enabled or battery powered?
- What is the complete budget, including tools, finishing supplies, shipping, amplifier, stands and possible replacement parts?
A small desktop speaker does not need the same output, bass displacement or dispersion as a speaker intended to fill a room. Similarly, “higher wattage” is not automatically better. Sensitivity, impedance minimum, excursion, enclosure alignment, listening distance and distortion are more useful selection criteria than one power number.
Gather the required parts
Acoustic and mechanical parts
- Woofer, midrange, tweeter or full-range driver
- Cabinet panels or a flat-pack enclosure
- Front baffle and internal braces
- Port tube, slot port or passive radiator when specified
- Binding posts, terminal cup or input connector
- Driver gaskets or sealing tape
- Wood glue, clamps, screws and suitable internal sealant
- Damping material
- Optional grille, grille frame, feet or isolation pads
Passive electrical parts
- Crossover board or mounting surface
- Capacitors, inductors and resistors
- Possible L-pad or Zobel network
- Internal speaker wire, solder and heat-shrink tubing
- Any fuse or protection device required by the design
Active or portable parts
An active design needs amplifier channels, a DSP or active crossover, a power supply, input connectors and any required cooling or ventilation. A portable design additionally needs a Bluetooth receiver, battery pack, battery-management or charging board, correct DC supply, power switch and indicator. Battery-powered projects are safer when based on a complete, protected module or kit; avoid exposed mains wiring unless you have the electrical expertise to build and enclose it safely.
Understand driver specifications
Do not choose drivers by diameter, price or advertised frequency range alone. The important specifications include:
What’s actually slowing this PC down?
Pick the symptom - the matching free tool is one click away.
Rank #2
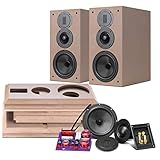
- THIS IS UNASSEMBLED DIY SPEAKER KIT, NOT FINISHED SPEAKER. Requires manual assembly, wood glue, soldering iron AND external amplifier to work
- High-fidelity Sound System – This DIY speakers kit with many components that are much more expensive high-end systems. Perfect as rear/side surround home theater speakers for a 5.1, 7.1 or 11.1 setup.DIY Bluetooth speaker kit for home theater
- 3 Way Bookshelf Speakers - Adopts three-way fourth-order speaker system reverse-phase design, with a luxurious and elegant appearance, high-end components included easy to set up and more stable excellent performance.wooden enclosure DIY speaker building kit
- Low Frequency - 6.5-inch large-diameter mid-bass unit L6-4R. Its diaphragm is made of all-black Kevlar fibre, an ultra-light and high-strength integrated composite material, a fatigue-resistant long-stroke rubber diaphragm folding ring, a highly compliant centering support piece, a unique magnetic circuit system with phase plug design, and a large magnetic steel drive unit.
- The mid-range unit uses a professional DN Series soft dome mid-range unit, with a high-quality diaphragm coated on the outside with a special damping material, and an independent dome mid-range unit to avoid the mid-range defect caused by the connection of the two frequency bands. The sound is sweet, natural and smooth.
- Nominal impedance
- The commonly stated 4-, 6- or 8-ohm rating. It is not a constant value across frequency.
- DC resistance (Re)
- The voice-coil resistance measured at rest. A multimeter reading will normally be lower than the nominal impedance.
- Sensitivity
- How much acoustic output the driver produces for a specified input. It helps determine amplifier requirements and whether a tweeter needs attenuation.
- Fs
- The driver’s free-air resonant frequency, important for enclosure modeling.
- Vas
- The equivalent compliance volume used in sealed and ported enclosure calculations.
- Qts
- A key damping parameter that influences suitable enclosure alignments.
- Xmax
- Approximate linear cone excursion. It is especially important for bass and subwoofer output.
- Sd
- Effective radiating cone area.
- Le
- Voice-coil inductance, which influences upper-frequency behavior and crossover design.
Also inspect frequency-response graphs, off-axis response, distortion data, physical cutout dimensions and phase behavior. A woofer and tweeter need compatible sensitivity, usable bandwidth, dispersion and crossover behavior—not merely matching impedance labels.
Choose the enclosure alignment
Sealed
A sealed cabinet is comparatively simple and forgiving of small volume errors. It has controlled low-frequency rolloff and no port-tuning calculation, but may provide less bass extension or efficiency than a correctly designed ported cabinet and can require more amplifier power or excursion.
Ported
A ported cabinet can provide greater bass extension or efficiency around its tuning frequency. However, internal volume, port cross-sectional area and port length must be correct. An undersized port can chuff; incorrect tuning can produce weak, boomy or one-note bass. Air leaks and misplaced damping also change the result.
Passive radiator
A passive radiator is useful when the required port would be too long or would not fit. It is not a shortcut around acoustic design: radiator displacement, cabinet volume and tuning must still be appropriate. Use a documented design unless you can model and validate the alignment.
Open baffle or dipole
An open-baffle speaker uses a large baffle rather than a conventional sealed cabinet. Front and rear radiation interact differently with the room, and bass requires substantial baffle dimensions or augmentation. It is an interesting specialist design, not a simpler alternative merely because it uses less wood. See Linkwitz Lab’s open-baffle design context.
Calculate internal volume correctly
For a rectangular cabinet:
Internal volume = internal height × internal width × internal depthWhen dimensions are in inches:
Volume in cubic feet = (H × W × D) / 1,728Calculate from the internal dimensions, not the outside dimensions. Then subtract the volume occupied by the driver baskets and magnets, braces, ports, terminal cups and any substantial crossover components.
For example, internal dimensions of 14 × 8.5 × 5.25 inches equal approximately 0.361 cubic feet before practical displacement is removed. This is a worked example for particular drivers, not a universal target for every small woofer.
Rank #3

- 【All-in-1 DIY Electronic Kits】DIY speaker kit is multi-functional in one to bring you a new audio experience . Its radio function can allow you to enjoy radio programs anytime, anywhere. The four audio input modes can meet your diverse music playback needs. Not only that, the speaker also supports hands-free calling, and the built-in high-sensitivity microphone makes the call clear and unhindered, ensuring smooth communication.The unique color LED voice-activated flashing light design creates a cool lighting effect and adds a touch of color to your music world.
- 【Unique Functions】This diy Bluetooth speaker kit has a one-click recording function. Simply long press the "mode" button while playing music from the USB-disk or TF card to commence recording, and long press it again to end the recording. Upon completion, the recording will automatically play. Moreover, the diy kit also has a power off memory function, which means that even after power off, the radio can intelligently retain the last Settings, without adjusting the frequency again.
- 【Versatile Playback Options】BANRIA soldering project kit support Bluetooth, AUX, USB-disk, and TF cards to play music. Bluetooth allows you to easily play music from your phone; Audio cable interface is suitable for any device that has a 3.5mm audio output; Usb sticks and TF card slots allow you to carry around a large number of songs. Whether it's family gatherings, outdoor activities or personal leisure, this speaker is the perfect choice for you!
- 【Professional Choice for School Education】This DIY electronics kit combines theoretical knowledge and practical operation, making it an ideal Back to School project that allows students to apply what they have learned in real scenarios and improve their soldering skills. Teachers can incorporate this kit into the curriculum to help students better understand the principles and techniques of soldering while enjoying a hands-on Back to School learning experience.
- 【English Manual】We provide a detailed English soldering manual.Rest assured, with the support of the manual, even soldering novices can successfully complete the task.
The driver’s Thiele-Small parameters determine whether that volume and tuning are suitable. Choosing a driver first and improvising a box afterward is a common failure: the required volume may not fit your proposed cabinet, or the port may require an impractical length. Modeling tools or a published design should settle those questions before cutting wood.
Do these 3 things before closing this tab:
1Scan for outdated or missing drivers - takes under a minute2Repair Windows errors before they cause bigger problems3Fix the driver behind crashes, sound loss and screen glitchesBuild the cabinet
- Confirm the design. Check panel dimensions, material thickness, driver cutouts, port opening, terminal position and internal volume.
- Cut accurately. Use a square and straightedge. A router, jigsaw or CNC service can produce cleaner driver and port openings than freehand cutting.
- Mark all openings. Include screw holes, recessed driver rebates, terminals and braces before assembly.
- Dry-fit the panels. Confirm that every joint, driver and port fits before applying glue.
- Add bracing. Brace large panels without obstructing the port or the driver’s rear radiation.
- Glue and clamp. Assemble the enclosure on a flat surface and keep the cabinet square while the adhesive cures.
- Seal the interior. Seal internal seams and terminal openings so the cabinet is airtight where the design requires it.
- Sand and finish. Flatten joints before applying paint, veneer, laminate or another finish.
- Install hardware. Fit terminals and driver gaskets, but delay final driver installation until electrical checks are complete.
For many conventional cabinets, 18–19 mm (approximately 3⁄4-inch) MDF or high-density particleboard is a practical material choice. MDF is dense, flat and easy to machine, but heavy and vulnerable to moisture. Plywood is lighter, holds screws well and tolerates moisture better, though its quality and flatness vary. Large subwoofers may need thicker or laminated panels and more substantial bracing. Material thickness is design-specific, not a universal rule.
Avoid excessively narrow, tall and unbraced boxes. Such proportions can encourage internal pipe resonances as well as panel vibration. Cabinet flex, poorly sealed joints and panel radiation can all degrade performance.
Use damping appropriately
Lining is material attached to selected cabinet walls. Stuffing is looser material placed inside, particularly in a sealed enclosure. Acoustic foam is not automatically interchangeable with polyester fiber or wool.
- Never block the port or passive radiator.
- Keep loose material away from the cone and moving parts.
- Follow the published design’s damping instructions.
- Do not assume more damping is always better.
- Use lighter, strategically placed damping in most ported cabinets than in sealed cabinets.
Damping changes internal reflections and can change the apparent acoustic volume. A Parts Express example discusses approximately 1⁄2 pound of material per cubic foot, but that is design-specific guidance rather than a universal recipe. See its speaker-building guide for the referenced example and qualifications.
Recommended Free Tools
Build or install the crossover
In a passive two-way speaker, the low-pass section sends lower frequencies to the woofer and the high-pass section sends higher frequencies to the tweeter. The crossover may also need level matching and impedance equalization.
- Capacitor: commonly used in series high-pass sections.
- Inductor: commonly used in series low-pass sections.
- Resistor: used for attenuation, shaping or impedance correction.
- L-pad: reduces tweeter output while helping maintain a more predictable load.
- Zobel network: can flatten a woofer’s rising impedance so a filter behaves more predictably.
Nominal-impedance formulas assume a purely resistive load. Real drivers are not purely resistive, so the calculated crossover point and acoustic slope may differ substantially from the result. Parts Express illustrates this limitation in its crossover and enclosure guide.
Rank #4

- DISCOVER HOW SPEAKERS WORK: This amazing DIY Bluetooth Speaker is your chance to discover how speakers work while building your own! It's super easy to assemble and the perfect way for kids to explore the world of sound, music and speakers through hands-on activities. It's fun, entertaining, useful and will never go out of style
- SAFE STEM PROJECTS FOR KIDS: Safety is our top priority, and we're proud to say we use the high quality circuit boards to make sure there are no problems no matter what! We also carry out 100% quality checks on all components, including battery boxes, wooden boards and other parts.We've crafted every detail with love and care to create the perfect environment for children to play, learn and have fun
- FAMILY BONDING TIME: Doing scientific experiments together is a good way for parents and children to build a great family relationship. Complete science projects with your kids as their friend and teacher, that’ll be an unforgettable and precious time
- EASY TO ASSEMBLE: No soldering is required. Each science kit comes with clear and detailed assembly instructions. Whether you're a beginner or an experienced hobbyist, you can easily get started and enjoy the process of creating your own masterpiece. It's the best snap circuits toy for kids aged 8-14
- UNIQUE GIFT CHOICE: Suitable for both kids and adults, this DIY Bluetooth speaker has a stylish design and practical functions, making it the best gift choice for birthdays, Christmas, New Year's Day or any other holiday. Makes a creative and unique gift for boys, girls, teens and children
A particular 8-ohm, two-way, 12 dB-per-octave example uses approximately 5.6 μF capacitors and 0.70–0.72 mH inductors. Those values must not be copied into another design without validation.
Do not assume the tweeter should always be connected with reversed polarity. The correct connection depends on the electrical filters, acoustic offsets, driver phase and measured response. A particular 12 dB-per-octave design may reverse tweeter polarity, but that is not a general rule.
Assemble the crossover safely
- Build one crossover first and label every component value.
- Follow the schematic exactly.
- Keep inductors separated and rotate adjacent inductors approximately 90 degrees relative to one another.
- Keep large inductors away from driver magnets where practical.
- Secure heavy parts with adhesive, cable ties or mechanical fasteners.
- Insulate exposed connections and avoid solder bridges.
- Build the second crossover as a mirror image with identical values and wiring.
- Check continuity and resistance before connecting the drivers.
Passive and active wiring
Passive two-way wiring sequence
- Connect amplifier positive to the cabinet positive terminal.
- Split the input positive into the woofer low-pass and tweeter high-pass branches.
- Connect the low-pass output to woofer positive and its return to woofer negative.
- Connect the high-pass output to tweeter polarity specified by the design schematic.
- Connect both crossover returns to cabinet negative.
- Check that no branch is shorted.
- Repeat the same polarity and layout for the second speaker.
A low-voltage battery “pop” test can help identify relative polarity in a passive driver, but it does not establish correct acoustic phase through a crossover. Use it only as a wiring check.
Active two-way signal flow
An active stereo two-way system routes the left and right inputs through a DSP, then sends separate processed outputs to woofer and tweeter amplifier channels:
Left input  → DSP left woofer/tweeter outputs → left amplifier channels → drivers
Right input → DSP right woofer/tweeter outputs → right amplifier channels → drivers
The DSP must be configured with appropriate crossover slopes, gains, delays and, where appropriate, limiters. miniDSP documents this architecture in its active two-way crossover guide. Active systems provide more control, but require more channels, power supplies, signal routing and configuration. DSP cannot repair a leaking cabinet, mechanical rattle, severe driver breakup or incorrectly wired driver.
Tools and safety equipment
Woodworking
- Tape measure, steel ruler, square and pencil
- Drill and bits
- Jigsaw, router or access to CNC cutting
- Clamps
- Sandpaper or random-orbit sander
- Safety glasses, hearing protection and dust protection
Electrical
- Soldering iron, wire stripper and cutter
- Heat gun or suitable heat-shrink tool
- Digital multimeter
- Screwdrivers and crimping tools
Optional measurement equipment
- Calibrated USB measurement microphone
- Computer with measurement software
- Audio interface for an analog microphone
- Impedance-measurement jig or analyzer
- Test amplifier and low-level signal source
Room EQ Wizard (REW) is free software for room, speaker, subwoofer and audio-device measurements. Its official page has displayed version information that may change, so check the site for the current release before downloading. A calibrated USB microphone is generally simpler than an analog microphone because it avoids a separate microphone preamp and phantom-power interface.
Test before playing loudly
Electrical pre-power checklist
- Measure resistance across the input terminals.
- Check for a short circuit or unexpectedly open connection.
- Confirm every driver is connected to its intended crossover branch.
- Verify left and right speakers are wired identically.
- Inspect solder joints and exposed conductors.
- Where practical, test the crossover before connecting valuable drivers.
Linkwitz Lab’s documented designs emphasize electrical checks before allowing the drivers to become “fault indicators”; basic spot checks can use a digital voltmeter, a low-level test signal and an AA cell. See its electrical testing and construction notes.
Best Value

- Subwoofer Audio Amplifier Board: 100W+100W Bluetooth 5.0 wireless connection, Bluetooth, USB and AUX audio input, 2.0 channel stereo output, just a little sound distortion. Note: When using AUX mode, please confirm that the Bluetooth connection of this module has been disconnected;
- Treble and Bass Adjustment: This digital Amp board with independent treble and bass adjustment buttons,you can directly adjust the treble and bass through the module, without using the player or speaker;
- Perfect Sound Quality Experience: The audio power subwoofer amplifier module with powerful chip, AM interference suppression function, shielding power inductance, low noise front stage operational amplifier, let you enjoy a more perfect sound quality experience;
- With Protective Function: This Bluetooth Amp module is designed with over-voltage protection, under-voltage protection, over-heat protection, short-circuit protection, with case to protective it;
- Easy Installation and Use: The illustration of each interface is printed on the protective plate, making it easy to install and use even without instructions. Small size: 4.4 in*2.75 in*0.78 in, easy to carry;
Acoustic checklist
- Start at low volume.
- Confirm that every driver produces sound.
- Listen for buzzes, rattles, air leaks and port turbulence.
- Check relative polarity with a centered vocal recording or test signal.
- Measure frequency response if possible.
- For ported designs, inspect nearfield woofer and port behavior.
- Check the finished speaker’s impedance before pairing it with an amplifier.
- Increase volume gradually and stop if you hear distortion, scraping or compression.
Place the speakers symmetrically, with tweeters near ear height and a roughly symmetrical listening triangle. Move them away from walls if bass is excessive and adjust toe-in gradually. REW can help optimize speaker and listening positions, analyze the reproduction chain and apply moderate room EQ. Room correction is a supplement—not a substitute—for a sound crossover and mechanically sound cabinet.
Troubleshoot common problems
| Symptom | Likely cause | First check |
|---|---|---|
| No sound | Open wire, failed solder joint or wrong terminal | Continuity and amplifier connection |
| Tweeter silent | Incorrect high-pass wiring or damaged tweeter | Crossover branch and driver resistance |
| Thin bass | Reversed polarity, air leak or incorrect port tuning | Polarity and cabinet seams |
| Boomy bass | Room gain or incorrect port alignment | Placement and modeled tuning |
| Harsh treble | Tweeter too loud or crossover error | L-pad, wiring and response measurement |
| Rattle | Loose panel, driver, brace or grille | Low-frequency test at low volume |
| Amplifier shuts down | Low impedance or short circuit | Resistance and impedance checks |
Passive versus active, MDF versus plywood
Passive speakers are easier to integrate with an existing amplifier and usually require fewer electronics. Active speakers can simplify driver equalization and time alignment, but need additional amplifier channels, power supplies and setup.
MDF is dense, inexpensive and easy to machine, but heavy and moisture-sensitive. Plywood is lighter, holds screws well and is more tolerant of moisture, though its quality varies. For large cabinets, rigidity and bracing matter more than simply choosing the thickest possible panel.
Budget realistically
A DIY speaker’s cost includes more than drivers and panels. Allow for crossover components, terminals, wire, damping, glue, finish, fasteners, shipping, amplifier or DSP, stands, measurement equipment and replacement parts. A kit may cost more than generic raw materials but can be cheaper than buying incorrect drivers, redesigning a crossover or rebuilding a cabinet.
Product availability and prices change. Use official sources such as Parts Express’ speaker-building resource center, its kit catalog and Dayton Audio’s current categories. Do not choose an individual driver without confirming the enclosure and crossover it is intended for.
Final recommendation for a first build
Choose a matched two-way kit if your priority is a reliable finished speaker. Choose a documented full-range design if you want the simplest wiring and cabinet. Attempt an original two-way design only after learning enclosure modeling and obtaining measurement equipment. Build one crossover first, test every connection with a multimeter, install the drivers carefully, and increase playback volume slowly.
The most successful home-built speakers are not necessarily the most expensive. They are the ones whose drivers, enclosure, crossover, amplifier and construction details were chosen together—and checked before the first serious listening session.
Quick wins for a faster PC:
Repair Windows errors before they cause bigger problemsFix Now →Scan for outdated or missing drivers - takes under a minuteDriver Scan →Clear out junk files and repair common Windows errorsFree Scan →Quick Recap
Product prices and availability are accurate as of the date/time indicated and are subject to change. Any price and availability information displayed on Amazon at the time of purchase will apply.

