Quick wins for a faster PC:
Repair Windows errors before they cause bigger problemsFix Now →Fix the driver behind crashes, sound loss and screen glitchesFind Drivers →Peas are one of the best cool-season crops for a home garden, but they are not forgiving about timing or site prep. If you plant too late, put them in compacted wet soil, or wait until the vines are tangled before installing support, the crop can go from promising to disappointing in a couple of warm weeks.
The short version is this: plant peas early, as soon as the soil is thawed, workable, and about 45 degrees F or warmer. Give them loose, well-drained soil with a practical pH target around 6.2 to 7.0. Most varieties need about 60 days to harvest, grow best in cool weather around 55 to 65 degrees F, and slow down or quit setting well when heat pushes toward 85 degrees F. Install support at planting, water consistently, mulch once seedlings are established, and harvest often.
As an Amazon Associate I earn from qualifying purchases.
From a construction and site-prep standpoint, the crop itself is simple. The bed is where homeowners usually lose. On our job sites, we see the same pattern with small garden projects that we see with patios and drainage work: if the base is wrong, the finish product suffers. For peas, the “base” is an 8 to 12 inch loose root zone, positive drainage, stable trellis anchoring, and a layout that lets you harvest without stepping into the bed.
Choose the Right Type of Pea
Before buying seed, decide what kind of peas you actually want to eat. The three main garden types are shelling peas, snow peas, and sugar snap peas.
#1 Best Overall

- Reusable and Versatile: Made of pliable, braided, and heavy-duty polyester, this netting can be used for vertical gardening, horizontal gardening, and A-Frame trellises; It’s long-lasting, reusable, and will support your plants’ growth; You can easily fold it up and store it away after you’re done using it
- Easy to Install and Adjust: This tellis netting comes in a size of 5 x 30 ft., and you can easily cut it to the size you desire; Simply wrap and tie the netting around any stable structure or support—there’s no need to worry about it unraveling
- Save Space: You can direct the growth of your plants and maximize your space by weaving the netting around poles or other structures; When you pull the netting until it’s taut, the sturdy trellis will carry the weight of your plant
- Large Square Mesh: Each mesh square is 6” x 6”, which leaves enough space to prune plants and pick plants through the trellis; If you cut parts of the netting to fit your garden, you can save the leftover part for another plant
- Strong Support: This durable tellis netting can support the weight of flowers, fruits, and vegetables such as cucumbers, blackberry, peas, cantaloupes, tomatoes, and other vining plants
Shelling Peas
Shelling peas are grown for the round green peas inside the pod. The pod is usually too fibrous to eat. These are the classic peas for fresh cooking, freezing, and short-term storage. Harvest timing is narrow: wait until pods are filled, but do not leave them on the vine for long. Mature peas can lose quality within 1 to 3 days if they sit too long.
Snow Peas
Snow peas have flat edible pods and are harvested before the peas inside fill out. They are useful for stir-fries, salads, and fast kitchen use. Because the pods are picked young, they can be productive when harvested frequently.
Sugar Snap Peas
Sugar snap peas have edible pods like snow peas, but the pod becomes plump and sweet as the peas fill inside. Many homeowners prefer snap peas because there is less waste and the harvest is easy to use fresh. Tall snap varieties can reach 5 to 6 feet, so plan a real trellis instead of a few thin sticks.
For small beds and containers, bush peas around 2 to 3 feet tall are easier to manage. For a dedicated bed with access from both sides, tall snow or snap peas are worth the support structure because they use vertical space efficiently.
Plant Peas Early Enough to Beat the Heat
Peas are a shoulder-season crop. In most of the United States, the main crop is planted in early spring. A fall crop is possible in many regions, but it takes more planning because shorter days and cooler fall light slow the plants down.
Use three numbers for planning: 45 degrees F soil temperature for reliable direct seeding, about 60 days to harvest for many varieties, and 85 degrees F as the heat threshold where flowering and pod set become unreliable. A seed packet may say 58 or 62 days, but that assumes reasonable growing conditions. Cold spring soil slows emergence. Fall crops often need extra lead time beyond the printed days to maturity.
Spring Timing Framework
In cold northern regions, prepare the bed in fall or winter so you can plant as soon as the soil is workable in spring. If you wait until a wet clay bed dries, then still need to dig, amend, and build support, you may lose the best planting window.
In moderate climates, start checking soil temperature several weeks before your average last frost date. Young pea plants tolerate light frost, but flowers and developing pods are more vulnerable. Row cover can reduce risk during cold snaps and also helps protect young seedlings from wind.
In warm southern regions, peas may perform better as a late winter or very early spring crop. In some mild climates, a fall or winter planting window is more useful than a traditional spring planting. The goal is not to match a calendar date; the goal is to give the crop roughly 8 to 10 cool weeks before sustained heat arrives.
Fall Timing Framework
For fall peas, count backward from your first expected frost, then add a buffer. If the variety lists 60 days to maturity, give it closer to 70 to 80 days before frost because fall growth is slower. In hot-summer areas, the challenge is getting seed to germinate while soil is still warm without pushing the crop into hard frost before pods mature. Light shade during germination and consistent moisture can help, but fall peas are still more of a calculated bet than spring peas in many states.
Rank #2

- PRODUCT SIZE - Trellis netting 5Ft*15 Ft, 6 inch square mesh, easily cut to desired size to use. Important note: The trellis netting comes in a vacuum sealed bag.
- HIGH QUALITY - Heavy-duty nylon netting is ideal for growing vine, veg, fruits, and flowers. White nylon mesh has outstanding durability. Breaking strength supports extremely heavy crop loads.
- EASY SETUP - It is available in a variety of widths. It is easy to handle, simple to install and will not tangle. It is soft, easy to set, pack and cut to size. Hang over trees, gardens or even a wall. Suitable for both vertical and horizontal garden application.
- SAFE FOR KIDS AND ANIMALS - Soft, no sharp edges, no irritating smell, each product are new. Safe for wildlife and your family.
- COMMERCIAL GRADE - Trellis Netting fully satisfies the requirements for a variety of growing techniques, both vertical and horizontal.
Build the Bed Like Drainage Matters
Peas do not need a fancy bed, but they do need a functional one. The root zone should be loose, fertile, and well drained. A practical pH target is 6.2 to 7.0, within the broader pea-friendly range of roughly 6.0 to 7.5. If you have not tested the soil in the last few years, start there before adding fertilizer.
The Tool Desk
Outbyte Driver Updater FREEScan for outdated or missing drivers - takes under a minuteDriver Scan →Outbyte PC Repair FREEClear out junk files and repair common Windows errorsFree Scan →The worst pea beds are usually compacted, low, and wet. Root rot and fusarium problems show up fast where water sits around the roots. If a shovel comes out glossy with sticky clay, or if footprints hold water after rain, fix drainage before worrying about seed variety.
In-Ground Bed Prep
For an in-ground pea bed, loosen the top 8 to 12 inches. Work in finished compost if the soil is low in organic matter, but avoid turning the bed into a loose pile that settles unevenly. A common target is 1 to 2 inches of compost blended into the top several inches of soil. For a 4 by 8 foot bed, that is about 2.7 to 5.3 cubic feet of compost.
Do not overload peas with nitrogen. Peas are legumes and can fix some nitrogen with the right soil biology. Too much nitrogen can give you leafy vines and fewer pods. Fertilizer should be based on a soil test, especially for phosphorus. Repeated use of generic high-phosphorus fertilizer can build up excess phosphorus and contribute to runoff problems.
Raised Bed Soil Volume Example
Raised beds are a good choice when native soil is compacted, wet, rocky, or contaminated. For peas, prioritize the root zone over decorative height. A loose 8 to 12 inch soil depth is usually more valuable than a tall frame filled with poor material.
Do these 3 things before closing this tab:
1Scan for outdated or missing drivers - takes under a minute2Clear out junk files and repair common Windows errors3Fix the driver behind crashes, sound loss and screen glitchesA 4 by 8 foot bed that is 12 inches deep needs about 32 cubic feet of fill. That is the calculation: 4 feet x 8 feet x 1 foot = 32 cubic feet. If bagged raised-bed mix costs around $6.65 per cubic foot, the fill alone can run about $213 before tax and delivery. At about $5.65 per cubic foot for a listed garden soil product, the same volume is about $181. Prices vary by region, brand, bag size, organic certification, and seasonal sales, but the point is consistent: soil can cost more than the lumber.
For a pea bed, a practical fill is usually a quality raised-bed mix amended with finished compost as needed. Avoid using straight topsoil in a raised frame; it often compacts and drains poorly. Also avoid filling the bottom with construction debris, random wood scraps, or unknown soil from another site. Around edible crops, known clean material matters.
Use a Trellis That Matches the Variety
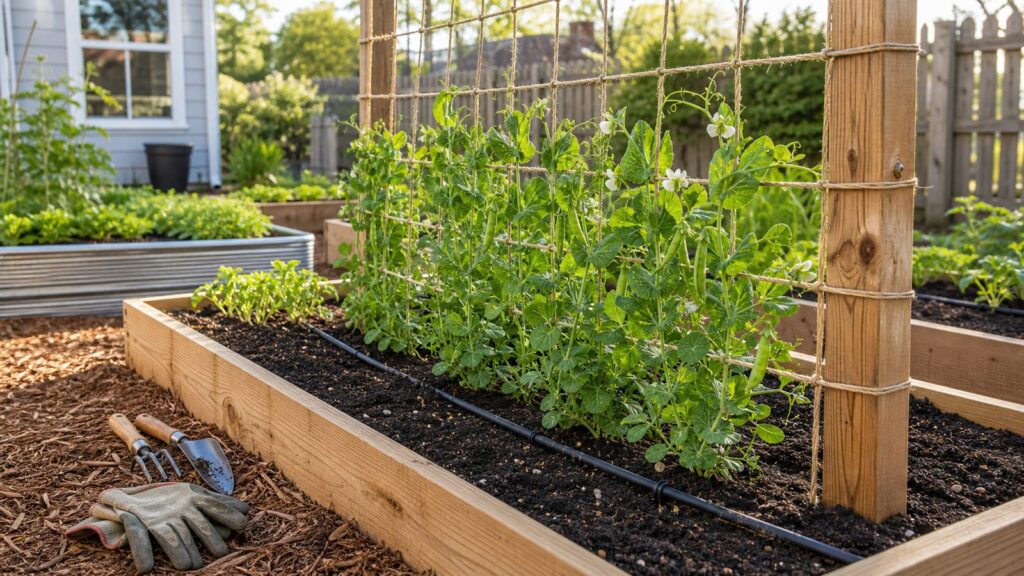
Install the trellis before planting or immediately after. Peas climb by tendrils, and young vines are much easier to train than a collapsed tangle of mature growth. Tall and vining peas may reach 5 to 6 feet. Bush peas around 2 to 3 feet may self-support, but even they benefit from low netting or short brush support in windy yards.
A basic pea trellis can be simple: stakes with jute, twine, or netting. For a 6 to 8 foot row, many homeowners can build a serviceable support for about $10 to $40 using stakes and netting. Reusable folding or metal trellises often run about $40 to $120 or more, depending on height, panel length, coating, gauge, and foldability. Current examples in the market include folding pea trellis products around $39.95 and tall expandable pea trellises around $119.99.
Free tools Windows power users keep installed
One-click scans. No signup required.
Trellis Height and Anchoring
For bush peas, a 30 to 36 inch support is usually enough. For tall snap or snow peas, use a 5 to 6 foot support. Keep the trellis narrow enough that you can harvest from both sides without leaning hard into the vines. A 3 to 4 foot wide bed with a centered trellis can work, but two outer rows on a wide bed are often easier to pick.
Wind load matters more than people expect. A pea trellis covered in vines behaves like a small sail. Use posts or stakes that reach deep enough to resist tipping. For temporary light netting, 12 to 18 inches of stake embedment may be enough in firm soil. For taller, heavier, or semi-permanent supports, deeper posts may be needed, and that changes the safety conversation.
Rank #3

- RELIABLE TRELLIS NETTING FOR VINING PLANTS – Brilliantly designed to provide a superb climbing structure to support your growing plants including: tomatoes, beans, peas, cucumbers, zucchinis, eggplants, blueberries herbs, berries and many more fruits and vegetables
- 6 INCH STRONG MESH FOR HIGH YIELD - Naturally yield a good harvest. Suitable for use in an A-frame, scrog, horizontal and vertical upward gardening configuration for excellent growth gains. The net is made using premium resistant material which provides safeguarding from the Sun
- AMAZING RESULTS – Maintain healthy plants by providing better sunshine coverage and increased protection by elevation from the ground. Perfect for gardeners who appreciate an effective solution with outstanding results
- QUICK SETUP & VERSATILITY SAVES TIME – Soft but durable, the flexible net is easy-to-use and can be applied quickly to fit your required setup. Suitable for multi-purpose use. Our net is highly versatile for indoor and outdoor plants
- QUALITY ASSURANCE – AlpineReach products go through a rigorous design and testing process so our customers receive top products with top customer service
Call 811 Before Digging Posts
If your trellis, fence-style support, or raised-bed project requires post holes, call 811 before digging. The national 811 system routes utility locate requests so buried electric, gas, water, sewer, and communication lines can be marked. This is not just for major construction. A homeowner with a post-hole digger can hit a shallow utility line.
In Texas, homeowners can use Texas811. Other states have their own 811 systems connected through the national service. Make the request before digging and allow the required notice period in your area. Also check local rules if you are installing a tall permanent support near a property line. Some neighborhoods treat permanent garden structures like fence elements, and HOA rules may restrict height, materials, or placement.
How to Plant Pea Seeds
Peas are usually direct-seeded. Transplants are possible, but direct seeding is simpler and avoids root disturbance. Plant when the soil is thawed, workable, and dry enough that it does not stick heavily to tools. A soil thermometer is inexpensive and useful; look for at least 45 degrees F.
Plant seeds about 1 to 1 1/2 inches deep. Spacing varies by row style. A simple single row can be planted about 1 inch apart, then thinned if needed. Double rows work well along a trellis, with the rows a few inches apart on either side of the support. For row sets, leave about 18 to 24 inches between sets so you can move, weed, and harvest. In wide-row planting, seeds are often spaced about 2 inches apart across the row.
If you are planting into a narrow trench, keep the trench shallow and even. Uneven planting depth creates uneven emergence. Do not bury seeds too deep in heavy spring soil. Cracked seed, saturated soil, and cold wet conditions all reduce germination.
Should You Soak Seeds or Use Inoculant?
Some gardeners soak pea seed briefly before planting, but it is not required and can backfire if seed coats crack or the soil is cold and wet. If you soak, keep it short and plant promptly into prepared soil.
Rhizobium legume inoculant typically costs about $5 to $15 for a small garden packet. It can be useful where peas or beans have not been grown recently. It is not a substitute for drainage, organic matter, or proper pH. Think of it as a biological helper, not a fix for poor site conditions.
Stagger Planting Without Chasing Heat
To spread harvest, sow 2 or 3 small plantings about 7 days apart. Stop before later rows are likely to flower in hot weather. Many homeowners keep planting every week because the first seedlings look good, then wonder why the later rows do not set pods. Peas have a short production window. Respect it.
Watering, Mulching, and Routine Care
Peas need consistent moisture, especially during flowering and pod fill. A practical target is about 1 inch of water per week when rainfall is short. Water the soil, not the leaves. Drip irrigation or a soaker hose laid along the row is better than overhead watering because it keeps foliage drier and reduces disease pressure.
Mulch after seedlings are established. Use 3 to 4 inches of clean straw, dry grass clippings, shredded leaves, or another organic mulch. Mulch helps retain moisture, cool the soil, and suppress weeds. Keep heavy mulch slightly away from the base of young stems so you do not trap moisture directly against them.
What’s actually slowing this PC down?
Pick the symptom - the matching free tool is one click away.
Rank #4

- PLANT-SAFE NYLON MATERIAL - Made from premium corrosion-resistant nylon fibers, this garden trellis netting is gentle on delicate stems and vines. Free from harsh chemicals and pungent odors, the soft mesh texture protects your plants while being safe for your garden ecosystem. Suitable for organic gardening.
- VERSATILE 5 x 350 FT ROLL WITH 6" MESH - This generous-sized trellis netting features a 6 inch square mesh, providing ample coverage for large gardens, raised beds, and greenhouses. Easily cut to any custom size to fit A-frames, vertical poles, horizontal setups, and SCROG configurations. One roll covers multiple growing seasons.
- BOOST YIELD AND PLANT HEALTH - Elevate your plants off the ground to improve air circulation and sunlight exposure, reducing the risk of ground rot, pests, and rodent damage. Trellis netting supports natural vertical growth, resulting in larger, healthier fruits and vegetables that are easier to harvest. Ideal for tomatoes, cucumbers, peas, beans, squash, and more.
- LONG-LASTING DURABILITY - Woven from high-strength flexible nylon fibers that resist UV rays, chemicals, and weathering. This heavy duty garden netting maintains its integrity season after season, providing reliable support through wind, rain, and sun. Designed for multi-year outdoor use without fraying or breaking.
- EASY SETUP AND TANGLE-FREE STORAGE - Pre-wound on a sturdy 6.9 x 9.8 inch cardboard reel for convenient unrolling, cutting, and storage. The soft, flexible mesh won't tangle or kink, making installation quick and hassle-free. Works perfectly with zip ties, garden clips, or twine for secure mounting on any support structure.
Weed early and gently. Pea roots are not deep, and aggressive hoeing can damage them. On a well-prepped bed, hand pulling small weeds is usually enough. Once vines fill the trellis and mulch is in place, weed pressure should drop.
Training the Vines
Most pea vines will find netting or twine, but early guidance helps. When seedlings are 4 to 6 inches tall, lean them gently toward the support. If wind is pushing them away from the trellis, add a low run of twine to hold them in the right plane. Do not tie stems tightly. Pea vines are delicate, and tight ties can kink them.
Harvest Peas at the Right Stage
Harvest is where a good planting turns into good food. Pick snow peas when pods are flat and tender. Pick snap peas when pods are plump, crisp, and sweet. Pick shelling peas when pods are filled but still green and fresh, before they turn starchy.
Use two hands or scissors. Hold the vine with one hand and remove the pod with the other so you do not pull the plant off the trellis. Harvest every 1 to 2 days during peak production. The more consistently you pick, the longer the plant tends to keep producing within its weather window.
Outdated Drivers Are Slowing You Down
One free scan finds every outdated or missing driver and matches the right update for your exact hardware.Free scan · exact hardware matchWindows Errors? Fix Them Before They Spread
Repair common Windows errors and clear accumulated junk for a smoother, more stable PC - no reinstall needed.Free scan · no reinstallCool peas quickly after harvest. Sweetness and texture drop fast after picking. If you are not eating them immediately, get them out of the sun, rinse only when needed, and refrigerate them in a breathable container or bag.
What It Costs to Grow Peas in 2026
Peas can be inexpensive if you already have a workable bed and reusable support. Costs rise when you need soil, edging, irrigation, or professional help. For planning, separate the crop cost from the site improvement cost. Seeds are cheap. Fixing a compacted or poorly drained bed is the real expense.
| Item or Project | Typical 2026 US Cost | Notes |
|---|---|---|
| Pea seed packet | $3-$13 | Tracked online pea-seed listings average about $5.95; organic, heirloom, and large-count packets cost more. |
| Rhizobium inoculant | $5-$15 | Useful where peas and beans have not grown recently. |
| DIY pea patch in existing bed | $15-$60 | Assumes workable soil and minimal new support materials. |
| Basic DIY trellis | $10-$40 | Stakes, jute, twine, or netting; durability varies. |
| Reusable metal or folding trellis | $40-$120+ | Height, coating, gauge, and foldability drive price. |
| Compost | $4-$10 per 1-2 cu. ft. bag | Bulk compost may cost less per cubic yard but may include delivery minimums. |
| Bagged garden or raised-bed soil | About $2.87-$8.47 per bag; roughly $5.65-$6.65 per cu. ft. on listed examples | Regional pricing, bag size, brand, and organic certification change the math. |
| Simple 4×8 wood raised bed materials | $75-$250 before soil | Lumber species, bed height, fasteners, and local prices matter. |
| Total small pea-ready DIY upgrade | $150-$600 | Includes modest bed improvement, support, and some soil or compost. |
| Professional bed prep or installation | $400-$1,500+ | Depends on labor, access, edging, soil removal, irrigation, trellis work, and cleanup. |
Professional gardener or landscaper rates commonly fall around $45 to $65 per hour or $110 to $200 per visit in national cost guides. Garden bed installation labor often runs $30 to $100 per hour or $5 to $15 per square foot. Minimum trip charges matter, so a small pea bed may be more economical when bundled with other yard work.
Independent reader supportYour contribution helps us test, update, and keep practical guides available for everyone.When to DIY and When to Hire a Pro
Growing peas is a good DIY project when the bed already drains, the soil is workable, and the trellis is temporary. A homeowner with basic tools can plant a row, run drip tubing or a soaker hose, and build a simple support in an afternoon.
Recommended Free Tools
Hire help when the problem is really a site problem. If water stands in the garden area, if the soil is compacted from construction traffic, if the bed needs retaining edges, or if you are adding permanent posts, irrigation, or a larger raised-bed layout, professional help can be worth it. The same is true if the bed sits near utilities, hardscape, drainage swales, or property lines.
On our job sites, we treat small garden structures the same way we treat other exterior improvements: layout first, drainage second, materials third. A pea trellis is minor, but a permanent 6 foot support near a side yard can create wind, access, fence, and HOA questions. A raised bed is simple, but not if it blocks drainage away from the house or traps water against siding, fencing, or a retaining wall.
Best Value

- PRODUCT SIZE - Trellis netting 5Ft *15 Ft, 3.5 inch square mesh, easily cut to desired size to use. Important note: The trellis netting comes in a vacuum sealed bag.
- HIGH QUALITY - Heavy-duty nylon netting is ideal for growing vine, veg, fruits, and flowers. White nylon mesh has outstanding durability. Breaking strength supports extremely heavy crop loads.
- EASY SETUP - It is available in a variety of widths. It is easy to handle, simple to install and will not tangle. It is soft, easy to set, pack and cut to size. Hang over trees, gardens or even a wall. Suitable for both vertical and horizontal garden application.
- SAFE FOR KIDS AND ANIMALS - Soft, no sharp edges, no irritating smell, each product are new, no chemical drug residues. Safe for wildlife and your family.
- COMMERCIAL GRADE - Trellis Netting fully satisfies the requirements for a variety of growing techniques, both vertical and horizontal.
Troubleshooting Common Pea Problems
Most pea failures are easy to diagnose if you look at timing, moisture, and airflow. Use the symptoms below to narrow the cause before adding fertilizer or replanting.
| Symptom | Likely Cause | Practical Fix |
|---|---|---|
| Poor germination | Cold saturated soil, seed planted too deep, cracked seed, or old seed | Wait for workable soil around 45 degrees F or warmer, plant 1 to 1 1/2 inches deep, and use fresh seed. |
| Seedlings yellow and stall | Compacted soil, poor drainage, low fertility, or cold stress | Improve drainage, add finished compost, avoid overwatering, and use row cover during cold snaps. |
| Plants are leafy but low on pods | Too much nitrogen or heat during flowering | Avoid high-nitrogen fertilizer and plant earlier next season so flowering happens in cool weather. |
| Flowers but few pods | Hot weather, especially near or above 85 degrees F | Plant earlier in spring or plan a better-timed fall crop if your frost date allows. |
| White powder on leaves | Powdery mildew, often worse with humidity and crowded foliage | Improve spacing and airflow, water at soil level, and choose resistant varieties where mildew is common. |
| Plants collapse or roots discolor | Root rot or fusarium in wet or disease-prone soil | Improve drainage, rotate peas and beans away from that bed for multiple seasons, and choose resistant varieties. |
| Vines fall over | Trellis installed too late, too short, or poorly anchored | Install support at planting and match trellis height to mature variety height. |
Season-End Cleanup and Rotation
Once heat shuts the crop down, remove spent vines and clean up the bed. If the plants were healthy, they can go into compost. If you had serious disease, especially root rot or heavy mildew, dispose of the affected material according to your local guidance and avoid spreading it through the garden.
Quick wins for a faster PC:
Fix the driver behind crashes, sound loss and screen glitchesFind Drivers →Repair Windows errors before they cause bigger problemsFix Now →Rotate peas and beans out of the same bed for multiple seasons where disease pressure exists. A simple rotation is to follow peas with warm-season crops that appreciate the prepared bed, then move legumes elsewhere the next cool season. Do not assume that because peas fix nitrogen, the bed needs no future amendment. Keep using soil tests, compost, and observation.
If your trellis is reusable, clean it before storage. Dry metal panels before stacking so coatings last longer. Roll netting carefully or, if it is too tangled to reuse, plan for a sturdier support next year. Durable materials cost more up front but can save time across several seasons.
Bottom Line
Peas reward homeowners who work ahead. Prepare the bed before the planting window opens, direct-seed when soil is workable and at least about 45 degrees F, give the plants a sturdy trellis from day one, and keep moisture steady without wetting the foliage. Expect most varieties to need about 60 days, but plan around your local heat and frost dates rather than the seed packet alone.
The best pea gardens are not complicated. They are well-timed, well-drained, easy to harvest, and built with enough support to handle a full wall of vines. Spend money where it matters: soil structure, drainage, a usable trellis, and safe layout. That is the difference between a few tangled vines and a clean, productive cool-season crop.
Frequently Asked Questions
When is the best time to plant peas?
Plant peas in early spring as soon as the soil is thawed, workable, and about 45 degrees F or warmer. Most varieties need about 60 days to harvest and perform best before hot weather arrives.
How deep and how far apart should pea seeds be planted?
Plant pea seeds about 1 to 1 1/2 inches deep. In single or double rows, seeds are commonly planted about 1 inch apart, with 18 to 24 inches between row sets for access.
Do peas need a trellis?
Tall and vining peas usually need a trellis 5 to 6 feet high. Bush peas around 2 to 3 feet tall may grow with little support, but low netting helps keep plants upright and easier to harvest.
Why are my pea plants flowering but not producing pods?
The most common cause is heat. Peas grow best in cool weather and often set pods poorly when temperatures approach or exceed about 85 degrees F. Too much nitrogen can also cause leafy plants with fewer pods.
Do these 3 things before closing this tab:
1Fix the driver behind crashes, sound loss and screen glitches2Repair Windows errors before they cause bigger problems3Scan for outdated or missing drivers - takes under a minuteHow much does it cost to grow peas at home in 2026?
A simple DIY pea patch in an existing bed may cost about $15 to $60. A modest upgraded bed with support often runs $150 to $600, while professional bed prep or installation can reach $400 to $1,500 or more.
Do I need to call 811 for a pea trellis?
Call 811 before digging post holes for a trellis, fence-style support, or raised-bed structure. Utility lines can be shallower than expected, and locate requirements vary by state.
Quick Recap
Product prices and availability are accurate as of the date/time indicated and are subject to change. Any price and availability information displayed on Amazon at the time of purchase will apply.

