Do these 3 things before closing this tab:
1Fix the driver behind crashes, sound loss and screen glitches2Clear out junk files and repair common Windows errors3Scan for outdated or missing drivers - takes under a minuteSome links on this page are affiliate links: if you buy through them we may earn a commission, at no extra cost to you.
Drywall finish levels are a specification system, not a beauty contest. Level 0 through Level 5 tells the drywall contractor how much taping, coating, sanding, and skim coating is included before final decoration. The right level depends on the room, the lighting, the paint sheen, the wall texture, and whether the drywall is part of a fire-rated or utility assembly.
For most painted living spaces, Level 4 is the normal target. For smooth walls or ceilings hit by strong natural light, recessed lighting, dark paint, or gloss paint, Level 5 is often worth pricing. Garages, storage rooms, tiled walls, attics, and temporary spaces may only need Level 1 or Level 2. On our job sites, the expensive problems usually come from vague wording: a homeowner thinks they bought smooth premium walls, while the contract only says “finish drywall.” That is not specific enough.
As an Amazon Associate I earn from qualifying purchases.
Recommended Free Tools
The industry language comes from GA-214, Recommended Levels of Finish for Gypsum Panel Products, and is also recognized in ASTM C840. These standards give builders, owners, inspectors, painters, and architects a common way to describe the finish before decoration. They do not replace good workmanship, flat framing, correct board layout, proper primer, or a realistic inspection under normal lighting.
Drywall Finish Levels at a Glance
There are six standard drywall finish levels: Level 0, Level 1, Level 2, Level 3, Level 4, and Level 5. The higher number generally means more compound, more labor, and a smoother surface, but it does not mean every room should get the highest level. A Level 5 finish in an unfinished mechanical room is usually wasted money. A Level 2 finish under glossy paint in a sunlit hallway is a predictable disappointment.
#1 Best Overall
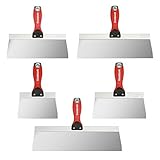
- COMPLETE 5-PIECE SET: Includes 6", 8", 10", 12", and 14" drywall taping knives for a wide range of drywall finishing tasks
- TEMPERED STAINLESS STEEL BLADES: Durable stainless steel blades with aluminum backing provide the right balance of flexibility and control for smooth, even finishing
- ERGONOMIC DESIGN: Ergonomic Soft handles provide a comfortable, secure grip and help reduce hand fatigue during extended use
- VERSATILE DRYWALL APPLICATIONS: Ideal for applying and smoothing joint compound, feathering edges, finishing drywall seams, and general drywall repair
- ALLOY HAMMER END: Built-in alloy hammer end helps reset drywall nails, while the impact- and solvent-resistant design enhances durability; large hang holes allow for convenient storage
| Finish level | What it includes | Common use | Typical 2026 installed cost per drywall sq. ft. |
|---|---|---|---|
| Level 0 | Panels installed only; no tape or compound | Temporary construction or undecided finish | $1.00-$1.50 |
| Level 1 | Tape embedded at joints and inside corners | Attics, plenums, concealed spaces, fire taping | $1.25-$1.75 |
| Level 2 | Level 1 plus a coat over tape, fasteners, and accessories | Garages, storage rooms, warehouses, tile substrate | $1.50-$2.00 |
| Level 3 | Additional coat over joints and angles; two coats on fasteners/accessories | Heavy texture, medium texture, heavy wallcovering | $1.75-$2.25 |
| Level 4 | More coats over joints, angles, fasteners, and accessories | Standard painted residential walls, light texture | $2.00-$2.75 |
| Level 5 | Level 4 plus a thin skim coat over the full surface | Smooth walls, ceilings, critical light, dark or glossy paint | $2.50-$3.50+ |
Those numbers are planning ranges for drywall surface area, not floor area. A 2,000-square-foot house can easily have around 6,000 square feet of drywall surface once walls and ceilings are counted. Tall ceilings, stairwells, open plans, many corners, occupied-home protection, scaffold work, and premium paint systems can push costs higher.
Level 0 Drywall Finish
Level 0 means gypsum panels are hung, but there is no taping, joint compound, corner bead finishing, sanding, primer, or decoration. You have boards on the framing and that is essentially it.
Quick wins for a faster PC:
Repair Windows errors before they cause bigger problemsFix Now →Scan for outdated or missing drivers - takes under a minuteDriver Scan →This level is used when the construction is temporary, when final finishes are not yet selected, or when the panels are installed only as a short-term enclosure. It is not suitable for painted rooms, garages that require taped separations, or any area where joints must be sealed for appearance, smoke control, or fire-rated assembly continuity.
From a builder’s perspective, Level 0 is a holding condition. It can make sense during phased work, commercial tenant improvements where the final layout is not approved, or areas that will be removed soon. For a normal home remodel, it should rarely be the final specification.
Level 1 Drywall Finish
Level 1 is often called fire taping, although that phrase can be used loosely. At Level 1, joint tape is embedded in joint compound at joints and interior angles. Tool marks and ridges are acceptable. Fastener heads and accessories do not need the same finished appearance expected in occupied rooms.
You will see Level 1 above ceilings, in attics, in service corridors, in plenums, behind utility areas, and in concealed or nonpublic spaces. The goal is not a smooth decorative wall. The goal is to close the board joints enough for the intended assembly and use.
What’s actually slowing this PC down?
Pick the symptom - the matching free tool is one click away.
For garages and rated separations, be careful with assumptions. Drywall between a garage and a living space may be part of a fire-resistance or separation requirement. The code issue is not whether the wall looks good; it is whether the assembly is built, fastened, and treated correctly. Local jurisdictions can have their own inspection expectations, and rated assemblies should follow the approved design, board type, fastener schedule, and joint treatment requirements.
Level 2 Drywall Finish
Level 2 starts with Level 1 and adds a coat of joint compound over the tape, fastener heads, and accessories. Excess compound is removed, but the surface is still not intended for standard smooth paint.
This is a common level for garages, storage rooms, warehouse areas, utility spaces, and gypsum board used as a tile substrate. It can also be appropriate where appearance is secondary and the room will not be judged like a living room.
Tile is one of the common reasons to specify Level 2. In a dry interior tile area, the tile system often needs a flat, properly fastened substrate, not a fully painted Level 4 wall. In wet areas, the backer, waterproofing, and tile assembly matter more than decorative drywall finishing. Do not assume ordinary drywall with Level 2 finish is acceptable behind every shower or wet wall. The substrate must match the moisture exposure and tile manufacturer’s requirements.
If a client asks us whether Level 2 is “good enough” for a garage, the honest answer is: often yes, if expectations are set. If the garage will be painted bright white with strong LED shop lights and used as a clean workshop, Level 3 or Level 4 may be the better value. If it is a normal parking and storage garage, Level 2 is a practical specification in many projects.
Level 3 Drywall Finish
Level 3 is the point where the wall is being prepared for visible decoration, but not for smooth paint. It includes Level 2 work plus an additional coat over joints and interior angles, with two coats over fasteners and accessories. The surface should be smooth enough for heavy or medium texture and some heavy-duty wallcoverings.
Level 3 is not the right base for smooth flat paint, eggshell paint, satin paint, or glossy paint. It can work well when the planned finish hides normal joint variation. A heavy knockdown texture, orange peel texture, or robust commercial wallcovering can disguise more than paint can.
Rank #2

- 【Premium 3Cr13 Stainless Steel Blades】Crafted from high-grade 3Cr13 stainless steel, these drywall knives and putty knives offer exceptional hardness and rust resistance. The polished, electroplated blades ensure smooth application of drywall mud, easy cleanup, and long-lasting performance—ideal for scraping, spreading, and finishing tasks with your drywall tools.
- 【Ergonomic Anti-Slip Handles for Fatigue-Free Use】Features CNC-machined handles with TPR non-slip grips and finger contours for maximum control. The hammer-end cap and hanging hole add versatility, reducing hand strain during prolonged drywall repair projects or DIY renovations.
- 【All-in-One Drywall Repair Kit with 10” Mud Pan】This 8-piece drywall tool set includes taping knives (8”, 10”), putty knives (1.5”, 2”), joint knives (4”, 6”), a 3” multi-tool, and a 10” mud pan. The mud pan boasts reinforced seams and a contoured design for efficient drywall mud scooping, minimizing waste.
- 【Multi-Tool for Versatile Applications】The 3-inch multi-tool functions as a paint scraper, nail puller, bottle opener, and adhesive cutter. Perfect for detailed drywall knife work, removing vinyl, or cracking open paint cans.
- 【Grade for DIY & Construction】Ideal for drywall finishing, spackling, wallpaper application, and concrete repairs. Whether you’re a contractor smoothing joint compound or a homeowner patching wall cracks, this drywall repair kit (espatulas para construccion) delivers precision and durability.
The key is to coordinate the finish level with the final decoration. If the owner starts with a textured plan, prices Level 3, then later changes to smooth paint, the drywall scope has changed. That change affects labor, drying time, sanding, primer, and probably the project schedule.
The Tool Desk
Outbyte PC Repair FREEClear out junk files and repair common Windows errorsFree Scan →Outbyte Driver Updater FREEScan for outdated or missing drivers - takes under a minuteDriver Scan →Level 4 Drywall Finish
Level 4 is the standard target for many painted residential walls. It builds on Level 3 with additional compound: two separate coats over flat joints, one separate coat over interior angles, and three coats over fasteners and accessories. When finished well, sanded properly, and primed correctly, Level 4 is suitable for flat paint, light textures, and many standard wallcoverings where critical lighting is not present.
For normal bedrooms, hallways, family rooms, closets, and many remodels, Level 4 is the practical benchmark. In 2026, a Level 4 installed drywall price often falls around $2.00-$2.75 per square foot of drywall surface, with several estimating sources clustering common Level 4 work around $1.80-$2.50 depending on market and project complexity.
Level 4 still has limits. Long walls with big windows, smooth ceilings, stairwells, dark colors, semi-gloss paint, and low-angle light can reveal joints, fasteners, sanding marks, and differences in surface porosity. That does not automatically mean the drywall work is defective. It may mean the specified finish level did not match the lighting and paint system.
Where Level 4 Usually Works
Level 4 is usually appropriate for standard painted walls with flat, matte, or eggshell paint; rooms with balanced lighting; areas receiving a light texture; and spaces where normal viewing conditions apply. It is also a good baseline when the owner wants a clean residential finish without paying for full-surface skim coating throughout the house.
Free tools Windows power users keep installed
One-click scans. No signup required.
Where Level 4 Gets Risky
Level 4 becomes risky on smooth ceilings, open-plan rooms with window walls, walls washed by recessed cans or sconces, dark accent walls, and any surface scheduled for satin, semi-gloss, or gloss paint. These conditions create what the trade calls critical light. The light travels across the wall instead of straight into it, so small changes in surface texture cast shadows.
Level 5 Drywall Finish
Level 5 is Level 4 plus a thin skim coat over the entire surface. The skim coat can be applied by trowel, roller, spray, or another approved method, then finished to create a more uniform surface. The purpose is to reduce joint photographing, fastener visibility, and texture differences between the gypsum board face paper and the joint compound.
Level 5 is the premium drywall finish for smooth, high-visibility work. It is commonly used on ceilings, tall walls, stairwells, gallery walls, dark painted rooms, modern open-plan spaces, walls with large windows, and areas receiving gloss or semi-gloss paint. It is also the finish level we discuss early when a client wants a very clean modern interior without texture.
In 2026, Level 5 commonly runs around $2.50-$3.50+ per square foot of drywall surface for all-in installed work in normal markets. Compared with Level 4, the upgrade often adds about $0.50-$1.25+ per square foot because the crew is coating the full surface, not just joints and fasteners. In high-cost metros, occupied remodels, or scaffold-heavy rooms, the premium can be higher.
Level 5 does not mean flawless under every viewing condition. It does not fix bowed studs, poor board layout, framing humps, bad lighting placement, wet compound painted too early, cheap primer, or glossy paint applied over a poorly sealed surface. It is the best drywall finish level for reducing visible imperfections, but it still depends on the whole system.
When Level 5 Is Worth It
Level 5 is usually worth considering on smooth ceilings, long uninterrupted walls, two-story foyers, stairwells, rooms with large windows, rooms with wall washers or strong recessed lighting, dark accent walls, and any surface scheduled for satin, semi-gloss, or gloss paint. It is also useful where repairs or additions meet existing drywall and you need a more uniform surface after patching.
When Level 5 Is Overkill
Level 5 is usually overkill in closets, utility rooms, attics, storage rooms, most garages, mechanical spaces, and walls that will receive medium or heavy texture. It may also be unnecessary on standard painted walls with flat paint and forgiving lighting. We often recommend using Level 5 selectively instead of automatically upgrading the whole project.
Level 4 vs. Level 5: The Real Difference
The difference between Level 4 and Level 5 is not simply “good” versus “perfect.” Level 4 treats the joints, angles, fasteners, and accessories. Level 5 adds a skim coat over the entire surface so the wall or ceiling has more consistent porosity and texture before primer and paint.
Rank #3

- 14-in-1 Painter's Tool: The paint scrapers can be used to scrape putty, clean two rollers, open cracks, open bottles, open lids, pull nails, serve as a utility cutter, and feature two screw bits inside: Screwdriver PH#2 & 1/4 Slotted. Also included are mini roller covers, a bottle opener, a 3/4-in paint spray wrench, and a tool for spreading putty compound. The extended handle for broom thread is designed ergonomically for all-day use with minimal fatigue
- Joint Knives & Taping Knives: Stainless steel polished blades are easy to clean, with a precision ground blade edge. The lightweight, soft grip handle features impact resistance and solvent resistance, anti-slip properties, and ergonomic design suitable for long-term use with minimal fatigue. Putty knives feature an alloy metal hammerhead for setting drywall nails, and hang holes for convenient storage
- 12” Premium Mud Pan: Polished stainless steel for easy cleanup. Heli-arc welded end caps feature outstanding strength and watertight seams. Seamlessly curved inside corners prevent buildup. Straight-sheared edges allow for fast, easy, and clean drywall knife swipes. The contoured bottom provides a comfortable grip for use
- What You Will Get: Multi-purpose Painter's Tool x 1, 6-inch Flex Joint Knife x 1, 4-inch Flex Joint Knife x 1, 8-inch Taping Knife x 1, 12-inch Taping Knife x 1, 12-inch Mud Pan x 1. If you have any issues or suggestions about the combo set, we are always here to help you
- Brand Story: Goldblatt has delivered high quality, continuous innovation, and client satisfaction since 1885. Goldblatt designs, manufactures, and distributes high-quality trade tools in the masonry, concrete, drywall, tile, and paint tool categories in over 100 countries around the world
That full-surface treatment matters because drywall panels and joint compound absorb primer and paint differently. Even when a joint is sanded smooth, paint can reveal a slight change in texture or sheen. This is called photographing or telegraphing. Under direct, even light, it may not be obvious. Under low-angle light from windows or fixtures, it can stand out.
For a standard living room with flat paint and no harsh lighting, Level 4 can look excellent. For a smooth ceiling under recessed lighting, Level 4 may show every joint line after paint. That is why the lighting plan and paint schedule should be reviewed before the drywall finish level is finalized.
How Much Drywall Finishing Costs in 2026
Drywall pricing is usually based on square feet of drywall surface, not the home’s floor area. This is one of the most common budgeting mistakes homeowners make. A 12-foot by 12-foot bedroom with 8-foot ceilings has 144 square feet of floor area, but the four walls alone total about 384 square feet before openings. Add the ceiling and you are near 528 square feet of drywall surface, minus windows and doors if the estimator deducts them.
For 2026 planning, national installed drywall ranges commonly cluster around $1.50-$3.50 per square foot of drywall surface for standard residential work. Finish-only labor is often reported around $1.10-$2.50 per square foot. Full hang-and-finish work is commonly quoted around $1.75-$3.75 per square foot depending on finish level, room complexity, local labor rates, and schedule demands.
| Project condition | Cost impact | Why it matters |
|---|---|---|
| Small repair or single room | Higher per-square-foot price | Mobilization, protection, setup, and cleanup still take time |
| High ceilings or stairwells | Often significant increase | Requires staging, ladders, slower production, and more handling |
| Second-story or scaffold-dependent work | Can add roughly 30%-50% to labor | Access slows hanging, finishing, sanding, and cleanup |
| Level 5 finish | Often adds $0.50-$1.25+ per sq. ft. | Full-surface skim coat, more sanding, and tighter primer control |
| Occupied-home remodel | Higher labor and protection cost | Dust control, floor protection, masking, and daily cleanup matter |
| Fire-rated or moisture-resistant board | Material and labor premium | Heavier panels, special assemblies, and inspection requirements may apply |
A good drywall bid should state whether it includes hanging, taping, finishing, sanding, primer, texture, paint, corner bead, moisture-resistant board, fire-rated board, debris handling, delivery, floor protection, and cabinet or countertop protection. If the bid only gives a lump sum with no finish level, you do not yet know what you are buying.
Choosing the Right Finish Level by Room
The best drywall finish level is the one that matches how the room will actually be used and seen. On our projects, we look at four things before recommending a level: final decoration, lighting angle, durability expectations, and whether the drywall has a code or assembly role.
| Room or surface | Expected decoration | Lighting condition | Recommended level | When to upgrade |
|---|---|---|---|---|
| Bedroom walls | Flat, matte, or eggshell paint | Normal room lighting | Level 4 | Upgrade dark accent walls to Level 5 |
| Smooth ceilings | Flat ceiling paint | Recessed cans or window light | Level 5 | Almost always upgrade if no texture is planned |
| Garage walls | Utility paint or unfinished | Basic lighting | Level 2 | Use Level 3 or 4 for a finished workshop |
| Tile backing in dry areas | Tile | Hidden by tile | Level 2 | Upgrade only if exposed paint areas remain |
| Living room window wall | Smooth painted wall | Strong natural light | Level 5 | Use mockup if paint is dark or glossy |
| Closets | Paint | Low visibility | Level 3 or 4 | Match adjacent room if doors are often open |
| Attic or concealed service area | None | Not public | Level 1 | Follow rated assembly requirements if applicable |
This selective approach controls cost. Instead of paying for Level 5 everywhere, many homeowners get the best return by using it on ceilings, stairwells, window walls, and major focal walls, while keeping Level 4 in standard rooms and Level 2 in utility areas.
Paint, Primer, Texture, and Lighting Matter as Much as the Level
Drywall finish level describes the surface before final decoration. It does not guarantee the final painted appearance by itself. Primer quality, paint sheen, roller nap, spray technique, lighting, humidity, and surface inspection all affect the finished room.
Primer is not optional for quality painted drywall. Fresh drywall has different absorption rates between the face paper and joint compound. A proper drywall primer helps equalize porosity before paint. Without it, even a decent Level 4 surface can flash, where some areas look dull and others look shiny. Primer also reveals sanding scratches, ridges, bubbles, and uneven texture before the finish coats go on.
Paint sheen is another major factor. Flat paint hides the most. Matte and eggshell are still forgiving in many rooms. Satin, semi-gloss, and gloss reflect more light, so they reveal more surface variation. Dark colors can behave the same way because they show shadows and texture differences more clearly.
Texture changes the equation. A medium orange peel, heavy knockdown, or similar texture can hide minor finishing variation. Smooth walls and smooth ceilings hide almost nothing. That is why a Level 3 wall may be acceptable under heavy texture but unacceptable under smooth eggshell paint.
Lighting should be coordinated before finishing. Recessed cans close to a wall, wall sconces, LED strips, wall grazers, and large windows all increase visibility of normal drywall variation. A flashlight held tight to the wall is not a fair inspection method for standard work, but final lighting at a low angle is a real design condition. If the finished room will have critical light, the finish level should account for it.
PC Slower Than It Used to Be?
A free scan shows the junk files, broken settings and background clutter dragging Windows down - then fixes them in one click.Free scan · Windows 10 & 11Crashes, No Sound, or Screen Glitches?
Random freezes, missing sound and display glitches usually trace back to one bad driver. Find and replace yours safely.Free scan · under a minuteHow Long Drywall Finishing Takes
A typical room does not get finished in one pass. Joint compound needs time to dry or cure between coats, and temperature, humidity, ventilation, and compound type all affect the schedule.
Rank #4

- What You Get: The drywall tools set includes 1 x Multi-purpose Painter’s Tool, 2 x Putty Knife (4, 6 inch), 3 x Taping Knife (8, 10, 12 inch), 1 x 12” Mud Pan
- Robust Build Quality: All drywall finishing tools are made of premium 3Cr13 stainless steel for excellent corrosion and rust resistance; The chrome-plated fog-face design of the thickened flexible blade is more durable and highlights the texture; The zinc alloy hammer end ensures a firm handle and can also be used as a hammer
- Multifunctional Paint Scraper: The Painting Scrapers can be used for Scrape Putty, Clean Rollers, Open Cracks, Open Bottles, Open Lids, Pull Nails, Utility Cutter, 1/4” & 3/8” Paint Spray Nut Wrench and Scrape Putty Spread Compound
- Comfortable Handle: The soft bi-material handle of the plaster knife set is made of high-quality PP&TPR with anti-slip texture on both sides and finger guide rail, providing you with a comfortable edge grip; With its ergonomic proportions, it facilitates large drywall jobs and reduces hand fatigue during long term working; Hanging hole design for easy storage
- 14” Drywall Mud Pan: The drywall mud tool is also made of 3CR13 stainless steel like the joint knife, mirror polished, rust-resistant and easy to clean; It features excellent weld strength and waterproof seams; The seamlessly curved inside corners and straight-cut edges allow the user to quickly, easily and cleanly wipe down with a drywall knife; Contoured bottom provides a comfortable grip
For a small room, hanging may take 1 day, taping and first coat another day, second and third coats 1-2 more visits, sanding and touchups another visit, and primer after the surface is dry and clean. In normal conditions, a small Level 4 room often takes 3-5 working days from hang to ready-for-primer, even though the crew may only be onsite for part of each day. Larger jobs overlap rooms and crews, so the calendar works differently.
Level 5 adds time because the full surface must be skim coated and then sanded or finished consistently. Depending on project size and drying conditions, that can add 1-3 days or more. Cold, damp jobs extend dry times and increase shrinkage risk. Good ventilation and stable temperature help, but forced drying that is too aggressive can create its own problems.
Setting compound can help with prefilling gaps, repairs, and schedule-sensitive work because it chemically sets rather than only drying by evaporation. It still needs proper handling, cure time, and sandability. The final coats and primer should not be rushed just because an earlier coat used a fast-setting product.
Inspection Standards and Mockups
The cleanest drywall projects have the inspection expectations defined before the first board is hung. We prefer to write the level into the contract, tie it to the paint schedule, and identify high-risk walls early. A useful specification might say, “Level 4 finish, ready for drywall primer and eggshell paint, no critical-light guarantee,” or “Level 5 finish on ceilings and window walls only.”
For premium smooth work, a mockup is cheap insurance. A 4-foot by 4-foot or 8-foot by 8-foot sample area can be finished, primed, painted, and reviewed under the final lighting. That sample gives the owner, contractor, painter, and designer a real reference point. It also prevents the common argument where everyone used the phrase “smooth finish” but meant different things.
Inspection should happen before paint with broad, practical lighting, not only with a flashlight held against the wall. It should also happen after primer because primer exposes scratches, ridges, bubbles, and flashing. Touchups after primer are normal on quality work. Major repairs after finish paint are slower, messier, and more expensive.
Permits, Fire-Rated Walls, and Safety Notes
Drywall replacement can be simple cosmetic work, or it can be part of a regulated building assembly. Permit rules vary by city and state. Some jurisdictions allow limited drywall replacement without a permit if no structural, electrical, plumbing, or fire-rated assembly work is involved. Others require permits when large areas are opened, rated assemblies are affected, or work is connected to a larger remodel.
What’s actually slowing this PC down?
Pick the symptom - the matching free tool is one click away.
In practical terms, call the local building department or have your contractor verify requirements when drywall work involves garage-to-house separations, multifamily walls, tenant separations, stair enclosures, commercial corridors, ceilings below habitable space, electrical changes, plumbing changes, insulation replacement, or moisture damage. The inspector may care less about whether the finish is Level 3 or Level 4 and more about board type, thickness, fastening pattern, joint treatment, penetrations, and continuity of the assembly.
For garages and rated separations, treat drywall as life-safety work. Do not cut holes, leave open joints, skip required tape, or use the wrong board thickness because the area is “just a garage.” If a wall or ceiling is part of a fire-resistance-rated assembly, follow the tested assembly or local code requirement.
Safety also matters during finishing. Sanding dust should be controlled with ventilation, plastic containment where appropriate, respirators, and proper cleanup. In older homes, paint, texture, joint compound, or other materials may contain lead or asbestos depending on age and prior renovations. Testing is the responsible first step before demolition or aggressive sanding in suspect areas.
When to DIY and When to Hire a Pro
Drywall finishing is one of those trades that looks simple until light hits the wall. A careful homeowner can handle small patches, closet repairs, utility rooms, and some garage work. A full Level 4 room or a Level 5 ceiling is a different standard.
Recommended Free Tools
DIY makes sense for small repairs under 2 square feet, low-visibility storage areas, simple nail pops, minor dents, and areas that will receive heavy texture. Expect to buy joint compound, tape, sanding blocks or screens, a 6-inch knife, a 10- or 12-inch knife, a mud pan, primer, drop cloths, and dust protection. Even a small patch may take 2-3 visits because compound needs to dry between coats.
Hire a pro for ceiling work, water-damage repairs, large cracks, recurring movement, stairwells, high walls, whole-room finishing, Level 5 work, smooth ceilings, fire-rated assemblies, and any area with strong lighting or glossy paint. Also hire a pro if the work touches electrical boxes, plumbing openings, mold, suspected asbestos, or structural movement.
Best Value

- 【Sturdy Stainless Steel Material】: Crafted from 304 stainless steel, this drywall knife set is designed for drywall finishing, spackling, and paint scraping. The polished edges facilitate consistent application and simplified cleaning.
- 【Tempered Steel Blades】: Each blade is manufactured for structural integrity and a lightweight feel. Suitable for home improvement, DIY, and professional wall repair projects while maintaining balance and control.
- 【Ergonomic Grip Design】: Features handles with TPR slip-resistant grips and a metal hammer-end cap. The design includes a hanging hole for organized storage and a functional end for setting nails.
- 【Multi-purpose painter's tool】: The stainless steel scraper includes a carbide-tipped edge for prying nails, stripping paint, and slicing through thick adhesives without chipping or warping
- 【Multi-Purpose Scraper Too】l: The included stainless steel scraper tool features a versatile edge for removing paint, clearing adhesives, and light prying tasks without bending.
The cost difference is not just labor speed. Professional crews know how wide to feather joints, when to use setting compound, how to control ridges, how to sand without hollowing the joint, and how to stage work so primer reveals only minor touchups. On high-visibility walls, that experience is usually cheaper than repainting after a poor finish.
How to Write Drywall Finish Levels Into a Contract
The contract should be specific enough that the owner, builder, drywall subcontractor, and painter are all pricing the same result. “Finish drywall” is too vague. “Smooth finish” is also too vague unless it names the level, primer, paint sheen, and any critical-light areas.
Do these 3 things before closing this tab:
1Scan for outdated or missing drivers - takes under a minute2Clear out junk files and repair common Windows errors3Fix the driver behind crashes, sound loss and screen glitchesA strong drywall scope should include the finish level by area, drywall surface square footage, board type and thickness, corner bead expectations, texture or no texture, whether primer is included, whether paint is included, whether dust control and floor protection are included, and whether high-light conditions are excluded or specifically upgraded.
For example: “Install 1/2-inch gypsum board at walls and 5/8-inch gypsum board at ceilings as shown. Finish bedrooms and hallways to Level 4 for drywall primer and eggshell paint. Finish living room ceiling and south window wall to Level 5. Primer and paint by painting contractor. Drywall contractor to perform touchups after primer inspection.”
That language is much clearer than a one-line allowance. It also makes changes easier to price. If the owner later chooses semi-gloss paint on a long hallway, everyone can see why Level 5 or a mockup should be discussed before paint goes on the wall.
Bottom Line: Match the Finish to the Room
For most homeowners, the practical rule is simple: Level 2 for garages and utility spaces, Level 3 for heavy texture, Level 4 for normal painted walls, and Level 5 for smooth premium surfaces exposed to unforgiving light. Level 0 and Level 1 belong mostly in temporary, concealed, or assembly-specific conditions.
The finish level should be selected before bids are compared, not after the walls are painted. If you want a high-end smooth interior, budget for the drywall, primer, paint, lighting coordination, and inspection process that make that result realistic. If the space is utilitarian, do not pay for a finish nobody will see. Good construction is not always the most expensive specification; it is the specification that fits the room, the risk, and the final expectation.
Frequently Asked Questions
What drywall finish level is best for painted walls?
Level 4 is the standard choice for most painted residential walls with flat, matte, or eggshell paint. Use Level 5 for smooth ceilings, dark colors, gloss or semi-gloss paint, large window walls, or surfaces hit by low-angle light.
Is Level 5 drywall worth the extra cost?
Level 5 is worth it where flaws will be easy to see: smooth ceilings, stairwells, long walls, dark accent walls, glossy paint, and rooms with large windows or recessed lighting. It is usually overkill in closets, garages, storage rooms, and heavily textured areas.
How much does Level 5 drywall cost in 2026?
A 2026 planning range for Level 5 drywall is commonly about $2.50-$3.50+ per square foot of drywall surface for installed work. In many markets, it adds roughly $0.50-$1.25+ per square foot over Level 4.
Free tools Windows power users keep installed
One-click scans. No signup required.
What is the difference between Level 4 and Level 5 drywall?
Level 4 finishes the joints, inside corners, fasteners, and accessories with multiple coats of compound. Level 5 adds a thin skim coat over the entire surface to create more uniform texture and porosity before primer and paint.
Do I need a permit to replace drywall?
Permit rules vary by jurisdiction. Small cosmetic drywall repairs may not require a permit, but work involving fire-rated walls, garages, multifamily separations, electrical, plumbing, insulation, structural repairs, or large remodel areas should be verified with the local building department.
Can I paint directly over finished drywall?
You should use drywall primer before paint. Primer helps equalize porosity between joint compound and drywall paper, reveals defects before finish paint, and reduces flashing or uneven sheen.
Quick Recap
Product prices and availability are accurate as of the date/time indicated and are subject to change. Any price and availability information displayed on Amazon at the time of purchase will apply.

